
Categorie popolari
State cercando un filato?


Commenti / Domande (38)
![]() Brina We ha scritto:
Brina We ha scritto:
Ich versuche mich gerade an dem Vorderteil, aber ich komme auf keinen grünen Nenner. Ich habe für Größe „L“ 47 M. angeschlagen und dann eine R. li gestrickt. Und bin nun wieder bei der Vorderseite. Ich soll nun das M1A stricken über 26 M. und danach 4 li. 3re 3x + 4 li. 2 re + Kr. = 27 Doch 27 + 26 = 53, dass passt ja nicht bei 47 M. Was muss ich in M1A Stricken? Ich hab es mit dem Diagramm versucht, aber das verstehe ich nicht.
17.02.2022 - 12:29DROPS Design ha risposto:
Liebe Brina, in L stricken Sie so: die 26 Maschen in M.1A, dann *4 li, 3 re*, x 2 (7x2 = 14 M Rippenmuster) + 4 li + 2 re, + 1 Randmasche = 26+14+4+2+1=47 Maschen. Dann stricken Sie M.1B über die Maschen M.1A (= 26 Maschen) , dh immer 47 Maschen; oder misverstehe ich vielleicht Ihre Frage?
17.02.2022 - 13:39
![]() Shel ha scritto:
Shel ha scritto:
Hello again! For the front band a couple of questions please: 1) what does it mean to pick up "161 sts (DIVISIBLE BY 6+5)" ? I'm making size Large. 2) is it 161 stitches altogether (right AND left sides) or 161 each side? I tried picking up 161 on the left side but could only find about half that number to pick up - and they are quite close together. Thank you.
19.10.2021 - 23:06DROPS Design ha risposto:
Dear Shel, the number of stitches given for the bands should be picked up from the middle of the neck on the back, through the bottom edge. Once for the left side once for the right side. Of course if it feels too much, you can use less stitches, but the number should be a number that could be divisible by 6 plus 5. Happy Stitching!
20.10.2021 - 02:32
![]() Debbie ha scritto:
Debbie ha scritto:
Front band. To make band wider? Inc 1 sts in each p section on every 38 sts ? So when I have 3 pearl stiches I would increase 1 sts or 3 sts, on every 38 sts? I would like to know is it 1 or 3 inc in the pearl section,don’t understand the directions. So then I will not have 167 sts I will have around 15 sts more,correct.
02.07.2021 - 21:44DROPS Design ha risposto:
Dear Debbie, for the bands, you start out with picking up 149-155-161-167-173-179 stitches, then when you get to 4 cm, mark out 32-32-32-38-38-38 stitches from mid back, and then do the increases in the purl stitches of these marked out stitches. Happy Stitching!
03.07.2021 - 06:42
![]() Debbie ha scritto:
Debbie ha scritto:
Right front piece. On size xl what are the 26 sts p4/k3 times 3=21 sts then p4,k2 and 1 edge st =7 so 21 sts +7=28 how to knit the 26 sts ?
03.05.2021 - 19:40DROPS Design ha risposto:
Dear Debbie, if you mean the set up row, the 26 stitch is not all that is in the row, but it is M.1A pattern (wich is on 26 stitch), and then *p4 /k3- 3 times, , p4, k2, and the edges stitch in one row (26 + 21 stitch = 47 stitch for size XL, wich you cast on to beginn with.) Happy knitting!
03.05.2021 - 23:39
![]() Shel ha scritto:
Shel ha scritto:
Hi, just started the back piece. It says "continue in rib as follows (first row= RS" followed by rib pattern. My question- for WS is the pattern followed exactly the same or are the stitches reversed i.e. knit for purl and purl for knit? Thanks!
09.04.2021 - 16:08DROPS Design ha risposto:
Dear Shel, you start the back with ribbing, so from the WS you knit what looks like a knit stitch (that was knit as a purl from the other side), and purl the stitches that look like purls (that were knitted in the previous row, from the RS. Happy Knitting!
09.04.2021 - 19:04
![]() Chris ha scritto:
Chris ha scritto:
Me again.. On the front sides, when you get to 37 stitches (for XXL), the instructions say 'continue with K over K' etc.. Does that mean you don't continue with the pattern? Thanks.
13.01.2019 - 22:10DROPS Design ha risposto:
Dear Chris, work the sts as before, with cables towards the neck. Happy knitting!
14.01.2019 - 12:33
![]() Chris ha scritto:
Chris ha scritto:
I did not intend that my full name should appear in my question - everyone else only has their first name shown - would you please revise my name to Chris or delete my question as soon as possible.
04.01.2019 - 21:02DROPS Design ha risposto:
Dear Chris, your question (and the answer) has been updated. Happy knitting!
07.01.2019 - 09:21
![]() Chris ha scritto:
Chris ha scritto:
Stuck at the back armholes. Working the XXL size, 4 stitches have been cast off at the beginning of rows 1,2,3 and 4 of the armhole. Now I need to decrease 2 stitches 4 times, followed by 1 stitch 4 times. From the number of stitches remaining it appears that I need to actually double these workings. I want a neat effect so please explain (stitch by stitch) exactly how to work the decreases in both right side and wrong side rows.
04.01.2019 - 19:13DROPS Design ha risposto:
Dear Chris, you cast off 4 sts at the beg of next 4 rows (= from both RS and WS = 4 sts 2 times on each side), then cast off 2 sts at the beg of next 8 rows (= 2 sts 4 times on each side), then cast off 1 st at the beg of next 8 rows (= 1 st 4 times on each side). Cast off the sts K over K and P over P and continue working them as before, K over K and P over P. Happy knitting!
07.01.2019 - 08:35
![]() Charlene ha scritto:
Charlene ha scritto:
I would like to knit Giselle (120-18) in Air, which is in the same yarn group as Paris. I am worried, however, that it wouldn\'t turn out well when worked in the much lighter yarn. What do you think? Thank you.
10.10.2018 - 23:41DROPS Design ha risposto:
Dear Charlene, since Paris and Air both belong to same yarn group you could use here Air instead of Paris, but texture will be different since both yarns are different. You may like to choose another yarn less "fluffy" just as Nepal or Alaska. Your DROPS store can help you choosing the yarn suiting you - even per mail or telephone. Happy knitting!
11.10.2018 - 10:24
![]() Ornella ha scritto:
Ornella ha scritto:
Splendido modello, chiare le istruzioni, grazie a voi ho fatto un bellissimo cardigan. Ho usato bomull lin uni colour unico difetto molti gomitoli del filato erano aggiunti anche più volte.......
09.05.2015 - 19:08
|
||||||||||||||||
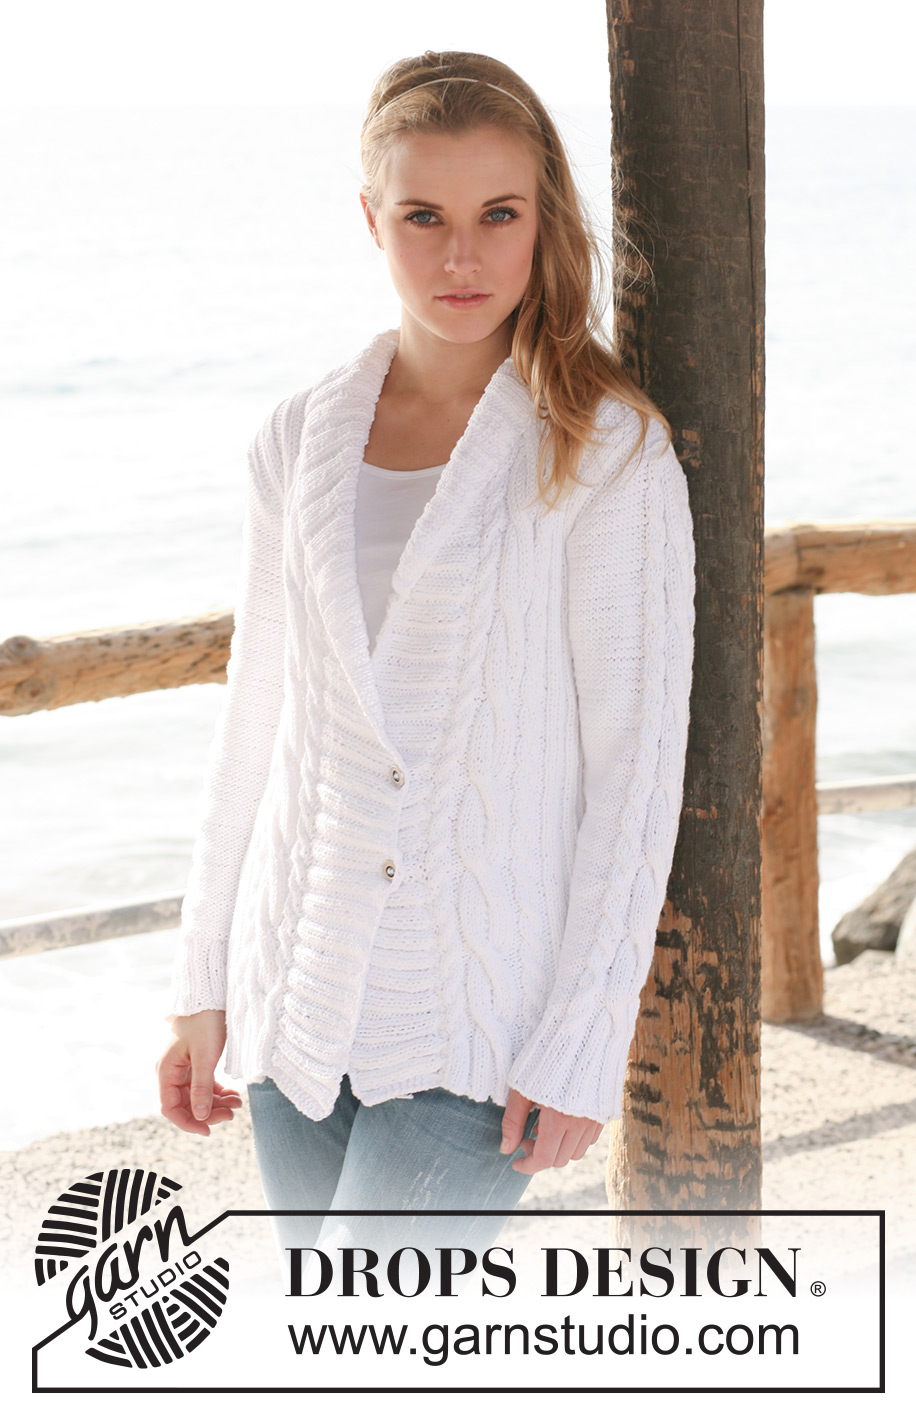
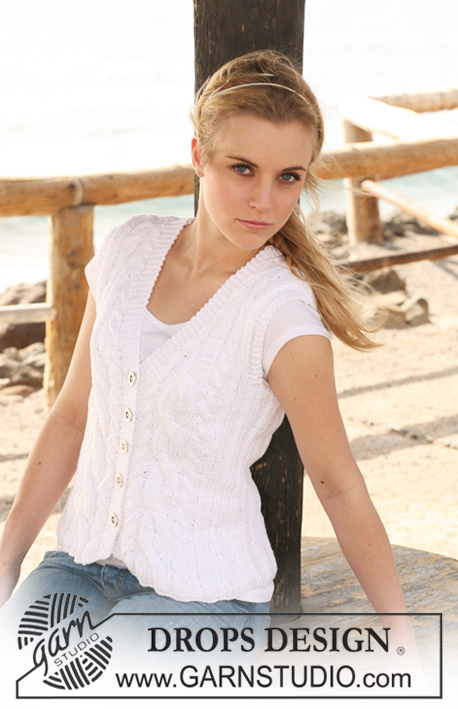
Giselle#gisellecardigan |
||||||||||||||||
 |
 |
|||||||||||||||
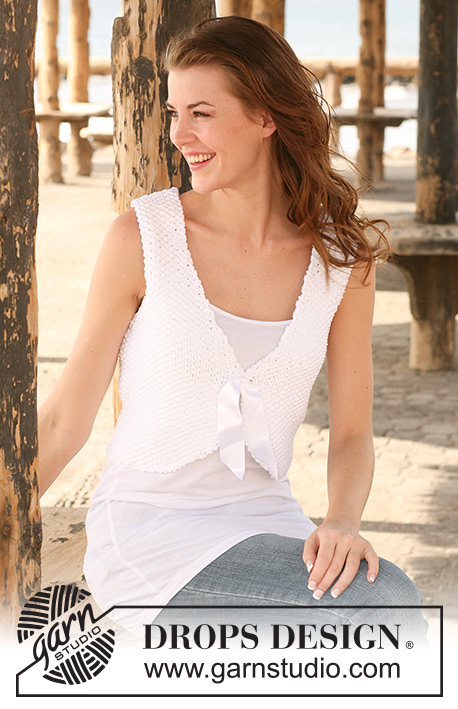
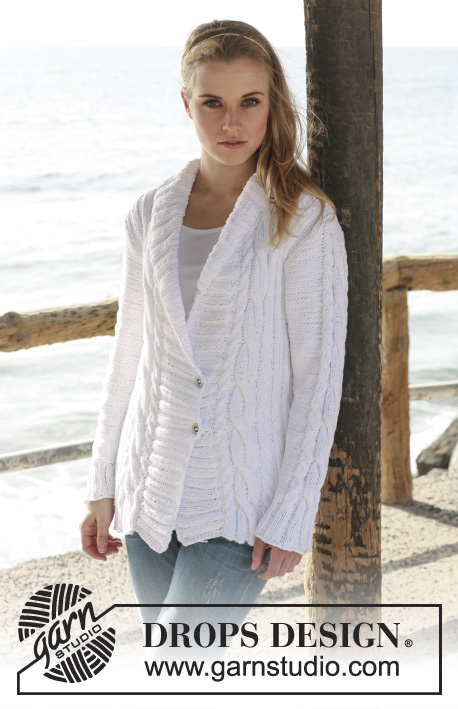
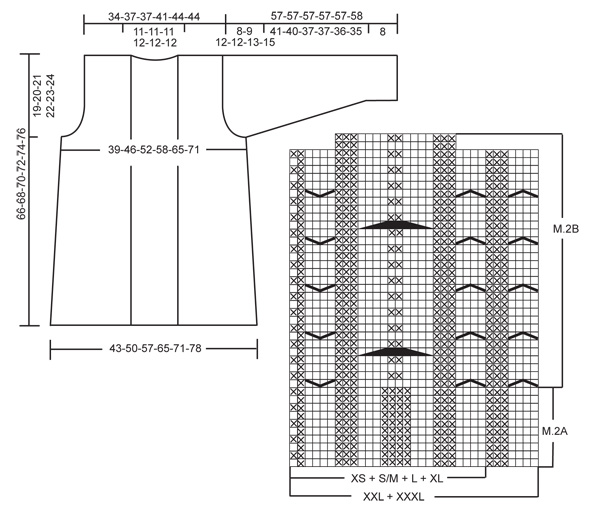
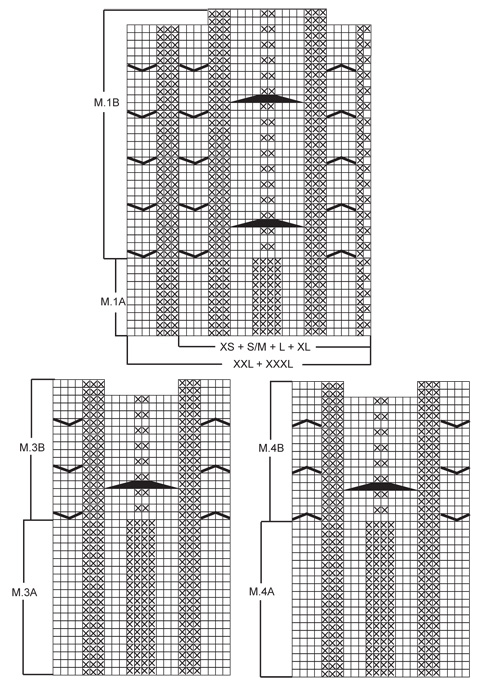
Giacca DROPS lavorata ai ferri a coste e trecce in "Paris". Taglie: dalla XS alla XXXL.
DROPS 120-18 |
||||||||||||||||
|
M LEGACCIO (avanti e indietro sui f): Lavorare tutti i f a dir. MOTIVO: Vedere i diagrammi M.1-M.4. I diagrammi mostrano il motivo dal diritto del lavoro. SUGGERIMENTO PER GLI AUMENTI (applicato alle maniche): Fare tutti gli aumenti dal diritto del lavoro! Aumentare prima/dopo la m di vivagno a m legaccio a ogni lato facendo 1 gettato, sul f successivo lavorare il gettato nel filo dietro della m per evitare un buco. ASOLE: Fare 2 asole sul bordo davanti destro a circa 37-39-41-43-45-47 e 45-47-49-51-53-55 cm dalla spalla. 1 ASOLA = intrecciare 1 m e avviare 1 nuova m sul f successivo (per risultati più ordinati fare le asole nella sezione a rov, vista dal diritto del lavoro). --------------------------------------------------------- --------------------------------------------------------- GIACCA: Tutte le parti sono lavorate avanti e indietro sui f circolari. DIETRO: Avviare 81-95-109-123-135-149 m con i f circolari n° 4 mm con Paris. Lavorare 1 f rov dal rovescio del lavoro e continuare a coste come segue (1° f = diritto del lavoro): 1 m di vivagno a M LEGACCIO – leggere sopra, 2 m dir, * 4 m rov/3 m dir *, ripetere *-* per un totale di 1-2-3-4-4-5 volte, * 3 m rov/3 m dir *, ripetere *-* per un totale di 3-3-3-3-4-4 volte, * 4 m rov/3 m dir *, ripetere *-* per un totale di 3 volte, 4 m rov, * 3 m dir/3 m rov *, ripetere *-* per un totale di 3-3-3-3-4-4 volte, * 3 m dir/4 m rov *, ripetere *-* per un totale di 1-2-3-4-4-5 volte, 2 m dir e 1 m di vivagno a M LEGACCIO. Quando il lavoro misura 6 cm lavorare il f successivo come segue dal diritto del lavoro: 1 m di vivagno a m legaccio, coste come prima sulle 6-13-20-27-27-34 m successive, m rasata sulle 21-21-21-21-27-27 m successive, coste come prima sulle 25 m successive, m rasata sulle 21-21-21-21-27-27 m successive, coste come prima sulle 6-13-20-27-27-34 m successive e 1 m di vivagno. Continuare in questo modo con dir su dir, rov su rov e m di vivagno a m legaccio. FARE ATTENZIONE ALLA TENSIONE DEL LAVORO! Quando il lavoro misura 34 cm diminuire sul f successivo dal diritto del lavoro come segue: diminuire tutte le sezioni con 4 m rov (= 6-8-10-12-12-14 sezioni a rov) a 3 m rov lavorando insieme a rov le prime 2 m in ogni sezione a rov = 75-87-99-111-123-135 m. Quando il lavoro misura 47-48-49-50-51-52 cm intrecciare per lo scalfo a ogni lato all’inizio di ogni f: 4 m 1 volta per tutte le taglie, 4 m 0-0-0-0-1-1 volta, 2 m 0-1-3-4-4-6 volte e 1 m 1-2-4-5-4-6 volte = 65-71-71-77-83-83 m. Continuare con dir su dir, rov su rov e 1 m a m legaccio a ogni lato verso lo scalfo. Quando il lavoro misura 64-66-68-70-72-74 cm intrecciare le 19-19-19-21-21-21 m centrali per il collo e finire ogni spalla in modo separato. Intrecciare 1 m sulla scollatura sul f successivo = 22-25-25-27-30-30 m rimaste sulla spalla. Intrecciare senza stringere con dir su dir e rov su rov quando il lavoro misura 66-68-70-72-74-76 cm. DAVANTI DESTRO: Avviare 33-40-47-54-61-68 m con i f circolari n° 4 mm con Paris. Lavorare 1 f rov dal rovescio del lavoro e continuare a coste come segue dal centro davanti (1° f = diritto del lavoro): Taglia XS: M.1A (= 26 m), 4 m rov/2 m dir e 1 m di vivagno a M LEGACCIO. Taglie S/M + L + XL + XXL + XXXL: M.1A (= 26-26-26-33-33 m), * 4 m rov/3 m dir *, ripetere *-* per un totale di 1-2-3-3-4 volte, 4 m rov, 2 m dir e 1 m di vivagno a M LEGACCIO. TUTTE LE TAGLIE: Quando il lavoro misura 6 cm lavorare M.1B invece di M.1A fino alla fine del lavoro (lavorare le m rimaste come prima). ALLO STESSO TEMPO quando il lavoro misura 34 cm diminuire sul f successivo dal diritto del lavoro come segue: diminuire in tutte le sezioni con 4 m rov (= 1-2-3-4-4-5 sezioni a rov) a 3 m rov lavorando insieme a rov le prime 2 m in ogni sezione a rov = 32-38-44-50-57-63 m. Quando il lavoro misura 47-48-49-50-51-52 cm intrecciare 4 m per lo scalfo all’inizio del f dal rovescio del lavoro e ora intrecciare per modellare lo scalfo all’inizio di ogni f dal rovescio del lavoro: 4 m 0-0-0-0-1-1 volta, 2 m 0-1-3-4-4-6 volte e 1 m 1-2-4-5-4-6 volte = 27-30-30-33-37-37 m rimaste sul f. Continuare con dir su dir, rov su rov e 1 m a m legaccio verso lo scalfo. Quando il lavoro misura 65-67-69-71-73-75 cm distribuire 5-5-5-6-7-7 diminuzioni in modo uniforme su M.1 = 22-25-25-27-30-30 m rimaste sulla spalla. Sul f successivo intrecciare tutte le m con dir su dir e rov su rov. DAVANTI SINISTRO: Come il davanti destro, ma a specchio, cioè lavorare M.2 invece di M.1. Durante gli intrecci per lo scalfo a lato intrecciare all’inizio del f dal diritto del lavoro (invece del rovescio del lavoro). MANICA DESTRA: Lavorata avanti e indietro sui f. Avviare 52-52-52-52-56-56 m con i f circolari n° 4 mm con Paris. Lavorare 1 f rov dal rovescio del lavoro e continuare a coste avanti e indietro sui f come segue (1° f = diritto del lavoro): Taglie XS + S/M + L + XL: 1 m di vivagno a m legaccio, 1 m rov, * 3 m dir/3 m rov *, ripetere *-* per un totale di 2 volte, M.3A (= 24 m), * 3 m rov/3 m dir *, ripetere *-* per un totale di 2 volte, 1 m rov e 1 m di vivagno a m legaccio. Taglie XXL + XXXL: 1 m di vivagno a m legaccio, 1 m rov, * 3 m dir/4 m rov *, ripetere *-* per un totale di 2 volte, M.3A (= 24 m), * 4 m rov/3 m dir *, ripetere *-* per un totale di 2 volte, 1 m rov e 1 m di vivagno a m legaccio. TUTTE LE TAGLIE: Continuare in questo modo fino a quando il lavoro misura circa 8 cm. Ora lavorare il f successivo come segue dal diritto del lavoro: 1 m di vivagno a m legaccio, 13-13-13-13-15-15 m a m rasata rovescia (cioè rov sul diritto del lavoro e dir sul rovescio del lavoro), M.3B, 13-13-13-13-15-15 m a m rasata rovescia e 1 m di vivagno a m legaccio. Continuare in questo modo (M.3B ripetuto in verticale). ALLO STESSO TEMPO quando il lavoro misura 9-9-9-9-11-13 cm aumentare 1 m a ogni lato – leggere il SUGGERIMENTO PER GLI AUMENTI, e ripetere gli aumenti ogni 6-4-3-2,5-2-1,5 cm per un totale di 7-10-12-14-15-18 volte = 66-72-76-80-86-92 m. Quando il lavoro misura 49-48-45-45-44-43 cm - NOTA! Meno per le taglie più grandi a causa dell’arrotondamento della manica più lungo e della maggiore ampiezza delle spalle – intrecciare per l’arrotondamento della manica a ogni lato all’inizio di ogni f: 4 m 1 volta, 2 m 3-3-2-2-2-2 volte e 1 m 2-3-9-9-10-12 volte, poi intrecciare 2 m a ogni lato fino a quando il lavoro misura 56-56-56-56-56-57 cm. Sul f successivo intrecciare 3 m all’inizio del f, e ora distribuire 6 diminuzioni in modo uniforme su M.3. Intrecciare 3 m all’inizio del f successivo e lavorare le m rimaste sul f, m rov di M.3. Intrecciare tutte le m. MANICA SINISTRA: Come la manica destra, ma lavorare M.4 invece di M.3. CONFEZIONE: Cucire i margini delle spalle. BORDO DAVANTI: Riprendere dal diritto del lavoro circa 149-155-161-167-173-179 m (divisibile per 6 + 5) lungo il davanti sinistro dal centro dietro al bordo inferiore con i f circolari n° 4 mm con Paris. Lavorare 1 f dir dal rovescio del lavoro e continuare a coste come segue dal diritto del lavoro: 2 m a m legaccio, * 3 m rov/3 m dir *, ripetere *-* fino a quando rimangono 3 m e finire con 3 m a m legaccio. Continuare in questo modo fino a quando il bordo davanti misura 4 cm. Ora inserire un segnapunti dopo 32-32-32-38-38-38 m dal centro dietro. Continuare a coste come prima, ALLO STESSO TEMPO aumentare 1 m in ogni sezione a rov (visto dal diritto del lavoro) sulle 32-32-32-38-38-38 m = 5-5-5-6-6-6 aumenti (per rendere il collo ampio abbastanza attorno alla scollatura). Ripetere gli aumenti quando il bordo davanti misura 7 e 10 cm. Quando il bordo davanti misura 11-11-11-12-12-12 cm intrecciare tutte le m con dir su dir e rov su rov. Ripetere lungo il bordo destro dal bordo inferiore al centro dietro (1° f a coste lavorato come segue dal diritto del lavoro: 3 m a m legaccio, * 3 m dir/3 m rov *, ripetere *-* fino a quando rimangono 2 m e finire con 2 m a m legaccio al centro dietro). Quando il bordo davanti misura 9-9-9-10-10-10 cm fare 2 ASOLE – leggere sopra. CONFEZIONE: Cucire i bordi davanti al centro dietro nel filo più esterno delle m. Quando si piega il collo verso il diritto del lavoro ci saranno 4 m a m legaccio al centro dietro con 6 m dir a ogni lato. Attaccare le maniche all’interno della m di vivagno. Cucire le maniche e i margini dei lati nel filo più esterno delle m. Attaccare i bottoni sul bordo davanti sinistro. |
||||||||||||||||
Spiegazioni del diagramma |
||||||||||||||||
|
||||||||||||||||
 |
||||||||||||||||
 |
||||||||||||||||
Avete terminato questo modello?Allora taggate le vostre foto con #dropspattern #gisellecardigan o inviatele alla #dropsfan gallery. Avete bisogno di aiuto con questo modello?Troverete 21 video tutorial, una sezione per i commenti/domande e molto altro guardando il modello su www.garnstudio.com © 1982-2026 DROPS Design A/S. Ci riserviamo tutti i diritti. Questo documento, compreso tutte le sue sotto-sezioni, è protetto dalle leggi sul copyright. Potete leggere quello che potete fare con i nostri modelli alla fine di ogni modello sul nostro sito. |
||||||||||||||||


Con oltre 40 anni di esperienza nel design di modelli di maglia e uncinetto, DROPS Design offre la più estesa collezione di modelli gratuiti su internet - tradotti in 17 lingue. Ad oggi vi possiamo fornire 324 cataloghi e 12290 modelli - 9561 dei quali sono tradotti in Italiano.
Ci stiamo impegnando molto per darvi il meglio che vi possiamo offrire in termini di maglia e uncinetto, ispirazioni e consigli così come filati di grande qualità ad un prezzo incredibile! Volete utilizzare i nostri modelli per qualcosa d'altro oltre al vostro uso personale? Potete leggere tutto ciò che è consentito nel testo sul Copyright in basso su tutte le pagine dei nostri modelli. Buon lavoro!
Lasciare un commento sul modello DROPS 120-18
Noi saremmo felici di ricevere i tuoi commenti e opinioni su questo modello!
Se vuoi fare una domanda, fai per favore attenzione a selezionare la categoria corretta nella casella qui sotto per velocizzare il processo di risposta. I campi richiesti sono indicati da *.