
Categorie popolari
State cercando un filato?


Commenti / Domande (139)
![]() Sharon ha scritto:
Sharon ha scritto:
Hi is it possible for me to get this pattern in PDF format ? Many thanks
26.02.2022 - 16:26DROPS Design ha risposto:
Dear Sharon, you can save them as PDF by clicking on print and then, when selecting a printer, choosing "Save as PDF". Happy crocheting!
27.02.2022 - 16:59
![]() Virginie SELME ha scritto:
Virginie SELME ha scritto:
Bonjour, Le coloris N°43 a t'il été remplacé ? Je ne vois pas par quelle autre couleur dans la gamme Karisma le remplacer pour obtenir un aussi joli modèle que celui présenté en photo !
16.01.2022 - 21:53DROPS Design ha risposto:
Bonjour Mme Selme, effectivement, le coloris 43 n'est plus disponible, contactez votre magasin DROPS, il pourra vous conseiller la meilleure couleur adaptée. Bon crochet!
17.01.2022 - 09:20
![]() Sara Marie ha scritto:
Sara Marie ha scritto:
Hola, cuanto material necesito para hacer una colcha para cama individual de 90cms. Muchas gracias
14.12.2021 - 13:32
![]() Pia Norrbygård ha scritto:
Pia Norrbygård ha scritto:
Hej jag börja virka från mönster men fick det inte att stämma, så beslöt mig för att kolla på videon efter. det står *1 st, 1 fm om lm i 8-stgruppen" men blev så "stramt" så när man kollar videon visa att man ska virka 3 lm (första stolpen ) + 3 lm och SEN fast maska. vilken är rätt? känns som videon är rätt men tänkte kolla med er:) MVH Pia """VARV 6: Byt färg. *1 st(=ersätts av 3 lm första gång)i 1.fm, 3 lm, 1 fm om lm i 8-stgruppen, """
12.09.2021 - 15:30DROPS Design ha risposto:
Hej Pia. Det är tänkt att det ska vara som det är beskrivet i mönstret, men om du tycker att det blir lite stramt så kan du välja att göra som i videon istället. Mvh DROPS Design
24.09.2021 - 10:48
![]() Sheridan Doyle ha scritto:
Sheridan Doyle ha scritto:
Hi, I love this seaside blues blanket and want to make it in the exact colours. Has the Drops Karisma Ice Blue (no.43) been discontinued? I can’t find it anywhere, not even on garnstudio. If so, what would be a suitable replacement colour? Thanks
13.04.2021 - 21:26DROPS Design ha risposto:
Dear Sheridan, the no.43 ice blue can be substituted by either the no 68 light sky blue (a lighter sghade) or the light denim blue (a bit darker, more sky-blue-ish shade). Happy Crafting!
13.04.2021 - 21:50
![]() Katrine ha scritto:
Katrine ha scritto:
Kan noen forklare 2. omgang. 1 st i den første av de 3 lm
26.01.2021 - 19:35DROPS Design ha risposto:
Hei Katrine, Du hekler 1 stav i den tredje luftmaske fra heklenålen (hopp over 2 luft masker). God fornøyelse!
27.01.2021 - 07:42
![]() Kathy ha scritto:
Kathy ha scritto:
Hi, Is there a video of this pattern being made up? I am having a great deal of difficulty understanding the written pattern!
05.01.2021 - 01:01DROPS Design ha risposto:
Dear Kathy, we do not have any video for this square yet, follow the pattern stitch after stitch, round after round to get how to work it. Happy crocheting!
05.01.2021 - 11:25
![]() A Eriksen ha scritto:
A Eriksen ha scritto:
Omg 2: 3 lm, 1 st i den første af af de 3 lm osv frem til *. Jeg synes den første st gruppe bliver meget anderledes end de andre st grupper. Er der en fejl i opskriften så det kun er en st der laves i den første lm og ikke en hel st gruppe, da de 3 lm = 1 st?
31.10.2020 - 20:02DROPS Design ha risposto:
Hej, Den første stangmaske gruppe ser lidt anderledes i og med først stangmaske består af 3 luftmasker, men det kommer du ikke til at se i de færdige ruder. God fornøjelse!
05.11.2020 - 13:19
![]() Pamela Hasian ha scritto:
Pamela Hasian ha scritto:
I am trying to make the Seaside Blues blanket. I can't seem to find the details for the assembly. I only have the chart M 2. I am not an expert crocheted by any means. I do understand the other instructions as I have made other blankets. I like the way these squares are joined, I just don't know how to do it. Thank you so much and I appreciate your patience.
01.07.2020 - 14:28DROPS Design ha risposto:
Dear Mrs Hasian, you will find here a video showing how to crochet the squares together in both height and width, ie as shown in M.2 - see diagram key for the number of chains to crochet between sc/squares. Happy crocheting!
01.07.2020 - 15:41
![]() Ida Eskol Svenningsen ha scritto:
Ida Eskol Svenningsen ha scritto:
I omg 6: Efter de 3 lm, der erstatter en st, står der, at man skal lave en fm - i hvilken maske fra forrige omgang skal denne laves? Synes ikke, at jeg kan fornemme det ud fra billederne af tæppet.
09.04.2020 - 23:30DROPS Design ha risposto:
Hei Ida. Du avsluttet 5. omgang med 1 kjedemaske i 1. fastmaske på omgangen. Når du begynner på 6. omgang hekler du 3 luftmasker (erstatter 1.stav), deretter hekler du 3 luftmasker, 1 fastmaske om luftmasken i 8-stavgruppen osv... Bokstaven i mangler foran 1 fm. Slik skal det stå: 6.OMG: Skift farve. * 1 st (erstattes af 3 lm første gang) i 1 fm, 3 lm, 1 fm om lm i 8-st-gruppen..... mvh DROPS design
15.04.2020 - 15:33
|
||||||||||
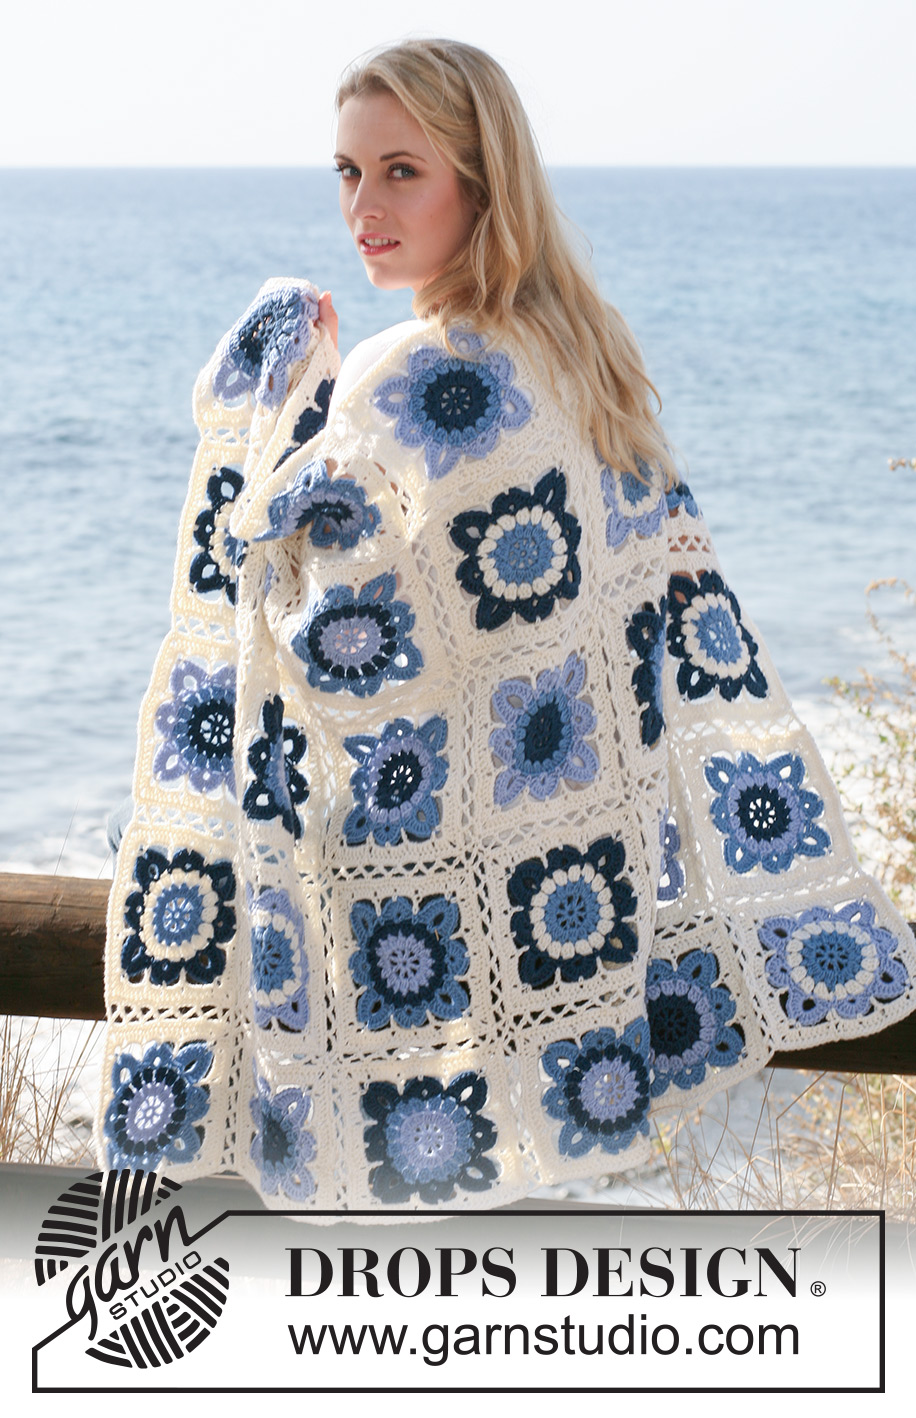
Seaside Blues#seasidebluesblanket |
||||||||||
 |
 |
|||||||||
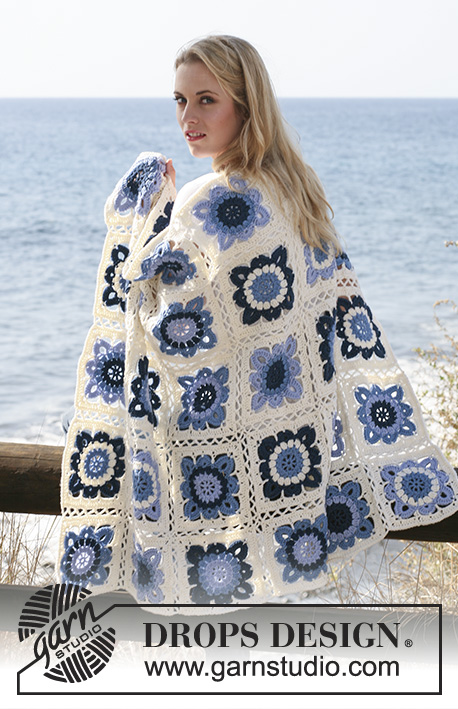
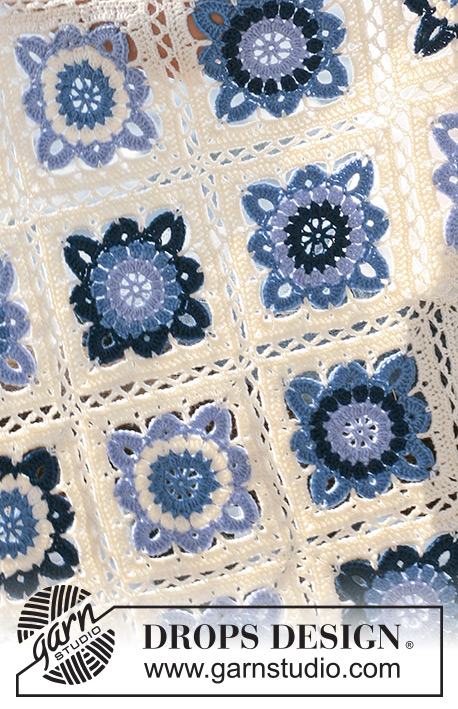
Coperta DROPS a quadrati all’uncinetto in ”Karisma”.
DROPS 120-3 |
||||||||||
|
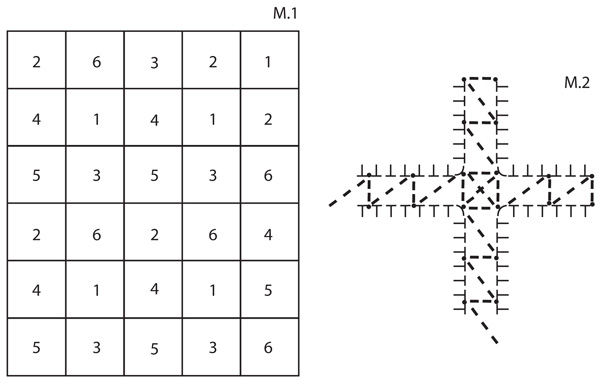
COMBINAZIONE COLORI: Quadrato 1: 1° - 2° giro: blu jeans chiaro 3° giro: panna 4° - 5° giro: blu ghiaccio 6° - 8° giro: panna Quadrato 2: 1° - 2° giro: blu/grigio scuro 3° giro: blu ghiaccio 4° - 5° giro: blu jeans chiaro 6° - 8° giro: panna Quadrato 3: 1° - 2° giro: blu jeans chiaro 3° giro: panna 4° - 5° giro: blu/grigio scuro 6° - 8° giro: panna Quadrato 4: 1° - 2° giro: blu ghiaccio 3° giro: blu jeans chiaro 4° - 5° giro: blu/grigio scuro 6° - 8° giro: panna Quadrato 5: 1° - 2° giro: blu/grigio scuro 3° giro: blu jeans chiaro 4° - 5° giro: blu ghiaccio 6° - 8° giro: panna Quadrato 6: 1° - 2° giro: blu ghiaccio 3° giro: blu/grigio scuro 4° - 5° giro: blu jeans chiaro 6° - 8° giro: panna CONFEZIONE DEI QUADRATI: Ved diag M.1 e M.2. -------------------------------------------------------- COPERTA: Fare in totale 30 quadrati, 5 per ogni combinazione colore – vedere COMBINAZIONE COLORI! QUADRATO: Con 1 filo Karisma e l’uncinetto n° 5, avviare 4 cat e formare 1 anello con 1 m.bss nella 1° cat. 1° GIRO: 4 cat (= 1 m.a + 1 cat), * 1 m.a nell’anello, 1 cat *, ripetere da *-* in totale 7 volte, terminare con 1 m.bss nella 3a cat d’inizio giro = 8 m.a. RICORDATI LA TENSIONE DEL LAVORO! 2° GIRO: 3 cat (= 1 m.a), 1 m.a nella 1a di queste 3 cat, ma non fare l’ultima estrazione del filo (= 2 m sull’uncinetto), 1 m.a nella stessa cat, ma non fare l’ultima estrazione del filo (= 3 m sull’uncinetto), 1 gettato, far passare l’uncinetto attraverso tutte e 3 le m = 1 m sull’uncinetto (= 1 gruppo di m.a). Lavorare * 1 cat, 1 m.a nella cat successiva, ma non fare l’ultima estrazione del filo (= 2 m sull’uncinetto), 1 m.a nella stessa cat, ma non fare l’ultima estrazione del filo (= 3 m sull’uncinetto), 1 gettato, far passare l’uncinetto attraverso tutte e 3 le m = 1 m sull’uncinetto (= 1 gruppo di m.a), 1 cat, 1 m.a nella m.a successiva, ma non fare l’ultima estrazione del filo (= 2 m sull’uncinetto), 1 m.a nella stessa m.a, ma non fare l’ultima estrazione del filo (= 3 m sull’uncinetto), 1 gettato, far passare l’uncinetto attraverso tutte e 3 le m = 1 m sull’uncinetto (= 1 gruppo di m.a) *. Ripetere da *-* e finire con 1 gruppo di m.a nell’ultima cat, 1 cat e 1 m.bss nella 3a cat d’inizio giro = 16 gruppi di m.a. Tagliare il filo. 3° GIRO: Cambiare colore. Lavorare 4 cat, * 3 m.a nella cat successiva, 1 cat *, ripetere da *-*, e finire con 2 m.a nell’ultima cat e 1 m.bss nella 3a cat d’inizio giro. Tagliare il filo. 4° GIRO: Cambiare colore. Lavorare 1 cat, 1 m.b nella 1a cat, * 3 cat, 1 m.b nella cat successiva, 3 cat, 1 m.b nella stessa cat, 3 cat, 1 m.b nella cat successiva, 3 cat, 1 m.b nella cat successiva, 7 cat, 1 m.b nella stessa cat, 3 cat, 1 m.b nella cat successiva, *, ripetere da *-*, terminare con 1 m.bss nella 1a m.b d’inizio giro. (= 4 archetti di 7 cat = angoli). 5° GIRO: 1 cat, 1 m.b nella 1a m.b del giro precedente, * saltare l’archetto di 3 cat, nell’archetto di 3 cat successivo, lavorare così: 4 m.a, 1 cat, 4 m.a. Saltare l’archetto di 3 cat successivo, 1 m.b nella m.b successiva, saltare l’archetto di 3 cat successivo, nell’archetto di 7 cat, lavorare così: 6 m.a, 2 cat, 6 m.a. Saltare l’archetto di 3 cat successivo, 1 m.b nella m.b successiva *, ripetere da *-*, e finire con 1 m.bss nella 1a m.b d’inizio giro. Tagliare il filo. 6° GIRO: Cambiare colore. Lavorare * 1 m.a (= la prima volta, all’inizio del giro, sostituire con 3 cat) nella 1a m.b, 3 cat, 1 m.b nella cat del gruppo di 8 m.a, 3 cat, 1 m.a nella m.b successiva, 5 cat, nell’archetto (di 2 cat) dell’angolo lavorare così: 1 m.b, 3 cat, 1 m.b, 5 cat *, ripetere da *-*, finire con 1 m.bss nella 3a cat d’inizio giro. 7° GIRO: 3 cat, * 4 m.a (= la prima volta, all’inizio del giro, sostituire la prima m.a con 3 cat) nell’archetto di 3 cat, 4 m.a nell’archetto di 3 cat successivo, 5 m.a nell’archetto di 5 cat, nell’archetto (di 3 cat) dell’angolo lavorare così: 3 m.a, 2 cat, 3 m.a. 5 m.a nell’archetto di 5 cat successivo *, ripetere da *-*, finire con 1 m.bss nella 3a cat d’inizio giro. 8° GIRO: 1 cat, 1 m.b in ognuna delle 16 m.a successive, * nell’archetto (di 2 cat) dell’angolo lavorare così: 1 m.b, 1 cat, 1 m.b; poi 1 m.b nelle 24 m.a successive * ripetere da *-*, finire con 1 m.b in ognuna delle ultime 8 m.b, 1 m.bss nella 1a cat d’inizio giro. Tagliare filo. Fissare tutti i fili. CONFEZIONE: Posizionare i quadrati come indicato in M.1 con 5 quadrati in orizzontale e 6 quadrati in verticale – ved spieg sopra! Unire i quadrati tra di loro lavorando con il filo color panna e l’uncinetto n°5 come indicato in M.2 - unirli prima in altezza, poi in lunghezza. |
||||||||||
Spiegazioni del diagramma |
||||||||||
|
||||||||||
 |
||||||||||
Avete terminato questo modello?Allora taggate le vostre foto con #dropspattern #seasidebluesblanket o inviatele alla #dropsfan gallery. Avete bisogno di aiuto con questo modello?Troverete 9 video tutorial, una sezione per i commenti/domande e molto altro guardando il modello su www.garnstudio.com © 1982-2026 DROPS Design A/S. Ci riserviamo tutti i diritti. Questo documento, compreso tutte le sue sotto-sezioni, è protetto dalle leggi sul copyright. Potete leggere quello che potete fare con i nostri modelli alla fine di ogni modello sul nostro sito. |
||||||||||


Con oltre 40 anni di esperienza nel design di modelli di maglia e uncinetto, DROPS Design offre la più estesa collezione di modelli gratuiti su internet - tradotti in 17 lingue. Ad oggi vi possiamo fornire 324 cataloghi e 12190 modelli - 9461 dei quali sono tradotti in Italiano.
Ci stiamo impegnando molto per darvi il meglio che vi possiamo offrire in termini di maglia e uncinetto, ispirazioni e consigli così come filati di grande qualità ad un prezzo incredibile! Volete utilizzare i nostri modelli per qualcosa d'altro oltre al vostro uso personale? Potete leggere tutto ciò che è consentito nel testo sul Copyright in basso su tutte le pagine dei nostri modelli. Buon lavoro!
Lasciare un commento sul modello DROPS 120-3
Noi saremmo felici di ricevere i tuoi commenti e opinioni su questo modello!
Se vuoi fare una domanda, fai per favore attenzione a selezionare la categoria corretta nella casella qui sotto per velocizzare il processo di risposta. I campi richiesti sono indicati da *.