
Categorie popolari
State cercando un filato?


Commenti / Domande (102)
![]() DROPS Design NL ha scritto:
DROPS Design NL ha scritto:
Hoi Karin. Het achterpand is het vierkant stukje op de schematekening. Dus u begint beneden en haakt naar boven = het stukje wordt steeds breder. Meerder bij een hoogte van 7 cm 1 stk aan iedere kant (= totaal 2 stk) - lees hoe in TIP VOOR HET MEERDEREN aan het begin van het patroon. Herhaal dit bij een hoogte van 15 cm. Dwz, totaal 4 stk extra. Vervolgens haak je de rand rond het werk (kraag). Succes. Tine
12.04.2010 - 11:15
![]() Karin ha scritto:
Karin ha scritto:
Hallo, Ik begrijp niets van de meerdering. Als ik begin met de aantal st. die het patron aangefft heb ik bij de 2e toer nog maar 42 steken. Is het begin van het rugpand dan de hals. En wat is precies het aantal steken wat ik moet meerderen is dit aangeduid met= steken> is dit wat ik dan over heb of moeten er zoveel = steken bij op? Ik ben al twee keer opnieuw begonnen maar ko er niet uit. Welke kant van het rugpand is het nu hals of onderaan de rug? Kunt u mij helpen
11.04.2010 - 13:29
![]() DROPS Design ha scritto:
DROPS Design ha scritto:
1. you cast on 78 and dec on 1st row to 58 so the edge should not become too tight, which happens easily. 2. work 58dc from back piece, 42dc around the chain of 56 ch, then 62dc along the other side of back piece, then 42dc around the chain of 56 ch. Ie 58+42+62+42 = 204 dc.
25.02.2010 - 22:11
![]() Jessica ha scritto:
Jessica ha scritto:
1.Why is the pattern written to start with 78 ch when you immedietely reduce that number to 58? 2.Instructions on the Edge Piece are written "Now crochet 1 dc in each dc from back piece and in each ch chain crochet 42-44-46-48 dc = 204-220-236-248 dc in total." I'm not sure where the number 42 comes in? or how a total number of 204 is reached. If I were to ignore this instuction and simply dc in each dc and ch around I would end up with 232 dc including a chain 3 to begin my row.
25.02.2010 - 15:10
![]() Karen Skall ha scritto:
Karen Skall ha scritto:
Vil være rigtig sød over en konfirmationskjole der er med tynde stropper, bare i hvid.
20.02.2010 - 19:31
![]() Gerda ha scritto:
Gerda ha scritto:
Perfekt om man känner för (behöver täcka) bara axlar, laangklänningen blir perfekt med denna modell i naagot garn uppblandat med silvertraad! supermooi!
06.02.2010 - 00:07Myriam ha scritto:
Por favor enviar el croquis de la puntada del cuerpo, i forma de armar.esta hermoso
02.02.2010 - 23:44
![]() DROPS Design NL ha scritto:
DROPS Design NL ha scritto:
Dat was omdat het patroon nog niet gepubliceerd was. Het is vanochtend gedaan, en de link is nu geactiveerd! Veel haakplezier. Gr. Tine
01.02.2010 - 09:53
![]() Lidy Nooij ha scritto:
Lidy Nooij ha scritto:
Mooi patroon kan hem alleen niet downloaden!!
31.01.2010 - 12:43Attallah ha scritto:
Formidable romantique et féminin j'attend inpassiament l'explication
29.01.2010 - 14:38
|
|||||||||||||
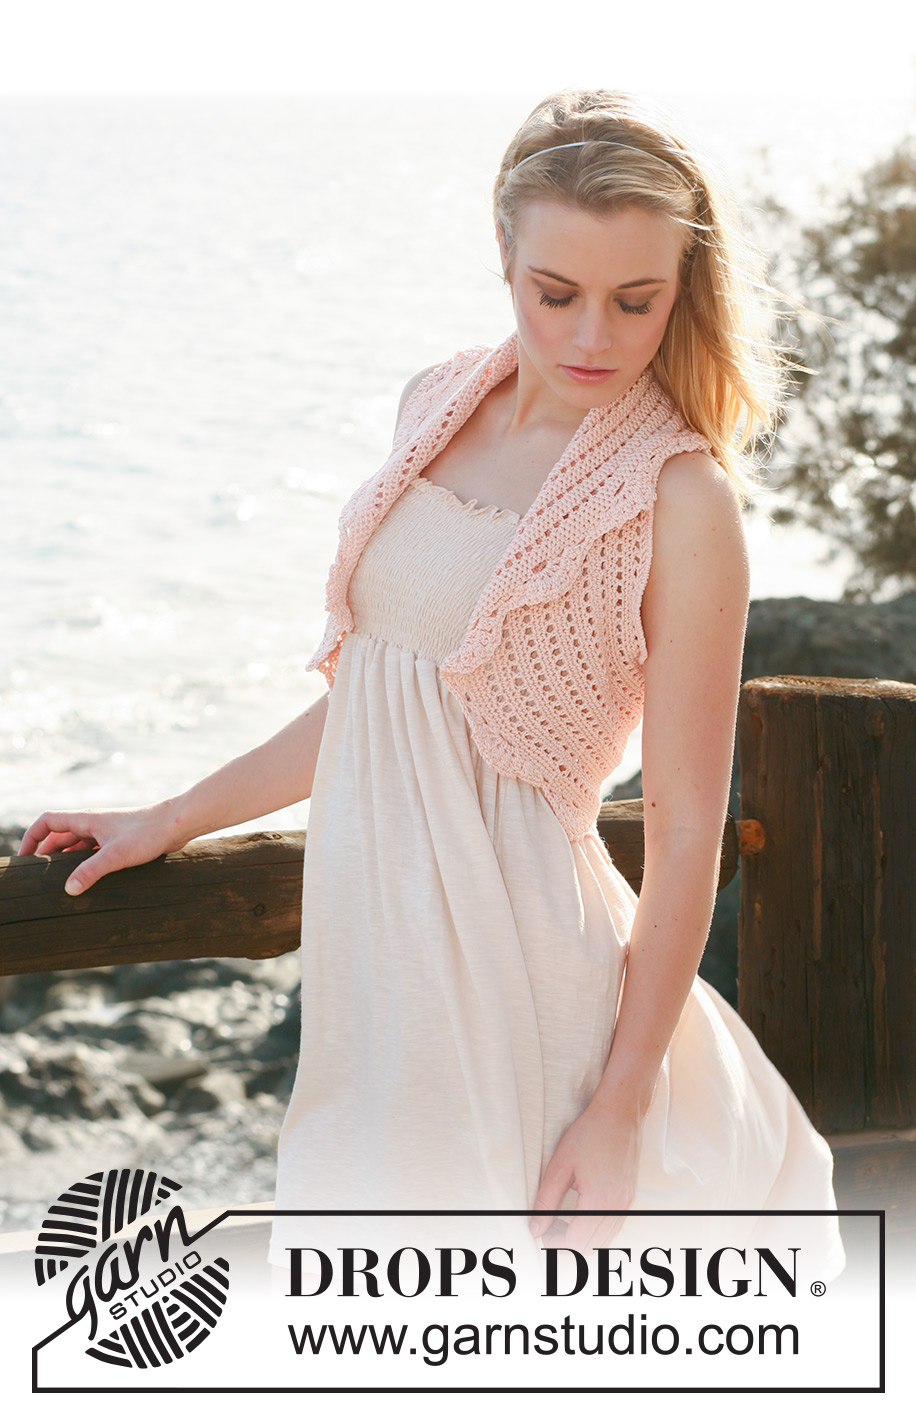
Peach Perfection#peachperfectionbolero |
|||||||||||||
 |
 |
||||||||||||
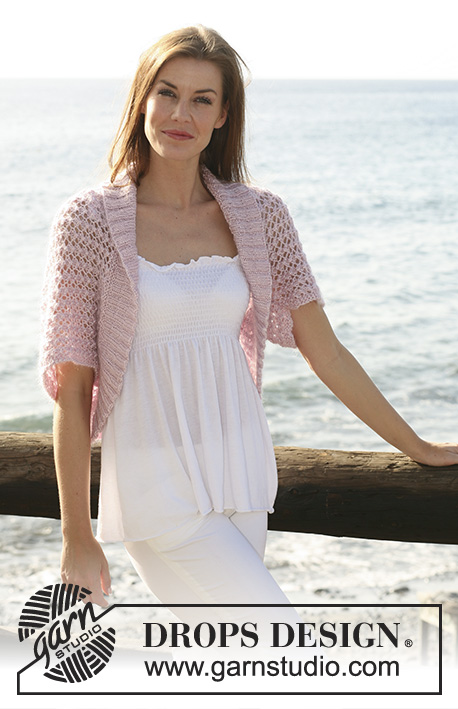
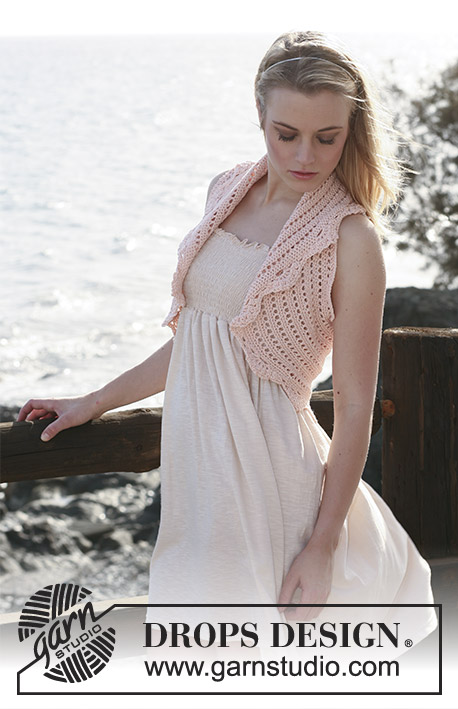
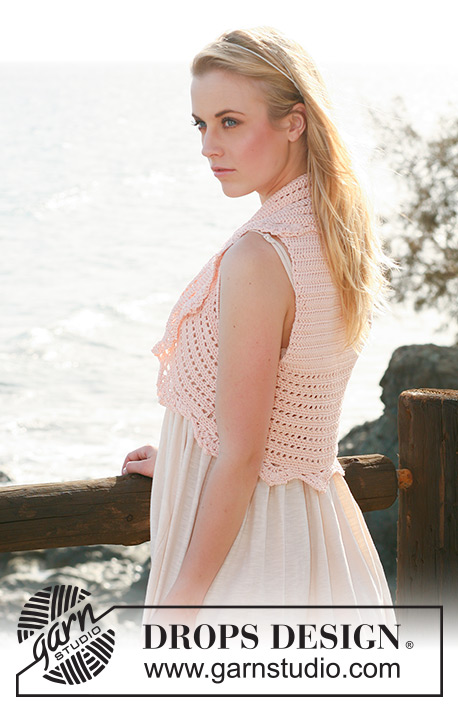
Gilet DROPS all’uncinetto in "Muskat". Taglie: Dalla S alla XXXL.
DROPS 119-22 |
|||||||||||||
|
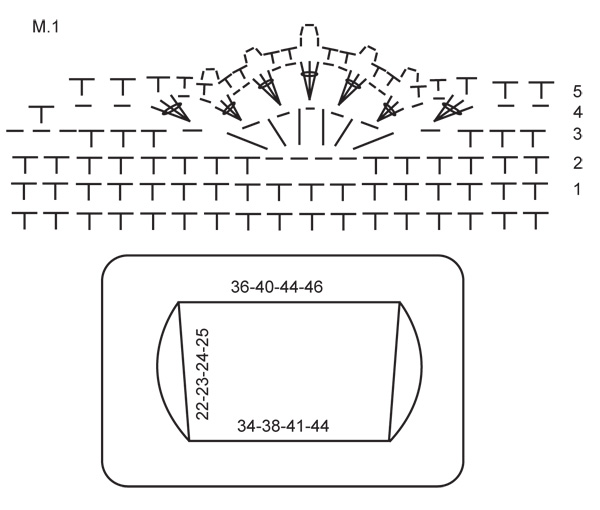
INFORMAZIONI PER IL LAVORO: Dietro: Sostituire la 1° m.a di ogni riga con 3 cat. Bordo: Sostituire la 1° m.b di ogni giro con 1 cat. Finire ogni giro con 1 m.bss nell’ultima cat dell’inizio del giro precedente. Sostituire la 1° m.a di ogni giro con 3 cat. Finire ogni giro con 1 m.bss nell’ultima cat dell’inizio del giro precedente. SUGGERIMENTO PER GLI AUMENTI: Aumentare lavorando 2 m nella stessa m. -------------------------------------------------------- -------------------------------------------------------- DIETRO: Avviare 78-86-94-99 cat lente con l’uncinetto n° 4 ed il filato Muskat. Lavorare 1 m.a nella 4° cat dall’uncinetto, * 1 m.a in ognuna delle 3 cat successive, saltare 1 cat *, ripetere da *-* e finire con 1 m.a in ognuna delle 2-2-2-3 ultime cat = 58-64-70-74 m.a. Proseguire con 1 m.a in ogni m.a. Quando il lavoro misura 7 cm, aumentare 1 m.a da ciascun lato – vedere il SUGGERIMENTO PER GLI AUMENTI, e ripetere questi aumenti quando il lavoro misura 15 cm = 62-68-74-78 m.a. Proseguire finché il lavoro non misura 22-23-24-25 cm. BORDO: Lavorare 1 m.a in ogni m.a lungo la parte superiore del dietro, avviare 56-58-60-64 cat, 1 m.a in ogni m.a lungo la parte inferiore del dietro, avviare 56-58-60-64 cat e finire con 1 m.bss nella m.a iniziale, nella parte superiore del dietro. Lavorare ora 1 m.a in ogni m.a del dietro e in ogni arco di cat lavorare 42-44-46-48 m.a = in tutto ci sono 204-220-236-248 m.a. Proseguire in tondo come segue: GIRO 1: 1 m.a nella 1° m.a, * 1 cat, saltare 1 m.a, 1 m.a nella m.a successiva *, ripetere da *-* e finire con 1 cat, saltare 1 m.a e 1 m.bss nella m.a iniziale del giro. GIRO 2: 1 m.b in ogni m.a e 1 m.b in ogni cat. GIRO 3: 1 m.b in ogni m.b. Ripetere questi 3 giri; ALLO STESSO TEMPO quando il bordo misura 5, 10 e 15 cm (assicurarsi di dover lavorare un giro di m.b) aumentare 34-34-34-36 m.b in modo uniforme – vedere il SUGGERIMENTO PER GLI AUMENTI = 306-322-338-356 m.b. Quando il bordo misura 17-18-19-20 cm (assicurarsi che il giro successivo sia un giro di m.b) lavorare 1 giro di m.b, ALLO STESSO TEMPO aumentare 0-1-2-1 m.b in modo uniforme = 306-323-340-357 m.b. Proseguire ora seguendo il diagramma M.1. ATTENZIONE! Iniziare dal giro indicato con 1 nel diagramma. Lavorare 1 ripetizione in verticale del diagramma M.1; tagliare e fermare il filo. |
|||||||||||||
Spiegazioni del diagramma |
|||||||||||||
|
|||||||||||||
 |
|||||||||||||
Avete terminato questo modello?Allora taggate le vostre foto con #dropspattern #peachperfectionbolero o inviatele alla #dropsfan gallery. Avete bisogno di aiuto con questo modello?Troverete 8 video tutorial, una sezione per i commenti/domande e molto altro guardando il modello su www.garnstudio.com © 1982-2026 DROPS Design A/S. Ci riserviamo tutti i diritti. Questo documento, compreso tutte le sue sotto-sezioni, è protetto dalle leggi sul copyright. Potete leggere quello che potete fare con i nostri modelli alla fine di ogni modello sul nostro sito. |
|||||||||||||


Con oltre 40 anni di esperienza nel design di modelli di maglia e uncinetto, DROPS Design offre la più estesa collezione di modelli gratuiti su internet - tradotti in 17 lingue. Ad oggi vi possiamo fornire 324 cataloghi e 12290 modelli - 9561 dei quali sono tradotti in Italiano.
Ci stiamo impegnando molto per darvi il meglio che vi possiamo offrire in termini di maglia e uncinetto, ispirazioni e consigli così come filati di grande qualità ad un prezzo incredibile! Volete utilizzare i nostri modelli per qualcosa d'altro oltre al vostro uso personale? Potete leggere tutto ciò che è consentito nel testo sul Copyright in basso su tutte le pagine dei nostri modelli. Buon lavoro!
Lasciare un commento sul modello DROPS 119-22
Noi saremmo felici di ricevere i tuoi commenti e opinioni su questo modello!
Se vuoi fare una domanda, fai per favore attenzione a selezionare la categoria corretta nella casella qui sotto per velocizzare il processo di risposta. I campi richiesti sono indicati da *.