
Categorie popolari
State cercando un filato?


Commenti / Domande (102)
![]() Dana Šimíčková ha scritto:
Dana Šimíčková ha scritto:
Hello, I am trying to make this pretty vest but I am not sure about one thimg. Could you please help? In the pattern you say that after finishing I am supposed to chain 56 to make the holes for arm and then in next row doubke crochet around these but onky 42. I tried but the edge seem to be little funky now! It is not straight and it has a tendency to roll. Do I understand it right then? The person on the picture seem to have the edges okay. Thanks for your advice and have a nice day Dana
19.04.2015 - 15:00DROPS Design ha risposto:
Dear Mrs Šimíčková, when working chains, the chains are often tighter than the sts in width, so that you will crochet more chains for armhole than you will make dc on 1st row (as for fundation ch at the bottom of back piece). If your chains are a bit looser, you can work a finishing edging around armholes afterwards or adjust your number of ch for armhole. Happy crocheting!
20.04.2015 - 09:59
![]() Bernadette ha scritto:
Bernadette ha scritto:
Hallo, eine Frage: bei der Kante steht "Die 3 R. wiederholen und gleichzeitig nach 5, 10 und 15 cm ....aufnehmen." Von wo weg werden die ersten 5 cm gemessen? Vom Kantenbeginn? Vom Beginn der 3 Runden? Oder ab der ersten Wiederholung der 3 Runden?
03.07.2014 - 16:08DROPS Design ha risposto:
Liebe Bernadette, die Maße beziehen sich alle auf den Kantenbeginn.
03.07.2014 - 23:47
![]() Wendy ha scritto:
Wendy ha scritto:
I don't understand how to do the arm holes?
31.05.2014 - 02:07DROPS Design ha risposto:
Dear Wendy, armholes are done when working 1st round for edge piece: start working 1 row over the top of back piece, then ch 56-64 (see size), work 1 row over the bottom of back piece and ch 56-64 for 2nd armhole. Join and work in the round. Happy crocheting!
03.06.2014 - 09:09Sarah King ha scritto:
It is a very hard pattern to make sense of even the diagram
21.03.2014 - 10:49
![]() Jessy ha scritto:
Jessy ha scritto:
Warum habe ich bei dem Armlöchern 56 Lm, aber im Anschluss nur 42 Stäbchen? Was passiert mit den fehlenden 14 Maschen? Danke für die Hilfe! :-)
25.02.2014 - 16:08DROPS Design ha risposto:
Liebe Jessy, die Maschen fehlen nicht wirklich, denn Sie häkeln ja um den Lm-Bogen herum, d.h. Sie stechen nicht in jede einzelne Lm ein, sondern holen den Faden um den Lm-Bogen. Auf diese Weise lassen sich die Stb gleichmäßig auf dem Lm-Bogen verteilen. Der etwas längere Lm-Bogen dient dazu, die Armausschnittrundung etwas besser zu formen.
25.02.2014 - 21:10
![]() Kate ha scritto:
Kate ha scritto:
On the Back Piece, Continue until piece measures 22-23-24-25 cm / 8 3/4"-9"-9½"-9 3/4". Do you keep increasing or do you keep it at 62-68-74-78 dc until you reach the right height.
22.01.2014 - 02:19DROPS Design ha risposto:
Dear Kate, when you get 62-68-74-78 dc, continue without inc until piece measures 22-23-24-25 cm / 8 3/4"-9"-9½"-9 3/4". Happy crocheting!
22.01.2014 - 09:50
![]() Berit ha scritto:
Berit ha scritto:
Står det jämnt fördelat så betyder det just jämnt fördelat!
27.09.2013 - 19:26
![]() Inga Persson ha scritto:
Inga Persson ha scritto:
Hej! Jag har skickat in en fråga den 22/9 2013. Önskar svar på denna omgående, tack! Mvh Inga Persson
26.09.2013 - 17:32DROPS Design ha risposto:
Hej Inga, Ja du ökar på hela varvet jämt fördelat!
02.10.2013 - 11:24
![]() GENTHIAL Mireille ha scritto:
GENTHIAL Mireille ha scritto:
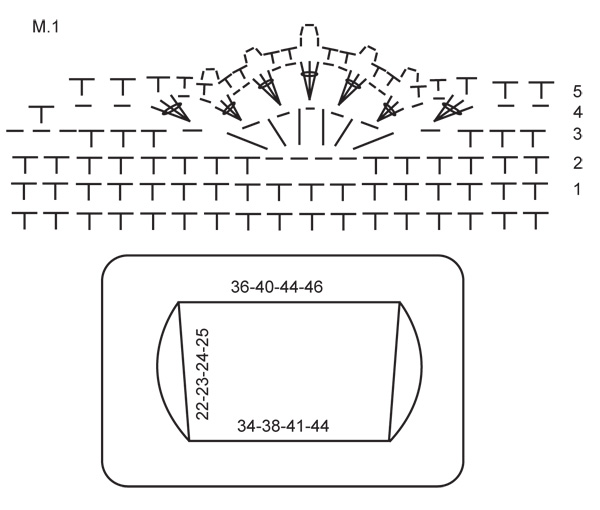
Je voudrai des explications sur le n° R-559 sur le motif M1 car le dessin n'est pas assez expliqué. Merci
23.09.2013 - 14:43DROPS Design ha risposto:
Chère Mme Genthial, dans le diag. M.1, chaque symbole représente 1 m, et on répète la totalité du diagramme à partir de la droite vers la gauche tout le tour. Pour toute aide personnalisée, je vous invite à vous adresser au magasin où vous avez acheté votre laine et/ou au forum DROPS. Bon crochet!
23.09.2013 - 16:43
![]() Inga Persson ha scritto:
Inga Persson ha scritto:
Hej! Jag virkar mönster Drops 119-22. Har kommit till kantstycket och virkar efter största storleken. När man har virkat 15 cm ska det ökas 36 m jämt fördelat på v. Jag förstår att det ska ökas på ett varv med fasta m. Jag har läst att det ska ökas 36 x 3. Jag virkar ju runt. Ska det ökas på undersidan , undersidan och ärmarna. Ska det ökas även på underdelen av västen. Hjälp mig att tänka rätt. Tacksam för en noga förklaring. Tack!
22.09.2013 - 19:31
|
|||||||||||||
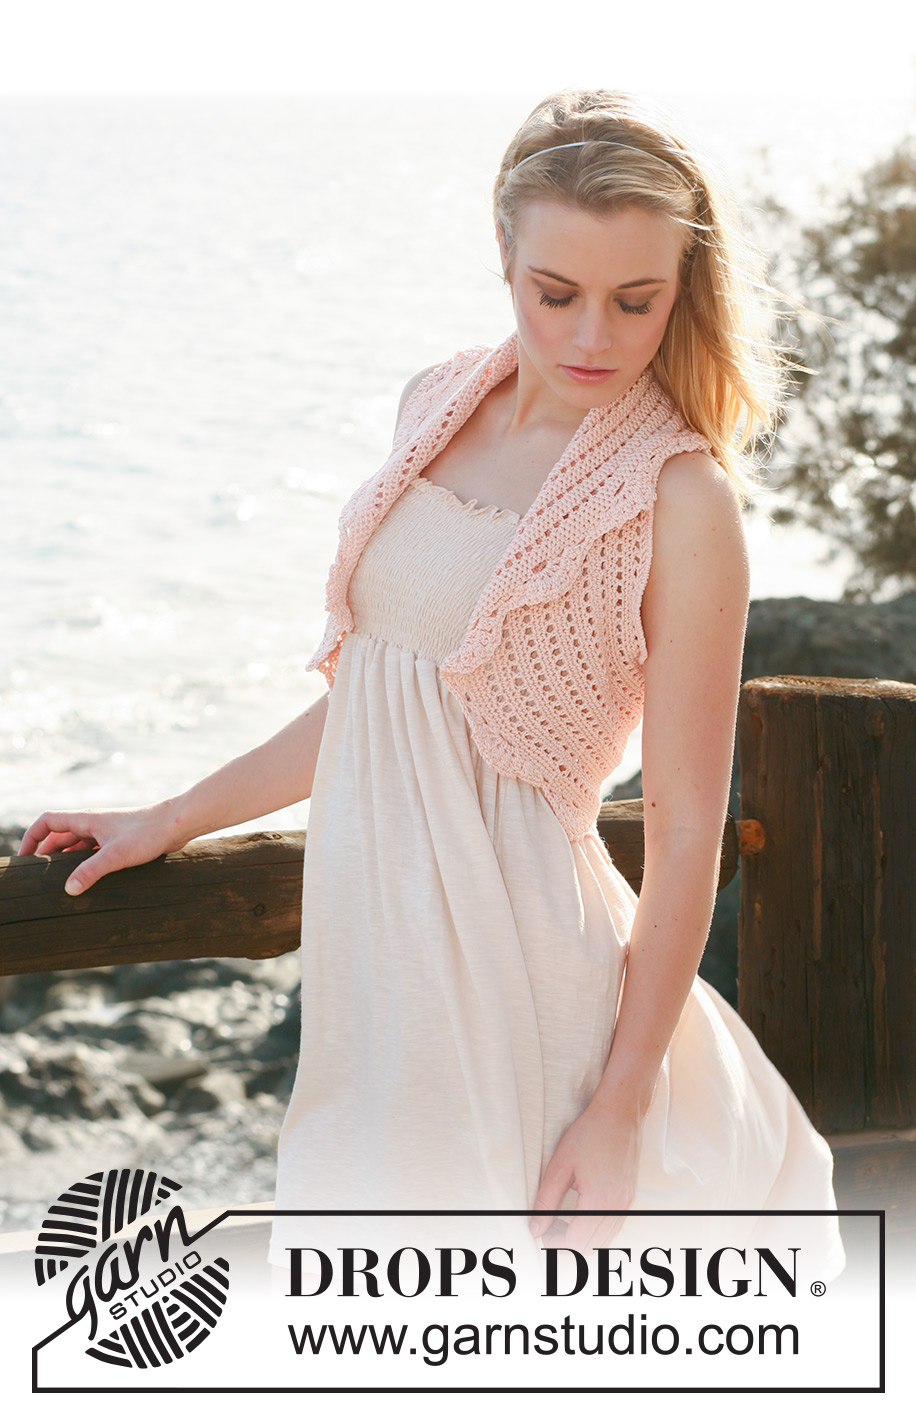
Peach Perfection#peachperfectionbolero |
|||||||||||||
 |
 |
||||||||||||
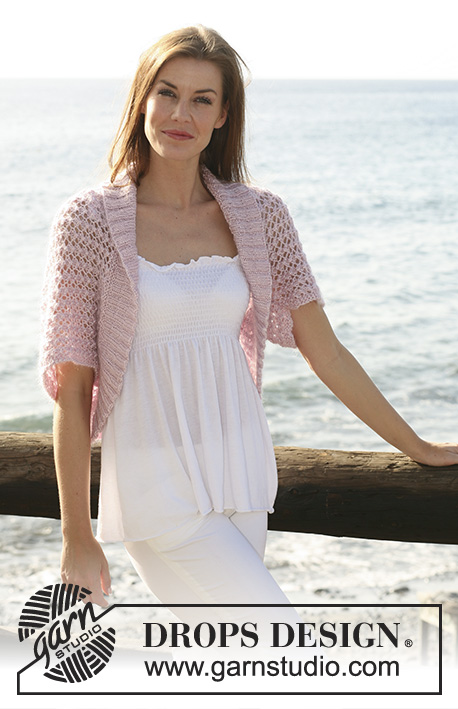
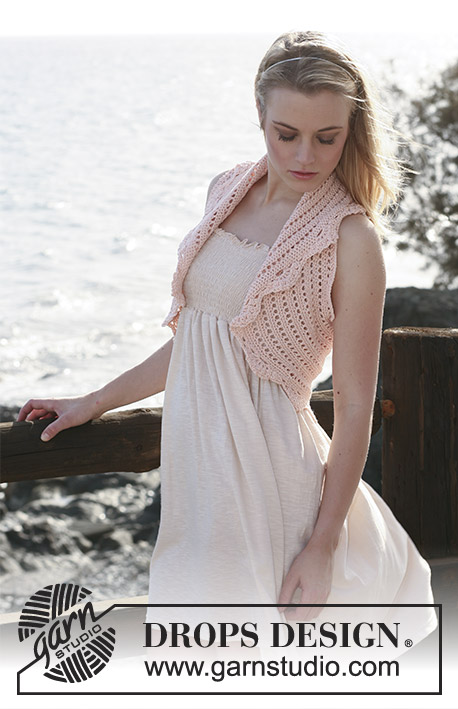
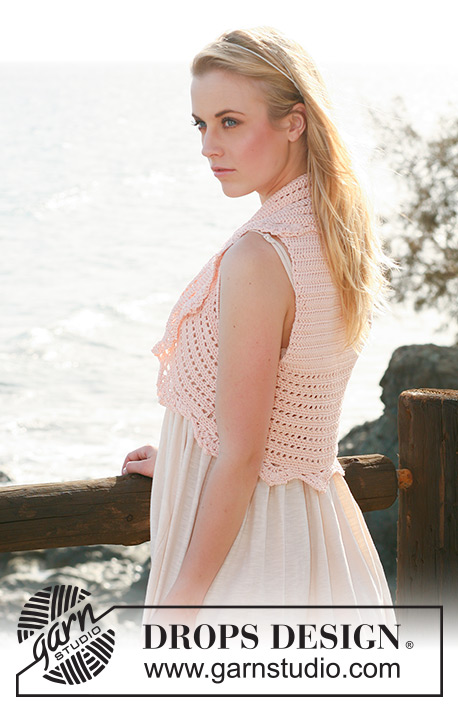
Gilet DROPS all’uncinetto in "Muskat". Taglie: Dalla S alla XXXL.
DROPS 119-22 |
|||||||||||||
|
INFORMAZIONI PER IL LAVORO: Dietro: Sostituire la 1° m.a di ogni riga con 3 cat. Bordo: Sostituire la 1° m.b di ogni giro con 1 cat. Finire ogni giro con 1 m.bss nell’ultima cat dell’inizio del giro precedente. Sostituire la 1° m.a di ogni giro con 3 cat. Finire ogni giro con 1 m.bss nell’ultima cat dell’inizio del giro precedente. SUGGERIMENTO PER GLI AUMENTI: Aumentare lavorando 2 m nella stessa m. -------------------------------------------------------- -------------------------------------------------------- DIETRO: Avviare 78-86-94-99 cat lente con l’uncinetto n° 4 ed il filato Muskat. Lavorare 1 m.a nella 4° cat dall’uncinetto, * 1 m.a in ognuna delle 3 cat successive, saltare 1 cat *, ripetere da *-* e finire con 1 m.a in ognuna delle 2-2-2-3 ultime cat = 58-64-70-74 m.a. Proseguire con 1 m.a in ogni m.a. Quando il lavoro misura 7 cm, aumentare 1 m.a da ciascun lato – vedere il SUGGERIMENTO PER GLI AUMENTI, e ripetere questi aumenti quando il lavoro misura 15 cm = 62-68-74-78 m.a. Proseguire finché il lavoro non misura 22-23-24-25 cm. BORDO: Lavorare 1 m.a in ogni m.a lungo la parte superiore del dietro, avviare 56-58-60-64 cat, 1 m.a in ogni m.a lungo la parte inferiore del dietro, avviare 56-58-60-64 cat e finire con 1 m.bss nella m.a iniziale, nella parte superiore del dietro. Lavorare ora 1 m.a in ogni m.a del dietro e in ogni arco di cat lavorare 42-44-46-48 m.a = in tutto ci sono 204-220-236-248 m.a. Proseguire in tondo come segue: GIRO 1: 1 m.a nella 1° m.a, * 1 cat, saltare 1 m.a, 1 m.a nella m.a successiva *, ripetere da *-* e finire con 1 cat, saltare 1 m.a e 1 m.bss nella m.a iniziale del giro. GIRO 2: 1 m.b in ogni m.a e 1 m.b in ogni cat. GIRO 3: 1 m.b in ogni m.b. Ripetere questi 3 giri; ALLO STESSO TEMPO quando il bordo misura 5, 10 e 15 cm (assicurarsi di dover lavorare un giro di m.b) aumentare 34-34-34-36 m.b in modo uniforme – vedere il SUGGERIMENTO PER GLI AUMENTI = 306-322-338-356 m.b. Quando il bordo misura 17-18-19-20 cm (assicurarsi che il giro successivo sia un giro di m.b) lavorare 1 giro di m.b, ALLO STESSO TEMPO aumentare 0-1-2-1 m.b in modo uniforme = 306-323-340-357 m.b. Proseguire ora seguendo il diagramma M.1. ATTENZIONE! Iniziare dal giro indicato con 1 nel diagramma. Lavorare 1 ripetizione in verticale del diagramma M.1; tagliare e fermare il filo. |
|||||||||||||
Spiegazioni del diagramma |
|||||||||||||
|
|||||||||||||
 |
|||||||||||||
Avete terminato questo modello?Allora taggate le vostre foto con #dropspattern #peachperfectionbolero o inviatele alla #dropsfan gallery. Avete bisogno di aiuto con questo modello?Troverete 8 video tutorial, una sezione per i commenti/domande e molto altro guardando il modello su www.garnstudio.com © 1982-2026 DROPS Design A/S. Ci riserviamo tutti i diritti. Questo documento, compreso tutte le sue sotto-sezioni, è protetto dalle leggi sul copyright. Potete leggere quello che potete fare con i nostri modelli alla fine di ogni modello sul nostro sito. |
|||||||||||||


Con oltre 40 anni di esperienza nel design di modelli di maglia e uncinetto, DROPS Design offre la più estesa collezione di modelli gratuiti su internet - tradotti in 17 lingue. Ad oggi vi possiamo fornire 324 cataloghi e 12290 modelli - 9561 dei quali sono tradotti in Italiano.
Ci stiamo impegnando molto per darvi il meglio che vi possiamo offrire in termini di maglia e uncinetto, ispirazioni e consigli così come filati di grande qualità ad un prezzo incredibile! Volete utilizzare i nostri modelli per qualcosa d'altro oltre al vostro uso personale? Potete leggere tutto ciò che è consentito nel testo sul Copyright in basso su tutte le pagine dei nostri modelli. Buon lavoro!
Lasciare un commento sul modello DROPS 119-22
Noi saremmo felici di ricevere i tuoi commenti e opinioni su questo modello!
Se vuoi fare una domanda, fai per favore attenzione a selezionare la categoria corretta nella casella qui sotto per velocizzare il processo di risposta. I campi richiesti sono indicati da *.