
Categorie popolari
State cercando un filato?


Commenti / Domande (209)
![]() Basia ha scritto:
Basia ha scritto:
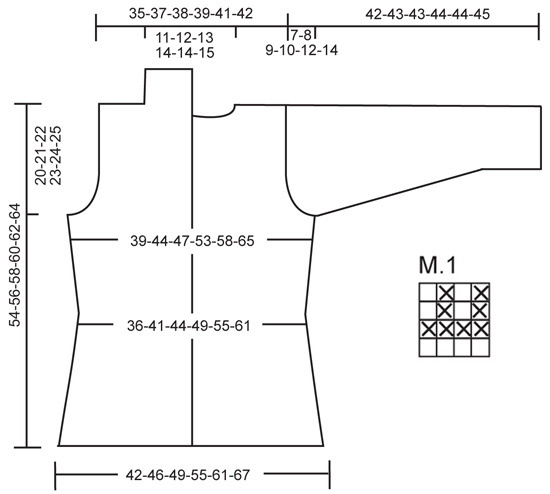
Dla rozmiaru S mam przerabiać: "M1 ponad 29 nast. o. i M1 ponad 57 nast. o". Co to dokładnie znaczy. M1 obejmuje 4 o. zatem 29o./4=7 zatem zostaje mi 1 o. Podobnie 57o./4=14 i 1 o. zostaje. Dlaczego część wykonywana wg schematu M1 nie równa się 28 o. czy 56 o. Jak przerabiać to oczko które zostaje po przerobieniu wielokrotności 4o. składających się na schemat M1?
29.01.2017 - 16:18DROPS Design ha risposto:
Witaj Basiu! Schemat czytamy od dołu, od prawej do lewej strony. Jeśli zostaje 1 oczko to przerabiasz je jak na początku schematu (patrz właściwy rząd po prawej stronie schematu). Jak odczytywać schematy znajdziesz TUTAJ. POWODZENIA!
30.01.2017 - 17:42Claudia Alarcon ha scritto:
Hola quiero hacer este sueter en lana Lace, pero aunque pertenece al mismo grupo A, el metraje de esta lana es de 400mts x cada 50 grs y el de la Alpaca es de 167 mts. Si compro la mitad de gamos me alcanza? Es decir 250grs para la talla chica? Saludos
25.01.2017 - 04:31DROPS Design ha risposto:
Hola Claudia. La calidad Lace es bastante más fina que la de Alpaca (es decir que la prenda final no va a tener la misma textura que en la foto si trabajas con Lace en lugar de con Alpaca). Pero los cálculos del material son correctos. Necesitarías 250 gr de Lace.
29.01.2017 - 14:20
![]() Basia ha scritto:
Basia ha scritto:
Czy robiąc tył w rozmiarze S nie zamykam żadnego oczka na pokrój pachy bo po zamknięciu oczek tył też ma 65 o. Czy dobrze to zrozumiałam?
24.01.2017 - 13:51DROPS Design ha risposto:
Witaj Basiu! Jest dokładnie jak piszesz. Na podkrój rękawa w rozmiarze S zostały zamknięte tylko 3 o. z każdej strony każdego markera (w części TYŁ & PRZODY). POWODZENIA!
25.01.2017 - 09:20
![]() Karin ha scritto:
Karin ha scritto:
Ich habe mir diese Jacke aus einem Faden Alpaca und einem Faden Delight gestrickt. Wunderbares Ergebnis! Der Farbverlauf der Delight ist aufgelöster und feiner. Sieht einfach großartig aus. Danke für dieses tolle Modell!
06.07.2016 - 12:33Debbie Bland ha scritto:
I understand now what I have to do. Change from rounds to rows. It would be clearer if it was stated at that stage for the not so experienced knitter. Only my opinion. Happy knitter
19.03.2016 - 08:09Debbie Bland ha scritto:
Hi, I'm struggling to understand how to do the sleeve cap. I've knitted the sleeve in rounds and measures 35cm but don't understand how to bind off EACH SIDE at the beginning of every row? Must have a mental blockage! Kind regards
17.03.2016 - 14:45DROPS Design ha risposto:
Dear Mrs Bland, when sleeve measures 35 cm start bind off 2 sts at the beg of each row on each side, ie you don't work any more in the rounds: bind off 3 sts at the beg of next row(round), work to the end of the round then turn and work now from WS binding off 3 sts at beg of this row, and continue alternately from RS and from WS at the same time bind off for cap sleeve. Happy knitting!
21.03.2016 - 08:13DEBBIE ha scritto:
Also meant to say that I did the gauge in the M1 pattern. Was that correct? Kind regards Debbie
24.02.2016 - 07:53DROPS Design ha risposto:
Dear Debbie, that's correct, gauge should be worked in M.1, ie 18 sts x 23 rows following diagram M.1 = 10 x 10 cm. Happy knitting!
24.02.2016 - 10:12DEBBIE BLAND ha scritto:
Sorry I meant 10 cmx 010cm
23.02.2016 - 21:37Debbie Bland ha scritto:
Hi, I haven't been able to get the correct yarn so have bought a substitute , double knit.. I've done my gauge & had to use size 6mm needles to get 10mmx10mm. Will that work on this pattern?
23.02.2016 - 21:34DROPS Design ha risposto:
Dear Mrs Band, some of our DROPS store are shipping throughout the world, see list here - gauge to this pattern is 18 sts x 23 rows in pattern = 10 x 10 cm - you may need smaller or larger needle depending on how you are working. Happy knitting!
24.02.2016 - 10:11
![]() Gio ha scritto:
Gio ha scritto:
Buonasera, quando il lavoro raggiunge i 28 cm devo lavorare una m. di M1 nel bordo davanti,ogni 2cm per 11 volte ( taglia M). Quindi per ottenere 17 m nel bordo a legaccio dovrei crescere di altri 22 cm (11per 2) :28+22 =50 cm di lavoro. Se a 35 cm devo intrecciare per gli scalfi, le 17 maglie le ottengo solo quando lavoro i metà davanti ? Grazie infinite.
07.01.2016 - 21:18DROPS Design ha risposto:
Buonasera Liliana, deve iniziare a incorporare 1 m di M.1 nel bordo davanti quando arriva a 28 cm, e ripeterlo per 11 volte ogni 2 cm per la taglia M, per cui arriverà circa a 48 cm (la prima volta non conta, si parte a 28 cm); a 35 cm deve intrecciare per gli scalfi come indicato, per cui continuerà a lavorare il bordo davanti quando lavorerà i due davanti in modo separato. La foto del modello le può essere di aiuto, l'ampliamento del bordo davanti continua anche dopo lo scalfo. Ci riscriva se ha bisogno di ulteriori chiarimenti. Buon lavoro!
08.01.2016 - 20:58
|
|||||||
Marit#maritcardigan |
|||||||
 |
 |
||||||
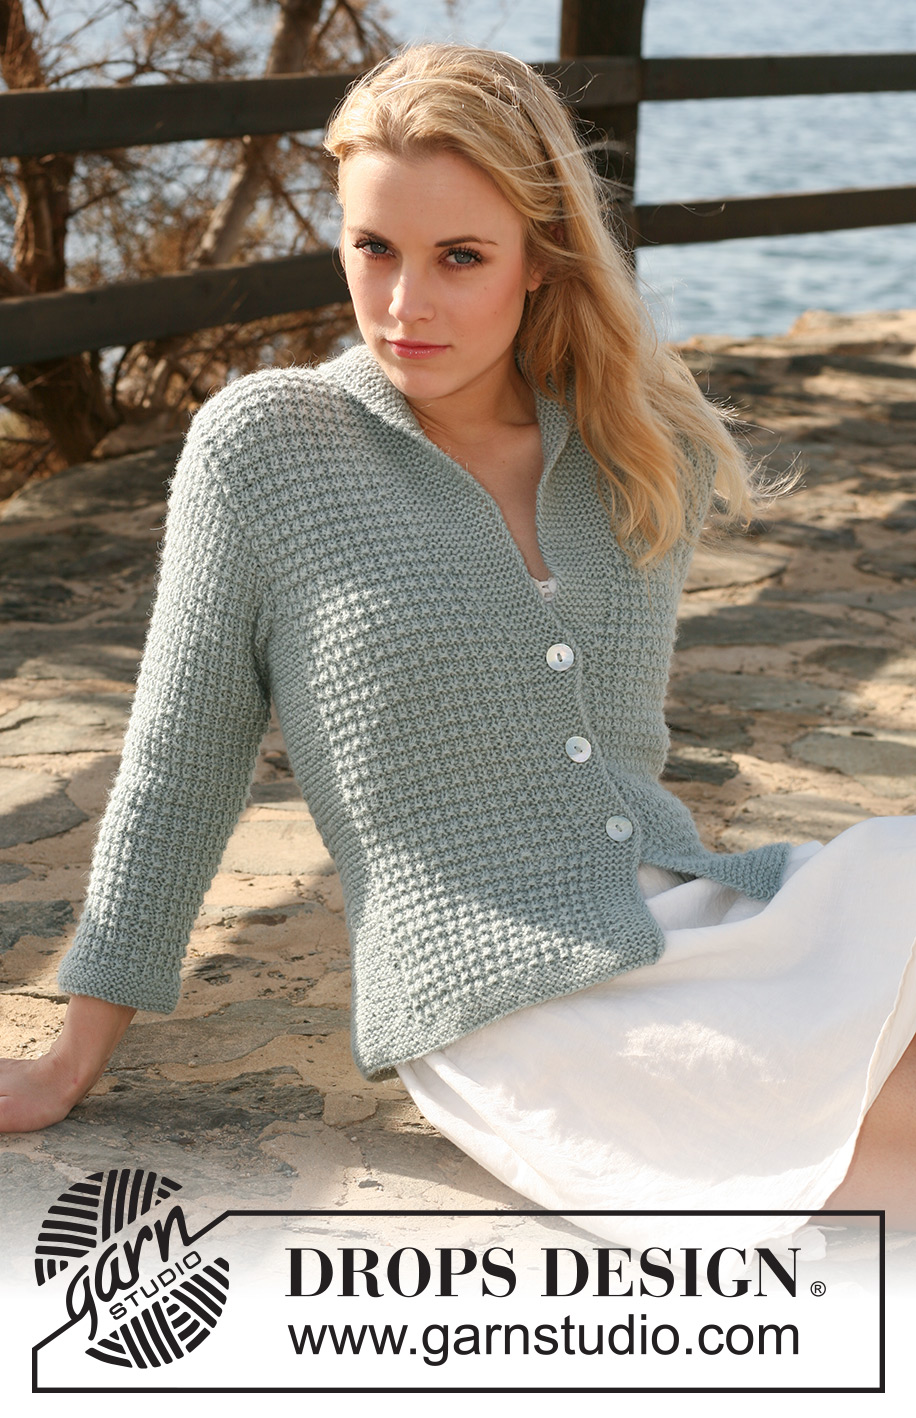
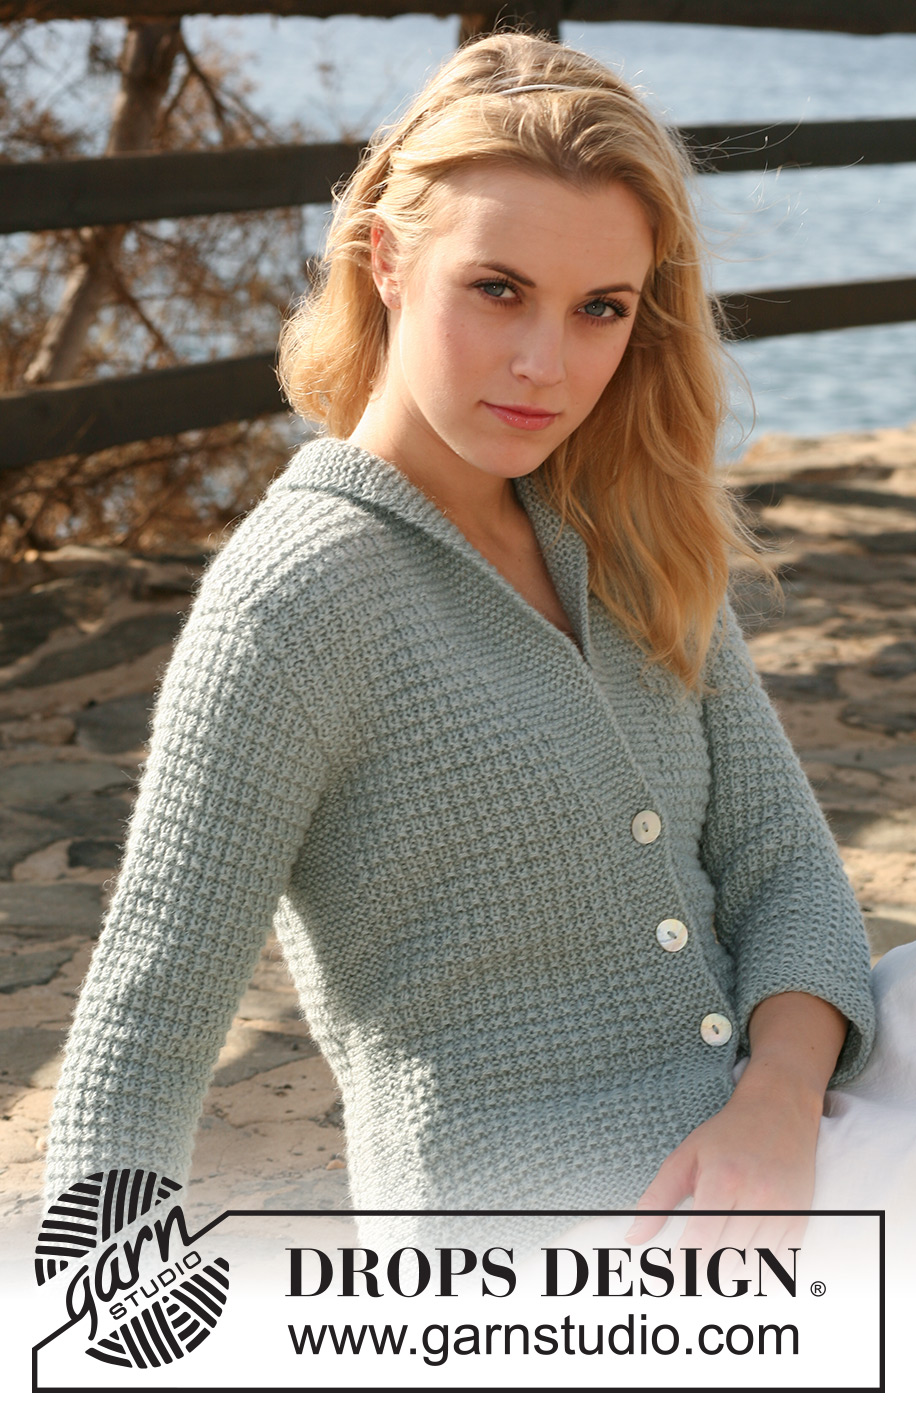
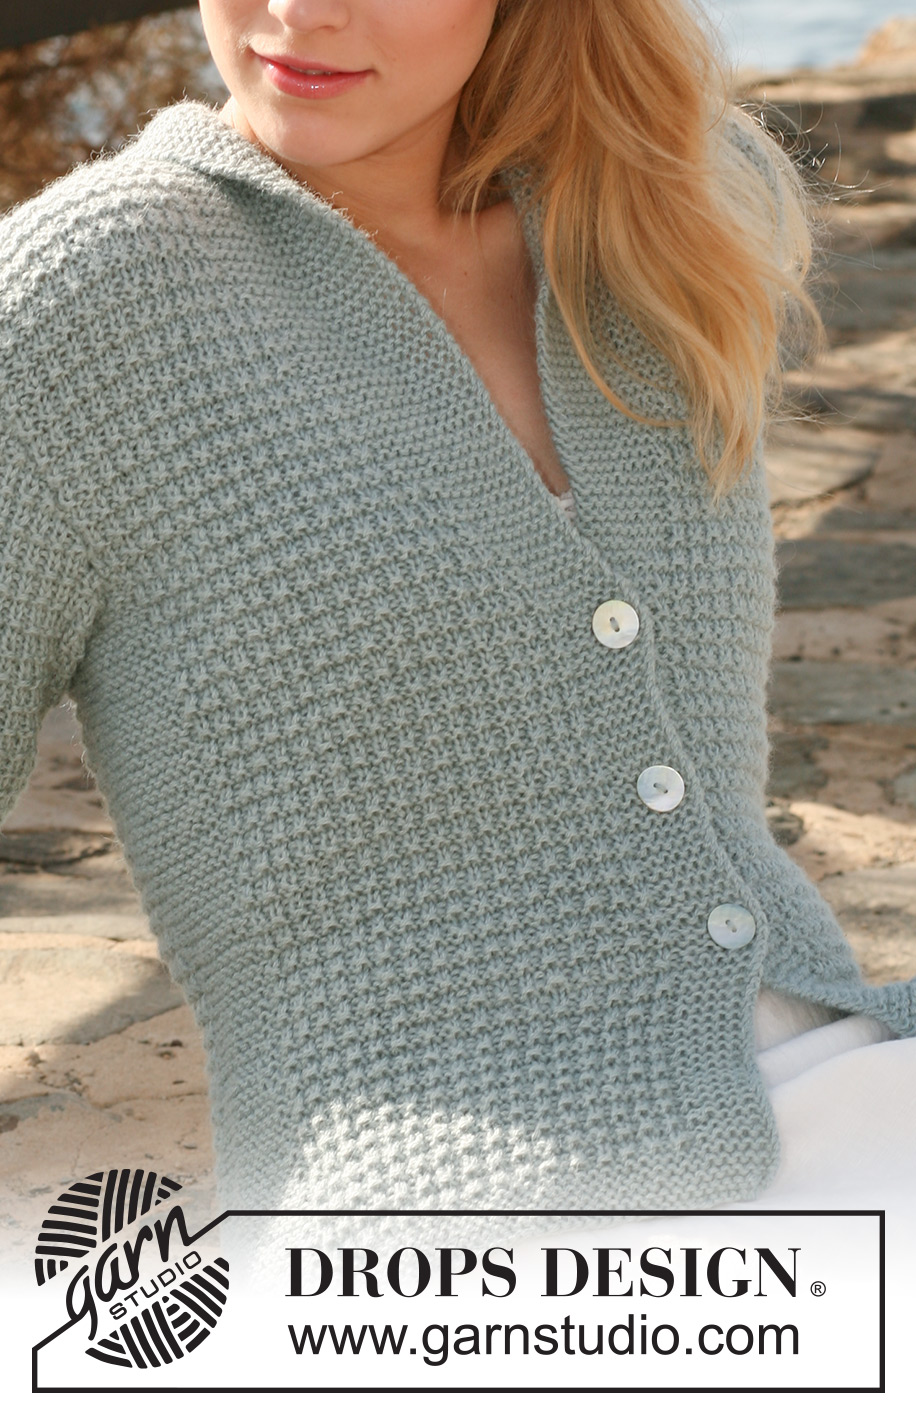
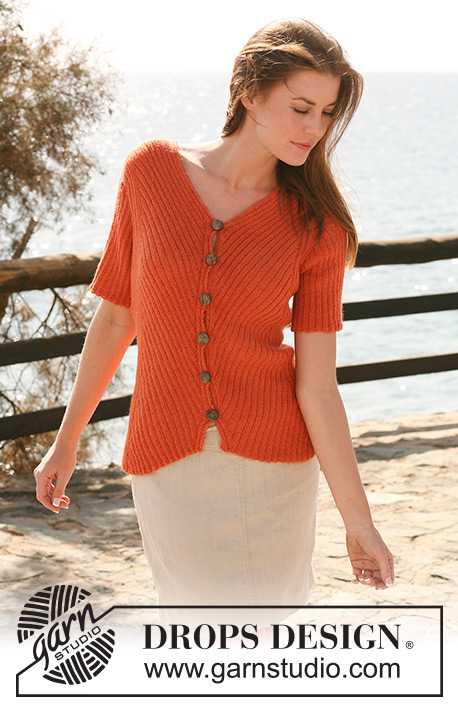
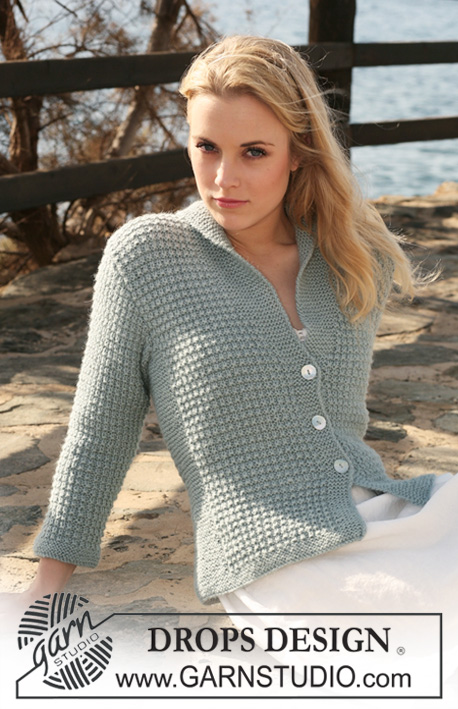
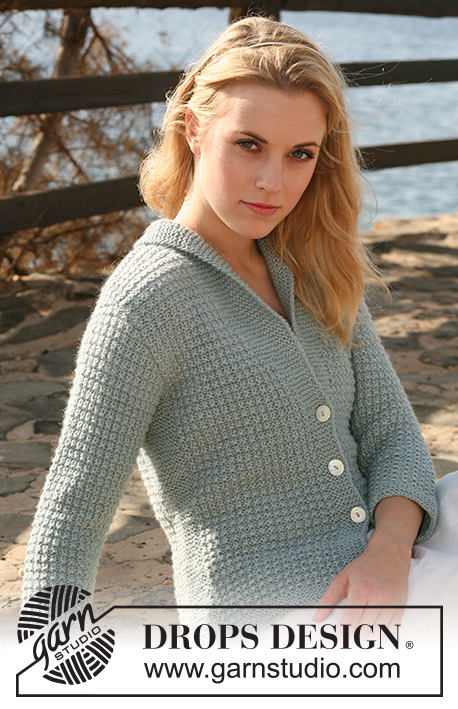
Giacca DROPS lavorata ai ferri con motivo a punto fantasia e colletto in 2 capi di "Alpaca". Taglie: S - XXXL.
DROPS 119-6 |
|||||||
|
M LEGACCIO (avanti e indietro sui f): Lavorare tutti i f a dir. M LEGACCIO (in tondo): 1 giro dir, 1 giro rov. MOTIVO: Vedere il diagramma M.1. Il diagramma mostra il motivo dal diritto del lavoro. ASOLE: Fare le asole sul bordo davanti destro. 1 asola = intrecciare la 3° m del bordo davanti destro dal centro davanti e avviare 1 nuova m sul f di ritorno. Fare le asole quando il lavoro misura: TAGLIA S: 14, 21 e 28 cm. TAGLIA M: 14, 21 e 28 cm. TAGLIA L: 14, 21 e 28 cm. TAGLIA XL: 15, 22 e 29 cm. TAGLIA XXL: 15, 22 e 29 cm. TAGLIA XXXL: 15, 22 e 29 cm. ------------------------------------------------------- CORPO: Lavorato avanti e indietro sui f circolari dal centro davanti. Avviare 163-179-193-211-233-257 m con i f circolari n° 4,5 mm con 2 capi di Alpaca. Inserire un segnapunti all'interno di 44-48-52-56-62-68 m da ogni lato (dietro = 75-83-89-99-109-121 m). Lavorare 8 f a M LEGACCIO – LEGGERE SOPRA, e continuare come segue dal diritto del lavoro: 6 m a m legaccio, M.1 sulle 29-33-37-41-47-53 m successive, 18 m a m legaccio (il segnapunti è al centro di queste m), M.1 sulle 57-65-71-81-91-103 m successive, 18 m a m legaccio (il segnapunti è al centro di queste m), M.1 sulle 29-33-37-41-47-53 m successive, e finire con 6 m a m legaccio. FARE ATTENZIONE ALLA TENSIONE DEL LAVORO! Continuare con il motivo in questo modo, ALLO STESSO TEMPO quando il lavoro misura 5 cm diminuire 1 m a ogni lato delle m a m legaccio a ogni lato lavorando 2 m insieme a dir, ripetere le diminuzioni ogni 2,5 cm per un totale di 5 volte = 143-159-173-191-213-237 m. Ricordarsi delle ASOLE sul bordo davanti destro – LEGGERE SOPRA!! Quando il lavoro misura 20 cm aumentare 1 m a ogni lato delle m a m legaccio a ogni lato, e ripetere gli aumenti ogni 6-6-6-7-7-7 cm per un totale di 3 volte = 155-171-185-203-225-249 m. ALLO STESSO TEMPO quando il lavoro misura 28-28-28-29-29-29 cm lavorare 1 m di M.1 nel bordo davanti (cioè il n° di m rimane lo stesso ma il n° di m a m legaccio sul bordo davanti aumenta e il n° di m in M.1 diminuisce), e ripeterlo ogni 2 cm per un totale di 10-11-13-13-14-15 volte (= 16-17-19-19-20-21 m legaccio sul bordo davanti). Continuare con M.1 e la m legaccio fino a quando il lavoro misura 34-35-36-37-38-39 cm. Ora intrecciare 6 m a ogni lato per lo scalfo (= 3 m a ogni lato del segnapunti) e finire ogni parte in modo separato. DIETRO: = 65-73-79-89-99-111 m. Continuare con M.1 su tutte le m. Intrecciare per lo scalfo a ogni lato all'inizio di ogni f: 2 m 0-1-2-3-4-6 volte e 1 m 0-1-1-3-5-6 volte = 65-67-69-71-73-75 m. Quando il lavoro misura 52-54-56-58-60-62 cm intrecciare le 17-19-21-23-23-25 m centrali per il collo e finire ogni spalla in modo separato. Intrecciare 1 m sulla scollatura sul f successivo = 23-23-23-23-24-24 m rimaste sulla spalla. Intrecciare quando il lavoro misura 54-56-58-60-62-64 cm. DAVANTI SINISTRO: Continuare con la m legaccio sul bordo davanti e M.1 sulle m rimaste. Intrecciare per lo scalfo a lato come descritto per il dietro = 39-40-42-42-44-45 m. Quando il lavoro misura 54-56-58-60-62-64 cm intrecciare le prime 23-23-23-23-24-24 m dal diritto del lavoro per la spalla = 16-17-19-19-20-21 m rimaste sul colletto. Lavorare le m rimaste sul f. Ora lavorare a f accorciati sul colletto (iniziando dal rovescio del lavoro) come segue: * 2 f solo sulle prime 8-8-8-9-9-10 m, 2 f su tutte le m *, ripetere *-* fino a quando il collo misura circa 6-6-7-7-8-8 cm sul lato più corto (misurato dalla spalla). Intrecciare. DAVANTI DESTRO: Come il davanti sinistro, ma specchio. MANICA: Lavorata in tondo con i f a doppia punta. Avviare 44-46-48-50-52-54 m con i f a doppia punta n° 4,5 mm con 2 capi di Alpaca. Inserire un segnapunti all'inizio del giro = centro sotto la manica. Lavorare 8 f a M LEGACCIO – LEGGERE SOPRA, e continuare con M.1 su tutte le m. Quando il lavoro misura 5 cm aumentare 1 m a ogni lato del segnapunti, e ripetere gli aumenti ogni 3-2,5-2-2-1,5-1,5 cm per un totale di 9-11-12-14-15-16 volte = 62-68-72-78-82-86 m. Incorporare le m aumentate in M.1 durante il lavoro. Quando il lavoro misura 35-35-34-34-32-31 cm - NOTA! Meno per le taglie più grandi a causa dell'arrotondamento della manica più lungo e della maggiore ampiezza delle spalle – intrecciare per l'arrotondamento della manica a ogni lato all'inizio di ogni f: 3 m 1 volta, 2 m 3 volte, 1 m 0-1-2-4-5-7 volte, poi 2 m a ogni lato fino a quando il lavoro misura 41-42-42-43-43-44 cm, ora intrecciare 3 m 1 volta a ogni lato e intrecciare le m rimaste. Il lavoro misura circa 42-43-43-44-44-45 cm. CONFEZIONE: Cucire i margini delle spalle. Attaccare le maniche. Cucire il colletto al centro dietro e attaccarlo alla scollatura sul dietro. Attaccare i bottoni. |
|||||||
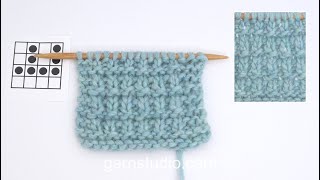
Spiegazioni del diagramma |
|||||||
|
|||||||
 |
|||||||
Avete terminato questo modello?Allora taggate le vostre foto con #dropspattern #maritcardigan o inviatele alla #dropsfan gallery. Avete bisogno di aiuto con questo modello?Troverete 18 video tutorial, una sezione per i commenti/domande e molto altro guardando il modello su www.garnstudio.com © 1982-2026 DROPS Design A/S. Ci riserviamo tutti i diritti. Questo documento, compreso tutte le sue sotto-sezioni, è protetto dalle leggi sul copyright. Potete leggere quello che potete fare con i nostri modelli alla fine di ogni modello sul nostro sito. |
|||||||


Con oltre 40 anni di esperienza nel design di modelli di maglia e uncinetto, DROPS Design offre la più estesa collezione di modelli gratuiti su internet - tradotti in 17 lingue. Ad oggi vi possiamo fornire 324 cataloghi e 12290 modelli - 9561 dei quali sono tradotti in Italiano.
Ci stiamo impegnando molto per darvi il meglio che vi possiamo offrire in termini di maglia e uncinetto, ispirazioni e consigli così come filati di grande qualità ad un prezzo incredibile! Volete utilizzare i nostri modelli per qualcosa d'altro oltre al vostro uso personale? Potete leggere tutto ciò che è consentito nel testo sul Copyright in basso su tutte le pagine dei nostri modelli. Buon lavoro!
Lasciare un commento sul modello DROPS 119-6
Noi saremmo felici di ricevere i tuoi commenti e opinioni su questo modello!
Se vuoi fare una domanda, fai per favore attenzione a selezionare la categoria corretta nella casella qui sotto per velocizzare il processo di risposta. I campi richiesti sono indicati da *.