
Categorie popolari
State cercando un filato?


Commenti / Domande (64)
![]() Susi Lorenzo ha scritto:
Susi Lorenzo ha scritto:
Se puede realizar este patrón en aguja circular sin costuras? Supongo que en en ese caso no se deja el punto de orillo en el cuerpo. Por ejemplo , una talla L serían 240x2= 480 puntos....y luego coincidiría bien para el volante?
27.05.2022 - 06:30DROPS Design ha risposto:
Hola Susi, sí, se haría quitando los puntos orillo. Por lo tanto 240x 2 = 480 puntos MENOS los 4 puntos orillo. Luego no interfiere en el volante, porque las costuras no afectan a los volantes.
29.05.2022 - 22:16
![]() Carmen ha scritto:
Carmen ha scritto:
Hola. Cómo se hace el Lado 2? Porque pone que se hace como el lado 1, pero el lado 1 yo lo empiezo por la sisa con 1pd - 3pjd. Sin embargo el lado 2 la vuelta del derecho la empiezo por el escote. Tengo tambien que hacer 1pd - 3pjd en el escote? Muchas gracias
15.06.2021 - 20:05DROPS Design ha risposto:
Hola Carmen, el Lado 2 se trabaja como el Lado 1, pero a la inversa. Es decir, las disminuciones de la sisa se hacen dónde la sisa y las del escote dónde el escote, manteniendo el número de disminuciones del Lado 1.
15.07.2021 - 00:56
![]() Popcorn ha scritto:
Popcorn ha scritto:
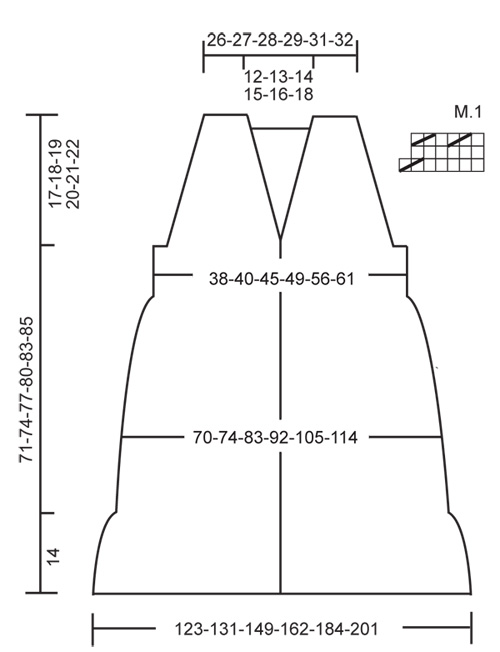
Hi It says see diagram for M1 ... But I don't see any diagram. Where's the diagram please. Thank you
09.11.2020 - 17:15DROPS Design ha risposto:
Dear Popcorn, you will find diagram M.1 near to the measurement chart, just on the right side of chart. Happy knitting!
10.11.2020 - 08:51
![]() Popcorn ha scritto:
Popcorn ha scritto:
I love this pattern but I don\'t like knitting! Its gorgeous. Is there any way I can get a CROCHET pattern version of this?
25.06.2020 - 00:38DROPS Design ha risposto:
Dear Popcorn, there is only a knitted version to this pattern - you will find our crochet tunics here and our crochet dresses here. Happy crocheting!
25.06.2020 - 09:13
![]() Sarah ha scritto:
Sarah ha scritto:
Hallo, ich trage normalerweise Größe M mit einem Brustumfang von ca 98 cm. Laut den Angaben in dieser Anleitung bräuchte ich eine Größe XXL... Kann das tatsächlich stimmen? Vielen Dank und liebe Grüße, Sarah
27.04.2020 - 13:54DROPS Design ha risposto:
Liebe Sarah, die Maßskizze zeigt die fertige Maße vom Top, eine ähnliche Kleidung können Sie messen und damit vergleichen. Mehr über Maßskizze lesen Sie hier. Viel Spaß beim stricken!
27.04.2020 - 14:26
![]() Martina Appel ha scritto:
Martina Appel ha scritto:
Hallo, ich habe das Problem, dass mein Mann sehr dicke Beine und Füße hat. Es darf auf keinen Fall einschneiden. Ich habe für Socken 72 Maschen für den Schaft in Doppelripp angeschlagen und das passt gut, ich weiß aber nicht, wie ich nun die Ferse und den Fuß arbeiten soll. Sein Bein ist am Ende der Schafthöhe 42 cm dich, die Schafthöhe geht von Boden bis Schaftende 15 cm und sein Fuß am Rist hat 29 cm.Können Sie mir helfen? martina-appelatgmx.net
15.02.2020 - 18:18DROPS Design ha risposto:
Liebe Frau Appel, leider können wir jeder Anleitung nach jedem individuellen Frage anpassen und einzelne Modelle auf individuellen Wunsch hin umrechnen. Wenn sie Hilfe damit brauchen, wenden Sie sich bitte an dem Laden wo Sie die Wolle gekauft haben, dort hilft man Ihnen gerne weiter. Viel Spaß beim stricken!
17.02.2020 - 13:15
![]() KK ha scritto:
KK ha scritto:
I looove this! Please can you let me know if you have a CROCHET pattern of it also? Thank you 💝
12.08.2019 - 20:47DROPS Design ha risposto:
Dear KK, you'll find our crocheted dresses here and our crocheted tunics there. Happy crocheting!
13.08.2019 - 08:08
![]() Savanah ha scritto:
Savanah ha scritto:
I don't understand the last instruction on the Decreasing Tip: "K YO into back of loop on next row." What loop does this refer to?
10.11.2018 - 18:13DROPS Design ha risposto:
Dear Savanah, that means you have to knit the YOs into back part of it (behind the needle), so there will be not so big hole in the garment. Happy knitting!
11.11.2018 - 22:32Emma ha scritto:
I'm just starting knitting, I'll work my way to this, but where abouts do you see how many balls you need to buy for each size? Thank you.
02.07.2014 - 12:53DROPS Design ha risposto:
Dear Emma, you will find at the right side of the picture under tab "Materials" the total weight of yarn required, ie for size S eg, you need 400 g Bomull-Lin / 50 g a ball = 8 balls. Happy knitting!
02.07.2014 - 18:41
![]() Mary Jane Coker ha scritto:
Mary Jane Coker ha scritto:
On the M1...do you knit all 3 rows...or do you purl row 2?
28.01.2013 - 03:51DROPS Design ha risposto:
Dear Mrs Mary Jane, M1 is worked back and forth on needle, r1 from RS = K, r2 from WS = P. Happy knitting!
28.01.2013 - 10:45
|
|||||||
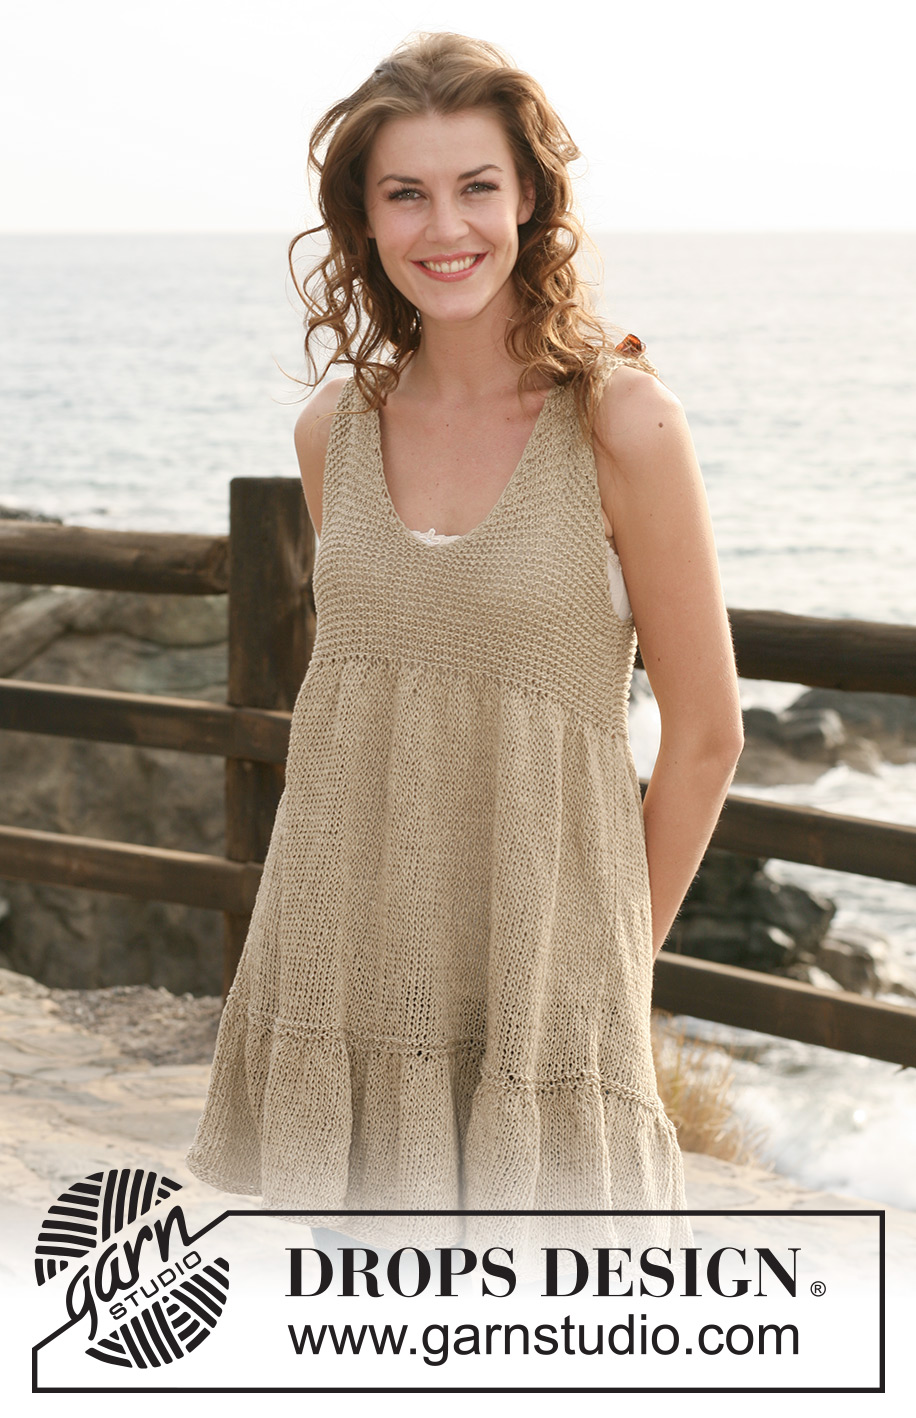
Sunday Morning Stroll#sundaymorningstrolltunic |
|||||||
 |
 |
||||||
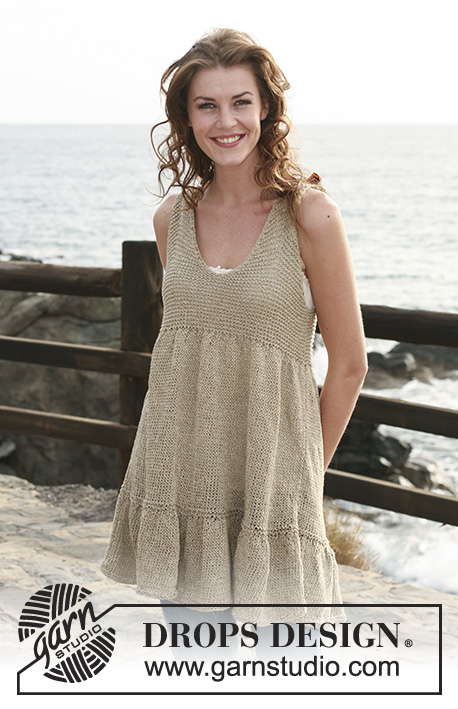
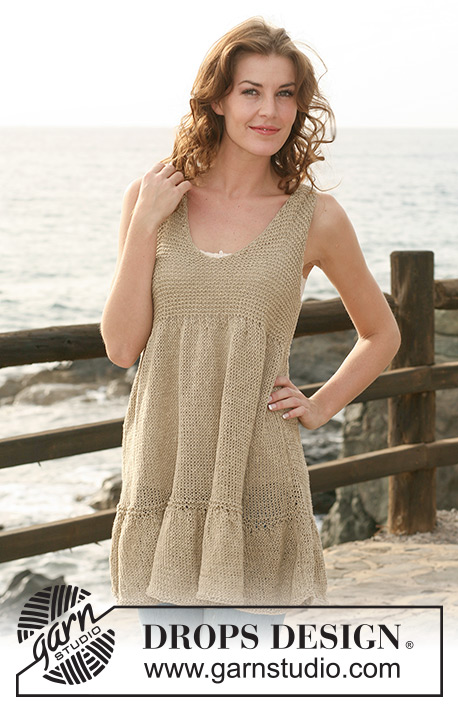
Tunica DROPS con il bordo volant e punto legaccio in "Bomull-Lin". Dalla S alla XXXL.
DROPS 118-3 |
|||||||
|
PUNTO LEGACCIO (avanti e indietro sul f): Lavorare tutti i ferri sul diritto. 1 “cresta” legaccio = 2 ferri a dir. SUGGERIMENTO PER MISURARE: Misurare il lavoro tenendo il lavoro sospeso se no sarà troppo lungo una volta indossato. BORDO VOLANT: Vedere diag M.1 (= 7 m). Il diagramma mostra il motivo sul diritto. DIMINUZIONI: Diminuire per gli scalfi e per lo scollo allo stesso ferro così: 1 m dir, 3 m insieme a dir, lavorare poi le maglie seguenti fino alla maglia con il segnapunti, 1 gettato, lavorare la m con il segnapunti a dir, 1 gettato, lavorare a dir finché non rimangano 4 m, passare 1 m a dir senza lavorarla, 2 m insieme a dir, accavallare la m passata sopra quella lavorata, 1 m dir (= 2 m diminuite sul f). Lavorare i gettati a dir ritorto al ferro seguente. -------------------------------------------------------- DIETRO: Si lavora avanti e indietro sui ferri circolari. Avviare 198-212-240-261-296-324 m (incl. 1 m vivagno ad ogni lato) con i ferri circolari 5,5 e Bomull-Lin. Lavorare 2 creste LEGACCIO – vedere le spiegazioni sopra! Continuare a maglia rasata. VEDERE SUGGERIMENTO PER MISURARE! RICORDARSI LA TENSIONE DEL LAVORO! Quando il lavoro misura 14 cm per tutte le taglie, lavorare il BORDO VOLANT al ferro successivo sul diritto così – vedere le spiegazioni sopra!: 1 m vivagno, M.1 sopra tutte le m finché non rimanga 1 m, terminare con 1 m vivagno. Quando M.1 è stato lavorato 1 volta in altezza ci sono 114-122-138-150-170-186 m sui ferri. Lavorare 1 ferro a rovescio sul rovescio del lavoro. Continuare con i ferri circolari 4. Lavorare 2 creste legaccio, ALLO STESSO TEMPO, distribuire 0-1-3-1-0-2 diminuzioni uniformemente sul 1° ferro = 114-121-135-149-170-184 m. Riprendere i ferri circolari 5,5 e lavorare a maglia rasata. Quando il lavoro misura 45 cm per tutte le taglie, lavorare il ferro successivo così sul diritto: 1 m vivagno, M.1 sopra tutte le maglie finché non rimanga 1 m, terminare con 1 m vivagno. Quando M.1 è stato lavorato 1 volta in altezza ci sono 66-70-78-86-98-106 m sul ferro. Lavorare 1 f rov sul rovescio del lavoro. Continuare con i ferri circolari 4 e continuare a punto legaccio su tutte le m. Quando il lavoro misura 54-56-58-60-62-63 cm intrecciare 3 m 1 volta all’inizio dei 2 ferri successivi per lo scalfo., poi all’inizio di ogni ferro ad ogni lato così: 2 m 3-3-4-5-7-8 volte e 1 m 2-3-4-5-6-7 volte = 44-46-48-50-52-54 m. Intrecciare quando il lavoro misura 69-72-75-78-81-83 cm. DAVANTI: Avviare e lavorare come per il dietro. Quando il lavoro misura 54-56-58-60-62-63 cm (= 66-70-78-86-98-106 m) intrecciare per lo scalfo 2-2-2-4-4-4 m all’inizio dei 2 ferri successivi = 62-66-74-78-90-98 m. Trasferire la metà delle m su un fermamaglie/filo (= 31-33-37-39-45-49 m). Terminare ogni parte separatamente. 1° parte: Inserire 1 segnapunti nella m centrale (la 16°-17°-19°-20°-23°-25°m). Continuare a punto legaccio, ALLO STESSO TEMPO, intrecciare per lo scalfo e lo scollo al 1° ferro sul diritto – VEDERE DIMINUZIONI! Ripetere queste diminuzioni ogni 4 ferri in totale 10-11-12-13-14-15 volte = 11-11-13-13-17-19 m. Continuare a punto legaccio sopra queste maglie per la bretella. Intrecciare quando il lavoro misura 73-76-79-82-85-87 cm (il davanti è più lungo del dietro perché le bretelle passano sopra le spalle e ricoprono il dietro per 2 cm). 2° parte: Lavorare come la 1° parte. CONFEZIONE: Cucire le bretelle del davanti alle 11-11-13-13-17-19 m ai lati del dietro. Cucire nella m vivagno. |
|||||||
Spiegazioni del diagramma |
|||||||
|
|||||||
 |
|||||||
Avete terminato questo modello?Allora taggate le vostre foto con #dropspattern #sundaymorningstrolltunic o inviatele alla #dropsfan gallery. Avete bisogno di aiuto con questo modello?Troverete 17 video tutorial, una sezione per i commenti/domande e molto altro guardando il modello su www.garnstudio.com © 1982-2026 DROPS Design A/S. Ci riserviamo tutti i diritti. Questo documento, compreso tutte le sue sotto-sezioni, è protetto dalle leggi sul copyright. Potete leggere quello che potete fare con i nostri modelli alla fine di ogni modello sul nostro sito. |
|||||||


Con oltre 40 anni di esperienza nel design di modelli di maglia e uncinetto, DROPS Design offre la più estesa collezione di modelli gratuiti su internet - tradotti in 17 lingue. Ad oggi vi possiamo fornire 324 cataloghi e 12290 modelli - 9561 dei quali sono tradotti in Italiano.
Ci stiamo impegnando molto per darvi il meglio che vi possiamo offrire in termini di maglia e uncinetto, ispirazioni e consigli così come filati di grande qualità ad un prezzo incredibile! Volete utilizzare i nostri modelli per qualcosa d'altro oltre al vostro uso personale? Potete leggere tutto ciò che è consentito nel testo sul Copyright in basso su tutte le pagine dei nostri modelli. Buon lavoro!
Lasciare un commento sul modello DROPS 118-3
Noi saremmo felici di ricevere i tuoi commenti e opinioni su questo modello!
Se vuoi fare una domanda, fai per favore attenzione a selezionare la categoria corretta nella casella qui sotto per velocizzare il processo di risposta. I campi richiesti sono indicati da *.