
Categorie popolari
State cercando un filato?


Commenti / Domande (13)
![]() Alex ha scritto:
Alex ha scritto:
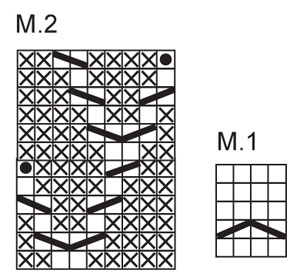
With the M1 and M2 patterns please can you just confirm to me that the pattern M1 goes over 5 rows (so the blanks are all K) and the only change is in row 2 where you have the slip 2 sts on needle behind piece, k2 k2 from needle and that M2 pattern is 12 rows long?
08.03.2018 - 15:34DROPS Design ha risposto:
Dear Alex, that's right, M.1 is worked over 4 sts and 5 rows. On round 2 work 3rd symbol, ie: slip 2 sts on cable needle in front of piece, K2, K2 from cable needle. M.2 is 12 rows. Happy knitting!
08.03.2018 - 15:41
![]() Alex ha scritto:
Alex ha scritto:
Hi, sorry for being a bit dumb, but I am fairly new, is the M1 pattern an invisible stitch increase please. And the M2, I am very confused about, I looked on you tube, can you direct me to videos please
08.03.2018 - 14:59DROPS Design ha risposto:
Dear Alex, start reading diagrams from the bottom corner on the right side towards the left on every round. You will find related videos showing each technique for the cables in the diagram. In round 2 in M.1 work: slip 2 sts on cable needle in front of piece, K2, K2 from cable needlee. Read M.2 the same way checking each symbol under diagram key. Happy knitting!
08.03.2018 - 15:38
![]() Cora W. ha scritto:
Cora W. ha scritto:
Soll beim Stricken der Abnahmen der Mütze (ab 24cm Länge) pro Runde je eine Abnahme in M1 erfolgen oder sollen alle Abnahmen in einer Runde erfolgen und dann bis zu einer Länge von 27cm weiter gestrickt werden? Vielen Dank!
05.12.2017 - 10:53DROPS Design ha risposto:
Liebe Cora, nach 24 cm nehmen Sie die Maschen in M.1 ab, dh die 4 M in M.1 so stricken: (2 M rechts zusammen x 2) = 2 M werden in jedem M.1 abgenommen, dh 8 M werden insgesamt abgenommen = 46-50 M bleiben noch. Die Maschen dann weiter stricken wie sie erscheinen, und nach 27 cm, 1 Rd rechts stricken und alle Maschen (2 M rechts zs) stricken. Viel Spaß beim stricken!
05.12.2017 - 11:26
![]() PATRICIA ha scritto:
PATRICIA ha scritto:
Bonjour, Je trouve les explications incompréhensibles à partir du rang 6 avec M1/M2. Ce n'est pas clair.
05.09.2016 - 18:03DROPS Design ha risposto:
Bonjour Patricia, quand vous tricotez M.1 et M.2, répétez les diagrammes en hauteur, c'est-à-dire que quand M.1 est terminé, reprenez au 1er rang de M.1 et continuez M.2 - quand M.2 est terminé 1 fois en hauteur, reprenez au 1er rang, et continuez M.1 comme avant, et ainsi de suite. Bon tricot!
06.09.2016 - 08:43
![]() Agnes ha scritto:
Agnes ha scritto:
Hei! I flettene over to masker strikkes det 1m rett,1 maske vrang med hjelpepinne. I videoene om hvordan strikke flette uten hjelpepinne, strikkes det kun rettmasker. Hva skal jeg bruke i oppskriften? Ser en forskjell? Jeg har problemer med å strikke vrang på grunn av maskenes plassering, når jeg strikker flette over to masker uten hjelpepinne. hva skal jeg gjøre?
25.04.2016 - 17:23DROPS Design ha risposto:
Hej Agnes. Videoen er en standard der viser hvordan du fletter. Du skal fölge mönstret som det staar: sett 2 m på hj.p foran arb, strikk 2 rett, strikk 2 rett fra hj.p, sett 1 m på hj.p bak arb, 1 r, 1 vr fra hj.p og sett 1 m på hj.p foran arb, 1 vr 1 r fra hj.p.
26.04.2016 - 13:54
![]() Carol Crosbie ha scritto:
Carol Crosbie ha scritto:
What is the direction for the V symbol in the graph? The upside down V is the cable, but there is not a definition in the above legend for the V. Thanks
14.11.2012 - 00:42DROPS Design ha risposto:
Dear Mrs Crosbie, there are 2 symbols : \ and / which are forming this "V". Happy Knitting!
14.11.2012 - 09:22
![]() Drops Design France ha scritto:
Drops Design France ha scritto:
Bonjour Sylvie, le diagramme est juste tel qu'il est présenté. Pour toute aide, n'hésitez pas à demander à votre distributeur ou à vous adresser sur le forum DROPS.
03.10.2011 - 09:06Sylvie ha scritto:
Je n'arrive pas à remproduire ce patron tel que demandé. Y'a-t-il un erreur dans ce patron?
02.10.2011 - 05:09
![]() Marie-Louise ha scritto:
Marie-Louise ha scritto:
Modèle très agréable à tricoter et qui monte vite
05.11.2009 - 16:13
![]() Elisabeth ha scritto:
Elisabeth ha scritto:
Rigtig flot Eskimo er bestemt noget lækkert garn at strikke med
30.06.2009 - 06:17
|
|||||||||||||||||||
Winter Bloom |
|||||||||||||||||||
|
|
|||||||||||||||||||
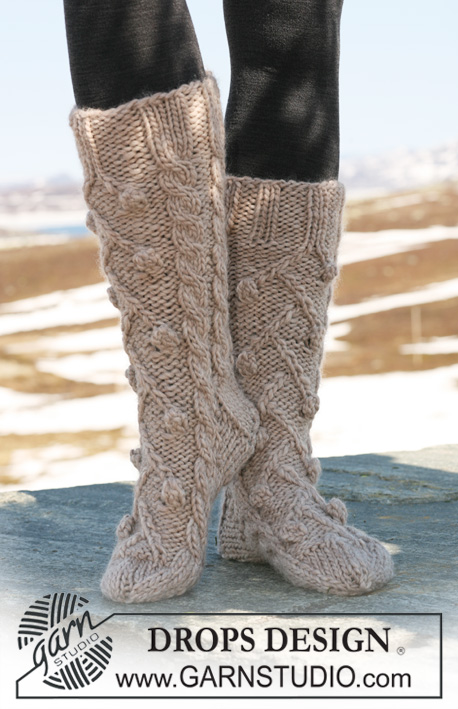
Completo formato da: cappello e scaldapolsi DROPS lavorati ai ferri con trecce in ”Snow”.
DROPS 116-41 |
|||||||||||||||||||
|
CAPPELLO: MOTIVO: Vedere i diagrammi M.1 e M.2. ------------------------------------- CAPPELLO: Lavorato in tondo con i f a doppia punta. Avviare 62-66 m con i ferri a doppia punta n° 8 mm con Snow. Continuare come segue: * 4 m dir, 2-3 m rov, 2 m dir, 3 m rov, 2 m dir, 4-5 m rov, 4 m dir, 2 m rov, 2 m dir, 2 m rov, 2 m dir, 2 m rov *, ripetere fino a quando il lavoro misura 4 cm (= 2 volte). Continuare come segue: M.1 (= 4 m), 2-3 m rov, M.2 (= 9 m), 2-3 m rov, M.1, 10 m rov, M.1, 2-3 m rov, M.2, 2-3 m rov, M.1, 10 m rov. Continuare con il motivo in questo modo, ALLO STESSO TEMPO quando il lavoro misura 17 cm diminuire 1 m in ognuna delle sezioni con 10 m rov, e ripetere le diminuzioni ogni 2 cm per un totale di 4 volte (diminuire all'inizio e alla fine delle sezioni a rov in modo alternato) = 54-58 m. Quando il lavoro misura 24 cm lavorare 2 m insieme a dir su tutte le m in tutte le ripetizioni di M.1 = 46-50 m. Quando il lavoro misira 27 cm lavorare 2 m insieme a dir per tutto il giro = 23-25 m. Far passare il filo attraverso le m rimaste e affrancare. ---------------------------------------------------- SCALDAPOLSI: MOTIVO: Vedere i diagrammi M.1 e M.2. SCALDAPOLSI: Lavorato in tondo con i f a doppia punta. Avviare 27 m con i f a doppia punta n° 8 mm con Snow. Continuare come segue: 4 m dir, 3 m rov, 2 m dir, 3 m rov, 2 m dir, 5 m rov, 4 m dir, 4 m rov fino a quando il lavoro misura 4 cm. Ora continuare come segue: M.1 (= 4 m), 3 m rov, M.2 (= 9 m), 3 m rov, M.1, 4 m rov. Continuare con il motivo in questo modo fino a quando il lavoro misura 20 cm, e ora continuare come segue: 4 m dir, 3 m rov, 2 m dir, 3 m rov, 2 m dir, 5 m rov, 4 m dir, 4 m rov. Intrecciare con dir su dir e rov su rov quando il lavoro misura 24 cm. |
|||||||||||||||||||
Spiegazioni del diagramma |
|||||||||||||||||||
|
|||||||||||||||||||
 |
|||||||||||||||||||
Avete terminato questo modello?Allora taggate le vostre foto con #dropspattern o inviatele alla #dropsfan gallery. Avete bisogno di aiuto con questo modello?Troverete 13 video tutorial, una sezione per i commenti/domande e molto altro guardando il modello su www.garnstudio.com © 1982-2026 DROPS Design A/S. Ci riserviamo tutti i diritti. Questo documento, compreso tutte le sue sotto-sezioni, è protetto dalle leggi sul copyright. Potete leggere quello che potete fare con i nostri modelli alla fine di ogni modello sul nostro sito. |
|||||||||||||||||||


Con oltre 40 anni di esperienza nel design di modelli di maglia e uncinetto, DROPS Design offre la più estesa collezione di modelli gratuiti su internet - tradotti in 17 lingue. Ad oggi vi possiamo fornire 324 cataloghi e 12290 modelli - 9561 dei quali sono tradotti in Italiano.
Ci stiamo impegnando molto per darvi il meglio che vi possiamo offrire in termini di maglia e uncinetto, ispirazioni e consigli così come filati di grande qualità ad un prezzo incredibile! Volete utilizzare i nostri modelli per qualcosa d'altro oltre al vostro uso personale? Potete leggere tutto ciò che è consentito nel testo sul Copyright in basso su tutte le pagine dei nostri modelli. Buon lavoro!
Lasciare un commento sul modello DROPS 116-41
Noi saremmo felici di ricevere i tuoi commenti e opinioni su questo modello!
Se vuoi fare una domanda, fai per favore attenzione a selezionare la categoria corretta nella casella qui sotto per velocizzare il processo di risposta. I campi richiesti sono indicati da *.