
Categorie popolari
State cercando un filato?


Commenti / Domande (73)
![]() Sharon ha scritto:
Sharon ha scritto:
Hi, this is strange. Started this sweater from scratch and am getting 21 sts per inch, but the width at the bottom of the sweater is 107. Rows per inch am n not getting so more yarn I know I have to shop, but I do t understand the width which is 107 with the correct stitch gauge.
30.04.2024 - 10:52DROPS Design ha risposto:
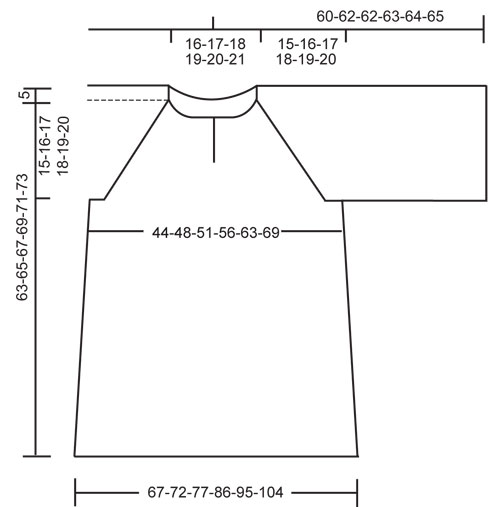
Dear Sharon, not sure which size you are working on, but with 21 sts = 10 cm/4", the 280-304-328-360-400-440 sts cast on should be approx. 133-145-155-172-190-210 cm in circumference, ie approx. 67-72-77-86-95-104 cm measured flat from side to side - just as shown in chart. Can this help?
30.04.2024 - 11:23
![]() Sharon Hunt-Edwards ha scritto:
Sharon Hunt-Edwards ha scritto:
Is the width on the lower part of this sweater 40 all around or 80? Sorry I work so I cannot go to the yarn store for help. Everytime. I was told in a response to a question about row gauge. I always swatch and did I did 3 times for this project and row gauge is not an achievable for me am not way off. Gauge is too long. What do I do here. Thank you.
25.04.2024 - 10:38DROPS Design ha risposto:
Dear Mrs Hunt-Edwards, all measurements are taken flat, from side to side, ie the bottom width is here 67-104 cm, ie 134-208 cm circumference. Read more about charts here, in this kind of garment, if your tension in height is not exactly the same, it might not be a problem as you can adjust to the measurments in cm, but remember that the total amount of yarn might be affected. Happy knitting!
25.04.2024 - 12:36
![]() Sharon Hunt-Edwards ha scritto:
Sharon Hunt-Edwards ha scritto:
Hi, am working on this sweater and need more yarn because I did not get rows per inch. Usually I would make size 52 which is not an option here. The sweater size I chose is 54 so this is a bit larger which is ok. Do I still need to knit an extra row between increases in this case?
20.04.2024 - 21:05DROPS Design ha risposto:
Dear Sharon, please do a gauge swatch and compare to the pattern and the diagram. If your gauge swatch matches the tension given in the pattern for rows as well, you should get the proper size, if you follow the pattern. If you are still unsure, you can always ask for help either over the phone or in person, in the store where you bought your DROPS yarn from. Happy Knitting!
20.04.2024 - 23:00
![]() Sharon Hunt ha scritto:
Sharon Hunt ha scritto:
Where the pattern says to do to decreases on body and not sleeves refers to the first part of decrease tip and 2 rounds? Please explain am not sure I understand. Thank you
13.04.2024 - 09:20DROPS Design ha risposto:
Dear Sharon, the decreasing tip only indicates how to work each decrease, both before and after the marker, not when to work them. You have the markers in the transitions between the body pieces and the sleeves. The first 2 rows with decreases (included in the total of times indicated later) you will only decrease on one side of the marker, the side in which you have the body pieces. For example, in the marker between the left sleeve and the front piece, decrease on the side of the front piece stitches. Happy knitting!
14.04.2024 - 23:19
![]() Sharon Hunt-Edwards ha scritto:
Sharon Hunt-Edwards ha scritto:
How many balls of yarn does it take to make this sweater. Am asking because 1 bought 21 ball of yarn per pattern, unless I calculated incorretly, and i have just 8 balls left. I used the yarn called for in the patteren and am getting row and stitch gauge. Yarn left won’t be enough to complete the sleeves and yoke. I took the 1050 divided by 50 to get the amount I needed. Is this incorrect? Please advise as I d not want to make same mistake again. Not sure if I will get same dyelot.
06.04.2024 - 10:42DROPS Design ha risposto:
Dear Sharon, the amount should be correct: 1050gr for the largest size in total and each ball is 50gr, so you should need 21 balls. Have you used 13 balls only for the body section? It should be half the balls for the body and half for the rest, approximately. Is the length and width of the body correct? Please check all of these first, before continuing. In case you still can only use these 8 balls, start working the sleeves and check the remaining balls; you could have approx. 3 balls for the yoke which could be enough. Happy knitting!
07.04.2024 - 21:08
![]() Annika ha scritto:
Annika ha scritto:
Hej! Stickar L, behöver förstå OK raglan avmaskningen. Står maska av vartannat varv 16ggr, varje varv 27ggr men att det är några varv som det ej avmaskas. Ska det maskas av på ärmar 16ggr? På fram/bak 27ggr? Sen sista 10ggr på vartannat varv maskas det inte av på ärm? Hur många gånger på ett varv ska det avmaskas? 8ggr dvs både på ärm och fram/bak? Är det vissa varv som det bara är avmaskning på fram/bak men inte på ärmen eller tvärt om? Mvh, Annika
30.03.2024 - 19:34DROPS Design ha risposto:
Hej Annika, du minskar för raglan på vartannat v 16 ggr, MEN de 2 første gange minskar du endast på fram och bakst. Når du er klar med de 16 ggr (32varv), minskar du till raglan på varje varv :)
05.04.2024 - 12:08
![]() Sharon Hunt-Edwards ha scritto:
Sharon Hunt-Edwards ha scritto:
Hello? 👋 how many balls of yarn are used before the armhole shaping on this sweater am concerned that maybe it’s not enough. Knitting to gauge.
28.03.2024 - 21:00DROPS Design ha risposto:
Dear Sharon, since the exact amount of yarn depends on many factors 8size, your personal gauge, etc), we cannot tell you exactly how many balls you are using until the armholes. Happy Knitting!
29.03.2024 - 08:33
![]() Ewelina ha scritto:
Ewelina ha scritto:
Witam!! Jestem na etapie łączenia tyłu, przodu z rękawami - gdzie teraz będzie się znajdować początek rzędu? Pozdrawiam
22.02.2022 - 13:59DROPS Design ha risposto:
Witaj Ewelino, nie jest do dookreślone. Ja umieściłabym ten 1 dodatkowy marker na początek okrążenia na środku przodu (tam gdzie robótka będzie dzielona, aby powstało pęknięcie przy dekolcie). Użyj markera w innym kolorze niż te na oznaczenie reglanów. Miłej pracy!
22.02.2022 - 15:04
![]() Ilka Keller ha scritto:
Ilka Keller ha scritto:
Wie lautet die Rückenabnahme (Halsausschnitt )?
23.01.2022 - 16:02DROPS Design ha risposto:
Liebe Frau Keller, bei diesem Modell wird man nur Maschen für das Halsauschnitt am Vorderteil abketten, nicht für Rückenteil. Viel Spaß beim stricken!
24.01.2022 - 09:49
![]() Manuela Hauenstein ha scritto:
Manuela Hauenstein ha scritto:
Ich stricke die Tunika in XXXL, Leider stimmt die Mengenangabe überhaupt nicht..... Habe xmal kontrolliert, ob ICH etwas falsch gemacht habe. Habe jetzt zweimal nachbestellt, das ist sehr ärgerlich! Vielleicht prüft ihr einmal die Mengenangabe nach? Ansonsten bin und bleibe ich ein treuer Fan
14.04.2021 - 22:53
|
|
Nicola#nicolatunic |
|
|
|
|
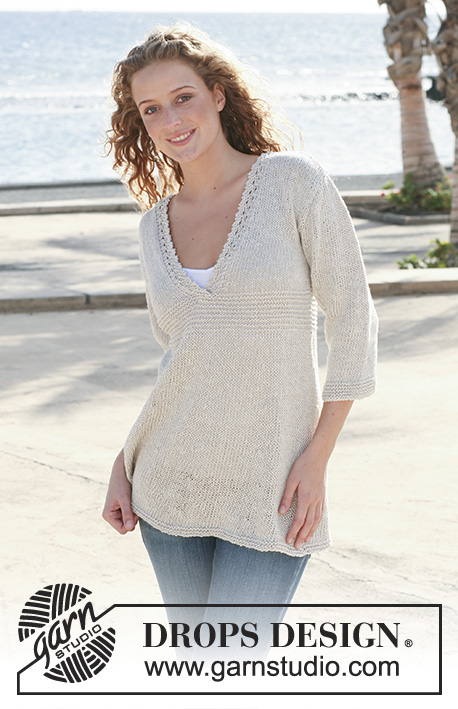
Tunica DROPS ai ferri, con sprone e maniche raglan a coste, in "Muskat". Taglie: Dalla S alla XXXL.
DROPS 112-3 |
|
|
PUNTO LEGACCIO (avanti e indietro sui ferri): Lavorare tutti i ferri a dir. PUNTO LEGACCIO (in tondo): Lavorare * 1 giro a dir e 1 giro a rov *, ripetere da *-*. SUGGERIMENTO PER IL LAVORO: Se la tensione del lavoro è troppo stretta, il raglan sarà troppo corto e gli scalfi troppo stretti. Si può correggere lavorando, a intervalli regolari, 1 giro aggiuntivo senza diminuzioni tra i giri con diminuzioni. SUGGERIMENTO PER LE DIMINUZIONI (per il raglan): Diminuire sul diritto del lavoro, come segue: Prima del segno: lavorare 2 m insieme a dir. Dopo il segno: passare 1 m a dir senza lavorarla, 1 m dir, accavallare la m passata sulla m lavorata. Diminuire sul rovescio del lavoro (dopo aver diviso il lavoro per lo scollo), come segue: Prima del segno: lavorare 2 m insieme a rov ritorto. Dopo il segno: lavorare 2 m insieme a rov. ------------------------------------------------------ DAVANTI e DIETRO: Si lavorano in tondo sui ferri circolari. Avviare 280-304-328-360-400-440 m sui ferri circolari n° 4 con il filato Muskat. Lavorare 2 giri a maglia rasata, 4 giri a punto legaccio - vedere le indicazioni sopra; proseguire a maglia rasata. Quando il lavoro misura 41 cm, passare ai ferri circolari n° 2,5; lavorare 1 giro a dir e proseguire a coste 1 m dir / 1 m rov. Inserire 2 segni nel lavoro a distanza di 140-152-164-180-200-220 m l’uno dall’altro (i segni indicano i lati). Quando il lavoro misura 48-49-50-51-52-53 cm, intrecciare 10 m da ciascun lato per lo scalfo (= intrecciare quindi le 5 m che precedono e le 5 m che seguono ognuno dei due segni) = 260-284-308-340-380-420 m. Lasciare il lavoro in sospeso e proseguire con le maniche. MANICHE: Si lavorano in tondo sui ferri a doppia punta. Avviare 112-118-124-130-136-142 m sui ferri a doppia punta n° 4 con il filato Muskat. Inserire un segno all’inizio del giro (= centro, sotto la manica). Lavorare 2 giri a maglia rasata, 4 giri a punto legaccio e proseguire a maglia rasata. Quando il lavoro misura 14 cm, passare ai ferri a doppia punta n° 2,5, lavorare 1 giro a maglia rasata e proseguire a coste 1 m dir / 1 m rov. Quando il lavoro misura 37-37-36-36-35-35 cm, intrecciare le 5 m che precedono e le 5 m che seguono il segno = 102-108-114-120-126-132 m. Lasciare il lavoro in sospeso e lavorare la seconda manica. SPRONE: Vedere il SUGGERIMENTO PER IL LAVORO! Trasferire le m delle maniche sullo stesso ferro circolare n° 2,5 usato per lavorare il dietro e il davanti, nel punto in cui sono state chiuse le m per gli scalfi = 464-500-536-580-632-684 m Inserire un segno in corrispondenza di ogni passaggio tra le maniche e il davanti / dietro = 4 segni. Proseguire a coste, 1 m dir / 1 m rov, ALLO STESSO TEMPO diminuire per il raglan come segue – vedere il SUGGERIMENTO PER LE DIMINUZIONI! ATTENZIONE! Fare le prime 2 diminuzioni solo sul davanti e sul dietro ma non sulle maniche. Diminuire ogni 2 ferri per un totale di 15-15-16-16-17-17 volte e poi ad ogni ferro per 22-25-27-30-32-35 volte. ATTENZIONE! Nel corso dei ferri senza diminuzioni lavorare 1 m dir da ciascun lato dei segni, sul diritto del lavoro. ALLO STESSO TEMPO, quando il lavoro misura 49-50-51-52-53-54 cm dividere il lavoro al centro davanti e proseguire avanti e indietro come segue: 5 m a punto legaccio, * 1 m dir / 1 m rov *, ripetere da *-* finché non rimangono 5 m, 1 m dir, 4 m a punto legaccio e avviare 1 nuova m alla fine della riga. Proseguire lavorando 5 m a punto legaccio da ciascun lato verso il centro e le restanti m come prima. ALLO STESSO TEMPO, quando il lavoro misura 57-58-59-60-61-62 cm mettere in attesa su un ferma maglie, per lo scollo, le 11-14-17-20-27-34 m da ciascun lato verso il centro. Intrecciare per lo scollo da ciascun lato, all’inizio di ogni ferro, come segue: 2 m 4-4-4-5-5-5 volte e 1 m 5 volte. Terminate tutte le diminuzioni, sul ferro ci sono 129-135-141-151-165-179 m. Riprendere ora 33-36-39-42-49-56 m (comprese le maglie messe in attesa sul ferma maglie) lungo lo scollo da ciascun lato = 195-207-219-235-263-291 m. Lavorare 2 ferri a dir; ALLO STESSO TEMPO diminuire 31-37-41-51-73-93 m in modo uniforme nel corso del primo ferro = 164-170-178-184-190-198 m. Intrecciare le m. CONFEZIONE: Cucire le aperture sotto le maniche. BORDO ALL’UNCINETTO: Con l’uncinetto n° 4, lavorare un bordo intorno allo scollo, come segue: 1 m.b nella prima m, * 3 cat, saltare ca. 1-1,5 cm, 1 m.b nella m successiva *, ripetere da *-*. All’estremità superiore dello scollo, su entrambi i lati, lavorare un cordino come segue: avviare 60 cat, girare il lavoro e lavorare 1 m.bss in ogni cat. Tagliare e fermare il filo. |
|
 |
|
Avete terminato questo modello?Allora taggate le vostre foto con #dropspattern #nicolatunic o inviatele alla #dropsfan gallery. Avete bisogno di aiuto con questo modello?Troverete 31 video tutorial, una sezione per i commenti/domande e molto altro guardando il modello su www.garnstudio.com © 1982-2026 DROPS Design A/S. Ci riserviamo tutti i diritti. Questo documento, compreso tutte le sue sotto-sezioni, è protetto dalle leggi sul copyright. Potete leggere quello che potete fare con i nostri modelli alla fine di ogni modello sul nostro sito. |


Con oltre 40 anni di esperienza nel design di modelli di maglia e uncinetto, DROPS Design offre la più estesa collezione di modelli gratuiti su internet - tradotti in 17 lingue. Ad oggi vi possiamo fornire 324 cataloghi e 12290 modelli - 9561 dei quali sono tradotti in Italiano.
Ci stiamo impegnando molto per darvi il meglio che vi possiamo offrire in termini di maglia e uncinetto, ispirazioni e consigli così come filati di grande qualità ad un prezzo incredibile! Volete utilizzare i nostri modelli per qualcosa d'altro oltre al vostro uso personale? Potete leggere tutto ciò che è consentito nel testo sul Copyright in basso su tutte le pagine dei nostri modelli. Buon lavoro!
Lasciare un commento sul modello DROPS 112-3
Noi saremmo felici di ricevere i tuoi commenti e opinioni su questo modello!
Se vuoi fare una domanda, fai per favore attenzione a selezionare la categoria corretta nella casella qui sotto per velocizzare il processo di risposta. I campi richiesti sono indicati da *.