
Categorie popolari
State cercando un filato?


Commenti / Domande (44)
![]() Florentina ha scritto:
Florentina ha scritto:
Vorrei realizzare questo progetto con COTTON MERINO, che ferri mi suggerite di usare per mantenere la forma del lavoro?
20.07.2025 - 18:48DROPS Design ha risposto:
Buonasera Fiorentina, Cotton Merino appartiene ad un gruppo filati diverso da quello dei filati utilizzati in questo modello e ha un diverso spessore: provi a lavorare un campione e adatti la lavorazione al suo campione. Buon lavoro!
21.07.2025 - 23:04
![]() Jenny ha scritto:
Jenny ha scritto:
Hoeveel draden drops kid silk heb je nodig voor dit patroon? Als je geen alpaca gebruikt?
31.01.2025 - 10:28DROPS Design ha risposto:
Dag Jenny,
Dag zou je 2 keer zoveel Kid-Silk nodig hebben als dat aangegeven staat en dus met een dubbele draad Kid-Silk breien.
05.02.2025 - 20:26
![]() Paula Mena Santos ha scritto:
Paula Mena Santos ha scritto:
Buenos días: Quisiera tejer este modelo pero sin utilizar el hilo de mohair y para la temporada de primavera (ni mucho calor ni mucho frío). ¿podrían aconsejarme un material adecuado? Muchas gracias!
17.04.2021 - 12:14DROPS Design ha risposto:
Hola Paula, te propongo utlizar los hilos del grupo de lanas C (solo un hilo), por ejemplo: DROPS Bomull-Lin, DROPS Paris, DROPS Loves You 8 (algodon) o DROPS Air. Buen trabajo!
21.04.2021 - 14:46
![]() Katherine Finch ha scritto:
Katherine Finch ha scritto:
Thanks! I won’t worry about the stitch difference of only 1, LOL. It was for the XL if you look, going from 227 to 226. I’m knitting with an alpaca, wool and silk yarn - Terra by The Fibre Company. Is it OK if I don’t use that extra piece of silk thread/yarn? I was able to obtain gauge without it. Thank you again!
13.04.2021 - 03:13DROPS Design ha risposto:
Dear Katherine, please understand that these patterns are made available to support DROPS yarn which they are desiged for, therefore we cannot advise you about using different brands. Happy Knitting!
14.04.2021 - 00:40
![]() Katherine Finch ha scritto:
Katherine Finch ha scritto:
Hi, I love this sweater and want to knit it correctly. I have a few questions. 1 - what is the thread you are referring to and when it it used? 2-I see that there\'s a decrease by 1 stitch in the first three rows (I am knitting an XL) - but for the life of me I can\'t figure out where the decrease is. 3 - is there any certain cast on method you recommend for this pattern? Thanks! - Katz Lee Finch
12.04.2021 - 23:18DROPS Design ha risposto:
Dear Katherine, by "thread" the pattern means the the two different yarn used (Drops Alpaca and DROPS Kid Silk). The piece is knitted with one of each held together. Any method of cast on is fine, probably teh simplest long tail cast on is the best for the piece. As for that one stitch, I don't think it is really that important if it is one stitch more or less, but I will check with the design team. Happy Knitting!
13.04.2021 - 01:27
![]() Martine ha scritto:
Martine ha scritto:
Pour le raglan, comment faire les diminutions sur l'envers ? La tension est trop serrée, et il est conseillé de faire un rang supplémentaire à intervalles réguliers sans diminutions. Qu'entend-on par intervalles réguliers ? Est-ce que je dois faire 2 rangs sans diminutions et les diminutions au 3e rang ?
17.02.2021 - 09:48DROPS Design ha risposto:
Bonjour Martine, s'il vous faut plus que 19 rangs pour avoir 10 cm, vous devrez tricoter davantage de rangs pour l'empiècement que le nombre total indiqué, recalculez le nombre de rangs nécessaire pour votre taille pour la hauteur par rapport à votre propre tension et adaptez les diminutions du raglan tous les 4 rangs par ex si besoin (au lieu de tous les 2 rangs). Votre magasin saura vous assister si besoin, même par mail ou téléphone. Bon tricot!
17.02.2021 - 13:47
![]() Niina Indrikson ha scritto:
Niina Indrikson ha scritto:
Kui ma koon kehaosa (esiliist+177 s parempidi+esiliist), siis kuidas ma koon 2. rida (töö PH): kas pahempidised silmused parempidi ( siis jääb töö PP ripskude) või pahempidi (siis jääb töö PP parempidine kude)? Edasi on kõik selge.
30.10.2019 - 10:59DROPS Design ha risposto:
Tere Pr. Indrikson! Juhendis tehakse nööbiliistusilmused 1x1 soonikkoes, kehaosal tehakse paar rida parempidises koes, siis paar rida 1x1 soonikut ja jätkatakse parempidises koes. Aga kuna parempidised read kipuvad rullima, siis võiks kohe alustada 4 rida soonikuga ning jätkata parempidises koes. Head kududmist!
30.10.2019 - 13:40
![]() Mischa ha scritto:
Mischa ha scritto:
Ik had 321 steken na alle minderingen 21+3=24x8 (4 markeerdraden x 2) = 192 steken - 2 alleen lijf= 190 hou ik 131 steken over dan moet ik nog voor de hals 2 (links en rechts) x 8 minderen = 115 st. blijven over. Waar slaan 77 steken op? En hoe kan ik aan 139 steken komen terwijl ik na de minderingen raglan op 131 zat? Dank
04.02.2019 - 00:31DROPS Design ha risposto:
Dag Mischa
De 77 steken slaan op de steken die je over hebt nadat je steeds geminderd hebt aan beide kanten voor de hals (zodat de hals aan de achterkant hoger wordt. Je neemt daarna weer steken op. Als je aan elke kant 31 steken opneemt heb je (31 + 31 + 77=) 139 steken op de naald.
08.02.2019 - 17:26
![]() Mischa ha scritto:
Mischa ha scritto:
Ik begrijp de instructie niet vanaf "Wanneer alle minderingen gedaan zijn.... 131 st." Na alle minderingen zijn er 321 - 190 steken (24 minderingen x 4 - 2 alleen het lijf)= 131 steken?
31.01.2019 - 19:26DROPS Design ha risposto:
Dag Mischa,
Als je klaar bent met de minderingen zijn dit het aantal steken die je op de naald hebt. Daarna zet je de steken van de hulpdraden er weer bij op en neem je steken op langs de hals (waar afgekant was) zodat je in totaal 131 steken op de naald hebt. Met deze steken brei je 6 ribbels.
03.02.2019 - 11:43
![]() Francesca Haydon ha scritto:
Francesca Haydon ha scritto:
I have got as far as the section named ‘yoke’ and have got the sleeves onto the same needles as the body and I have inserted markers. I’m knitting the largest size so understand I have to decrease the body . Every forth row I decrease by 3 stitches and on the other rows 31 times. Where do I make the decreases? How many stitches do I knit as normal and how many do I knit together ? It mentions rows with no decreases... so is it decrease by 31, 0, 31, 3? I am not experienced
29.12.2018 - 17:22DROPS Design ha risposto:
Dear Mrs Haydon, in the largest size you have 435 sts, dec first only on front and back pieces (= 4 sts dec) = 431 sts. Work 3 rows and dec on next row on front and back pieces again (4 sts dec) = 427 sts. Then dec on body and sleeves every 4th row 1 more time (= 8 sts dec) and every 2nd row 31 times (8 sts dec x 31 times = 248 sts dec ). Happy knitting!
02.01.2019 - 12:10
|
|
Abril#abrilcardigan |
|
|
|
|
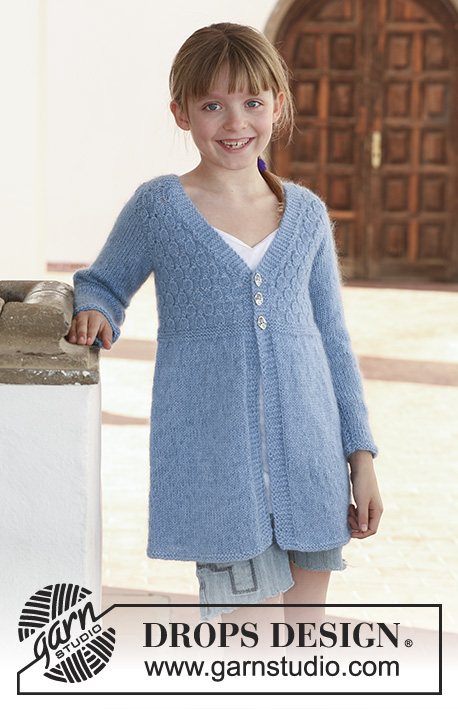
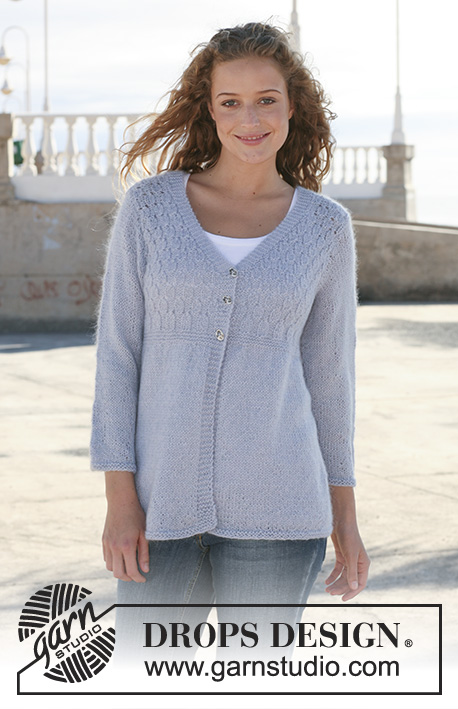
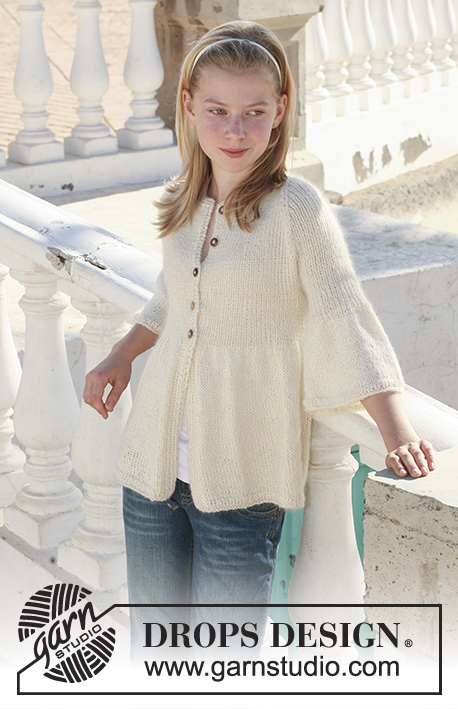
Giacca DROPS ai ferri, a coste e maniche raglan in "Alpaca" e "Kid-Silk". Taglie: dalla S alla XXXL
DROPS 112-8 |
|
|
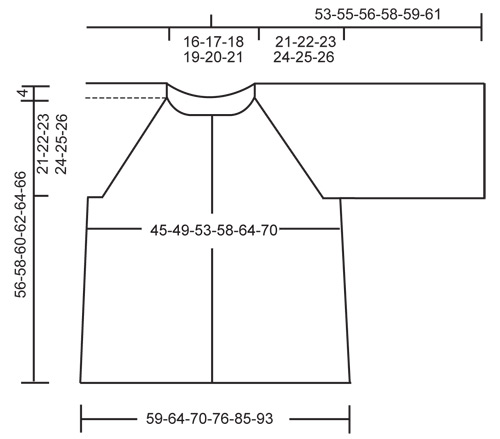
PUNTO LEGACCIO (avanti e indietro sui ferri): Lavorare tutti i ferri a dir. PUNTO LEGACCIO (in tondo): 1 giro a dir, 1 giro a rov ASOLE: Chiudere per le asole sul davanti destro. 1 asola = chiudere la 4a m dall'inizio del bordo; al ferro successivo avviare 1 nuova m in corrispondenza di quella chiusa. Chiudere per le asole quando il lavoro misura: TAGLIA S: 27, 32, 37, 42 e 48 cm. TAGLIA M: 27, 32, 37, 43 e 49 cm. TAGLIA L: 27, 32, 38, 44 e 50 cm. TAGLIA XL: 27, 33, 39, 45 e 51 cm. TAGLIA XXL: 27, 33, 39, 45 e 52 cm. TAGLIA XXXL: 27, 33, 39, 46 e 53 cm SUGGERIMENTO PER IL LAVORO: Se la tensione del lavoro è troppo stretta, la manica a raglan sarà troppo corta e gli scalfi troppo piccoli. In questi casi, aggiungere a intervalli regolari 1 ferro senza diminuzioni tra i ferri con diminuzioni. SUGGERIMENTO PER LE DIMINUZIONI (per il raglan): Tutte le diminuzioni vengono fatte sul diritto del lavoro. Lavorare finché non rimangono 2 m prima del segno: 2 m insieme a dir, segno, passare 1 m a dir senza lavorarla, 1 m a dir, accavallare la m passata sulla m lavorata. -------------------------------------------------------- DAVANTI E DIETRO: Si lavorano avanti e indietro sui ferri circolari iniziando dal bordo centrale sul davanti. Avviare 193-209-225-243-267-291 m (comprese 8 m, da ciascun lato, per i bordi centrali) sui ferri circolari n° 6 con 1 capo di ognuno dei 2 filati lavorati insieme. Proseguire come segue, sul diritto del lavoro: 2 m a punto legaccio, 1 m a dir, 1 m a rov, 1 m a dir, 1 m a rov, 1 m a dir, 1 m a rov (= bordo centrale), 177-193-209-227-251-275 m a maglia rasata, e finire con 1 m a rov, 1 m a dir, 1 m a rov, 1 m a dir, 1 m a rov, 1 m a dir, 2 m a punto legaccio (= bordo centrale). Lavorare ancora 1 ferro in questo modo e proseguire come segue sul diritto del lavoro: 2 m a punto legaccio, 1 m a dir, 1 m a rov, 1 m a dir, 1 m a rov, 1 m a dir, 1 m a rov (= bordo centrale), coste 1 m a dir / 1 m a rov sulle 176-192-208-226-250-274 m successive e finire con 1 m a rov, 1 m a dir, 1 m a rov, 1 m a dir, 1 m a rov, 1 m a dir, 2 m a punto legaccio(= bordo centrale). Lavorare ancora 1 ferro in questo modo; proseguire poi a maglia rasata lavorando i bordi centrali come prima. Quando il lavoro misura 26 cm, passare ai ferri n° 3,5; lavorare 1 ferro a rov sul rovescio del lavoro e proseguire come segue sul dir del lavoro: 2 m a punto legaccio, 1 m a dir, 1 m a rov, 1 m a dir, 1 m a rov, 1 m a dir, 1 m a rov (= bordo centrale), coste 1 m a dir/ 1 m a rov sulle 176-192-208-226-250-274 m successive e finire con 1 m a rov, 1 m a dir, 1 m a rov, 1 m a dir, 1 m a rov, 1 m a dir, 2 m a punto legaccio (= bordo centrale). Ricordarsi di chiudere per le ASOLE sul bordo centrale destro – vedere le spiegazioni sopra. Inserire 2 segni nel lavoro: il primo dopo le prime 52-56-60-64-70-76 m e il secondo prima delle ultime 52-56-60-64-70-76 m (tra i due segni ci sono 89- 97-105-115-127-139 m = dietro). Quando il lavoro misura 35-36-37-38-39-40 cm chiudere 8 m da ciascun lato per gli scalfi (= chiudere le 4 m che precedono e le 4 m che seguono ciascun segno) = 177-193-209-227-251-275 m. Lasciare il lavoro in sospeso e proseguire con le maniche. MANICHE: Si lavorano in tondo sui ferri a doppia punta. Avviare 68-72-76-80-84-88 m sui ferri a doppia punta n° 6 con 1 capo di ognuno dei 2 filati lavorati insieme. Inserire un segno all'inizio del giro (= maglia centrale, sotto la manica). Lavorare 2 giri a maglia rasata, 2 giri a coste 1 m a dir / 1 m a rov, e proseguire a maglia rasata. Quando il lavoro misura 14 cm passare ai ferri a doppia punta n° 3,5; lavorare 1 giro a maglia rasata e proseguire poi a coste 1 m a dir / 1 m a rov. Quando il lavoro misura 24 cm chiudere 4 m da ciascun lato del segno = 60-64-68-72-76-80 m. Lasciare il lavoro in sospeso e proseguire con l'altra manica. SPRONE: VEDERE IL SUGGERIMENTO PER LA MAGLIA! Inserire le m delle maniche sul ferro circolare n° 3,5 usato per lavorare il dietro e il davanti, in corrispondenza degli scalfi = 297-321-345-371-403-435 m. Inserire un segno in corrispondenza di ogni passaggio tra le maniche e il davanti / dietro = 4 segni. Proseguire a coste lavorando le m del bordo centrale come prima. Allo stesso tempo diminuire per raglan - VEDERE IL SUGGERIMENTO PER LE DIMINUZIONI! ATTENZIONE: fare le prime 2 diminuzioni solo sul davanti e sul dietro, non sulle maniche. Diminuire ogni 4 ferri per un totale di 6-5-5-4-4-3 volte e poi ogni 2 ferri per 18-21-23-26-28-31 volte. ATTENZIONE: durante i ferri senza diminuzioni, lavorare 1 m a dir, sul diritto del lavoro, da ciascun lato dei segni. ALLO STESSO TEMPO quando il lavoro misura 49-50-51-52-53-54 cm mettere in attesa su un fermamaglie 12-14-16-17-21-25 m da ciascun lato per il collo e chiudere per lo scollo, all'inizio di ogni ferro, da ciascun lato, come segue: 2 m per 2 volte e 1 m per 4-4-4-5-5-5 volte. Terminate tutte le diminuzioni, sul ferro ci sono 73-77-81-87-93-103 m. Riprendere 29-31-33-34-38-42 m (comprese le m in attesa sui fermamaglie) lungo il collo da entrambi i lati del davanti = 131-139-147-155-171-187 m. Lavorare 6 ferri a punto legaccio. ALLO STESSO TEMPO diminuire 23-27-31-35-47-59 m in modo uniforme durante il primo di questi ferri = 108-112-116-120-124-128 m. Chiudere le m. CONFEZIONE: Cucire le aperture sotto le maniche. Cucire i bottoni. |
|
 |
|
Avete terminato questo modello?Allora taggate le vostre foto con #dropspattern #abrilcardigan o inviatele alla #dropsfan gallery. Avete bisogno di aiuto con questo modello?Troverete 19 video tutorial, una sezione per i commenti/domande e molto altro guardando il modello su www.garnstudio.com © 1982-2026 DROPS Design A/S. Ci riserviamo tutti i diritti. Questo documento, compreso tutte le sue sotto-sezioni, è protetto dalle leggi sul copyright. Potete leggere quello che potete fare con i nostri modelli alla fine di ogni modello sul nostro sito. |


Con oltre 40 anni di esperienza nel design di modelli di maglia e uncinetto, DROPS Design offre la più estesa collezione di modelli gratuiti su internet - tradotti in 17 lingue. Ad oggi vi possiamo fornire 324 cataloghi e 12290 modelli - 9561 dei quali sono tradotti in Italiano.
Ci stiamo impegnando molto per darvi il meglio che vi possiamo offrire in termini di maglia e uncinetto, ispirazioni e consigli così come filati di grande qualità ad un prezzo incredibile! Volete utilizzare i nostri modelli per qualcosa d'altro oltre al vostro uso personale? Potete leggere tutto ciò che è consentito nel testo sul Copyright in basso su tutte le pagine dei nostri modelli. Buon lavoro!
Lasciare un commento sul modello DROPS 112-8
Noi saremmo felici di ricevere i tuoi commenti e opinioni su questo modello!
Se vuoi fare una domanda, fai per favore attenzione a selezionare la categoria corretta nella casella qui sotto per velocizzare il processo di risposta. I campi richiesti sono indicati da *.