
Categorie popolari
State cercando un filato?


Commenti / Domande (71)
![]() Marie Jacobsson ha scritto:
Marie Jacobsson ha scritto:
Dum fråga kanske men använder man båda garntyperna på samma gång dvs virkar med två garner samtidigt?
04.04.2014 - 09:46DROPS Design ha risposto:
Hej Marie. Ja, du virkar med två garner samtidigt. Det staar ogsaa i mönstret: Det virkas nerifrån och upp. Virka 210-230-250-270 lm med nål 4 och en tråd av varje kvalitet
04.04.2014 - 10:26
![]() Jasmin ha scritto:
Jasmin ha scritto:
Hallo, muss bei den 1+9 Abnahmerunden auch mit einer Wendeluftmasche gearbeitet werden? LG
22.02.2014 - 13:47DROPS Design ha risposto:
Liebe Jasmin, ja, bei jeder R mit festen M wenden Sie mit 1 Luftmasche. Gutes Gelingen!
22.02.2014 - 14:01
![]() Ann ha scritto:
Ann ha scritto:
Welche Körpermaße muss man ausmessen um zu bestimmen welche Größe benötigt wird?
19.02.2014 - 17:45DROPS Design ha risposto:
Liebe Ann, die Maße des Schultertuchs finden Sie ganz unten in der Schnittzeichnung, dort ist die obere Breite (Halsausschnitt), die Gesamtlänge und die untere Breite angegeben. Die obere Breite ist in diesem Fall am wichtigsten, damit das Tuch gut auf den Schultern sitzt und nicht von den Schultern rutscht oder zu eng wird. Viel Spaß beim Häkeln!
19.02.2014 - 18:51
![]() Soraya ha scritto:
Soraya ha scritto:
Es precioso, original y muy sencillo
01.08.2013 - 09:35Robinet ha scritto:
Modele tres agreable. Pouvez vous me dire quelle est l equivalent du crochet 5 en mm? Merci.
25.05.2013 - 15:45DROPS Design ha risposto:
Bonjour Mme Robinet - la taille des crochets dans nos modèles en français est indiqué en système métrique - pour toute conversion système U.K/U.S reportez-vous à la terminologie DROPS UK/US sous "Astuces et Aide". Bon crochet !
31.05.2013 - 09:42
![]() Marie Welling ha scritto:
Marie Welling ha scritto:
Hej Drops. Sikke en fin cape, den må jeg da lave. Hvad er målene for de enkelte størrelser? Det ville jo være ærgerligt at have hæklet og hæklet på en alt for lille eller stor kreation.
05.02.2013 - 15:49DROPS Design ha risposto:
Hej Marie. Se nederst paa mönstret. Her er en maalskitse med de forskellige maal i cm per str. God fornöjelse!
06.02.2013 - 15:32PNicole ha scritto:
I really love this. However, i am stuck on the row 7. (Repeat row 7 until piece measure approx 25-27-29-31cm - adjust so that next is from WS). What is WS stand for? and in the pattern from the bottom edge toward the top, it is smaller and smaller, but if i follow from row 7 until 25cm it looks bigger and bigger? How to adjust? Can anyone help on this? Thank you very much for your help. I wish i would finish one soon.
26.12.2012 - 02:21DROPS Design ha risposto:
Dear PNicole, shoulder wrap is worked from bottom edge towards the top, repeating row 7 means you will start each row with 8 ch, 1 dc (uk)/ sc(us) in the first loop, then *5 ch, 1 dc/sc in the next loop* until the end. You should skip the same number of loops. WS means wrong side. Happy crocheting !
29.12.2012 - 17:42
![]() Gigixoxo ha scritto:
Gigixoxo ha scritto:
This is so beautiful. I got to the starting of the yoke and I am stuck. It confused me, can someone help me starting with "Now insert 11-12-13-14 markers in piece (from RS) as follows: First marker after 8-8-9-9 dc, and then 17 dc between each marker = 8-9-9-10 dc left after the last marker. On next row dec 1 st to the left of all markers (dec 1 st by skipping 1 dc after marker) = a total of 11-12-13-14 dec sts on row. " Thank you for your help! I can't move on...
27.08.2012 - 18:06DROPS Design ha risposto:
Use stitch markers, or paper clips, safety pins, scrap yarn or what you have. Count from the beg of row and place a marker after the first 8-9 sts depending of which size you are making, place next marker another 17 dc further on row, then a third marker yet another 17 dc away, etc, once you have placed your last marker there will be 1-10 dc left after last marker (if you had correct number of dc to begin with on row).
28.08.2012 - 02:54
![]() Drops Design ha scritto:
Drops Design ha scritto:
Bonjour Titithemis, on doit bien avoir 240 ms dans la 2ème partie : 1 ml (pour tourner) puis 3 ms dans chacun des 80 arceaux = 240 ms.
11.05.2009 - 09:09
![]() Titithemis ha scritto:
Titithemis ha scritto:
Il y a un problême sur ce modèle car quand on arrive à la deuxième étape (retour au mailles serrées uniquement) avec 80 arceaus ms et 1 ml par arceaux cela fait 320 ms en tout en non les 240 annoncées. merci de rectifier pour les suivants . personnellement j'ai fait deux ms dans chaque arceaux et 1 ml. cordialement
10.05.2009 - 11:22
|
|
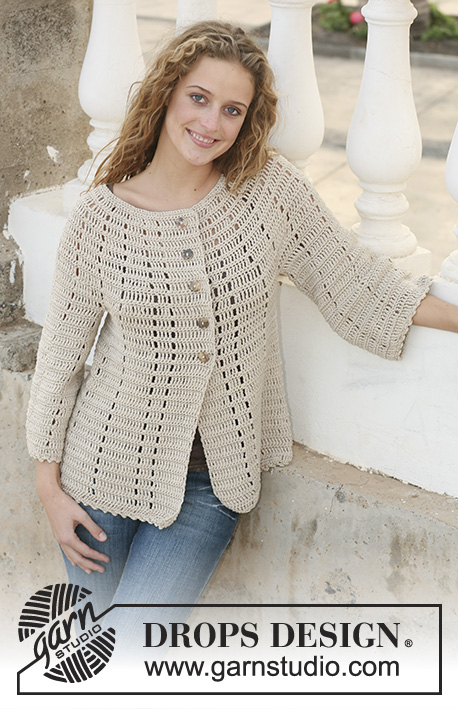
Milano#milanocardigan |
|
|
|
|
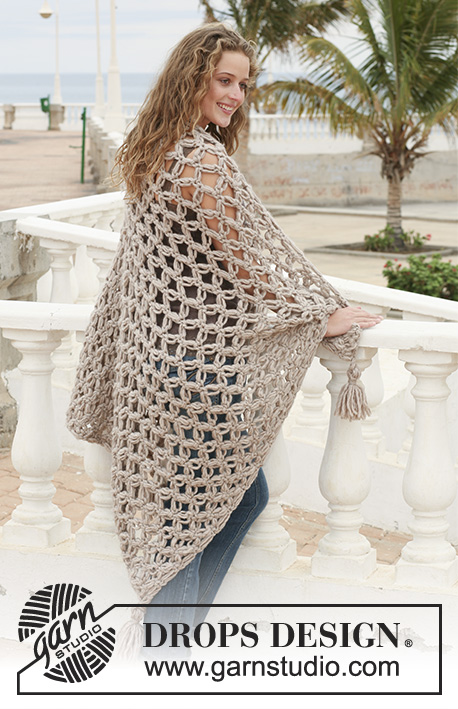
Coprispalle DROPS lavorato all’uncinetto in ”Cotton Viscose” e ”Kid-Silk”.
DROPS 111-38 |
|
|
COPRISPALLE: Lavorato dal bordo inferiore verso l’alto. Avviare 210-230-250-270 cat con l’uncinetto n° 4 mm e 1 capo di ogni qualità. RIGA 1(= diritto del lavoro): 1 m.b nella 2° cat dall’uncinetto, 1 m.b in ognuna delle 4-5-6-7 cat successive, saltare 1 cat, * 1 m.b in ognuna delle 8 cat successive *, ripetere *-*, e finire con 1 m.b in ognuna delle ultime 5-6-7-8 cat = 186-204-222-240 m.b. RIGHE 2-5: 1 m.b in ogni m.b – girare ogni riga con 1 cat. RIGA 6: * 5 cat, saltare 2 m.b, 1 m.b nella m.b successiva *, ripetere *-* = 62-68-74-80 archi di cat. RIGA 7: 8 cat, 1 m.b nel 1° arco di cat, * 5 cat, 1 m.b nell’arco di cat successivo *, ripetere *-*. Ripetere la riga 7 fino a quando il lavoro misura circa 25-27-29-31 cm – aggiustarlo in modo che il f successivo sia dal rovescio del lavoro. RIGA SUCCESSIVA: 1 cat, e 3 m.b in ogni arco di cat lungo la riga = 186-204-222-240 m.b. LE 2 RIGHE SUCCESSIVE: 1 m.b in ogni m.b. Ora inserire 11-12-13-14 segnapunti nel lavoro (dal diritto del lavoro) come segue: 1° segnapunti dopo 8-8-9-9 m.b, e poi 17 m.b tra ogni segnapunti = 8-9-9-10 m.b rimaste dopo l’ultimo segnapunti. Sulla riga successiva diminuire 1 m alla sinistra di tutti i segnapunti (diminuire 1 m saltando 1 m.b dopo il segnapunti) = per un totale di 11-12-13-14 m diminuite sulla riga. Lavorare 1 riga dal rovescio del lavoro con 1 m.b in ogni m.b. Sulla riga successiva diminuire 1 m alla destra di tutti i segnapunti (saltando 1 m.b prima del segnapunti). Ripetere le diminuzioni su ogni riga dal diritto del lavoro per un totale di 9 volte, alla sinistra e destra dei segnapunti in modo alternato. Alla fine di tutte le diminuzioni ci sono 87-96-105-114 m.b rimaste sulla riga. Lavorare 2 righe con 1 m.b in ogni m.b, tagliare e affrancare il filo. BORDO DAVANTI SINISTRO: Lavorare circa 55-67 m.b lungo il davanti – circa 3 m.b in ogni arco di cat e 2 m.b per 3 righe a m.b. Assicurarsi che il bordo non risulti troppo tirato né troppo molle! Ora lavorare 4 righe con 1 m.b in ogni m.b. BORDO DAVANTI DESTRO: Come il bordo davanti sinistro, ma dopo 2 righe lavorare 2 asole. 1 asola = 3 cat, saltare 3 m.b, sulla riga successiva lavorare 3 m.b nell’arco di cat. Posizionare l’asola più in alto a circa 2 cm dalla cima e l’altra 6 cm sotto la prima. Attaccare i bottoni. |
|
 |
|
Avete terminato questo modello?Allora taggate le vostre foto con #dropspattern #milanocardigan o inviatele alla #dropsfan gallery. Avete bisogno di aiuto con questo modello?Troverete 2 video tutorial, una sezione per i commenti/domande e molto altro guardando il modello su www.garnstudio.com © 1982-2026 DROPS Design A/S. Ci riserviamo tutti i diritti. Questo documento, compreso tutte le sue sotto-sezioni, è protetto dalle leggi sul copyright. Potete leggere quello che potete fare con i nostri modelli alla fine di ogni modello sul nostro sito. |


Con oltre 40 anni di esperienza nel design di modelli di maglia e uncinetto, DROPS Design offre la più estesa collezione di modelli gratuiti su internet - tradotti in 17 lingue. Ad oggi vi possiamo fornire 324 cataloghi e 12290 modelli - 9561 dei quali sono tradotti in Italiano.
Ci stiamo impegnando molto per darvi il meglio che vi possiamo offrire in termini di maglia e uncinetto, ispirazioni e consigli così come filati di grande qualità ad un prezzo incredibile! Volete utilizzare i nostri modelli per qualcosa d'altro oltre al vostro uso personale? Potete leggere tutto ciò che è consentito nel testo sul Copyright in basso su tutte le pagine dei nostri modelli. Buon lavoro!
Lasciare un commento sul modello DROPS 111-38
Noi saremmo felici di ricevere i tuoi commenti e opinioni su questo modello!
Se vuoi fare una domanda, fai per favore attenzione a selezionare la categoria corretta nella casella qui sotto per velocizzare il processo di risposta. I campi richiesti sono indicati da *.