
Categorie popolari
State cercando un filato?


Commenti / Domande (120)
![]() Anna-Karin ha scritto:
Anna-Karin ha scritto:
Hej! Jag får inte ihop det med ärmarna, man ska börja maska av vid 48 cm för att sen avsluta vid 56 cm. Då blir ärmkullen bara 8 cm. Men ärmhålan är ju större . 21 cm. Vad är detjag inte förstår här? Vänliga hälsningar Anna-Karin
07.03.2026 - 16:11DROPS Design ha risposto:
Hei Anna-Karin. Det er bare ermtoppen som er ca 8 cm. Den som former toppen på ermet. Men alle maskene til ermet (74-80-86-92-96-102 masker inkl de som er felt til ermtoppen) skal sys til ermhullet. mvh DROPS Design
23.03.2026 - 11:54
![]() Jean Webber ha scritto:
Jean Webber ha scritto:
I do not understand how to decrease 1 stitch in 1x1 rib . I am using pattern 112-40 Jamie Cardigan and the instructions say to decrease 1 stitch each side.
06.03.2026 - 18:27DROPS Design ha risposto:
Dear Mrs Webber, you can decrease inside 1 edge stitch by working 2 sts together at the beginning and at the end of the row. Happy knitting!
09.03.2026 - 07:35
![]() Anna ha scritto:
Anna ha scritto:
Hallo, ich bin mir nicht sicher, welche Größe ich bei dieser Jacke stricken soll. Normalerweise stricke ich eher L, aber nach den Maßen ist sie dann nicht so locker, wie auf dem Bild. Allerdings vermute ich, daß sie durch das Bündchen und kraus rechts Muster sowie vielleicht ein bisschen durch das Merino Garn nachgeben wird. Also müsste diese Größe dann vielleicht doch passen?
21.02.2026 - 11:39DROPS Design ha risposto:
Liebe Anna, ja, die Jacke dürfte sich aufgrund des Musters noch ein wenig weiten bzw. Sie können sie auch dahingehend nach dem Stricken spannen (angefeuchtet). Wenn es nicht so viel ist, was bei Ihnen fehlt, sollte es mit L dann passen - aber vergleichen Sie unbedingt die Maße in der Maßskizze mit Ihren Maßen und achten Sie auf jeden Fall auch auf Ihre Maschenprobe. Viel Spaß beim Stricken!
23.02.2026 - 09:45
![]() Martine ha scritto:
Martine ha scritto:
Bonjour, J'aimerais tricoter cette veste également en Soft tweed ,mais au point de jersey. Puis-je la tricoter en suivant les mêmes instructions ou y a-t-il certaines modifications à apporter étant donné le changement du point ? Par avance, merci pour votre aide.
17.11.2025 - 17:07DROPS Design ha risposto:
Bonjour Martine, il y aurait effectivement différents ajustements à faire car le bas se tricote en côtes (tension différente en largeur que pour du jersey), et le point mousse n'a pas la même tension que le jersey en hauteur; retrouvez ici tous les gilets et les vestes que vous pouvez réaliser en jersey avec un fil du groupe B, pensez à ajouter des filtres pour affiner la recherche si besoin. Bon tricot!
18.11.2025 - 09:10
![]() Lotta ha scritto:
Lotta ha scritto:
Har stickat helt enligt måtten för storlek L men garnet räckte inte. Det saknas ca 1/4 nystan. Någon mer som har haft det problemet?
02.11.2025 - 22:37
![]() Regina Friese ha scritto:
Regina Friese ha scritto:
Guten Tag, wird nach dem Bündchen weiter im Rippenmuster gestrickt und dann in die Krausrippe gewechselt ? Habe ich das so richtig verstanden ? Vielen Dank schonmal. Vielen Grüße Regina
23.10.2025 - 13:22DROPS Design ha risposto:
Liebe Regina, ja, es wird im Rippenmuster weitergestrickt und bei 28 cm Gesamtlänge zu den Krausrippen gewechselt. Viel Spaß beim Weiterstricken!
24.10.2025 - 13:03
![]() Susan Tapper ha scritto:
Susan Tapper ha scritto:
Bij het achterpand ga je bij 43 cm hoogte afkanten voor de armsgaten. XL heeft dan 116 steken. 4x 2 =8 en 5x1 =5. Dan hou ik nog 103 over en niet zoals gemeld 84?
16.10.2025 - 20:37DROPS Design ha risposto:
Hi Susan. in XL size you have to cast off for the armholes in each side: 3 sts 1 time, 2 sts 4 times and 1 st 5 times: 116-(3+3)-(8+8)-(5+5)=116-32=84 sts. Happy knitting!
17.10.2025 - 08:36
![]() Amanda ha scritto:
Amanda ha scritto:
Hi, re the decrease for the right front piece, pattern says 'as described for back piece', which decreases each side, but is the decrease for the fronts on one side of the piece only, if so which side (front or side)? Thanks.
01.10.2025 - 23:07DROPS Design ha risposto:
Hi Amanda, You decrease in the same way as on the back piece but only on the side (not mid-front). Regards, Drops Team.
02.10.2025 - 05:56
![]() Kirsten ha scritto:
Kirsten ha scritto:
Kan jeg ikke få et billede der viser ryggen på denne bluse. Tak
12.01.2025 - 21:26DROPS Design ha risposto:
Hej Kirsten, det har vi desværre ikke, men de øverste masker på rygstykket strikkes i retstrik som for forstykkerne :)
14.01.2025 - 12:06
![]() Gabriele Limp ha scritto:
Gabriele Limp ha scritto:
Liebes Drops Team, da ich nach langer Zeit wieder angefangen habe zu stricken, habe ich eine Frage bezüglich Modell 112-40,,, es steht dort nach 28 cm (Rückenteil) anfangen mit Krausrippe. Sind die vorherigen 5cm mit einberechnet oder heisst es nach 5cm anschließend nach 28cm? Würde mich über eine Antwort freuen. Dankeschön
13.10.2024 - 18:25DROPS Design ha risposto:
Liebe Frau Limp, diese 28 cm messen Sie ab der Anschlagskante, dh mit den ersten 5 cm. Viel Spaß beim Stricken!
14.10.2024 - 09:08
|
|
Jamie#jamiecardigan |
|
|
|
|
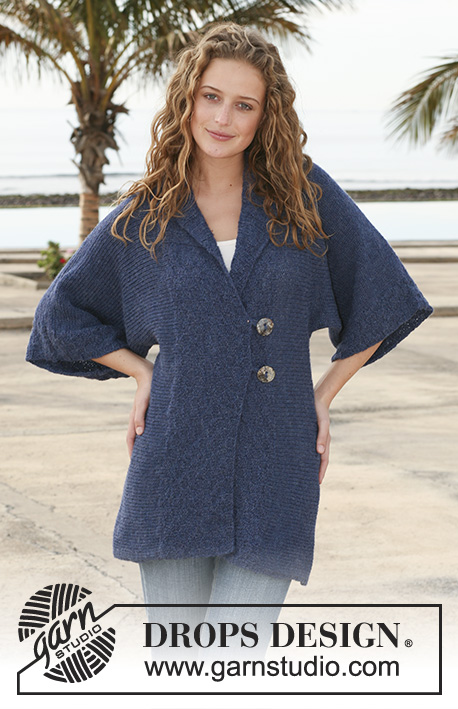
Cardigan DROPS lavorato ai ferri a coste in ”Merino Extra Fine”. Taglie: S - XXXL.
DROPS 112-40 |
|
|
M LEGACCIO (avanti e indietro sui f): Lavorare tutti i f a dir. ASOLE: Fare le asole sul bordo davanti destro. 1 asola: 2 m insieme a dir e avviare 1 nuova m sul f di ritorno. Fare le asole quando il lavoro misura 12, 20 e 28 cm, misurato dal bordo inferiore, per tutte le taglie. --------------------------------------------------------- DIETRO: Lavorato avanti e indietro sui f. Avviare 130-142-154-168-184-200 m (compresa 1 m di vivagno a ogni lato) con i f n° 4 mm con Merino. Lavorare 1 f rov dal rovescio del lavoro e continuare a coste, 1 m dir/1 m rov con 1 m di vivagno a ogni lato a m legaccio. FARE ATTENZIONE ALLA TENSIONE DEL LAVORO. Quando il lavoro misura 5 cm diminuire 1 m a ogni lato ogni 3 cm per un totale di 8 volte = 114-126-138-152-168-184 m. Quando il lavoro misura 28 cm continuare a m legaccio – leggere sopra. ALLO STESSO TEMPO sul 1° ferro distribuire 28-32-34-36-42-46 diminuzioni in modo uniforme = 86-94-104-116-126-138 m. Quando il lavoro misura 40-41-42-43-44-45 cm intrecciare per lo scalfo a ogni lato all'inizio di ogni f: 3 m 1 volta, 2 m 0-1-3-4-6-8 volte e 1 m 1-2-2-5-5-6 volte = 78-80-82-84-86-88 m. Quando il lavoro misura 58-60-62-64-66-68 cm intrecciare le 16-18-20-22-24-26 m centrali per il collo e finire ogni spalla in modo separato. Intrecciare 1 m sulla scollatura sul f successivo = 30-30-30-30-30-30 m rimaste sulla spalla. Intrecciare quando il lavoro misura 60-62-64-66-68-70 cm. DAVANTI DESTRO: Avviare 66-72-78-85-93-101 m (compresa 1 m di vivagno a lato e 1 m di vivagno verso il centro davanti) con i f n° 4 mm con Merino. Lavorare 1 f rov dal rovescio del lavoro e continuare a coste, 1 m dir/1 m rov, con 1 m di vivagno a ogni lato a m legaccio. Quando il lavoro misura 5 cm diminuire a lato come descritto per il dietro = 58-64-70-77-85-93 m. Quando il lavoro misura 28 cm continuare a m legaccio, ALLO STESSO TEMPO distribuire 14-16-17-18-21-23 diminuzioni in modo uniforme sul 1° ferro = 44-48-53-59-64-70 m. Quando il lavoro misura 35-36-37-38-39-40 cm intrecciare per modellare la scollatura all'inizio del f dal centro davanti: 1 m ogni 2 cm per un totale di 9-10-11-12-13-14 volte. ALLO STESSO TEMPO quando il lavoro misura 40-41-42-43-44-45 cm intrecciare per lo scalfo a lato come descritto per il dietro. Alla fine di tutte le diminuzioni ci sono 31-31-31-31-31-31 m rimaste sulla spalla (compresa 1 m di vivagno verso il centro davanti). Intrecciare quando il lavoro misura 60-62-64-66-68-70 cm. DAVANTI SINISTRO: Come il davanti destro, ma a specchio. MANICA: Lavorati avanti e indietro sui f. Avviare 66-70-72-74-78-80 m (compresa 1 m di vivagno a ogni lato) con i f n° 4 mm con Merino. Lavorare a coste, 1 m dir/1 m rov, con 1 m di vivagno a ogni lato. Quando il lavoro misura 8 cm continuare a m legaccio, ALLO TESSO TEMPO distribuire 16-18-18-18-20-20 diminuzioni in modo uniforme sul 1° ferro = 50-52-54-56-58-60 m. Ora aumentare 1 m a ogni lato, e ripetere gli aumenti ogni 3,5-2,5-2,5-2-2-1,5 cm per un totale di 12-14-16-18-19-21 volte = 74-80-86-92-96-102 m. Quando il lavoro misura 49-48-48-47-46-44 cm – meno per le taglie più grandi a causa dell'arrotondamento della manica più lungo e della maggiore ampiezza delle spalle – intrecciare per l'arrotondamento della manica a ogni lato all'inizio di ogni f: 3 m 1 volta, 2 m 4-4-5-5-5-5 volte, 1 m 0-1-1-2-5-8 volte, poi 2 m a ogni lato fino a quando il lavoro misura 55-55-56-56-57-57 cm, intrecciare 3 m a ogni lato e intrecciare le m rimaste. Il lavoro misura circa 56-56-57-57-58-58 cm. CONFEZIONE: Cucire i margini delle spalle. Attaccare le maniche. Cucire i margini dei lati e delle maniche all'interno della m di vivagno. BORDI DAVANTI: Riprendere 375-391-405-421-435-451 m all'interno della m di vivagno lungo il davanti destro, attorno alla scollatura e lungo il davanti sinistro. Lavorare 1 f dir dal rovescio del lavoro e continuare come segue: 5 m a m legaccio, 1 m dir/1 m rov, e finire con 1 m dir e 5 m a m legaccio. Quando il lavoro misura 3 cm fare le ASOLE sul bordo davanti destro – leggere sopra. Quando il lavoro misura 5 cm trasferire 98-101-104-107-110-113 m a ogni lato (= verso il bordo inferiore) su un fermamaglie e continuare sulle m rimaste per il collo. ALLO STESSO TEMPO trasferire 6 m sul fermamaglie a ogni lato alla fine di ogni f per un totale di 8-8-8-9-9-9 volte = 146-149-152-161-164-167 m sul fermamaglie a ogni lato. Le coste ora misurano circa 10-10-10-11-11-11 cm nel punto più ampio. Riportare tutte le m dei fermamaglie sui f di lavoro e lavorare 1 f a coste come prima su tutte le m. Intrecciare a coste. Attaccare i bottoni sul davanti sinistro in modo che combacino con le asole. |
|
 |
|
Avete terminato questo modello?Allora taggate le vostre foto con #dropspattern #jamiecardigan o inviatele alla #dropsfan gallery. Avete bisogno di aiuto con questo modello?Troverete 17 video tutorial, una sezione per i commenti/domande e molto altro guardando il modello su www.garnstudio.com © 1982-2026 DROPS Design A/S. Ci riserviamo tutti i diritti. Questo documento, compreso tutte le sue sotto-sezioni, è protetto dalle leggi sul copyright. Potete leggere quello che potete fare con i nostri modelli alla fine di ogni modello sul nostro sito. |


Con oltre 40 anni di esperienza nel design di modelli di maglia e uncinetto, DROPS Design offre la più estesa collezione di modelli gratuiti su internet - tradotti in 17 lingue. Ad oggi vi possiamo fornire 324 cataloghi e 12290 modelli - 9561 dei quali sono tradotti in Italiano.
Ci stiamo impegnando molto per darvi il meglio che vi possiamo offrire in termini di maglia e uncinetto, ispirazioni e consigli così come filati di grande qualità ad un prezzo incredibile! Volete utilizzare i nostri modelli per qualcosa d'altro oltre al vostro uso personale? Potete leggere tutto ciò che è consentito nel testo sul Copyright in basso su tutte le pagine dei nostri modelli. Buon lavoro!
Lasciare un commento sul modello DROPS 112-40
Noi saremmo felici di ricevere i tuoi commenti e opinioni su questo modello!
Se vuoi fare una domanda, fai per favore attenzione a selezionare la categoria corretta nella casella qui sotto per velocizzare il processo di risposta. I campi richiesti sono indicati da *.