
Categorie popolari
State cercando un filato?


Commenti / Domande (37)
![]() Brigitte ha scritto:
Brigitte ha scritto:
Bonjour, les rangs raccourcis pour le col se font du coté de l'epaule ou du bord ? merci
07.11.2025 - 18:40DROPS Design ha risposto:
Bonjour Brigitte, vous devez avoir plus de rang côté extérieur du col, ainsi pour le devant droit, vous commencez les rangs raccourcis sur l'endroit et pour le devant gauche sur l'envers. Bon tricot!
10.11.2025 - 06:55
![]() Brigitte ha scritto:
Brigitte ha scritto:
Bonjour, Peut-on tricoter le point astrakan sur une aiguille circulaire en rond ?
09.10.2025 - 18:44DROPS Design ha risposto:
Bonjour Brigitte, tout à fait, retrouvez une façon de le tricoter dans cette vidéo avec un exemple de modèle juste sous la description de la vidéo. Bon tricot!
10.10.2025 - 08:06
![]() Brigitte ha scritto:
Brigitte ha scritto:
Bonjour, est-il possible de faire ce modèle avec le point astrakan ? Faut-il rajouter des mailles ? Merci
13.09.2025 - 13:45DROPS Design ha risposto:
Bonjour Brigitte, si vous avez le même échantillon (12 m x 16 rangs point de riz = 10 x 10 cm), c'est probablement possible, sinon il vous faudra faire les ajustements nécessaires. Bon tricot!
15.09.2025 - 08:01
![]() Adele Daras ha scritto:
Adele Daras ha scritto:
After binding off the 7 stitches to shape armholes excluding the collar stitches how many stitches should the left and front pieces have? It's a big problem for me. Remember leave off the collar stitches How many for left and right fronts alone?
17.12.2020 - 14:03DROPS Design ha risposto:
Dear Mrs Daras, as previously explained, this will depends on the number of sts you already increased for collar, make sure to bind off the 7 sts on each side of the middle 46 sts = back piece and tha the middle of these 7 sts is the Knit st explained at the very beginning - and make sure you have the same number of sts on each front piece. Happy knitting!
17.12.2020 - 17:08
![]() Adele Daras ha scritto:
Adele Daras ha scritto:
Sorry to bother u. After binding off the 7 stitches to shape armholes there are 46 stitches for the back but it's not mentioned how many stitches should be left for the left and right fronts. Can u tell me how many stitches in each after the 7 stitch bind off. Thank u
17.12.2020 - 06:31DROPS Design ha risposto:
Dear Mrs Daras, this will depends on how many stitches you increased for collar on front band sts. you should have same number of sts on each front piece and cast off the 3 sts before the knit stitch on the side + the knit stitch on the side + the 3 sts after this stitch - (on either side of the middle 46 sts for back piece). Happy knitting!
17.12.2020 - 09:05
![]() Adele Daras ha scritto:
Adele Daras ha scritto:
Thank u for the info
14.12.2020 - 16:52
![]() Adele Daras ha scritto:
Adele Daras ha scritto:
I never did short rows before. Do u do wrap and turn the 9 stitches all at once every time u come to the collar edge? Then do all the rest of the st in garter stitch for 2 rows. Can u explain? I don't think I left my email on my last question abt binding off at on sleeve cap . Sorry. Thanks for ur help
13.12.2020 - 23:48DROPS Design ha risposto:
Dear Mrs Daras, short rows on collar are worked with the basic method - see video - but you can work them with the wrap&turn technique if you rather. Happy knitting!
14.12.2020 - 09:42
![]() Adele Daras ha scritto:
Adele Daras ha scritto:
The sleeve cap says bind off 3 stitches twice. Leaves me with 10 stitches. In the creative knitting pattern edition it states bind off rem ? stitches 6 times. U never state how many to bind off 6 times. What happens with the 10 I have left?
13.12.2020 - 20:03DROPS Design ha risposto:
Dear Mrs Daras, after you have cast off 3 sts 1 time on each side, bind off the reamining stitches, the sleeve should measure approx. 56- 57- 58 cm [ 22”-22½”- 22¾”]. Happy knitting!
14.12.2020 - 09:23
![]() Adele Daras ha scritto:
Adele Daras ha scritto:
Thank u for ur answer. I understand on each left and right front 15 stitches for shoulder and 19 stitches for collar. The problem is I have 23 stitches 15 goes for the shoulder 23-15 is 8. What do I do with the 8 stitches. I know one is decreased at beg of row another is decreased for armhole. So now there are 6 left. Do I use those to shape neck like the back using half the stitches please help me sorry to bother u again maybe I didn't explain it correctly
01.12.2020 - 15:02DROPS Design ha risposto:
Dear Mrs Daras, after all increases are done for collar you should have 19 sts in garter stitch for the collar and 16 sts decreased to 15 for the shoulder. = 35 sts decreased to 34 sts after cast off for armhole. Happy knititng!
01.12.2020 - 17:34
![]() Adele Daras ha scritto:
Adele Daras ha scritto:
Where is info for neck on left and right pieces ? It's missing. I got extra stitches on left and right pieces before shoulder bind off. On back there were 12 bound off for neck and one at neck edge Please help Thank u
28.11.2020 - 12:13DROPS Design ha risposto:
Dear Mrs Daras, you will cast off for shoulder the same number of sts on front piece as you did on back piece (= 15 or 16, see size) - 19-19-20-20-21-21 sts remain then on needle, these stitches are worked now with short rows to shape the collar shawl - this video shows how to knit this kind of collar without short rows. Happy knitting!
30.11.2020 - 08:19
|
|||||||
DROPS 110-12 |
|||||||
|
|
|||||||
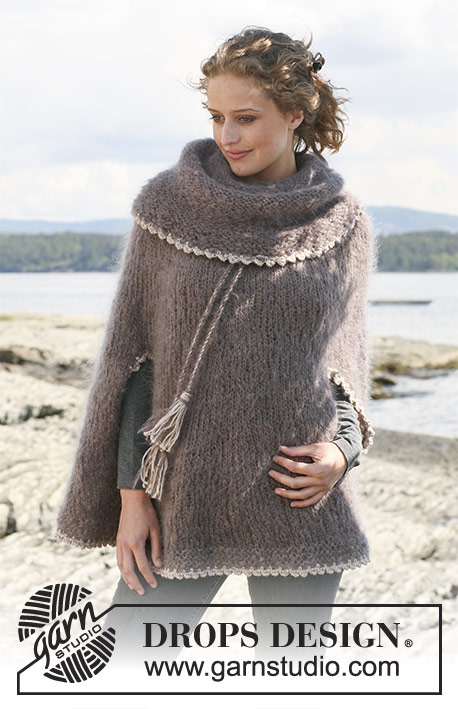
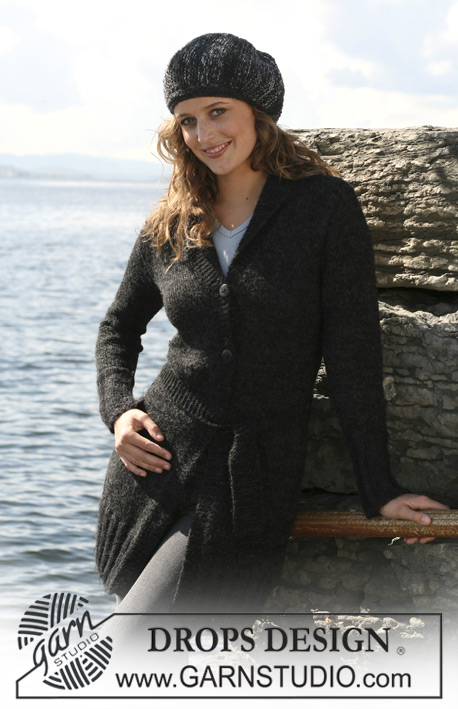
Cardigan DROPS lavorato ai ferri a grana di riso con pieghe in ”Snow”. Taglie: S - XXXL.
DROPS 110-12 |
|||||||
|
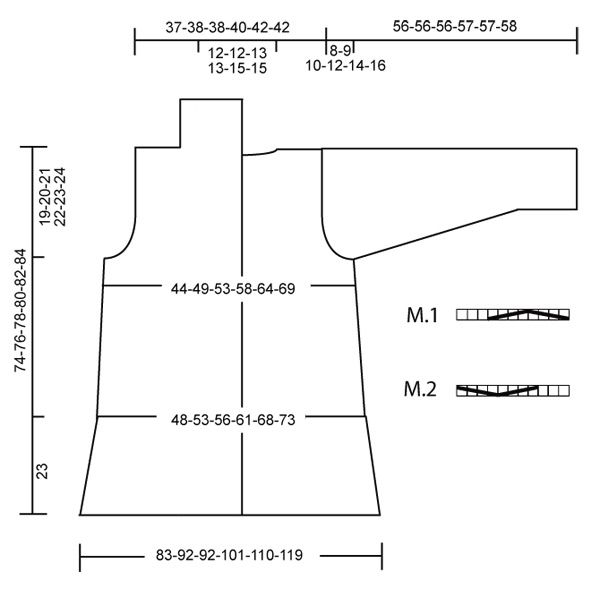
SUGGERIMENTO PER LE MISURE: A causa del peso del filato, tutte le misurazioni devono essere fatte con l’indumento appeso, altrimenti risulterà troppo lungo una volta indossato. M LEGACCIO (avanti e indietro sui f): Lavorare tutti i f a dir. M LEGACCIO (in tondo): 1 giro dir, 1 giro rov. GRANA DI RISO: Ferro 1: * 1 m dir, 1 m rov *, ripetere *-*. Ferro 2: dir su rov e rov su dir. Ripetere il ferro 2. PIEGHE: Vedere i diagrammi M.1 e M.2. I diagrammi mostrano la ripetizione del motivo dal rovescio del lavoro. Lavorare le pieghe a grana di riso. SUGGERIMENTO PER LE DIMINUZIONI: Diminuire lavorando 2 m insieme a dir prima e dopo la m a rov a ogni lato. ASOLE: Intrecciare per le asole sul bordo davsnti destro. 1 asola = intrecciare la 4° e 5° m sul bordo davanti e avviare 2 nuove m sul f di ritorno. Intrecciare per le asole quando il lavoro misura: Taglia S e M: 32, 37 e 42 cm Taglia L - XXXL: 30, 36 e 42 cm -------------------------------------------------- CARDIGAN Lavorato avanti e indietro sui f circolari dal centro davanti. Avviare 229-253-253-277-301-325 m con i f circolari n° 7 mm. Lavorare 3 f dir e 1 f rov dal rovescio del lavoro, ALLO STESSO TEMPO distribuire 17-19-19-21-23-25 diminuzioni in modo uniforme (lavorare insieme a rov ogni 12° e 13° m) = 212-234-234-256-278-300 m. FARE ATTENZIONE ALLA TENSIONE DEL LAVORO! Lavorare il f successivo come segue dal diritto del lavoro: 7 m a M LEGACCIO – leggere sopra, poi a GRANA DI RISO – leggere sopra, fino a quando rimangono 7 m e finire con 7 m a m legaccio (le 7 m a m legaccio a ogni lato = bordi davanti, lavorati a m legaccio per tutto il lavoro). Continuare a grana di riso con i bordi davanti a m legaccio. Quando il lavoro misura 23 cm – leggere il SUGGERIMENTO PER LE MISURE – continuare con le pieghe dal rovescio del lavoro (leggere sopra) come segue: 7 m a m legaccio, 9-10-10-11-12-13 ripetizioni di M.1, 9-10-10-11-12-13 ripetizioni di M.2, e finire con 7 m a m legaccio = 140-154-154-168-182-196 m. Ora lavorare 10 f a m legaccio su tutte le m, ALLO STESSO TEMPO distribuire 12-14-6-8-6-8 diminuzioni in modo uniforme sul 1° f (non diminuire sui bordi davanti) = 128-140-148-160-176-188 m. Lavorare 1 f dir dal diritto del lavoro con i bordi davanti a m legaccio. Lavorare il f successivo come segue dal rovescio del lavoro: 7 m a m legaccio, grana di riso su 28-31-33-36-40-43 m, 1 m dir (= lato), grana di riso su 56-62-66-72-80-86 m, 1 m dir (= lato), grana di riso su 28-31-33-36-40-43 m, finire con 7 m a m legaccio (la 1° m a ogni lato: dir dal rovescio del lavoro e rov dal diritto del lavoro, cioè rov visto dal diritto del lavoro). RICORDARSI DELLE ASOLE sul bordo davanti destro – leggere sopra. LEGGERE TUTTA LA SEZIONE SEGUENTE PRIMA DI CONTINUARE: Quando il lavoro misura 34 cm diminuire 1 m a ogni lato della m rov ai lati – leggere il SUGGERIMENTO PER LE DIMINUZIONI = 124-136-144-156-172-184 m. Ripetere le diminuzioni quando il lavoro misura 48-49-50-51-52-53 cm. ALLO STESSO TEMPO quando il lavoro misura 36 cm includere 1 m in più nel bordo davanti (quindi il n° delle m rimane lo stesso, ma il n° di m del bordo davanti aumenta e il n° di m a grana di riso diminuisce) ogni 5-5-4,5-4,5-4,5-4,5 cm per un totale di 7-7-8-8-9-9 volte. ALLO STESSO TEMPO quando il lavoro misura 43 cm aumentare 1 m all’interno della m più esterna del bordo davanti a ogni lato per il collo ogni 6-6-6-7-7-7 cm per un totale di 5 volte, lavorare gli aumenti a m legaccio. Quando il lavoro misura 55-56-57-58-59-60 cm intrecciare 7 m a ogni lato (la m rov e 3 m a ogni lato di questa) per lo scalfo e finire il davanti e il dietro in modo separato. DIETRO: = 46-52-56-62-70-76 m. Intrecciare per modellare lo scalfo a ogni lato all’inizio di ogni f: 2 m 0-1-2-3-4-5 volte e 1 m 1-1-1-1-2-3 volte = 44-46-46-48-50-50 m. Quando il lavoro misura 72-74-76-78-80-82 cm intrecciare le 12-12-14-14-16-16 m centrali per il collo e diminuire 1 m sulla scollatura sul f successivo = 15-16-15-16-16-16 m rimaste su ogni spalla. Intrecciare quando il lavoro misura 74-76-78-80-82-84 cm. DAVANTI SINISTRO: Intrecciare per lo scalfo come descritto per il dietro, ALLO STESSO TEMPO continuare ad aumentare per il collo e includere gli aumenti nel bordo davanti. Quando il lavoro misura 74-76-78-80-82-84 cm intrecciare le 15-16-15-16-16-16 m più esterne per la spalla e lavorare 19-19-20-20-21-21 m sul f = collo. Ora continuare sulle m del collo a ferri accorciati come segue (ferro 1 = rovescio del lavoro): * lavorare 2 f a m legaccio solo sulle 9-10-10-10-11-11 m verso il centro davanti, lavorare 2 f a m legaccio su tutte le m *, ripetere *-* fino a quando il collo misura circa 7,5-7,5-8-8-9-9 cm (misurati sul lato più corto) dalla spalla. Intrecciare. DAVANTI DESTRO: Come il davanti sinistro, ma a specchio. MANICA: Lavorata in tondo con i f a doppia punta. Avviare 29-29-31-31-33-33 m con i f a doppia punta n° 7 mm. Lavorare 16 giri a M LEGACCIO – leggere sopra – e continuare come segue: 28-28-30-30-32-32 m a grana di riso, 1 m rov. Continuare in questo modo. Quando il lavoro misura 7 cm aumentare 1 m a ogni lato della m rov ogni 6-5-4,5-3,5-3,5-2,5 cm per un totale di 7-8-9-10-10-12 volte = 43-45-49-51-53-57 m. Lavorare gli aumenti a grana di riso. ALLO STESSO TEMPO quando il lavoro misura 33-32-31-30-28-27 cm lavorare 10 giro a m legaccio su tutte le m, ma continuare con 1 m rov al centro sotto la manica. Quando il lavoro misura 48-47-46-45-43-42 cm – meno per le taglie più grandi a causa dell’arrotondamento della manica più lungo e della maggiore ampiezza delle spalle – intrecciare la m rov e 3-3-3-3-2-2 m a ogni lato di questa per lo scalfo e finire il lavoro avanti e indietro sui f. Intrecciare per modellare l’arrotondamento dello scalfo a ogni lato all’inizio di ogni f: 2 m 2 volte, 1 m 0-1-2-3-5-6 volte, poi 2 m a ogni lato fino a quando il lavoro misura 55-55-55-56-56-57 cm, ora intrecciare 3 m a ogni lato 1 volta e intrecciare le m rimaste. La manica misura circa 56-56-56-57-57-58 cm. CONFEZIONE: Cucire i margini delle spalle. Cucire il collo al centro dietro e attaccarlo al dietro. Attaccare le maniche. Attaccare i bottoni. |
|||||||
Spiegazioni del diagramma |
|||||||
|
|||||||
 |
|||||||
Avete terminato questo modello?Allora taggate le vostre foto con #dropspattern o inviatele alla #dropsfan gallery. Avete bisogno di aiuto con questo modello?Troverete 21 video tutorial, una sezione per i commenti/domande e molto altro guardando il modello su www.garnstudio.com © 1982-2026 DROPS Design A/S. Ci riserviamo tutti i diritti. Questo documento, compreso tutte le sue sotto-sezioni, è protetto dalle leggi sul copyright. Potete leggere quello che potete fare con i nostri modelli alla fine di ogni modello sul nostro sito. |
|||||||


Con oltre 40 anni di esperienza nel design di modelli di maglia e uncinetto, DROPS Design offre la più estesa collezione di modelli gratuiti su internet - tradotti in 17 lingue. Ad oggi vi possiamo fornire 324 cataloghi e 12290 modelli - 9561 dei quali sono tradotti in Italiano.
Ci stiamo impegnando molto per darvi il meglio che vi possiamo offrire in termini di maglia e uncinetto, ispirazioni e consigli così come filati di grande qualità ad un prezzo incredibile! Volete utilizzare i nostri modelli per qualcosa d'altro oltre al vostro uso personale? Potete leggere tutto ciò che è consentito nel testo sul Copyright in basso su tutte le pagine dei nostri modelli. Buon lavoro!
Lasciare un commento sul modello DROPS 110-12
Noi saremmo felici di ricevere i tuoi commenti e opinioni su questo modello!
Se vuoi fare una domanda, fai per favore attenzione a selezionare la categoria corretta nella casella qui sotto per velocizzare il processo di risposta. I campi richiesti sono indicati da *.