
Categorie popolari
State cercando un filato?


Commenti / Domande (48)
![]() Berit Bethke ha scritto:
Berit Bethke ha scritto:
Wie muss ich das verstehen? Bei einer Gesamtlänge von 8 cm in jedem Linksbereich 1 M abnehmen. Was bzw. wo ist der Linksbereich?
21.11.2024 - 18:47DROPS Design ha risposto:
Liebe Frau Bethke, mit "Linksbereich" meinen wir die "Gruppen" von 14 bis 28 linken Maschen die zwischen M.1 gestrickt werden; so werden diese Maschen abgenommen. Viel Spaß beim Stricken!
22.11.2024 - 08:54
![]() Ingrid ha scritto:
Ingrid ha scritto:
Korrigan Kaputzenpulli Frage zur PASSE: in Hoehe von 63cm werden 8 Maschen auf jeder Seite still gelegt.. Welche Maschen werden still gelegt?
03.02.2023 - 20:43DROPS Design ha risposto:
Liebe Ingrid, in L legen Sie die ersten 5 Maschen am Anfang der 2 nächsten Reihe für den Halsausschnitt still, dann stricken Sie wie zuvor (mit Raglanabnahmen) und gleichzeitig ketten Sie für den Hals beidseitig ab: 2 M x 2 Mal + 1 Masche x 3 Mal = es sind dann 60 M übrig. Für die Kapuze stricken Sie dann die stillgelegten Maschen, fassen Sie Maschen in die abgekettenen Maschen auf und stricken Sie die restlichen Maschen der Passen. Viel Spaß beim stricken!
06.02.2023 - 09:06
![]() Bella ha scritto:
Bella ha scritto:
Habe ich richtig verstanden, dass die Kapuze glatt rechts gestrickt wird? Mit jeweils 5 Krausrippe an den Aussernseiten?
18.01.2021 - 22:25DROPS Design ha risposto:
Liebe Bella, Kapuze wird glatt links (= links bei Hinreihen, rechts bei Rückreihen) mit 5 Maschen krausrechts beidseitig gestrickt. Viel Spaß beim stricken!
19.01.2021 - 07:17Maria ha scritto:
I'm sorry, but I still don't understand. If I slip 5 extetnal stiches on the stich holder and I have to decrease 1 next stich it would be the stich 'belonging' to the cable. How can I continue the cable if I'm suposed to cast off 3 stiches out of 8 of the pattern? And than, for the hoid I have to cast on 10 stiches, so 5 new stiches. Would be 5 siches enough for several rows (right now I'm only a bit after the middle of the raglan). Thanks
17.10.2018 - 09:46DROPS Design ha risposto:
Dear Maria, you stop working the cables when there are not enough stitches anymore to work them = when you start to cast off sts on each side, you stop working the cables. you don't cast on any new sts for the hood, you only pick up the stitches from the thread and work the sts remaining on needle and then work the hood (not sure what you mean with fold here). Happy knitting!
17.10.2018 - 12:16Maria ha scritto:
Dear Drops, thanks a lot. So if I've understood well, after 11 cm from the cast off row I shoud slip the band stiches on the stich holder, start decreasing for the neck, stop with the cables and in the same time continue decreasing for raglan?
16.10.2018 - 19:03DROPS Design ha risposto:
Dear Maria, correct, you continue decreasing for raglan as before and shape the neck on each side at the same time - (stop the cables when there is no stitches anymore to work them). Happy knitting!
17.10.2018 - 07:47Maria ha scritto:
I don't understand the explanation for the reglan. I have to start decrese for raglan when the piece mesures 50 cm. The reglan should take 50 rows (8x4 + 9x2). When the piece mesures 59 cm I'm supposed to slip external stiches on the stich holder and it seems like the raglan should be finished. It's 9 cm for 50 rows or I don't understand something? I'm making size S. Thanks.
16.10.2018 - 09:33DROPS Design ha risposto:
Dear Maria, in size S you start Yoke 1 row after body measures 48 cm, then decrease on yoke for the raglan as explained, and at the same time shape neckline: when piece measures 59 cm from the cast on row, slip the 5 sts at the beg of next 2 rows aside for neck and cast off/decrease for neck at the same time continue raglan decreases. Happy knitting!
16.10.2018 - 15:27
![]() Liath Hollins ha scritto:
Liath Hollins ha scritto:
All going well with this so far, but I’m stuck on the hood. I don’t understand the bit about putting stitches at mid front onto a holder - that is surely interfering with the cables? It would have really helped for the pattern to have had a diagram of this.
16.03.2018 - 14:01DROPS Design ha risposto:
Dear Mrs Hollins, you first put 5-6-8 sts (see size) on a st holder on each size for neck (these sts will be then knit back for hood) and bind off for neck as explained, the cables will "disappear", there are then no cable anymore on the hood. Happy knitting!
16.03.2018 - 14:28
![]() Ines ha scritto:
Ines ha scritto:
Guten Morgen, Könnt Ihr mir ungefähr sagen, wie viele Raglanabnahmen noch übrig sind, bei Größe XL, und die 8 Maschen für den Halsausschnitt still legt? Oder cm? Wenn ich nur, zu den 8 Maschen, 6 Maschen = 14, zunehmen soll, passt das alles nicht. Habe aber in einer Höhe von 66 cm angefangen. Lg
29.01.2018 - 07:15DROPS Design ha risposto:
Liebe Ines, es hängt von Ihrer Maschenprobe, aber der Halsausschnitt muss bei 64 cm anfangen, sonnst wird er etwas zu hoch sein (und Passe könnte auch länger sein). Viel Spaß beim stricken!
29.01.2018 - 10:32
![]() Eva ha scritto:
Eva ha scritto:
Hallo. Ich würde diesen Pulli gern ohne Kapuze stricken... Habt ihr da vielleicht einen kleinen Tipp, wie man das schön ausarbeiten könnte? Vielen Dank für eine Anregung und viele Grüße!!!
17.07.2016 - 15:54DROPS Design ha risposto:
Liebe Eva, Sie können zum Beisiel mit der angegebenen Maschenzahl eine Blende als Abschluss stricken.
18.07.2016 - 19:40
![]() Laperrière ha scritto:
Laperrière ha scritto:
Je tiens a vous remercier de m'avoir aider dans mon tricot.A bientôt peut etre.
02.03.2016 - 01:04
|
|||||||||||||
Korrigan |
|||||||||||||
|
|
|||||||||||||
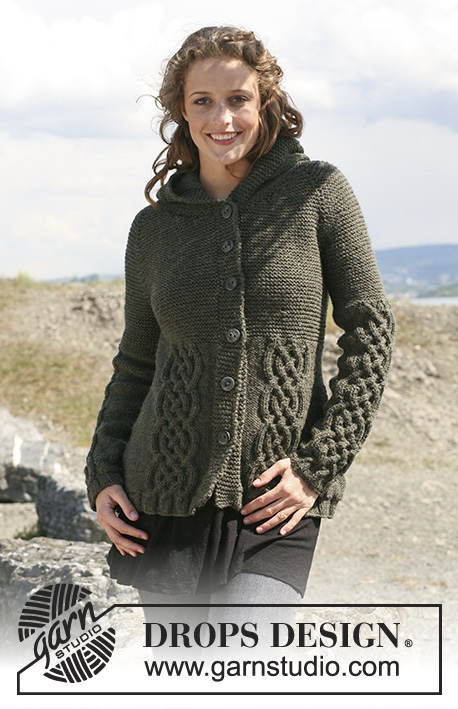
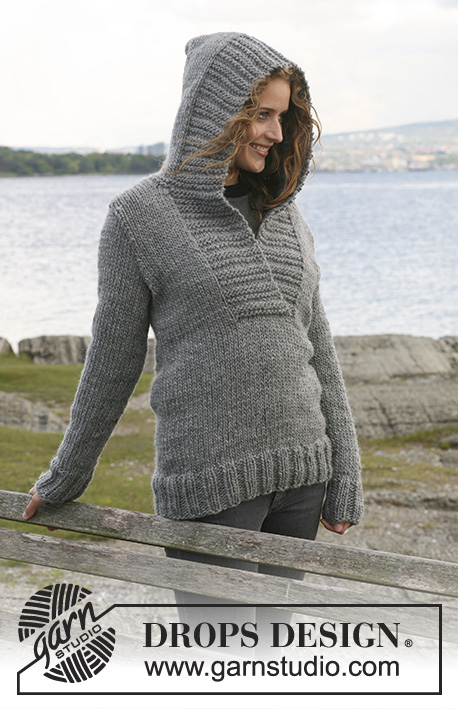
Maglione DROPS lavorato ai ferri in "Alaska" con trecce e manica a raglan. Taglie: dalla S alla XXXL.
DROPS 109-2 |
|||||||||||||
|
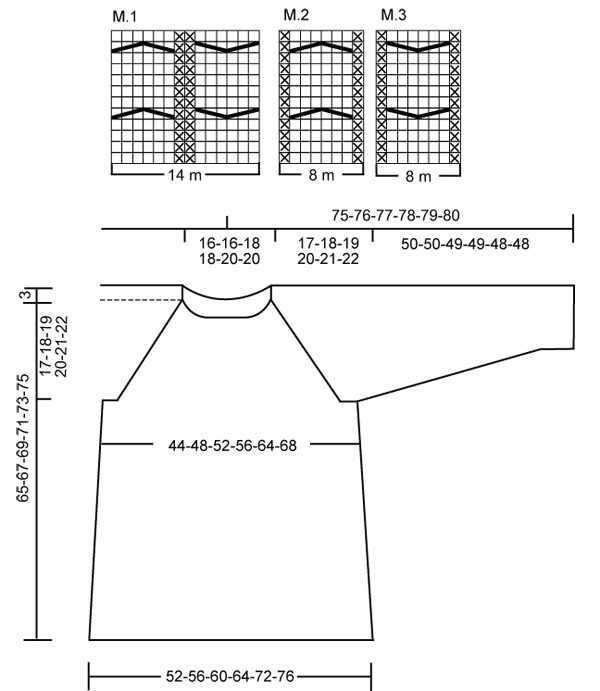
M. a legaccio avanti e indietro sui ferri: lavorare a dir. tutti i f. M. a legaccio in tondo: lavorare 1 giro a dir., 1 giro a rov. Motivo: Vedere i diagrammi M.1, M.2 e M.3. I diagrammi mostrano il motivo dal diritto del lavoro. Suggerimento per il lavoro: se la vostra tensione non corrisponde, cioè è troppo stretta, il raglan sarà troppo corto e lo scalfo troppo piccolo. Potete compensare ciò lavorando 1 f. in più senza diminuzioni tra i f. con diminuzioni. Suggerimento per il lavoro, applicato al raglan: Fare tutte le diminuzioni dal diritto del lavoro: Iniziare 2 m. prima del segnapunti: lavorare 2 m. insieme a dir., segnapunti, passare 1 m. a dir. senza lavorarla, 1 m. a dir., accavallare la m. passata sopra quella appena lavorata. Corpo: lavorato in tondo. Avviare 156-168-180-192-216-228 m. con i ferri circolari misura 5,5 mm con il filato Alaska. Lavorare 6 giri a m. legaccio – leggere sopra, allo stesso tempo distribuire 24 aumenti in modo uniforme sull’ultimo giro = 180-192-204-216-240-252 m. Inserire un segnapunti all’inizio del giro e un segnapunti dopo 90-96-102-108-120-126 m. (= per indicare i lati). Sul giro successivo passare ai ferri misura 6 mm e continuare come segue: 8-9-10-11-13-14 m. a rov., * M.1 (= 14 m.), 16-18-20-22-26-28 m. a rov. *, ripetere da *-* per un totale di 5 volte, e finire con M.1 e 8-9-10-11-13-14 m. a rov. Fare attenzione alla tensione del lavoro! Quando il lavoro misura 8 cm diminuire 1 m. in ogni sezione a rov. (= 6 m. diminuite per giro) ogni 10 cm per un totale di 4 volte = 156-168-180-192-216-228 m. Diminuire lavorando 2 m. insieme a rov. sul lato destro e sinistro di ogni sezione a rov. in modo alternato. Quando il lavoro misura 42 cm lavorare 1 f. a dir., allo stesso tempo distribuire 20 diminuzioni in modo uniforme – assicurarsi di diminuire 10 m. sul davanti e 10 m. sul dietro, 5 m. prima della treccia centrale e 5 m. dopo la treccia centrale = 136-148-160-172-196-208 m. Passare ai ferri misura 5,5 mm e lavorare 8 giri a m. legaccio. Ora tagliare il filo e completare il lavoro avanti e indietro sui ferri. Iniziare lavorando il f. 34-37-40-43-49-52 m. dopo il segnapunti all’inizio del giro – = centro davanti – come segue (dal diritto del lavoro): 5 m. a m. legaccio, M.2 (= 8 m.), 110-122-134-146-170-182 m. a m. legaccio, e finire con M.3 (= 8 m.) e 5 m. a m. legaccio. Quando il lavoro misura 48-49-50-51-52-53 cm intrecciare 8 m. a ogni lato (cioè 4 m. a ogni lato di entrambi i segnapunti) = 120-132-144-156-180-192 m. Mettere il lavoro da parte e lavorare le maniche. Manica: lavorata in tondo con i ferri a doppia punta. Avviare 34-36-38-40-42-42 m. con i ferri misura 5,5 mm e il filato Alaska. Lavorare 6 giri a m. legaccio, allo stesso tempo distribuire 8 aumenti in modo uniforme sull’ultimo giro = 42-44-46-48-50-50 m. Inserire un segnapunti all’inizio del giro. Sul f. successivo passare ai ferri misura 6 mm e continuare come segue: 4-5-5-6-6-6 m. a rov., M.1 (= 14 m.), 6-6-8-8-10-10 m. a rov., M.1 e finire con 4-5-5-6-6-6 m. a rov. Quando il lavoro misura 8 cm aumentare 1 m. a ogni lato del segnapunti ogni 4,5-4-4-3,5-3,5-3 cm per un totale di 9-10-10-11-11-13 volte – lavorare a rov. le m. aumentate. Allo stesso tempo quando il lavoro misura 44-43-41-40-38-37 cm passare ai ferri misura 5,5 mm, lavorare 1 giro a dir., distribuire 8 diminuzioni in modo uniforme e ora continuare a m. legaccio su tutte le m. Alla fine di tutti gli aumenti e diminuzioni, ci sono 52-56-58-62-64-68 m. sul f. Quando il lavoro misura 50-50-49-49-48-48 cm – meno per le taglie più grandi a causa dell’arrotondamento della manica più lungo e della maggiore ampiezza delle spalle – intrecciare 8 m. al centro sotto il braccio = 44-48-50-54-56-60 m. Mettere il lavoro da parte e lavorare l’altra manica. Sprone: leggere il suggerimento per il lavoro! Trasferire le maniche sullo stesso f. circolare misura 5,5 mm del corpo dove sono state intrecciate le m. per gli scalfi = 208-228-244-264-292-312 m. Inserire un segnapunti in ogni passaggio tra le maniche e il corpo = 4 segnapunti. Lavorare a m. legaccio avanti e indietro sui ferri con M.2/M.3 e 5 m. a m. legaccio verso il centro davanti come prima, allo stesso tempo diminuire per il raglan – leggere il suggerimento per le diminuzioni. Diminuire ogni 4 ferri 8-8-8-8-8-8 volte e ogni 2 ferri 9-11-12-14-15-17 volte. Allo stesso tempo quando il lavoro misura 59-61-63-64-66-68 cm trasferire 5-5-5-6-8-8 m. da ogni lato verso il centro davanti su dei fermamaglie per il collo. Diminuire per modellare la scollatura a ogni lato all’inizio di ogni f.: 2 m. 1-1-2-2-3-3 volte e 1 m. 2-3-3-3-4-5 volte. Alla fine di tutte le diminuzioni ci sono 54-56-60-62-72-74 m. sul f. Lavorare 1 f. a dir., distribuire 6-6-8-8-12-14 diminuzioni in modo uniforme = 48-50-52-54-60-60 m. Cappuccio: riprendere 10-10-12-12-14-14 m. su ogni davanti (comprese le m. dai fermamaglie) = 68-70-76-78-88-88 m. Lavorare 4 f. a m. legaccio con i f. misura 5,5 mm, allo stesso tempo distribuire 12 aumenti in modo uniforme sul 1° f. = 80-82-88-90-100-100 m. Inserire un segnapunti al centro dietro (dopo 40-41-44-45-50-50 m.). Passare ai ferri misura 6 mm e continuare a m. rasata al contrario con 5 m. a m. legaccio da ogni lato. Allo stesso tempo aumentare 1 m. a ogni lato del segnapunti su ogni ottavo f. per un totale di 4 volte = 88-90-96-98-108-108 m. Intrecciare quando il cappuccio misura 38-38-39-39-40-40 cm. Confezione: cucire le aperture sotto le braccia. Piegare il cappuccio a metà e cucirlo in alto dal diritto del lavoro. |
|||||||||||||
Spiegazioni del diagramma |
|||||||||||||
|
|||||||||||||
 |
|||||||||||||
Avete terminato questo modello?Allora taggate le vostre foto con #dropspattern o inviatele alla #dropsfan gallery. Avete bisogno di aiuto con questo modello?Troverete 30 video tutorial, una sezione per i commenti/domande e molto altro guardando il modello su www.garnstudio.com © 1982-2026 DROPS Design A/S. Ci riserviamo tutti i diritti. Questo documento, compreso tutte le sue sotto-sezioni, è protetto dalle leggi sul copyright. Potete leggere quello che potete fare con i nostri modelli alla fine di ogni modello sul nostro sito. |
|||||||||||||


Con oltre 40 anni di esperienza nel design di modelli di maglia e uncinetto, DROPS Design offre la più estesa collezione di modelli gratuiti su internet - tradotti in 17 lingue. Ad oggi vi possiamo fornire 325 cataloghi e 12298 modelli - 9569 dei quali sono tradotti in Italiano.
Ci stiamo impegnando molto per darvi il meglio che vi possiamo offrire in termini di maglia e uncinetto, ispirazioni e consigli così come filati di grande qualità ad un prezzo incredibile! Volete utilizzare i nostri modelli per qualcosa d'altro oltre al vostro uso personale? Potete leggere tutto ciò che è consentito nel testo sul Copyright in basso su tutte le pagine dei nostri modelli. Buon lavoro!
Lasciare un commento sul modello DROPS 109-2
Noi saremmo felici di ricevere i tuoi commenti e opinioni su questo modello!
Se vuoi fare una domanda, fai per favore attenzione a selezionare la categoria corretta nella casella qui sotto per velocizzare il processo di risposta. I campi richiesti sono indicati da *.