
Categorie popolari
State cercando un filato?


Commenti / Domande (38)
![]() Mita Singh ha scritto:
Mita Singh ha scritto:
Another part to the the neck rise question. I am doing the size 11/12 so I have 16 sts left on the needle. Do I start at the marker on left back sleeve and knit 16 sts to the front marker of the left sleeve then turn and knit all the way to the marker on the front right sleeve? Then turn and knit to the back Left sleeve marker(which is where I started the neck rise)? So there are 3 rows now. Then I start with the M4 from back marker of left sleeve to back marker of right sleeve for 3 rows?
02.06.2020 - 16:55DROPS Design ha risposto:
Dear Mrs Singh, you are correct. Happy knitting!
05.06.2020 - 12:01
![]() Mita Singh ha scritto:
Mita Singh ha scritto:
Hello again, I am almost done knitting this sweater and had a question regarding the rise in the back of the neck. I don’t see any videos showing how to do this. I did find a video that shows how to do an elevation in the mid back but I don’t know whether that applies to this Erik pattern. I am not sure where to start knitting the rise in the back of neck. Do you start a stitch over the marker on the back of left sleeve? Sorry for the long question.
02.06.2020 - 15:47
![]() Mita ha scritto:
Mita ha scritto:
Hello again, I started the M3 pattern and did not do any decrease around the 4 Markers. So should I do the raglan decreases along side pattern right from the beginning of pattern? At least the photo of the sweater would suggest so. Thank you!
28.03.2020 - 03:38DROPS Design ha risposto:
Dear Mita, when working the yoke you will have to decrease for raglan at each of the 4 markers (see DECREASE TIP) a total of 16 times on every other round then 9 times on every round, at the same time, you are working in pattern following diagrams: K1 round, M.3, M.4, M.2, M.4 = 41 rows in total and approx. 17 cm and 92 sts remain. Happy knitting!
30.03.2020 - 09:14
![]() Mita Singh ha scritto:
Mita Singh ha scritto:
I really appreciate the prompt response. Thank you very much for the clarification!
23.03.2020 - 23:35
![]() Mita ha scritto:
Mita ha scritto:
Hi, thanks so much for the beautiful pattern. I am knitting a sweater for the first time and am stuck at the “pattern” section after joining sleeves. I am knitting a size 11/12 and I don’t understand what M3(18 rounds) mean? Do I just Make 3 stitches after the markers which would mean an increase of 8 stitches per round? I am confused about where to do the increases in a round and how many stitches would be increased per round? Please help!!
23.03.2020 - 18:27DROPS Design ha risposto:
Dear Mita, M+ (18 rounds) mean that you should knit the M.3 pattern (look for the diagram at the bottom of the pattern), which is knitted over 18 rows. No increases here, just knit the pattern that has the "name" of M.3. Happy Knitting.
23.03.2020 - 20:20
![]() Birgitta Malmqvist ha scritto:
Birgitta Malmqvist ha scritto:
Hej och tack för svaret! Undrar nu över avslutningen vid halsen. Lite svårt att förstå hur ni menar. Skall det stickas ifrån märktråden på framsidan tom märktråden på den andra sidan? Mao över alla 4 märktrådar? Önskar en tydligare förklaring Tack..
07.11.2018 - 10:41DROPS Design ha risposto:
Hej Birgitta. Första gång du stickar förhöjning i nacken stickar du till märktråden fram på först vänster ärm, vänder, så till fram på höger ärm, vänder. Sedan stickar du till märktråden bak på först vänster, så höger ärm. Lycka till!
08.11.2018 - 09:53
![]() Birgitta Malmqvist ha scritto:
Birgitta Malmqvist ha scritto:
Hej! Angående en pojktröja som heter Erik....Förstår inte hur det kan vara möjligt att vid storlek 14 år skall vara 308 maskor när man börjar med avmaskningen för raglanärmen. Efter18 avmaskningar skall det finnas 100 maskor kvar. Enligt mina beräkningar blir det ju 164 maskor.. Är det fel på mönstret eller ligger felet hos mig?
30.10.2018 - 13:35DROPS Design ha risposto:
Hej, du gör helt rätt men det minskas först på vartannat varv 18 gånger och sedan på varje varv ytterligare 8 gånger. Då blir det 100 maskor kvar.
30.10.2018 - 17:59
![]() Bareaud ha scritto:
Bareaud ha scritto:
C'est tres dommage que toutes les expications soit poour aiguilles circulaire, n'est il pas possible de les avoir pour deux aiguilles normal, il m'est impossible de travailller avec des aiguilles circulaire. merci pour votre reponse
25.11.2014 - 23:18DROPS Design ha risposto:
Bonjour Mme Bareaud, lorsqu'un ouvrage est, comme celui-ci, tricoté entièrement en rond sur aig. circulaire, vous pouvez recalculer le nbe de mailles pour chaque pièce ainsi que les diminutions pour le raglan si vous souhaitez tricoter chaque pièce séparément - ou bien visualiser nos vidéos (cf onglet du même nom à droite de la photo) pour comprendre comment procéder quand on tricote en rond. Beaucoup sont finalement devenues adeptes des circulaires après les avoir essayées. Bon tricot!
26.11.2014 - 10:07
![]() Sandra ha scritto:
Sandra ha scritto:
English please
16.08.2014 - 23:24
![]() Gisela Hohn ha scritto:
Gisela Hohn ha scritto:
Hallo und guten Tag, wäre es möglich, eine Angabe in Größe M und XL zu erhalten? Es gibt in diesen Größen wenig Herren Modelle... Freundlichen Gruß Gisela Hohn
28.02.2013 - 12:10DROPS Design ha risposto:
Liebe Gisela, wenn Sie in unserer Suchmaschine unter der Hauptkategorie Herren nach dem Stichwort „Pullover“ suchen, erhalten Sie 7 Seiten mit Mustern, die meisten in Größe S - M - L - XL - XXL – XXXL. Viel Spaß beim Aussuchen.
01.03.2013 - 13:29
|
|||||||
Erik#eriksweater |
|||||||
|
|
|||||||
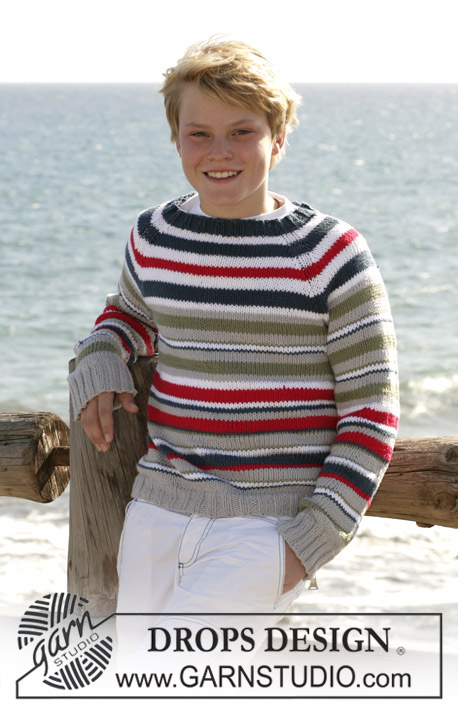
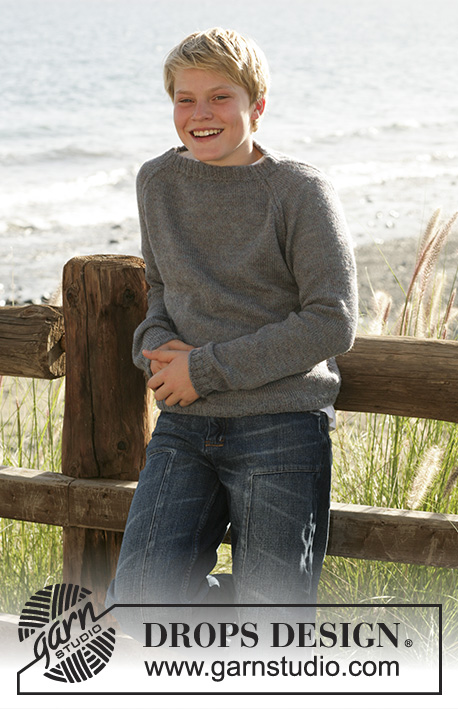
Maglione lavorato ai ferri con raglan e motivo a punto fantasia in 2 capi di DROPS Alpaca. Taglie: bambini da 5 a 14 anni.
DROPS Children 15-11 |
|||||||
|
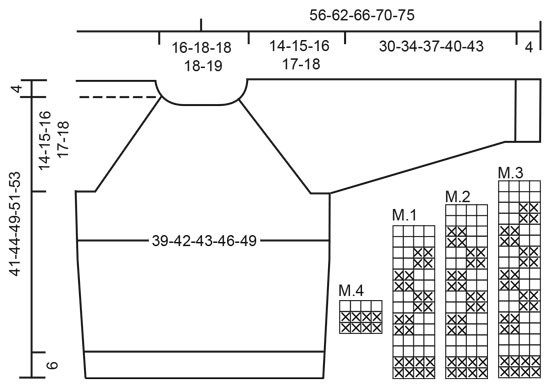
CAMPIONE: 19 m x 25 f con i f n° 4 mm con 2 capi di Alpaca a m rasata = 10 x 10 cm COSTE 1: * 2 m rov, 4 m dir *, ripetere *-*. COSTE 2: * 3 m dir, 3 m rov *, ripetere *-*. SUGGERIMENTO PER LE DIMINUZIONI (applicato al raglan): Diminuire come segue dal diritto del lavoro: iniziare 3 m prima del segnapunti: 2 m insieme a rov, 2 m dir (il segnapunti è al centro di queste 2 m), 2 m insieme a rov. SUGGERIMENTO PER IL LAVORO (applicato al collo): Per evitare buchi quando si gira il lavoro, passare la 1° m a dir quando si torna indietro e tirare bene il filo. MOTIVO: Diagrammi M.1-M.4. I diagrammi sono visti dal diritto del lavoro. -------------------------------------------------------- DAVANTI E DIETRO: Lavorato in tondo sui f circolari. Avviare 132-138-144-156-168 m con i f circolari n° 4 mm con 2 capi di Alpaca DROPS. Lavorare 1 giro a m legaccio. Inserire 1 segnapunti all'inizio del giro e 1 segnapunti dopo 66-69-72-78-84 m (= centro dei lati). Continuare a COSTE 1 – leggere la spiegazione sopra. Lavorare fino a quando le coste misurano 6 cm. Continuare a m rasata. Quando il lavoro misura 9 cm aumentare 1 m a ogni lato del srgnapunti (= 4 aumenti) ogni 4,5-4-5-5,5-5,5 cm per un totale di 4-5-5-5-5 volte = 148-158-164-176-188 m. Quando il lavoro misura 27-29-33-34-35 cm intrecciare 8 m a ogni lato per lo scalfo (cioè 4 m a ogni lato di ogni segnapunti) = 132-142-148-160-172 m rimaste in totale per il davanti e il dietro. Mettere il lavoro da parte. MANICA: Avviare 42-42-48-48-48 m con i f a doppia punta n° 4 mm con 2 capi di Alpaca DROPS. Lavorare 1 giro a m legaccio. Continuare a COSTE 1 – leggere la spiegazione sopra. Quando il lavoro misura 4 cm continuare a m rasata. Quando il lavoro misura 8-8-10-10-10 cm aumentare 2 m al centro sotto la manica ogni 2,5-2,5-3-2,5-2,5 cm 10-12-10-13-14 volte in totale = 62-66-68-74-76 m. Quando il lavoro misura 34-38-41-44-47 cm intrecciare 8 m al centro sotto il braccio = 54-58-60-66-68 m. Lasciare il lavoro da parte e lavorare un'altra manica. SPRONE: Trasferire le maniche sullo stesso f circolare del davanti e dietro all'altezza degli intrecci per lo scalfo = 240-258-268-292-308 m. Lavorare 1 giro a m legaccio (ALLO STESSO TEMPO nella taglia 7/8 anni distribuire 2 aumenti in modo uniforme = 260 m). Inserire 1 segnapunti in tutti i punti di passaggio tra il davanti e il dietro e le maniche (= 4 segnapunti). Iniziare con il motivo e il raglan sul giro successivo come segue: MOTIVO: lavorare il motivo seguendo il diagramma in modo continuato sul f e in altezza come segue: TAGLIA 5/6: M.1 (= 14 f), M.4 (= 3 f), M.1 (= 14 f) e M.4 (= 3 f). 34 f in totale = 14 cm. TAGLIA 7/8: lavorare 1 giro dir, M.1 (= 14 f), M.4 (= 3 f), 1 giro dir, M.1 (= 14 f) e M.4 (= 3 f). 36 f in totale = 15 cm. TAGLIA 9/10: 1 giro dir, M.2 (= 16 f), M.4 (= 3 f), M.2 (= 16 f) e M.4 (= 3 f). 39 f in totale = 16 cm. TAGLIA 11/12: 1 giro dir, M.3 (= 18 f), M.4 (= 3 f), M.2 (= 16 f) M.4 (= 3 f). 41 f in totale = 17 cm. TAGLIA 13/14: 1 giro dir, M.3 (= 18 f), M.4 (= 3 f), 1 giro dir M.3 (= 18 f), M.4 (= 3 f). 44 f in totale = 18 cm. RAGLAN: Diminuire 1 m a ogni lato dei 4 segnapunti (= 8 diminuzioni) – leggere il suggerimento per le diminuzioni. Diminuire a f alterni 15-15-17-16-18 volte e su ogni f 4-6-5-9-8 volte. Ci sono 88-92-92-92-100 m rimaste sul f alla fine di tutte le diminuzioni per il raglan. Lasciare le m sul f e lasciare i segnapunti nel lavoro. Tagliare il filo. Il lavoro misura circa 45-48-53-55-57 cm fino alla spalla. ALZATA SUL DIETRO DEL COLLO: Lavorare un'alzata sulle spalle e sul dietro del collo per rendere più bello il collo. Lavorare l'alzata come segue: iniziare all'altezza del segnapunti dietro la manica sinistra (iniziare lavorando la 1° m sulla manica). Lavorare la manica avanti e indietro fino al segnapunti sul davanti della manica sinistra. Girare il lavoro – leggere il SUGGERIMENTO PER IL LAVORO. Tornare indietro sulle m sulla manica sinistra, continuare sul dietro e la manica destra fino al segnapunti sul davanti della manica destra. Girare il lavoro. Tornare indietro sulla manica destra e continuare sul dietro fino al segnapunti sul dietro della manica sinistra. Girare il lavoro. Continuare a lavorare M.4 avanti e indietro sulle m sul dietro (dal segnapunti sul dietro della manica sinistra al segnapunti sul dietro della manica destra). Quando M.4 è stato lavorato 1 volta in altezza girare il lavoro e lavorare 1 giro a m legaccio (dal diritto del lavoro) su tutte le m e ALLO STESSO TEMPO distribuire 10-8-8-8-10 diminuzioni in modo uniforme = 78-84-84-84-90 m. COLLO: Continuare il giro sul f. Lavorare a COSTE 2 – leggere la spiegazione sopra. Quando le coste misurano 6 cm intrecciare senza stringere, dir su dir e rov su rov. CONFEZIONE: Piegare le coste a metà sulla scollatura verso il rovescio del lavoro e cucirle sull'interno. Cucire le aperture sotto le braccia. |
|||||||
Spiegazioni del diagramma |
|||||||
|
|||||||
 |
|||||||
Avete terminato questo modello?Allora taggate le vostre foto con #dropspattern #eriksweater o inviatele alla #dropsfan gallery. Avete bisogno di aiuto con questo modello?Troverete 19 video tutorial, una sezione per i commenti/domande e molto altro guardando il modello su www.garnstudio.com © 1982-2026 DROPS Design A/S. Ci riserviamo tutti i diritti. Questo documento, compreso tutte le sue sotto-sezioni, è protetto dalle leggi sul copyright. Potete leggere quello che potete fare con i nostri modelli alla fine di ogni modello sul nostro sito. |
|||||||


Con oltre 40 anni di esperienza nel design di modelli di maglia e uncinetto, DROPS Design offre la più estesa collezione di modelli gratuiti su internet - tradotti in 17 lingue. Ad oggi vi possiamo fornire 324 cataloghi e 12290 modelli - 9561 dei quali sono tradotti in Italiano.
Ci stiamo impegnando molto per darvi il meglio che vi possiamo offrire in termini di maglia e uncinetto, ispirazioni e consigli così come filati di grande qualità ad un prezzo incredibile! Volete utilizzare i nostri modelli per qualcosa d'altro oltre al vostro uso personale? Potete leggere tutto ciò che è consentito nel testo sul Copyright in basso su tutte le pagine dei nostri modelli. Buon lavoro!
Lasciare un commento sul modello DROPS Children 15-11
Noi saremmo felici di ricevere i tuoi commenti e opinioni su questo modello!
Se vuoi fare una domanda, fai per favore attenzione a selezionare la categoria corretta nella casella qui sotto per velocizzare il processo di risposta. I campi richiesti sono indicati da *.