
Categorie popolari
State cercando un filato?


Commenti / Domande (10)
![]() Sophie ha scritto:
Sophie ha scritto:
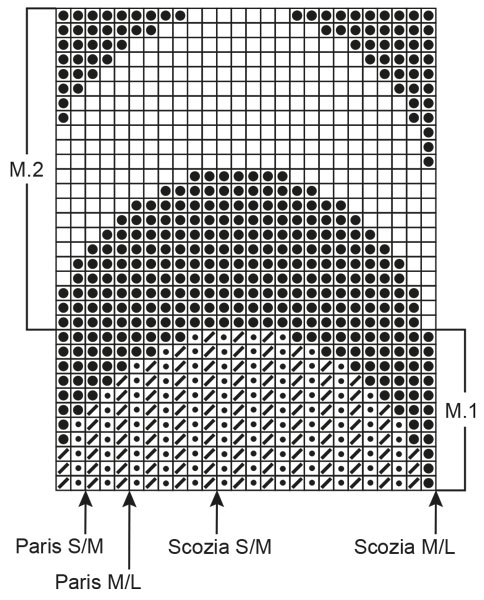
Hallo, ich bin ein bisschen verwirrt von den beiden Pfeilen im Muster. Für Größe S/M umfassen sie 11 Maschen für das Wellenmuster, beginnend und endend mit einer verdrehten Masche (Fortsetzung des Bündchenmusters), Wenn ich diese 11 Maschen immer hintereinanderstricke, habe ich also immer wieder zwei verdrehte rechte Maschen nebeneinander und das Muster stimmt alternierend mal mit dem darunterliegenden Bündchenmuster überein, und mal nicht. Lese ich das richtig so? Vielen Dank!
25.07.2024 - 15:20DROPS Design ha risposto:
Liebe Sophie, das Wellenmuster beginnt mit dem Pfeil, aber dann wird es von ganz vom Anfang an wiederholt. Also stricken Sie beim ersten Mal die 11 Maschen, dann den ganzen Rapport von vorne ab der Linksmasche, also 26 Maschen, und wiederholen auch die ganze Zeit diesen Rapport. Der Pfeil zeigt nur an, wo das Muster begonnen wird, damit es symmetrisch zu liegen kommt. Viel Spaß beim Stricken!
28.07.2024 - 09:57
![]() Marie ha scritto:
Marie ha scritto:
Bonjour, Je ne comprends pas bien le nombre de mailles à rabattre pour les emmanchures et l'encolure. Il s'agit bien de rabattre des mailles et non des diminutions? Serait-il possible d'avoir des précisisons, car je ne comprends pas quand vous dites "1 fois 2 m et 12-13 fois 1 m alternativement tous les 3 ET 4 rangs. Merci beaucoup!
20.04.2023 - 00:07DROPS Design ha risposto:
Bonjour Marie, effectivement, on doit bien rabattre ces mailles et pas les diminuer. Vous allez rabattre au début de chaque rang de chaque côté 2 mailles au début des 2 rangs suivants puis 1 m au début de chaque rang de chaque côté alternativement tous les 3 et 4 rangs - dans cette leçon, nous expliquons comment procéder pour des augmentations/diminutions, procédez de la même façon pour rabattre les mailles, rappelez-vous bien qu'elles doivent être rabattues de chaque côté (en début de rang sur l'endroit ainsi qu'en début de rang sur l'envers). Bon tricot!
20.04.2023 - 10:04
![]() Yve ha scritto:
Yve ha scritto:
I am confused by the starting arrow. I wish to make this in in S/M. However if I start with the 2 P stitches, then P 3 from the L side of the diagram- it means when I pick the rib up again my stitches do not correspond. So I’m knitting in to P and vice versa. With the m/L this wouldn’t happen as the amount of stitches (5) is odd. Can you help!
27.04.2022 - 08:39
![]() Yvette ha scritto:
Yvette ha scritto:
In M1 when the pattern distinguishes between , k1 p1, and then k1 as in rib, p1 as in rib - does this mean to knit AND to purl into the back of loop? Otherwise what is the difference between purl in rib and just a regular purl stitch ! many thanks!
18.02.2022 - 22:18DROPS Design ha risposto:
Dear Yvette, in M1 you work the twisted rib, so k1 is twisted (in the back loop) but p1 is worked as usual. So when it says K1 as in rib, you work in the back loop; otherwise, you work as usual. Happy knitting!
19.02.2022 - 19:09
![]() Ula ha scritto:
Ula ha scritto:
Przepraszam ale nadal nie jest to dla mnie jasne.. Od strzalki ku lewej=2o. Potem od prawej do konca schematu czy znow do strzalki? I potem kazde powtorzenie kolejno zaczynac od prawej do konca czy strzalki? Potem, zzy podzielic robotke na pol i od polowy zaczac od strzalki znow bo tak zrozumialam jest w opisie ' zaczac znow od strzalki i wykonac tyl' mimo ze technicznie dalej robic na okraglo. Pomozcie prosze
19.08.2020 - 17:28DROPS Design ha risposto:
Witaj Ulu, zaczynasz od strzałki ku lewej stronie =2o. Potem od prawej do końca schematu i dalej każde powtórzenie od prawej i do końca schematu (nie od strzałki). Po podziale robótki patrz jak biegnie wzór, tak aby nie było przesunięcia, tylko płynne przejście. Miłej pracy!
20.08.2020 - 15:33
![]() Ula ha scritto:
Ula ha scritto:
Witam ponownie. Czy rowniez kazde powtorzenie wzoru nalezy zaczac od miejsca oznaczonego strzałką? Czy moze po rozpoczeciu w tym miejscu nalezy wykonywac wzor od prawej do lewej do konca okrazenia. Prosze rowniez o wyjasnienie jak zamykac pierwsze 4o. na podkroje rekawow. Z gory dziekuje za pomoc. Pozdrawiam cieplo Team Drops'a
18.08.2020 - 23:25DROPS Design ha risposto:
Witaj Ulu! Jeżeli powtarzamy kilka razy ten sam schemat na szerokość, będziemy go przerabiać najpierw od strzałki do końca rzędu (od prawej do lewej strony), a kolejny motyw będziemy zaczynać już od pierwszego oczka schematu. Co do zamknięcia 4 o. to robimy to tak samo jak w przypadku zakańczania robótki. Powodzenia!
19.08.2020 - 17:07
![]() Ula ha scritto:
Ula ha scritto:
Bardzo prosze o wytlumaczenie jak przerabiac schematy M1 i M2. Czy powtarzajac M1 na okolo i potem ponad nim M 2 czy jakos inaczej. Dziekuje z gory za pomoc..
18.08.2020 - 16:58DROPS Design ha risposto:
Witaj Ulu, najpierw wykonujesz schemat M1 na wysokość, a jak się zakończy, schemat M2 ponad schematem M1. Pozdrawiamy!
19.08.2020 - 16:59
![]() Mette Løbner ha scritto:
Mette Løbner ha scritto:
Husk lige at opdatere maskeantallet til ribben ved hals/ærme til drops Paris, der skal flere masker til end der står.
17.04.2020 - 18:55
![]() Annie ha scritto:
Annie ha scritto:
Hi. I am a bit confused on the s/m and m/l arrows on the diagram. I read in your tips that ig indicates the beginning point, but it doesnt make sense to me :( Please help, i so wish to try this pattern! Also, which size wojld you recomment for the UK size 12-14 Thanks
17.06.2019 - 23:02DROPS Design ha risposto:
Dear Annie, start reading diagram beginning with the stitch for your size and work towards the left (= end of the repeat, ie 2 sts in S/M and 5 sts in M/L, then repeat diagram from the bottom corner on the right side towards the left, until the side (work the remaining stitches after a whole repeat as the first stitches in the repeat). Then Repeat the same on the second half of stitches, pattern will be the same on front and back piece, but will not match on the sides. To find the best matching size, see here. Happy knitting!
18.06.2019 - 08:39
![]() Mimi ha scritto:
Mimi ha scritto:
Jeg prøvde å strikke denne modellen flere ganger, men hver gang ender den opp med å være alt for stor. Selv om jeg er omtrent samme størrelse på modellen, og brukte drops sitt Paris garn?
11.09.2018 - 08:48DROPS Design ha risposto:
Hei Mimi, Det høres ut som strikkefastheten din er for løs. Prøv å bruke en størrelse mindre nål - og strikk en prøvelapp før du starte igjen. God fornøyelse!
11.09.2018 - 08:58
|
|||||||||||||
Siempre Celeste |
|||||||||||||
 |
 |
||||||||||||
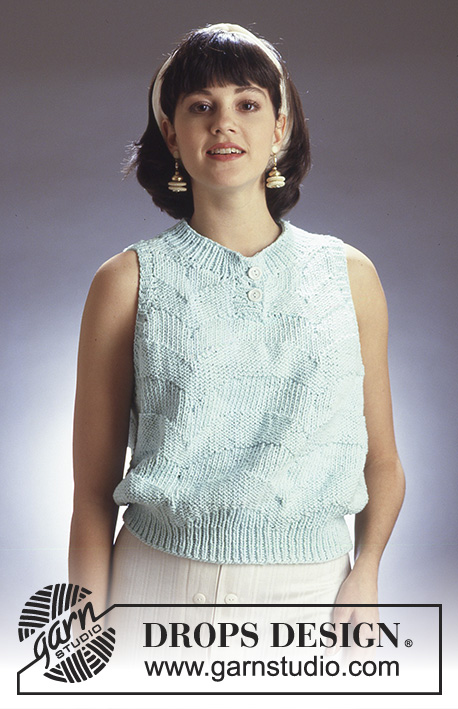
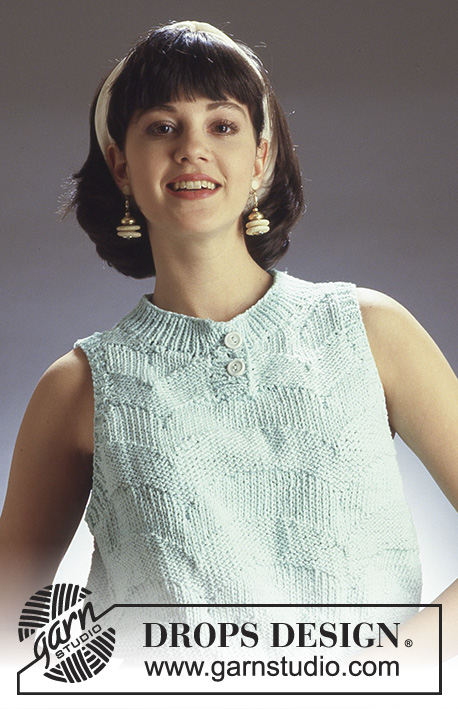
Maglia DROPS con motivo a onde in “Paris. Taglie: S-L.
DROPS 10-9 |
|||||||||||||
|
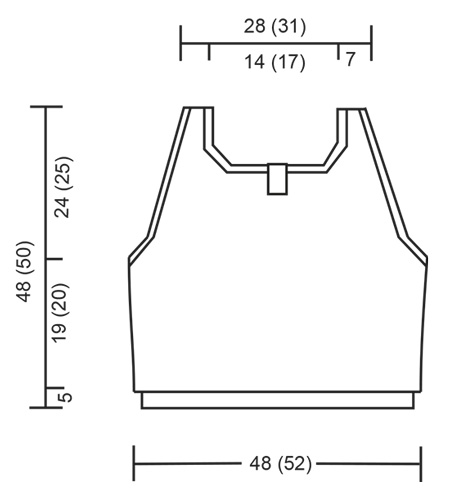
MOTIVO: Vedere il diagramma. Il diagramma è visto dal diritto del lavoro. 1 quadrato = 1 maglia x 1 ferro. Iniziare il motivo all’altezza della freccia e lavorare il motivo sul davanti, iniziare ancora all’altezza della freccia e ripetere il motivo sul dietro. COSTE: * 1 maglia diritto nel filo dietro della maglia, 1 maglia rovescio *, ripetere *-*. ----------------------------------------------- CORPO: Lavorato in tondo con i ferri circolari. Avviare 164-176 maglie con i ferri n° 2,5 mm e lavorare 5 cm a coste. Passare ai ferri n° 5 mm e lavorare M.1 – iniziare all'altezza della freccia e aggiustare l'inizio del giro in modo che le coste e il motivo combacino, lavorare 82-88 maglie per il davanti, poi iniziare ancora all'altezza della freccia e lavorare 82-88 maglie del dietro. Inserire un segnapunti a ogni lato del davanti/dietro, verranno usati quando si intrecciano le maglie a ogni lato. Alla fine M.1 finire il lavoro in M.2. Ricordarsi di mantenere la tensione corretta. Quando il lavoro misura 24-25 cm intrecciare 4 maglie a ogni lato (2 maglie a ogni lato di ogni segnapunti) per lo scalfo e finire il davanti e il dietro in modo separato. DAVANTI: = 78-84 maglie. Intrecciare per lo scalfo a ogni lato: 2 maglie 1 volta, 1 maglia 12-13 volte ogni * 3 e 4 * ferri in modo alternato. ALLO STESSO TEMPO quando il lavoro misura 35-37 cm intrecciare le 6 maglie centrali per lo spacco e finire ogni lato in modo separato. Quando il lavoro misura 40-42 cm intrecciare per modellare la scollatura all’inizio di ogni ferro dal centro davanti: 9-11 maglie 1 volta, 2 maglie 2 volte, 1 maglia 2 volte. Intrecciare le maglie rimaste sulla spalla quando il lavoro misura 48-50 cm. DIETRO: = 78-84 maglie. Intrecciare per lo scalfo come descritto per il davanti. Quando il lavoro misura 43-45 cm intrecciare le 26-30 maglie centrali per il collo e finire ogni lato in modo separato. Intrecciare per modellare la scollatura a ferri alterni: 2 maglie 2 volte, 1 maglia 1 volta. Intrecciare le maglie rimaste sulla spalla quando il lavoro misura 48-50 cm. CONFEZIONE: Cucire le spalle. Riprendere circa 70 maglie attorno alla scollatura sui ferri circolari n° 2,5 mm e lavorare 4 cm a coste, intrecciare. Riprendere 14 maglie sul lato sinistro dello spacco con i ferri n° 2,5 mm e lavorare 4 cm a coste, intrecciare. Ripetere lungo il lato destro dello spacco, ma dopo 2 cm fare 2 asole distribuite in modo uniforme. 1 asola = intrecciare 2 maglie e avviare 2 nuove maglie sul ferro di ritorno. Intrecciare quando le coste misurano 4 cm. Mettere la parte a coste di destra sopra quella di sinistra nella parte inferiore dello spacco e affrancare. Riprendere circa 75 maglie attorno a ogni scalfo con i ferri circolari n° 2,5 mm e lavorare 1,5 cm a coste, intrecciare. |
|||||||||||||
Spiegazioni del diagramma |
|||||||||||||
|
|||||||||||||
 |
|||||||||||||
 |
|||||||||||||
Avete terminato questo modello?Allora taggate le vostre foto con #dropspattern o inviatele alla #dropsfan gallery. Avete bisogno di aiuto con questo modello?Troverete 19 video tutorial, una sezione per i commenti/domande e molto altro guardando il modello su www.garnstudio.com © 1982-2026 DROPS Design A/S. Ci riserviamo tutti i diritti. Questo documento, compreso tutte le sue sotto-sezioni, è protetto dalle leggi sul copyright. Potete leggere quello che potete fare con i nostri modelli alla fine di ogni modello sul nostro sito. |
|||||||||||||


Con oltre 40 anni di esperienza nel design di modelli di maglia e uncinetto, DROPS Design offre la più estesa collezione di modelli gratuiti su internet - tradotti in 17 lingue. Ad oggi vi possiamo fornire 324 cataloghi e 12290 modelli - 9561 dei quali sono tradotti in Italiano.
Ci stiamo impegnando molto per darvi il meglio che vi possiamo offrire in termini di maglia e uncinetto, ispirazioni e consigli così come filati di grande qualità ad un prezzo incredibile! Volete utilizzare i nostri modelli per qualcosa d'altro oltre al vostro uso personale? Potete leggere tutto ciò che è consentito nel testo sul Copyright in basso su tutte le pagine dei nostri modelli. Buon lavoro!
Lasciare un commento sul modello DROPS 10-9
Noi saremmo felici di ricevere i tuoi commenti e opinioni su questo modello!
Se vuoi fare una domanda, fai per favore attenzione a selezionare la categoria corretta nella casella qui sotto per velocizzare il processo di risposta. I campi richiesti sono indicati da *.