
Categorie popolari
State cercando un filato?


Commenti / Domande (28)
![]() Gudrun ha scritto:
Gudrun ha scritto:
Guten Tag, ich habe beim Rückenteil auf jeder Seite die Maschen abgenommen. Die Zunahme soll nach 5 cm erfolgen. Muss ich nun erst noch 5 cm stricken? Vielen Dank für Ihre Unterstützung Gudrun
15.03.2025 - 12:58DROPS Design ha risposto:
Liebe Gudrun, die Abnahmen sollen nach ca 4 cm fertig sein (insgesamt. 11 Reihen *1. R: Abnahme, 2. Reihe ohne Abnahmen. 3. Reihe abnehmen; 4. Reihe ohne abnahmen, 5. Reihe abnehmen*, insgesamt 2 Mal von *bis* stricken, dann bei der nächsten Reihe abnehmen = 7 Mal insgesamt abwechslungsweise in jeder Reihe und in jeder 2. Reihe), so können Sie die Zunahmen nach 5 cm ab Anschlagksante anfangen. Viel Spaß beim Stricken!
17.03.2025 - 07:39
![]() Cecile Vandenborre ha scritto:
Cecile Vandenborre ha scritto:
Zou graag dat patroon willen bestellen vind het heel mooi en wil het proberen het te breien bedankt groetjes Cecile
20.02.2025 - 07:32
![]() Gre Minnaert ha scritto:
Gre Minnaert ha scritto:
Mooie spencer ik vraag me af of de armsgaten niet te wijd zijn
03.02.2025 - 19:55
![]() Monique Gallardo ha scritto:
Monique Gallardo ha scritto:
Le modèle de ce gilet est très beau. Modèle que je cherchais... Merci pour partage...
14.11.2024 - 21:40
![]() Brigid ha scritto:
Brigid ha scritto:
It's still unclear to me. one surface is mostly knit stiches (smoother texture), and one surface is mostly purl (bumpy texture) which is the right side and which is the wrong side? Thank you
13.11.2024 - 11:25DROPS Design ha risposto:
Dear Brigid, the right side is the side where you work alternately (K1, P1) - you can add a marker on this side of piece to remember that's the right side. Happy knitting!
13.11.2024 - 17:06
![]() Brigid ha scritto:
Brigid ha scritto:
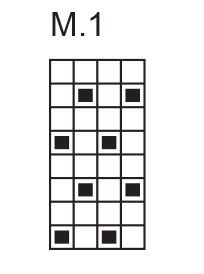
When knitting the ridge M.1, every second row is entirely knit stitches. Are these knit rows on the right side or the wrong side of the piece ? Thank you
12.11.2024 - 23:38DROPS Design ha risposto:
Dear Brigid, M.1 is a kind of seed/moss stitch, so start from RS with row 1: (K1, P1) repeat from (to), Row2: purl all stitches, Row 3: (P1, K1) repeat from (to), Row 4: purl all stitches. Repeat these 4 rows. Happy knitting!
13.11.2024 - 08:05
![]() Brigid ha scritto:
Brigid ha scritto:
Does the back of this also have the texture, or is it just stocking stitch?
07.10.2024 - 15:42DROPS Design ha risposto:
Dear Brigid, back piece is here worked entirely in stocking stitch, only front pieces are worked in moss/seed stitch. Happy knitting!
07.10.2024 - 16:08
![]() Ellen ha scritto:
Ellen ha scritto:
How do you do the bind off on the right front piece after casting on the stitches?
04.09.2024 - 15:51DROPS Design ha risposto:
Hi Ellen, The text should say to decrease, not bind off, inside the 1 edge stitch by the armhole. Decrease by working 2 stitches together after working the edge stitch. Happy knitting!
05.09.2024 - 06:41
![]() Teresa Soza ha scritto:
Teresa Soza ha scritto:
Please, I need a more detalles instruction for the increases in the L side at the beginning of front
04.08.2024 - 22:02DROPS Design ha risposto:
Dear Mrs Soza, for the right front piece you will increase on the right side of piece (1 time on every row, 2 times on every other row) - either at the beg of row from RS or at the end of row from WS; and at the same time increase on the left side of piece = at the end of every row from RS. Happy knitting!
05.08.2024 - 08:14
![]() Bärbel Grabsch ha scritto:
Bärbel Grabsch ha scritto:
Hallo, was ist mit den Zunahmen in jeder Reihe gemeint? Bezieht sich das nur auf Hinreihen oder muss in Hin-und Rückreihen zugenommen werden? Vor den Randmaschen und nach den Randmaschen? Ich habe schon einige Teile nach euren Anleitungen gestrickt, komne diesmal aber irgendwie nicht zurecht. Liebe Grüße Bärbel
17.07.2024 - 16:32DROPS Design ha risposto:
Liebe Bärbel, wenn in jeder Reihe zugenommen werden soll, dann sind auch die Rück-Reihen gemeint (also Hin- UND Rück-Reihen). Die Zunahmen arbeiten Sie direkt neben der Randmasche (die Randmasche bleibt immer ganz außen am Rand). Gutes Gelingen weiterhin!
22.07.2024 - 10:16
|
|||||||
Tropical Oceania |
|||||||
 |
 |
||||||
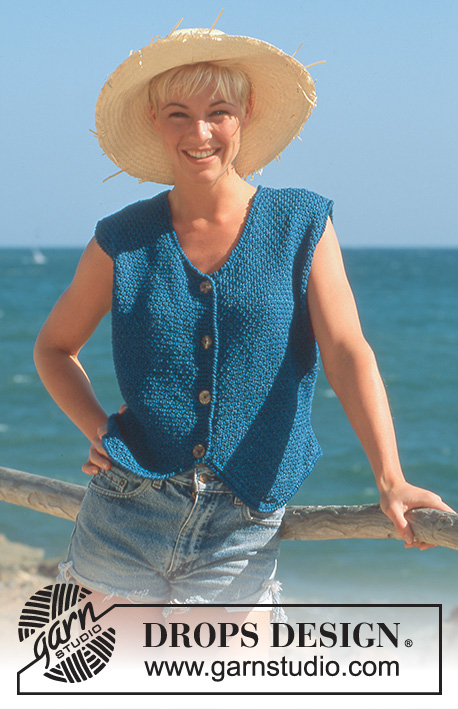
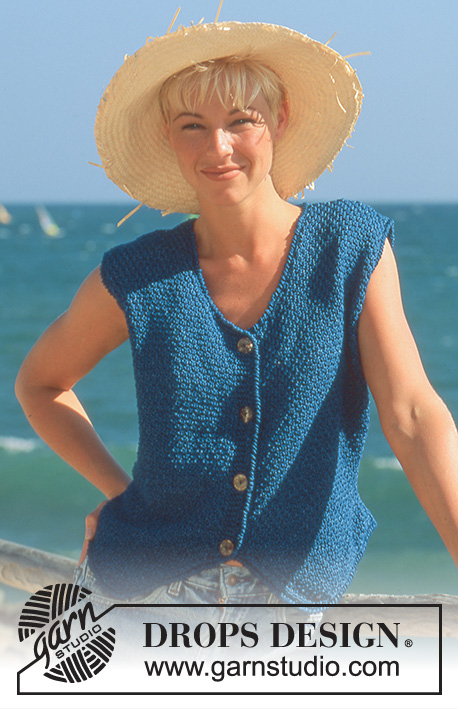
Gilet DROPS con motivo a punto fantasia.
DROPS 41-7 |
|||||||
|
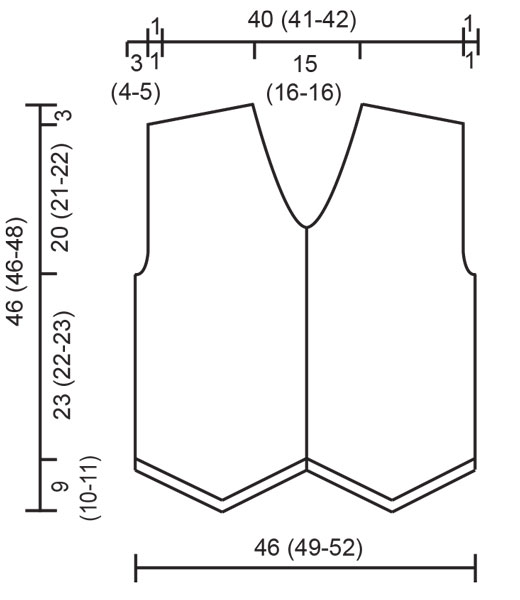
CAMPIONE: 20 maglie x 26 ferri con i ferri n° 4 mm e a maglia rasata = 10 x 10 cm. COSTA/MAGLIA LEGACCIO (avanti e indietro): 1 costa in altezza = 2 ferri. 1° ferro diritto, 2° ferro diritto. ASOLE: Quando il lavoro misura 1 (1-1), 10 (10-11), 19 (19-20) e 28 (28-30) cm intrecciare per le asole sul davanti destro come segue: intrecciare la 3° e la 4° e avviare 2 nuove maglie sulle maglie intrecciate sul ferro successivo. DAVANTI DESTRO: Avviare 3 maglie con i ferri n° 4 mm e lavorare M.1 e allo stesso tempo aumentare a ogni lato all’interno delle maglie di vivagno come segue: sul lato destro (= verso il centro davanti): 1 maglia 14 (15-16) volte per la taglia S: Alternato su ogni ferro e a ferri alterni e per le taglie M+L: in modo alternato su ogni ferri, ogni 2 ferri e ogni 2 ferri e sul lato sinistro: 2 maglie 13 (14-15) volte per le taglie S+M: in modo alternato su ogni ferro, ogni 2 ferri e ogni 2 ferri e per la taglia L: ogni 2 ferri = 43 (46-49) maglie. Il lavoro misura circa 9 (10-11) cm. Misurare il lavoro da qui. Avviare 1 maglia sul lato sinistro per la cucitura laterale e 5 maglie sul lato destro (= bordo davanti) = 49 (52-55) maglie (compresa 1 maglia di vivagno per la cucitura). Lavorare le 5 maglie del bordo davanti a coste (maglia legaccio) fino alla fine del lavoro. Ricordarsi delle asole sul bordo davanti destro – vedere la spiegazione sopra. Continuare ad intrecciare sul lato sinistro all’interno delle maglie di vivagno in modo alternato su ogni ferro, ogni 2 ferri e ogni 2 ferri: 1 maglia 7 (7-7) volte = 42 (45-48) maglie (compresa 1 maglia di vivagno). Quando il lavoro misura 5 (5-5) cm aumentare sul lato sinistro all’interno delle maglie di vivagno ogni 4 ferri: 1 maglia 10 (10-10) volte = 52 (55-58) maglie (compresa 1 maglia di vivagno). Quando il lavoro misura 23 (22-23) cm intrecciare per lo scalfo sul lato sinistro a ferri alterni: 2 maglie 3 (3-4) volte, 1 maglia 1 (3-3) volte = 45 (46-47) maglie. Quando il lavoro misura 29 (29-31) cm intrecciare per il collo sul lato destro a ferri alterni: 5 (6-6) maglie 1 volta, 2 maglie 3 volte, 1 maglia 4 volte e poi ogni 4 ferri: 1 maglia 5 volte. Allo stesso tempo quando il lavoro misura 43 (43-45) cm intrecciare per la spalla dallo scalfo verso la scollatura a ferri alterni: 6 maglie 3 volte e poi intrecciare le 7 (7-8) maglie rimaste. Ora tutte le maglie sono state intrecciate. Il lavoro misura circa 46 (46-48) cm (lunghezza totale compreso lo spacco = circa 55 (56-59) cm.) DAVANTI SINISTRO: lavorare come per il destro, ma a specchio e senza asole sul bordo davanti. DIETRO: Avviare 88 (94-100) maglie (compresa 1 maglia di vivagno a ogni lato per la cucitura) con i ferri n° 4 mm e lavorare a maglia rasata e allo stesso tempo intrecciare a ogni lato all’interno delle maglie di vivagno in modo alternato su ogni ferro, ogni 2 ferri e ogni 2 ferri: 1 maglia 7 (7-7) volte = 74 (80-86) maglie (comprese 2 maglie di vivagno). Quando il lavoro misura 5 (5-5) cm aumentare a ogni lato all’interno delle maglie di vivagno ogni 4 ferri: 1 maglia 10 (10-10) volte = 94 (100-106) maglie. Quando il lavoro misura 23 (22-23) cm intrecciare a ogni lato per lo scalfo verso a ferri alterni: 2 maglie 3 (3-4) volte, 1 maglia 1 (3-3) volte = 80 (82-84) maglie. Quando il lavoro misura 43 (43-45) cm intrecciare a ogni lato per la spalla dallo scalfo verso il centro del lavoro a ferri alterni: 6 maglie 3 volte e poi intrecciare le 7 (7-8) maglie rimaste. Allo stesso tempo, quando il lavoro misura 44 (44-46) cm intrecciare le 26 (28-28) maglie centrali per il collo. Poi intrecciare 2 maglie verso il collo sul ferro successivo per modellare la scollatura. Ora tutte le maglie devono essere intrecciate e il lavoro misura circa 46 (46-48). CONFEZIONE: Cucire le spalle e i margini dei lati. Lavorare 1 riga a maglie basse con il filo singolo dal diritto del lavoro con l’uncinetto n° 4 mm distribuita come segue: 30 maglie sul dietro del collo, 38 maglie lungo il collo a V, 55 maglie sul bordo davanti, 28 maglie sulla parte davanti della punta dello spacco, 30 maglie sull’altra parte della punta dello spacco, 70 maglie sul dietro. Poi lavorare una riga a punto gambero dal diritto del lavoro come segue: lavorare una riga a maglie basse nel verso opposto, cioè da sinistra a destra senza girare il lavoro. Le maglie a punto gambero possono anche essere lavorate come segue: * Prendere il filo sotto attraverso la maglia bassa rendere la maglia lunga, (circa 2 cm in altezza), ora ruotare l’uncinetto di 360° e in senso orario, fare un nuovo occhiello con l’uncinetto e farlo passare attraverso entrambe le maglie sull’uncinetto *. Ripetere *-*. Ripetere entrambe le righe attorno allo scalfo con circa 85 maglie. Attaccare i bottoni. |
|||||||
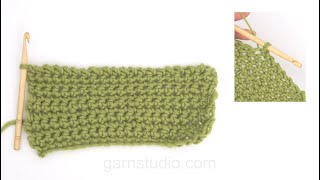
Spiegazioni del diagramma |
|||||||
|
|||||||
 |
|||||||
 |
|||||||
Avete terminato questo modello?Allora taggate le vostre foto con #dropspattern o inviatele alla #dropsfan gallery. Avete bisogno di aiuto con questo modello?Troverete 17 video tutorial, una sezione per i commenti/domande e molto altro guardando il modello su www.garnstudio.com © 1982-2026 DROPS Design A/S. Ci riserviamo tutti i diritti. Questo documento, compreso tutte le sue sotto-sezioni, è protetto dalle leggi sul copyright. Potete leggere quello che potete fare con i nostri modelli alla fine di ogni modello sul nostro sito. |
|||||||


Con oltre 40 anni di esperienza nel design di modelli di maglia e uncinetto, DROPS Design offre la più estesa collezione di modelli gratuiti su internet - tradotti in 17 lingue. Ad oggi vi possiamo fornire 324 cataloghi e 12290 modelli - 9561 dei quali sono tradotti in Italiano.
Ci stiamo impegnando molto per darvi il meglio che vi possiamo offrire in termini di maglia e uncinetto, ispirazioni e consigli così come filati di grande qualità ad un prezzo incredibile! Volete utilizzare i nostri modelli per qualcosa d'altro oltre al vostro uso personale? Potete leggere tutto ciò che è consentito nel testo sul Copyright in basso su tutte le pagine dei nostri modelli. Buon lavoro!
Lasciare un commento sul modello DROPS 41-7
Noi saremmo felici di ricevere i tuoi commenti e opinioni su questo modello!
Se vuoi fare una domanda, fai per favore attenzione a selezionare la categoria corretta nella casella qui sotto per velocizzare il processo di risposta. I campi richiesti sono indicati da *.