
Categorie popolari
State cercando un filato?


Commenti / Domande (59)
![]() Cathy ha scritto:
Cathy ha scritto:
Bjr Je ne vois rien concernant les boutonnières dans vos explications !
14.12.2025 - 19:32
![]() Jean Bawcutt ha scritto:
Jean Bawcutt ha scritto:
How do i do the I CORD Edge? Is it just a rib pattern?
09.12.2025 - 17:15DROPS Design ha risposto:
Hi Jean, Here is a link to a video showing you how to work the I-cord edge: https://www.garnstudio.com/video.php?id=1343&lang=en Regards, Drops Team.
10.12.2025 - 07:02
![]() Diane Crevier ha scritto:
Diane Crevier ha scritto:
Is there away to download this pattern to knitCompanion?
19.11.2025 - 22:24DROPS Design ha risposto:
Hi Diane, Right click on the pattern and you get a drop-down meny where you can click on Save As and save the pattern to the file of your choosing. Regards, Drops Team.
20.11.2025 - 06:23
![]() Arwen ha scritto:
Arwen ha scritto:
Bonjour, Je voudrais bien réaliser ce modèle, mais je ne sais pas ce que veut dire I-cord ??? Merci pour votre réponse
16.11.2025 - 20:20DROPS Design ha risposto:
Bonjour Mme Arwen, c'est une technique qui consiste à former un petit tube tel un tricotin ici, en bordure, retrouvez dans cette vidéo comment on tricote ce type de bordure I-cord avec des mailles point mousse après/avant. Bon tricot!
17.11.2025 - 08:31
![]() Martina ha scritto:
Martina ha scritto:
Hej igen Ignorera min fråga, jag upptäckte nu att det bara är prydnadsknappar!
30.10.2025 - 15:01
![]() Martina ha scritto:
Martina ha scritto:
Hej! När, var och hur stickar man knapphålen?
30.10.2025 - 12:04DROPS Design ha risposto:
Hei MArtina. Det sys 2 pyntknappar i var sida om västen, kantmaskorna från framstycket läggs över kantmaskorna från bakstycket, sedan sys knapparna fast genom båda lager. Placera översta knappen ca 1 cm från ärmhålet och placera den nästa ca 9-10 cm nedanför. mvh DROPS Design
03.11.2025 - 14:21
![]() HALA ha scritto:
HALA ha scritto:
Vill gärna ha förklaring för axel minskning, är minskningen utaxeln eller inne axeln?
29.10.2025 - 19:23
![]() Leclerc ha scritto:
Leclerc ha scritto:
Bonjour. Je vois le nombre de pelotes les aiguilles mais pas l\'explication du modèle...je cherche où. Désolée de vois déranger mais ce débardeur avec boutons me plaît bcp. Bonne journée et merci
24.10.2025 - 14:21DROPS Design ha risposto:
Bonjour Mme Leclerc, faites défiler la page vers le bas, après la liste des fournitures, vous trouverez des photos (modèles que vous pourriez aimer), puis les liens pour acheter la laine selon le pays, la pelote, les boutons et les aiguilles, les explications commencent juste après Explications. Bon tricot!
29.10.2025 - 14:49
![]() Blampain Agnès ha scritto:
Blampain Agnès ha scritto:
Bonjour, comment réaliser le modèle Blue Night Vest avec deux aiguilles et NON une aiguille circulaire? J'attends votre réponse avec impatience pour vous commander le nécessaire. Merci d'avance, Agnès
17.10.2025 - 09:08DROPS Design ha risposto:
Bonjour Agnès, le pull est realise en allers et retours, donc vous pouvez le tricoter avec les aiguilles droites. L'aiguille circulaire peut etre utile pour relever les mailles autour de l'encolure. Pour rabattre les mailles avec I-cord, vous pouvez utiliser 1 aiguille double pointes (est plus courte) ou 1 aiguille droite. Bon tricot!
17.10.2025 - 09:35
![]() Sarah ha scritto:
Sarah ha scritto:
Design pattern drops 254-34 The decrease tip 1 for the armholes . Are the first 10 and last12 stitches extra or inclusive of the 8 I-cord edge stitches? I don’t not understand the instructions.
03.10.2025 - 14:36DROPS Design ha risposto:
Dear Sarah, the first 10 and last 12 stitches include the 8 I-cord edge stitches. That is, work the first 10 stitches of the row (= 8 I-cord edge stitches + 2 stitches) and the last 12 stitches (the first 2 are the new decrease, then 2 more stitches and 8 I-cord edge stitches). Happy knitting!
05.10.2025 - 19:31
|
|||||||
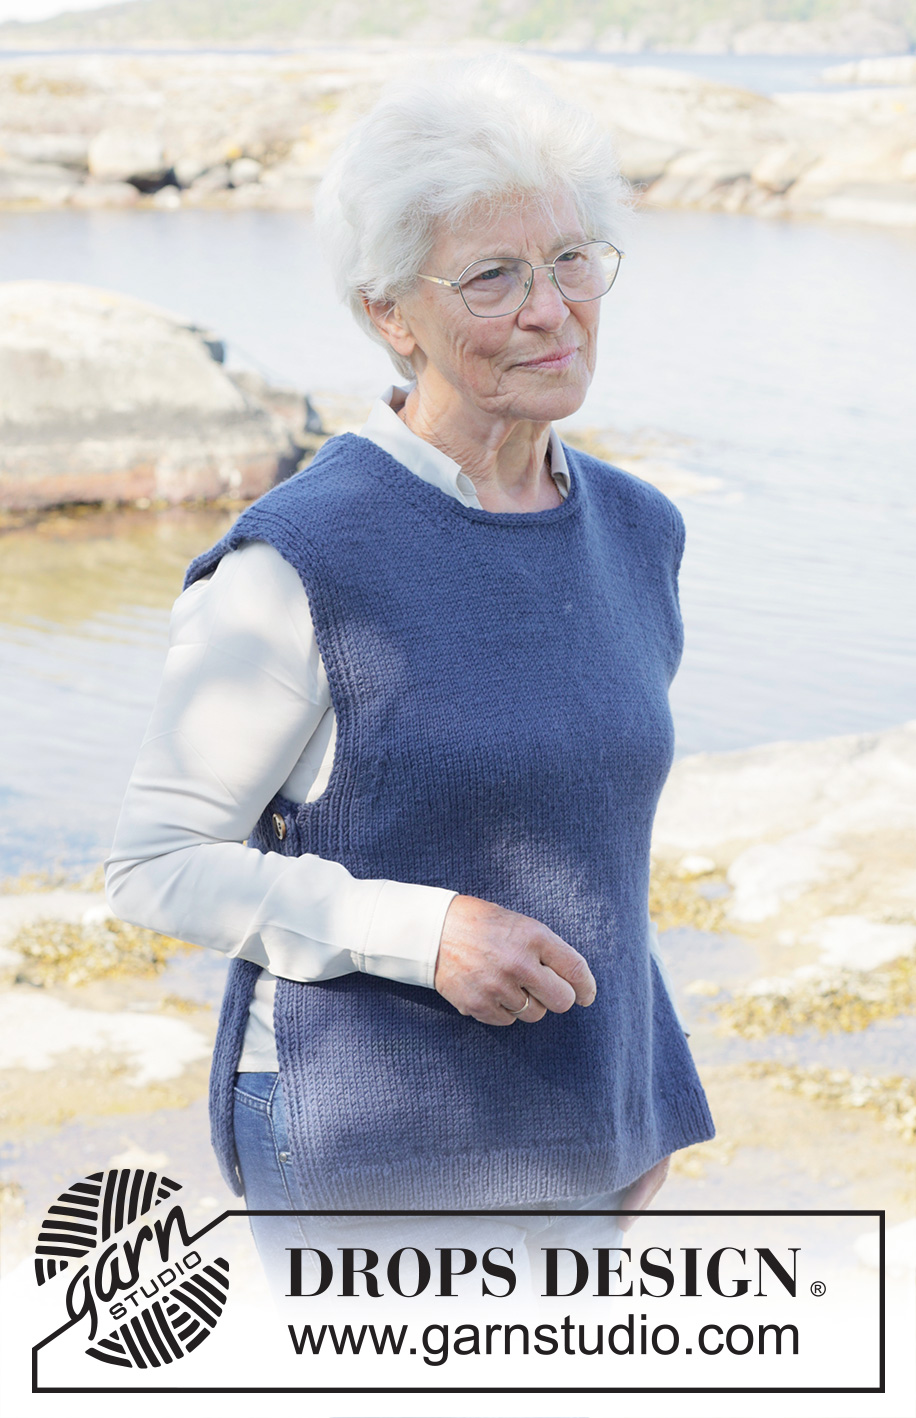
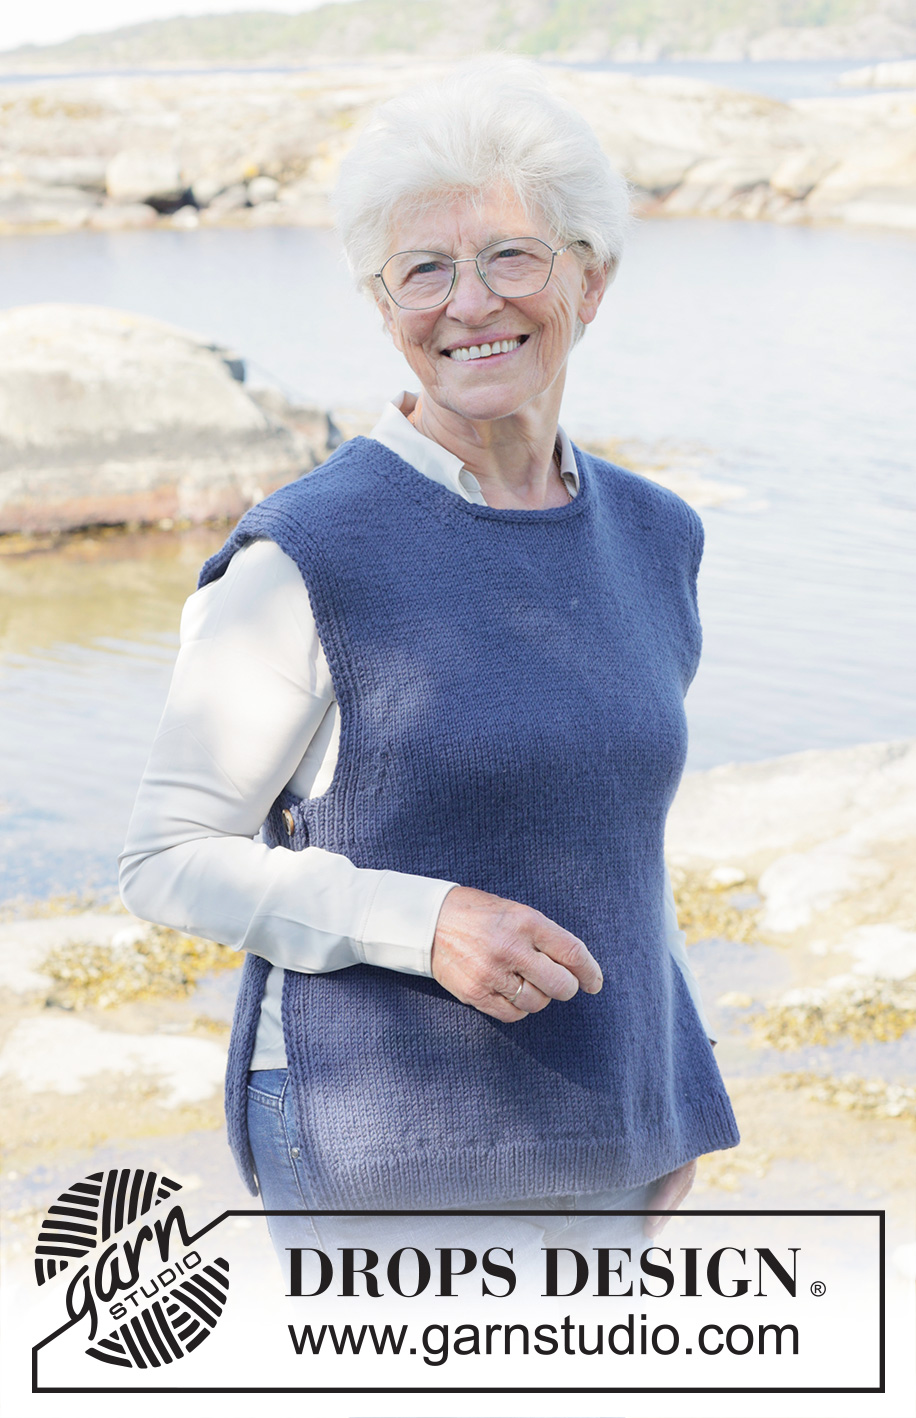
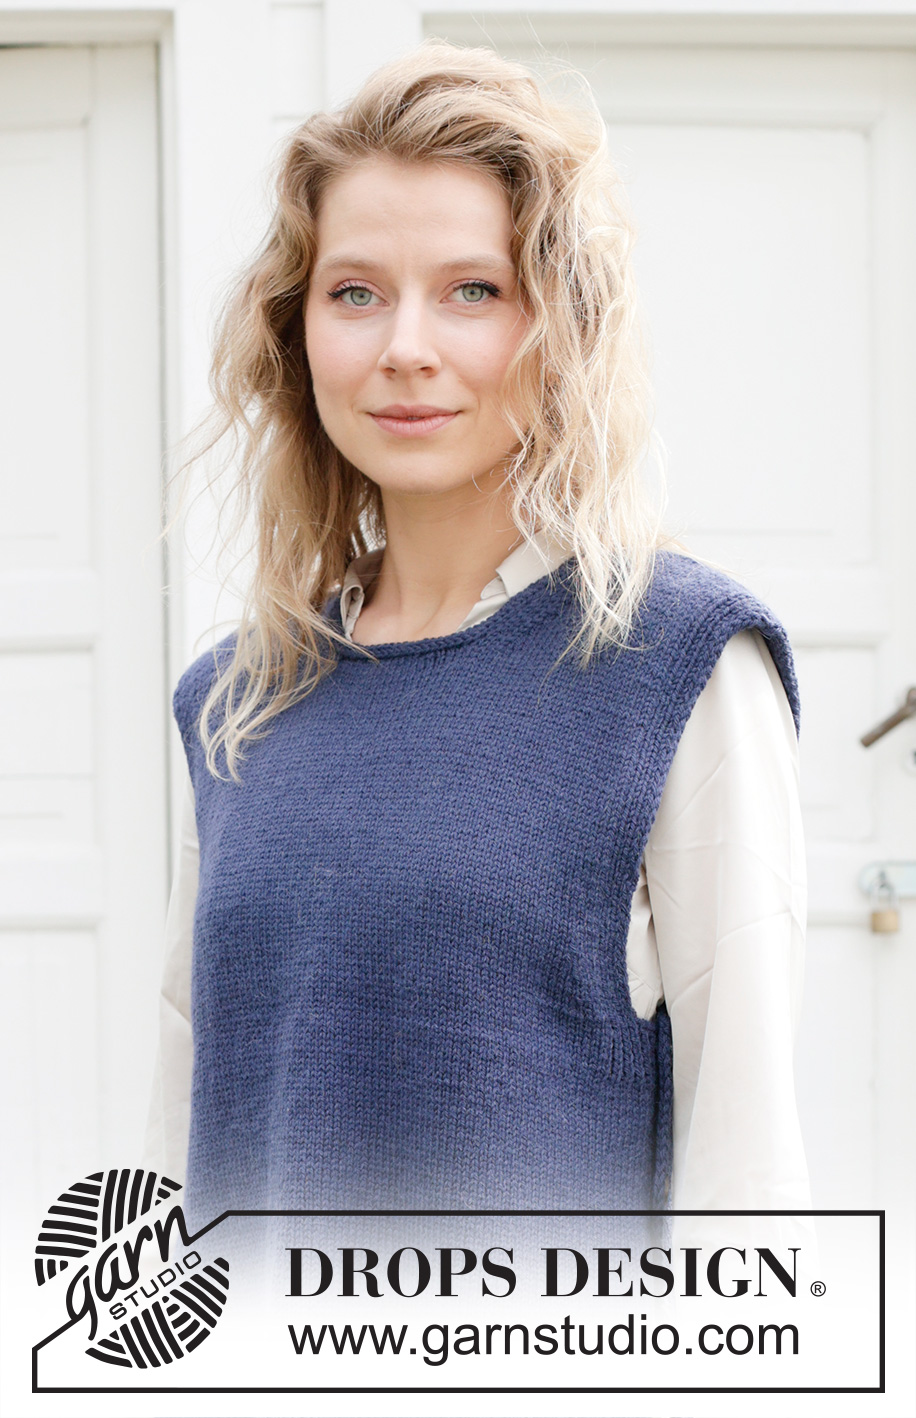
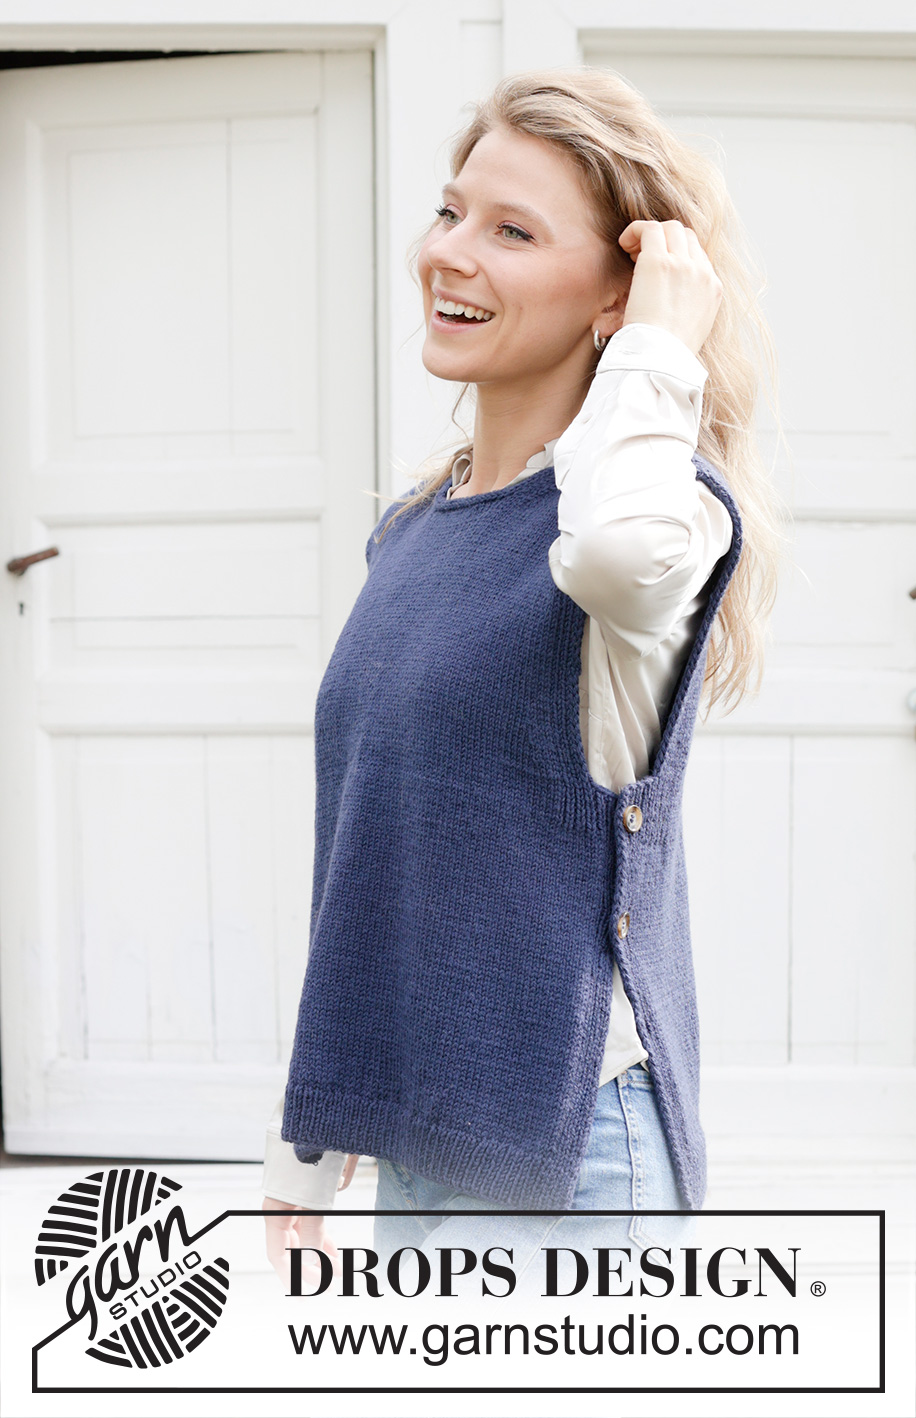
Blue Night Vest#bluenightvest |
|||||||
 |
 |
||||||
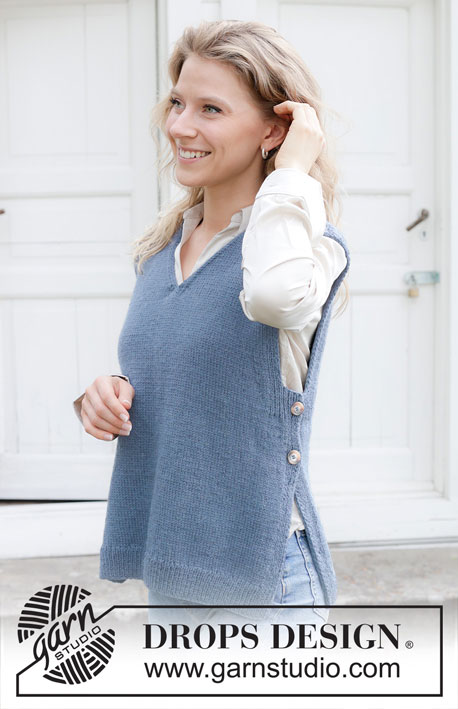
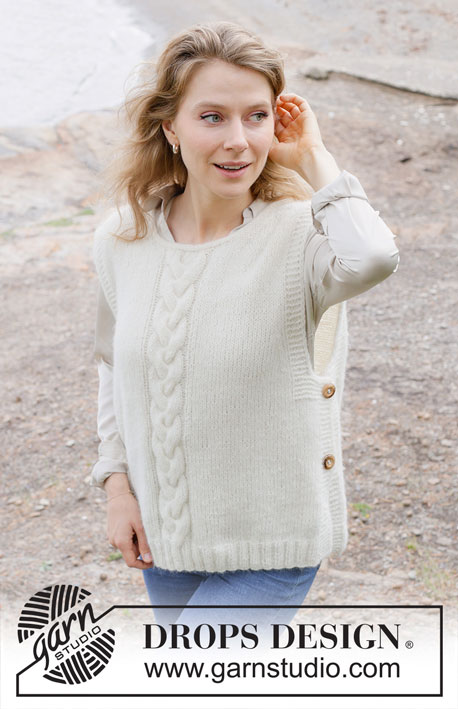
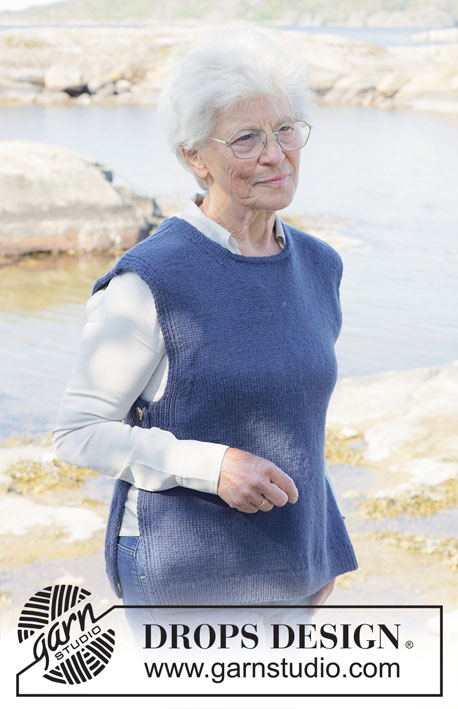
Gilet lavorato ai ferri in DROPS Lima. Lavorato dal basso verso l’alto, con collo rotondo, spacchi laterali e I-cord. Taglie: S - XXXL.
DROPS 254-34 |
|||||||
|
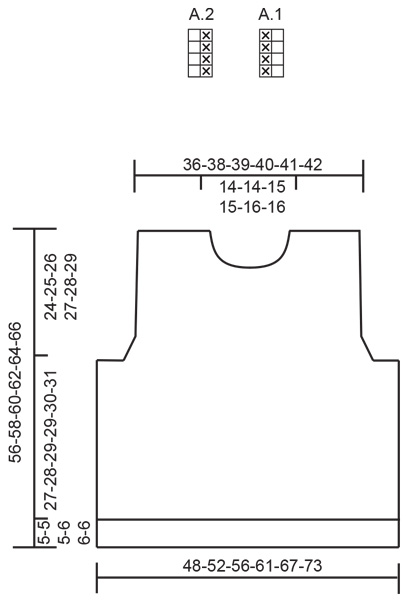
------------------------------------------------------- TECNICHE IMPIEGATE: ------------------------------------------------------- MOTIVO: Vedere i diagrammi A.1 e A.2. I diagrammi mostrano il motivo dal diritto del lavoro. BORDI CON I-CORD: INIZIO DEL FERRO: Passare 1 maglia a rovescio con il filo sul davanti, 1 maglia diritto, lavorare 6 maglie in A.1. FINE DEL FERRO: Lavorare fino a quando rimangono 8 maglie, lavorare 6 maglie con A.2, passare 1 maglia a rovescio con il filo sul davanti, 1 maglia diritto. SUGGERIMENTO PER LE DIMINUZIONI-1 (per gli scalfi): Lavorare tutte le diminuzioni dal diritto del lavoro! INIZIO DEL FERRO: Lavorare le prime 10 maglie come prima, passare 1 maglia a rovescio con il filo sul davanti, 1 maglia diritto e accavallare la maglia passata sulla maglia diritto (= 1 maglia diminuita). FINE DEL FERRO: Lavorare fino a quando rimangono 12 maglie sul ferro, lavorare 2 maglie insieme a diritto (= 1 maglie diminuita), lavorare fino alla fine del ferro come prima. SUGGERIMENTO PER LE DIMINUZIONI-2 (per la scollatura): Lavorare tutte le diminuzioni dal diritto del lavoro! INIZIO DEL FERRO: Lavorare le prime 3 maglie come prima, passare 1 maglia a rovescio con il filo davanti, 1 maglia diritto e accavallare la maglia passata sulla maglia diritto (= 1 maglia diminuita). FINE DEL FERRO: Lavorare fino a quando rimangono 5 maglie sul ferro, lavorare 2 maglie insieme a diritto (= 1 maglie diminuita), lavorare 3 maglie diritto. CHIUSURA AD I-CORD (per la scollatura dietro): Avviare 3 maglie sul ferro destro dal diritto del lavoro. Non girare. Riportare le 3 maglie sul ferro sinistro, in modo che il filo sia 3 maglie all’interno del ferro (il filo si tira durante il lavoro per formare un piccolo tubo). FERRO 1 (diritto del lavoro): 2 maglie diritto, 2 maglie insieme a diritto ritorto. Riportare le 3 maglie dal ferro destro sul ferro sinistro, 2 maglie diritto, 2 maglie insieme a diritto ritorto. Non girare Ripetere il FERRO 1 fino a quando rimangono 3 maglie sul ferro destro. Riportare le 3 maglie sul ferro sinistro. Intrecciare. Cucire un piccolo punto, che unisce l’inizio e la fine dell’i-cord. ------------------------------------------------------- INIZIO DEL LAVORO: ------------------------------------------------------- GILET – BREVE RIASSUNTO DEL LAVORO: Lavorato in piano con i ferri circolari, dal basso verso l’alto. Lavorare il davanti e il dietro in modo separato, cucire le spalle. Attaccare dei bottoni decorativi a ogni lato. Riprendere le maglie attorno alla scollatura, poi intrecciare con I-cord. DAVANTI: Avviare 117-127-137-149-163-177 maglie con i ferri circolari n° 3,5 mm e DROPS Lima. Lavorare il BORDO CON I-CORD – leggere la descrizione sopra, coste (1 maglia diritto, 1 maglia rovescio) fino a quando rimangono 9 maglie, 1 maglia diritto e lavorare seguendo BORDI CON I-CORD. Lavorare queste coste in piano per 5-5-5-6-6-6 cm. Passare ai ferri circolari n° 4 mm. Dal diritto del lavoro, lavorare il bordo come prima (8 maglie), lavorare a maglia rasata e diminuire 9-11-13-13-15-17 maglie in modo uniforme sulle 101-111-121-133-147-161 maglie successive, lavorare il bordo come prima (8 maglie) = 108-116-124-136-148-160 maglie. Continuare in piano a maglia rasata e 8 maglie del bordo a ogni lato. Ricordarsi di mantenere la tensione corretta. Quando il lavoro misura 28-29-30-31-32-33 cm, lavorare 9-9-11-15-19-23 maglie in più a coste (= A.1/A.2) all’interno delle 8 maglie del bordo, ottenendo un bordo di 17-17-19-23-27-31 maglie a ogni lato. Quando il lavoro misura 32-33-34-35-36-37 cm, iniziare a lavorare gli scalfi come segue: Intrecciare 9-9-11-15-19-23 maglie a ogni lato (ora lavorare il BORDO CON I-CORD su 8 maglie come prima a ogni lato fino alla fine del lavoro). Poi continuare a diminuire per gli scalfi come segue ogni 4 ferri – leggere il SUGGERIMENTO PER LE DIMINUZIONI-1: 1 maglia 3-5-6-7-8-9 volte a ogni lato = 84-88-90-92-94-96 maglie. Quando il lavoro misura 48-50-51-53-54-56 cm, mettere in sospeso le 18 maglie centrali per la scollatura e finire ogni spalla in modo separato. SPALLE: = 33-35-36-37-38-39 maglie. Leggere il SUGGERIMENTO PER LE DIMINUZIONI-2 e diminuire per il collo 1 maglia ogni 2 ferri 6-6-7-7-8-8 volte = 27-29-29-30-30-31 maglie per le spalle. Intrecciare quando il lavoro misura 56-58-60-62-64-66 cm. DIETRO: Avviare 117-127-137-149-163-177 maglie con i ferri circolari n° 3,5 mm e DROPS Lima. Lavorare il BORDO CON I-CORD, lavorare a coste (1 maglia rovescio, 1 maglia diritto) fino a quando rimangono 8 maglie, BORDO CON I-CORD. Continuare queste coste e il bordi per 5-5-5-6-6-6 cm. Passare ai ferri circolari n° 4 mm e lavorare come segue dal diritto del lavoro: lavorare il bordo come prima (8 maglie), maglia rasata e diminuire 9-11-13-13-15-17 maglie in modo uniforme sulle 101-111-121-133-147-161 maglie successive, lavorare il bordo come prima (8 maglie) = 108-116-124-136-148-160 maglie. Continuare in piano a maglia rasata e le 8 maglie del bordo a ogni lato. Quando il lavoro misura 28-29-30-31-32-33 cm, lavorare 9-9-11-15-19-23 maglie in più a coste (= A.1/A.2) all’interno delle 8 maglie di vivagno, ottenendo un bordo di 17-17-19-23-27-31 maglie a ogni lato. Quando il lavoro misura 32-33-34-35-36-37 cm, iniziare a lavorare gli scalfi come segue: Intrecciare 9-9-11-15-19-23 maglie a ogni lato (ora lavorare il BORDO CON I-CORD su 8 maglie come prima a ogni lato fino alla fine del lavoro). Poi continuare le diminuzioni per gli scalfi ogni 4 ferri – ricordarsi del SUGGERIMENTO PER LE DIMINUZIONI-1: 1 maglia 3-5-6-7-8-9 volte a ogni lato = 84-88-90-92-94-96 maglie. Quando il lavoro misura 52-54-56-58-60-62 cm, intrecciare le 26-26-28-28-30-30 maglie centrali per la scollatura e finire ogni spalla in modo separato. SPALLE: = 33-35-36-37-38-39 maglie. Ricordarsi del SUGGERIMENTO PER LE DIMINUZIONI-2 e diminuire per il collo 1 maglia ogni 2 ferri 2 volte = 27-29-29-30-30-31 maglie per le spalle. Intrecciare quando il lavoro misura 56-58-60-62-64-66 cm. CONFEZIONE: Cucire i margini delle spalle. Attaccare 2 bottoni a ogni lato del gilet; mettere le maglie del bordo del davanti sulle maglie del bordo del dietro e attaccare i bottoni attraverso entrambi gli strati. Il bottone superiore è posizionato 1 cm sotto lo scalfo, il 2° bottone 9-10 cm sotto il primo. SCOLLATURA: Usando i ferri circolari n° 3,5 mm e DROPS Lima, iniziare su una spalla, e riprendere 84-84-90-90-96-96 maglie dal diritto del lavoro (comprese le 18 maglie in sospeso al centro davanti). CHIUDERE CON I-CORD– leggere la descrizione sopra. |
|||||||
Spiegazioni del diagramma |
|||||||
|
|||||||
 |
|||||||
 |
|||||||
Avete terminato questo modello?Allora taggate le vostre foto con #dropspattern #bluenightvest o inviatele alla #dropsfan gallery. Avete bisogno di aiuto con questo modello?Troverete 20 video tutorial, una sezione per i commenti/domande e molto altro guardando il modello su www.garnstudio.com © 1982-2026 DROPS Design A/S. Ci riserviamo tutti i diritti. Questo documento, compreso tutte le sue sotto-sezioni, è protetto dalle leggi sul copyright. Potete leggere quello che potete fare con i nostri modelli alla fine di ogni modello sul nostro sito. |
|||||||


Con oltre 40 anni di esperienza nel design di modelli di maglia e uncinetto, DROPS Design offre la più estesa collezione di modelli gratuiti su internet - tradotti in 17 lingue. Ad oggi vi possiamo fornire 324 cataloghi e 12290 modelli - 9561 dei quali sono tradotti in Italiano.
Ci stiamo impegnando molto per darvi il meglio che vi possiamo offrire in termini di maglia e uncinetto, ispirazioni e consigli così come filati di grande qualità ad un prezzo incredibile! Volete utilizzare i nostri modelli per qualcosa d'altro oltre al vostro uso personale? Potete leggere tutto ciò che è consentito nel testo sul Copyright in basso su tutte le pagine dei nostri modelli. Buon lavoro!
Lasciare un commento sul modello DROPS 254-34
Noi saremmo felici di ricevere i tuoi commenti e opinioni su questo modello!
Se vuoi fare una domanda, fai per favore attenzione a selezionare la categoria corretta nella casella qui sotto per velocizzare il processo di risposta. I campi richiesti sono indicati da *.