
Categorie popolari
State cercando un filato?


Commenti / Domande (9)
![]() Birgit Falkenberg ha scritto:
Birgit Falkenberg ha scritto:
Fejl i opskrift. Forside 5. Pind: der skal da laves 3 knaphuller, ikke? (Se billede, tegning og montering - 3 knapper) I jeres opskrift strikkes kun 2 knaphuller!
22.09.2025 - 13:19DROPS Design ha risposto:
Hei Birgit. Nei, i oppskriften står det: På neste pinne fra retten felles det til 3 knapphull slik: Strikk 3-3-4-4 (4-4) rett, * 1 kast, 2 rett sammen, 4-4-5-5 (6-6) masker rett *, gjenta fra *-* 1 gang til, 2 rett sammen, 1 kast og 4-4-4-4 (4-4) masker rett. Altså, det lages 3 kast (=3 knappehull og det strikkes 2 masker rett 3 ganger. mbh DROPS Design
29.09.2025 - 14:17
![]() Birgit Falkenberg ha scritto:
Birgit Falkenberg ha scritto:
Hvorfor 3 knapper/huller på billede og tegning, når der i opskriften kun skal strikkes 2 huller? Der er også omtalt 5 knapper i alt. (3 +2 til seler)
18.09.2025 - 21:11DROPS Design ha risposto:
Hei Birgit. Nederst i oppskriften under MONTERING står det: Sy 3 knapper nederst på romperen på bakstykket. mvh DROPS Design
22.09.2025 - 13:06
![]() Julia ha scritto:
Julia ha scritto:
I’ve just finished the top of the front and moved the stitches to a string to begin the back. Do I cut the string at the end of the front and then use the same ball of yarn for the back or do I need to do two separate balls of yarn? If I am doing two separate balls of yarn do i then use each side respective yarn ball to do the rows when working in the round? Sorry if this doesn’t make sense I am a complete beginner so I don’t know the terms yet!
23.01.2025 - 05:34DROPS Design ha risposto:
Hi Julia, It is easiest to cut the strand and continue with the same ball for the back piece. Happy knitting!
23.01.2025 - 07:09
![]() Birgit Johansson ha scritto:
Birgit Johansson ha scritto:
Tack då vet jag.
17.12.2024 - 13:14
![]() Birgit Johansson ha scritto:
Birgit Johansson ha scritto:
Hej. Ska man inte sticka ngn kant vid armar och ben?
16.12.2024 - 19:29DROPS Design ha risposto:
Hej Birgit, ikke i den her opskrift - men du må gerne vælge en kant og strikke eller hækle på hvis du vil det :)
17.12.2024 - 13:08
![]() Rina ha scritto:
Rina ha scritto:
Good day, 1-3. romper and finished up to the body back piece where have to bind stitches off. begin with 51 stitches and bind of but i count 30 stitches as to the pattern"s 21 stitches ? please assist me
08.05.2024 - 10:18DROPS Design ha risposto:
Dear Rina, in 2nd size you will cast off on each side = at the beg of every row on each side 2 sts 6 times (2 x 6 x 2 sides= 24 sts in total) and 1 stitch 3 times (1x3x2 sides = 6 sts in total), so that you get: 51-24-6= 21 sts left. Happy knitting!
08.05.2024 - 13:11
![]() Rene ha scritto:
Rene ha scritto:
Can you explain the first line about the straps I don’t understand what it means saying knit up one stitch from uppermost can’t get it at all thank you
02.02.2024 - 21:45DROPS Design ha risposto:
Dear Rene, the outermost stitches in the back piece are the stitches closer to the side edges at the very top of the back piece; you can see the second photo of the pattern to better locate them. To learn how to knit up stitches or pick up as knit stitches, you can watch the following video: https://www.garnstudio.com/video.php?id=59&lang=en. Happy knitting!
04.02.2024 - 22:39
![]() YS ha scritto:
YS ha scritto:
First part - front piece - size 6/9. At the end of this part, when the pattern says to increase every 4 rows 5 times, does that mean the increase section will have 17 or 20 rows? In this section the increases would be at row 1, 5, 9, 13, and 17. Do I make the first 3 for the armholes at row 18 or at row 21?
08.05.2023 - 19:39DROPS Design ha risposto:
Dear Ys, increase first 4 times on every 2nd row like this: (1 row with increase, 1 row without increase), work from (to) a total of 3 times, then work 1 row with increase. Now increase on every 4th row: (work 3 rows without increase, increase on next row from RS), work these 4 rows a total of 5 times. Happy knitting!
09.05.2023 - 07:35
![]() Astrid ha scritto:
Astrid ha scritto:
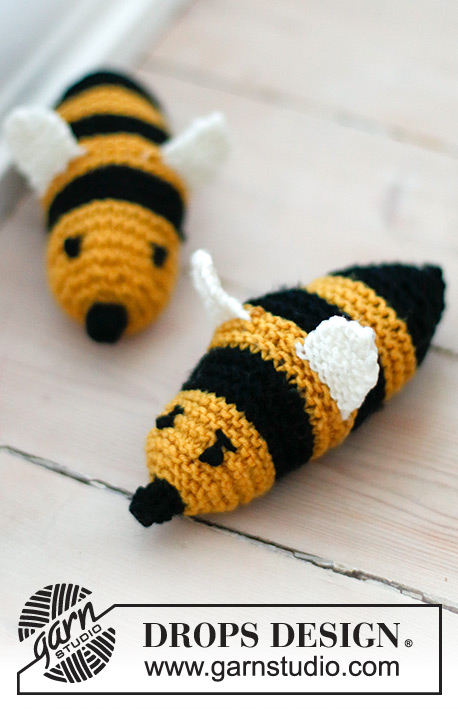
Hallo, gibt es eine Anleitung von der Hummel? LG Astrid
18.03.2023 - 09:30DROPS Design ha risposto:
Hallo Astrid, ja, die Anleitung finden Sie unter diesem Link. Viel Spaß beim Stricken!
18.03.2023 - 13:31
|
|
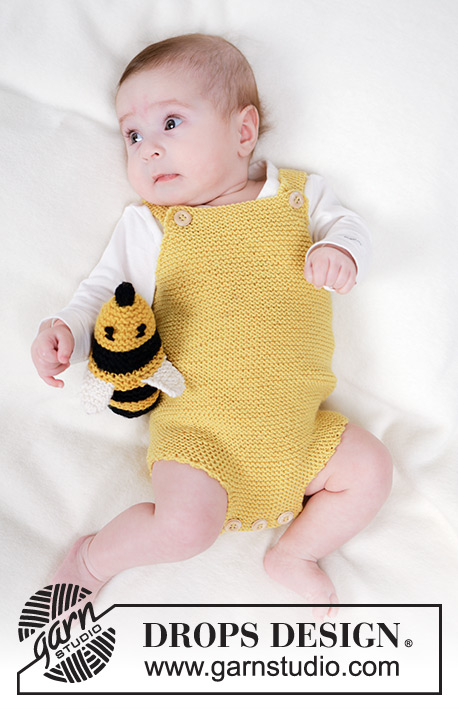
Bumblebee Romper#bumblebeeromper |
|
 |
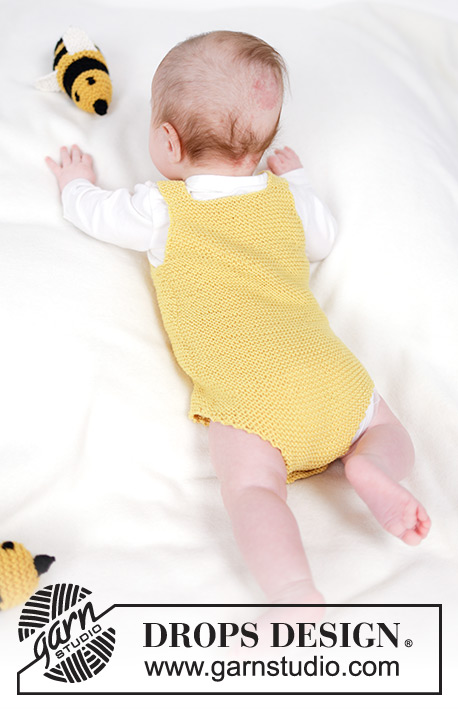 |
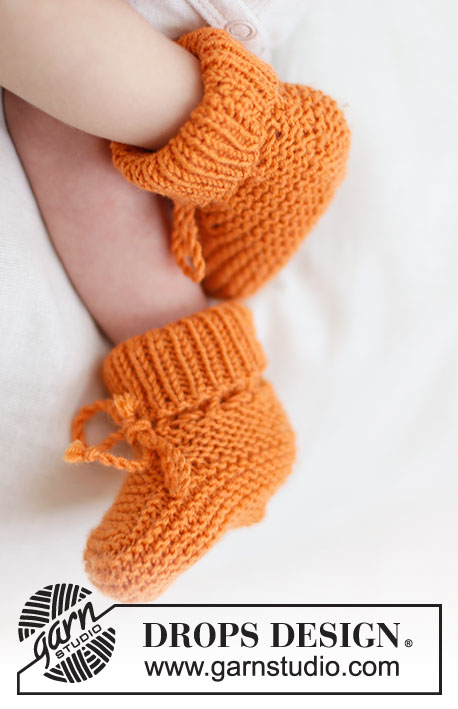
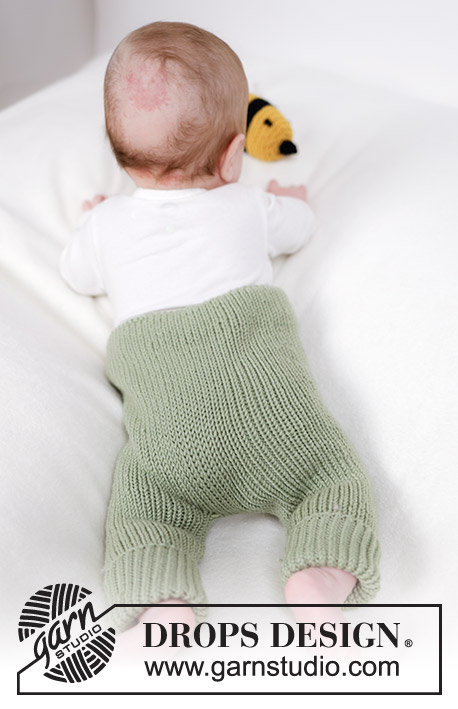
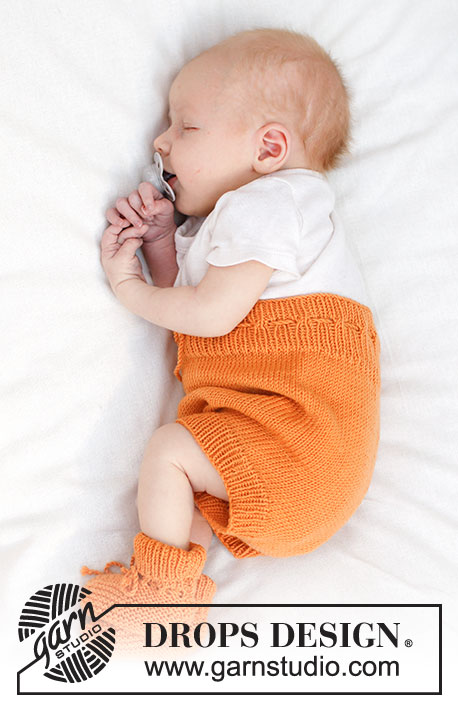
Tutina per neonati lavorato ai ferri in DROPS BabyMerino. Lavorato dall’alto in basso a maglia legaccio. Taglie: 0 - 4 anni.
DROPS Baby 45-3 |
|
|
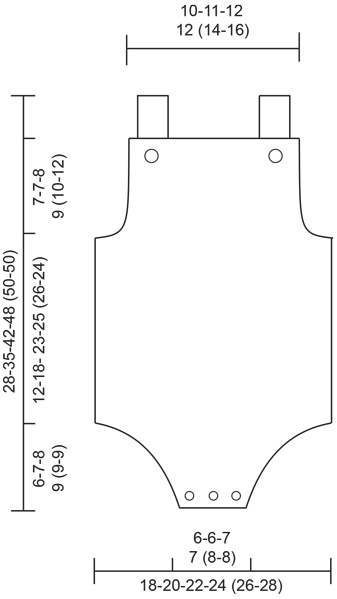
------------------------------------------------------- TECNICHE IMPIEGATE: ------------------------------------------------------- COSTA/MAGLIA LEGACCIO (avanti e indietro): Lavorare tutti i ferri a diritto. 1 costa in altezza = 2 ferri diritto. COSTA/MAGLIA LEGACCIO (lavorata in tondo): 1 costa = 2 giri. Lavorare 1 giro diritto e 1 giro rovescio. SUGGERIMENTO PER GLI AUMENTI: Lavorare tutti gli aumenti dal diritto del lavoro. Aumentare 1 maglia, all’interno di 1 maglia di vivagno a ogni lato, facendo 1 gettato che viene lavorato a diritto ritorto sul ferro successivo per evitare buchi. ------------------------------------------------------- INIZIO DEL LAVORO: ------------------------------------------------------- TUTINA – BREVE RIASSUNTO DEL LAVORO: Lavorato in 2 parti, in piano e dall’alto in basso, prima di unirle e continuare in tondo con i ferri circolari corti. Poi si divide ancora il lavoro e finire la parte inferiore in piano. Lavorare le bretelle alla fine. DAVANTI: Avviare 27-29-32-32 (36-42) maglie con i ferri circolari n° 3 mm e DROPS Baby Merino. Lavorare a MAGLIA LEGACCIO su tutte le maglie – leggere la descrizione sopra. Sul ferro 5 lavorare 2 asole come segue: 3 maglie diritto, 1 gettato, 2 maglie insieme a diritto, lavorare a diritto fino a quando rimangono 4 maglie, 1 gettato, 2 maglie insieme a diritto, 2 maglie diritto. Quando il lavoro misura 2-2-3-3 (3-4) cm aumentare 1 maglia a ogni lato – leggere il SUGGERIMENTO PER GLI AUMENTI! Aumentare in questo modo ogni 2 ferri per un totale di 2-3-4-6 (7-4) volte, poi ogni 4 ferri 5-5-5-4 (6-8) volte. Alla fine degli aumenti, avviare 3 maglie alla fine dei 2 ferri successivi per gli scalfi = 47-51-56-62 (68-72) maglie. FARE ATTENZIONE ALLA TENSIONE DEL LAVORO! Il lavoro misura circa 7-7-8-9 (10-12) cm. Mettere il lavoro da parte e lavorare il dietro. DIETRO: Avviare e lavorare nello stesso modo del davanti ma senza asole = 47-51-56-62 (68-72) maglie. Ora unire le 2 parti e continuare a lavorare in tondo. CORPO: Mettere le maglie del dietro e davanti sullo stesso ferro circolare n° 3 mm = 94-102-112-124 (136-144) maglie – ora misurare il lavoro da qui. Inserire 1 segnapunti tra ogni sezione, al centro delle maglie avviate a ogni lato. Lavorare a MAGLIA LEGACCIO in tondo – leggere la descrizione sopra altri 12-18-23-25 (26-24) cm. Ora dividere ancora il lavoro all’altezza del segnapunti e finire il davanti e il dietro in modo separato. DIETRO: = 47-51-56-62 (68-72) maglie. Continuare a maglia legaccio in piano e intrecciare all’inizio di ogni ferro come segue: 3 maglie 2-2-2-2 (2-2) volte a ogni lato. Poi intrecciare 2 maglie 4-5-6-7 (8-9) volte e 1 maglia 2-2-2-2 (2-2) volte a ogni lato = 15-15-18-18 (20-20) maglie. Continuare a lavorare fino a quando il lavoro misura 18-25-31-34 (35-33) cm. Intrecciare a diritto. DAVANTI: = 47-51-56-62 (68-72) maglie. Lavorare nello stesso modo del dietro = 15-15-18-18 (20-20) maglie. Continuare fino a quando il lavoro misura 17-23-29-34 (35-33) cm. Sul ferro successivo dal diritto del lavoro lavorare 3 asole come segue: 3-3-4-4 (4-4) maglie diritto, * 1 gettato, 2 maglie insieme a diritto, 2-2-3-3 (4-4) maglie diritto *, ripetere *-* un’altra volta, 1 gettato, 2 maglie insieme a diritto, 1 gettato e 2-2-2-2 (2-2) maglie diritto. Continuare a lavorare fino a quando il lavoro misura 18-25-31-34 (35-33) cm. Intrecciare a diritto. BRETELLE: Riprendere 1 maglia in ognuna delle 6-7-7-8 (8-8) maglie più esterne a un lato del dietro. Lavorare a maglia legaccio in piano per 9-15 cm (o fino alla lunghezza desiderata). Questo vi permette di avere una sovrapposizione di 3-5 cm in modo che la misura possa essere aggiustata. Intrecciare a diritto. Lavorare una bretella dall’altro lato del dietro nello stesso modo. CONFEZIONE: Attaccare i bottoni sulle bretelle e sulla parte inferiore del dietro. |
|
 |
|
Avete terminato questo modello?Allora taggate le vostre foto con #dropspattern #bumblebeeromper o inviatele alla #dropsfan gallery. Avete bisogno di aiuto con questo modello?Troverete 18 video tutorial, una sezione per i commenti/domande e molto altro guardando il modello su www.garnstudio.com © 1982-2026 DROPS Design A/S. Ci riserviamo tutti i diritti. Questo documento, compreso tutte le sue sotto-sezioni, è protetto dalle leggi sul copyright. Potete leggere quello che potete fare con i nostri modelli alla fine di ogni modello sul nostro sito. |
|


Con oltre 40 anni di esperienza nel design di modelli di maglia e uncinetto, DROPS Design offre la più estesa collezione di modelli gratuiti su internet - tradotti in 17 lingue. Ad oggi vi possiamo fornire 324 cataloghi e 12290 modelli - 9561 dei quali sono tradotti in Italiano.
Ci stiamo impegnando molto per darvi il meglio che vi possiamo offrire in termini di maglia e uncinetto, ispirazioni e consigli così come filati di grande qualità ad un prezzo incredibile! Volete utilizzare i nostri modelli per qualcosa d'altro oltre al vostro uso personale? Potete leggere tutto ciò che è consentito nel testo sul Copyright in basso su tutte le pagine dei nostri modelli. Buon lavoro!
Lasciare un commento sul modello DROPS Baby 45-3
Noi saremmo felici di ricevere i tuoi commenti e opinioni su questo modello!
Se vuoi fare una domanda, fai per favore attenzione a selezionare la categoria corretta nella casella qui sotto per velocizzare il processo di risposta. I campi richiesti sono indicati da *.