
Categorie popolari
State cercando un filato?


Commenti / Domande (38)
![]() Elizabeth ha scritto:
Elizabeth ha scritto:
For the back/front piece, I cast on 74 stitches. I then did 4 garter stitches (4 knit stitches), then I k2,p2 for the rib. At the end there is a k2, then k4 for garter stitch for a total of 6 knits at the end. When I turn and repeat the row the result is that I\'m knitting the purl stitches and purling the knit stitches. Is this correct? Normally, for a rib I knit the knits and purl the purls. Have I misread the instructions? Thank you! Elizabeth
10.02.2026 - 22:04DROPS Design ha risposto:
Hi Elizabeth, When you turn and work from the wrong side, the 4 garter stitches on each side are knitted, then you continue the rib (purl above purl and knit above knit) as seen from the wrong side. The row will be : Knit 4, (purl 2, knit 2) repeat until there are 6 stitches left, purl 2 and knit 4. Regards, Drops Team.
11.02.2026 - 06:40
![]() Alice ha scritto:
Alice ha scritto:
For the raglan decreases it sounds like you have to move a stitch , take off the marker , put the stitch back on the left needle to be able to slip the 2 together and then knit 1 and pass the slipped stitches over the knit , and then add the marker back. Is this correct ? It’s written in a confusing way where the stitch marker is between the two stitches to be slipped together which wouldn’t work
16.11.2025 - 21:21DROPS Design ha risposto:
Hi Alice, The raglan markers are each inserted into 1 stitch and you slip the 2 stitches after this marker-stitch. Regards, Drops Team.
17.11.2025 - 06:44
![]() Anne-Marie ha scritto:
Anne-Marie ha scritto:
Hej Jeg har strikket krop og ærmer indtil lukkede masker til ærmegab. Jeg synes dog både krop og ærmer ser korte ud... 31 cm inkl rib til krop og 35 cm til ærmer... Er det fordi det er "hængeærmer" i raglan? Jeg har kigget på diagram og regnet og håber det kommer til at passe.
03.09.2025 - 19:15DROPS Design ha risposto:
Hei Anne-Marie. Ja. på denne genseren er det 31 cm fra start til ermhull. Sammenligne gjerne målene på denne genseren med en annen genser du har og som du liker lengden på og se om du syns det blir nok med 31 cm. Syns du det blir for kort, strikk den lengre (men pass på at du har nok garn). mvh DROPS design
08.09.2025 - 13:48
![]() Jonna Toft ha scritto:
Jonna Toft ha scritto:
Hej jeg er ved at strikke denne model clear winter sky, jeg har strikket for og bagstykke på rundpind, problemet er ærmerne som jeg er bange for bliver for korte. 38 cm så skal der lukkes masker af og ærmerne sættes på rundpind sammen med for og bagstykke. Jeg kan ikke gennemskue om der bliver strikket 10 cm mere som kan lægges til ærmerne så længden kommer til at passe eller jeg skal improvisere og strikke dem 10 cm længere, kan i hjælpe mig? Mvh Jonna toft Hedegaard
03.08.2025 - 12:05DROPS Design ha risposto:
Hej Jonna. 38 cm är kun upp till ärmhålet på ärmen, den totala längden på hela ärmen kommer bli längre när du stickar sammen med for og bagstykke. Mvh DROPS Design
28.08.2025 - 10:20
![]() Shelah Feiss ha scritto:
Shelah Feiss ha scritto:
Thanks so much for answering my last question. The videos were very helpful The video on Raglan decreasing shows a different method that what the instructions say, So I should not use the method in the video? Also, after decreasing at all 4 markers, what does every 2nd round mean? Do I knit two full rows so I am knitting past all 4 decreases and then decrease on the next row? Thanks for your help.
27.02.2025 - 04:23DROPS Design ha risposto:
Dear Mrs Feiss, decrease as explained in the pattern, ie as also shown in this video; the stitch with the marker is the one you can see going "straight upwards" in the middle of our piece. Hpe this can help. Decreasing every other round means working (1 round with decreases, 1 round without decrease) repeat from (to) the total of times described for your size (you decrease 8 sts on every decrease round). Happy knitting!
27.02.2025 - 11:23
![]() Shelah Feiss ha scritto:
Shelah Feiss ha scritto:
I don't understand how to put the sleeves together with the body. the circular needle tips are on each end of one cast off on the body. How do I get the second sleeve on when the second cast off area is not open ? This is supposed to be an easy pattern, but really isn't for beginner knitters.
19.02.2025 - 21:10DROPS Design ha risposto:
Dear Mrs Feiss, you should have cast off 6-6-6-8-8-10 stitches on each side of body for each armhole at the end of body, and the same number of stitches at the end of each sleeve, then slip all stitches on the same circular needle (cast off stitches over ach other, see video), then work yoke decreasing for raglan. See in this video how we worked a raglan bottom up (note that the decreases are worked a different way, please remember to follow the pattern). Happy knitting!
20.02.2025 - 14:32
![]() Gabi Schulz ha scritto:
Gabi Schulz ha scritto:
Hallo , voller Freude habe ich den Pullover sofort in Angriff genommen. Leider ist mir des öfteren der Faden gerissen.... Nun habe ich das Vorder- u. Rückenteil bis zu den Armausschnitten gestrickt, sowie die Ärmel. Leider reicht die Wolle nicht, habe nur noch 2 Knäuel und muss ja noch die Passe, sowie den Kragen stricken. Sehr, sehr ärgerlich. Hoffentlich bekomme ich noch Wolle nach, ich weis garnicht wieviel ich brauche..... bitte antworten sie mir schnellstens. Vlg G.Schulz
29.01.2025 - 14:36
![]() Chantal Lehericey ha scritto:
Chantal Lehericey ha scritto:
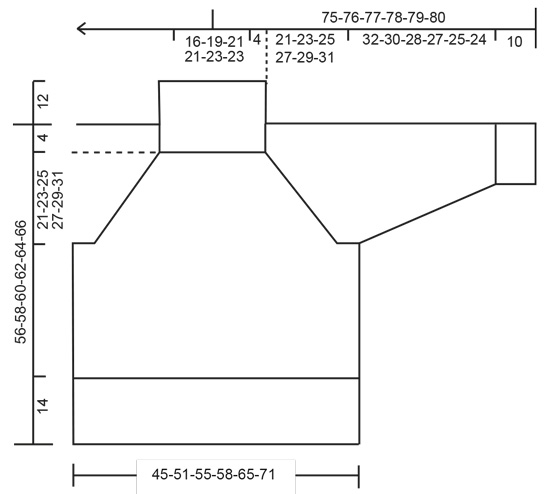
Bonjour, je vois que sur le croquis, la manche arrive plus haut dans le dos que sur le devant, or on ne tricote pas plus haut pour le dos, puisque c'est identique dos et devant. il n'y a pas de devant et de dos une fois le pull terminé. D'où viennent ces 4 cm en plus ? Merci pour votre réponse.
15.01.2025 - 11:30DROPS Design ha risposto:
Bonjour Mme Lehericey, les 4 cm de hauteur indiqués à gauche dans la hauteur totale correspondent à la hauteur de l'épaule. Retrouvez ici comment lire le schéma des mesures. Bon tricot!
15.01.2025 - 15:54
![]() Amaia ha scritto:
Amaia ha scritto:
Hi, I am confused about the sleeve instructions: " Increase like this every 8-6-7-4-3-2 cm a total of 4-5-4-6-7-10 times = 40-42-44-48-54-60 stitches. When the sleeve measures 42-40-38-37-35-34 cm". Why would the sleeve for the smallest size measure 42 cm in total and the one for the biggest size only 34?
02.01.2025 - 14:17DROPS Design ha risposto:
Dear Amaia, sleeves are shorter in larger sizes because yoke is longer - see also chart measurements. Happy knitting!
03.01.2025 - 07:37
![]() Jule ha scritto:
Jule ha scritto:
"In dieser Weise ca. alle 8-6-7-4-3-2 cm insgesamt 4-5-4-6-7-10 x in der Höhe zunehmen = 40-42-44-48-54-60 Maschen." Diesen Teil der Anleitung für die Ärmel verstehe ich nicht. Wie viele cm soll ich denn insgesamt stricken? Und wie oft muss ich Maschen zunehmen? Ich stricke Größe M. Soll ich dann alle 6 cm 5 neue Maschen aufeinmal aufnehmen?
28.11.2024 - 19:40DROPS Design ha risposto:
Lieber Jule, man wird jeweils 2 Maschen zunehmen, die 1. Abnahme wird nach 12 cm gestrickt, die 2. nach 18 cm (= 6 cm danach), die 3. nach 24 cm (6 cm danach), die 4. nach 30 cm und die 5. nach 36 cm. Viel Spaß beim Stricken!
29.11.2024 - 08:23
|
|
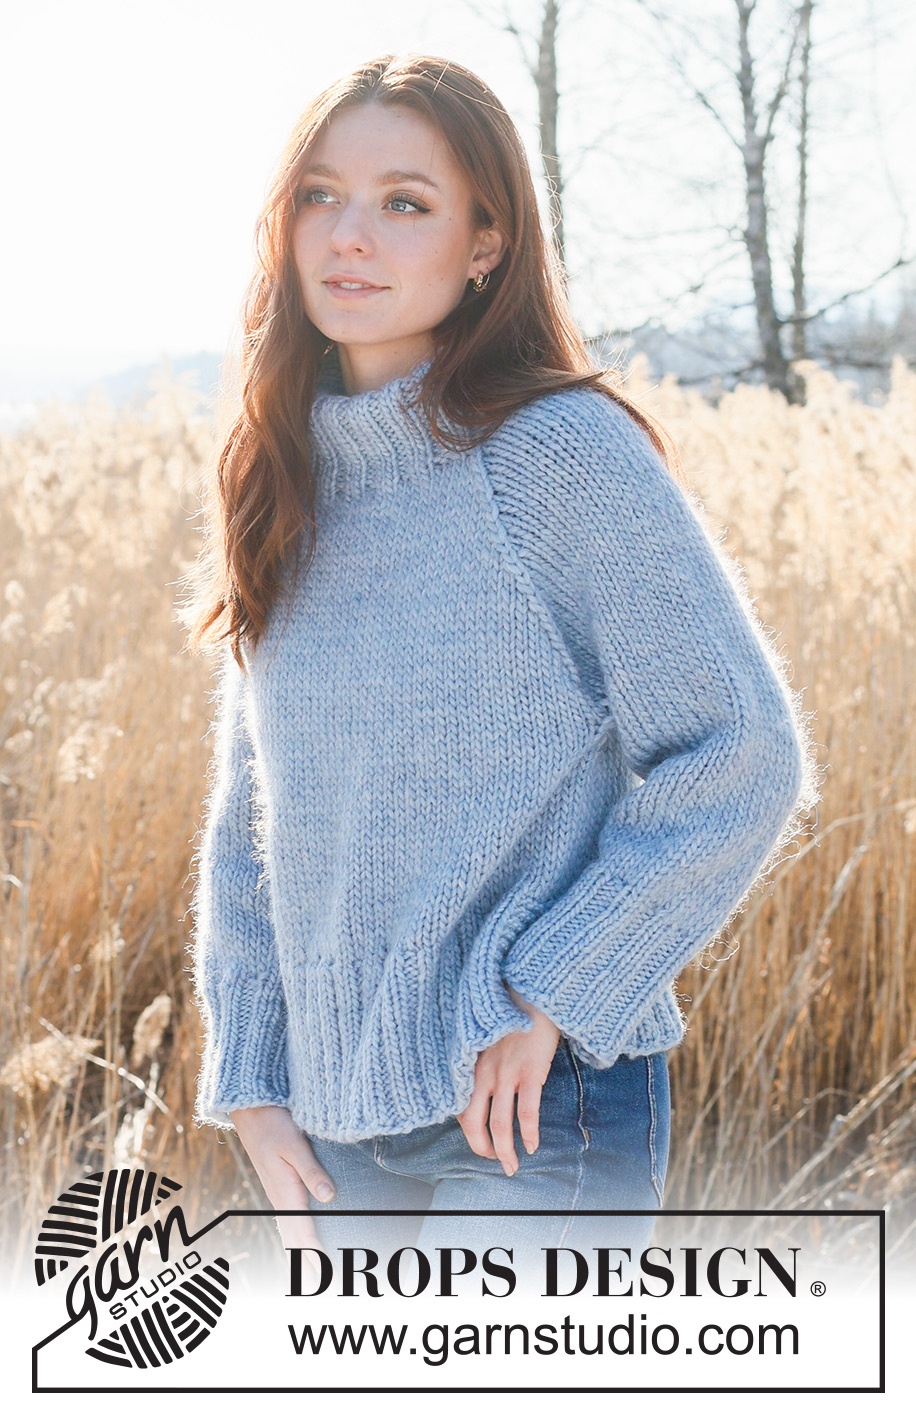
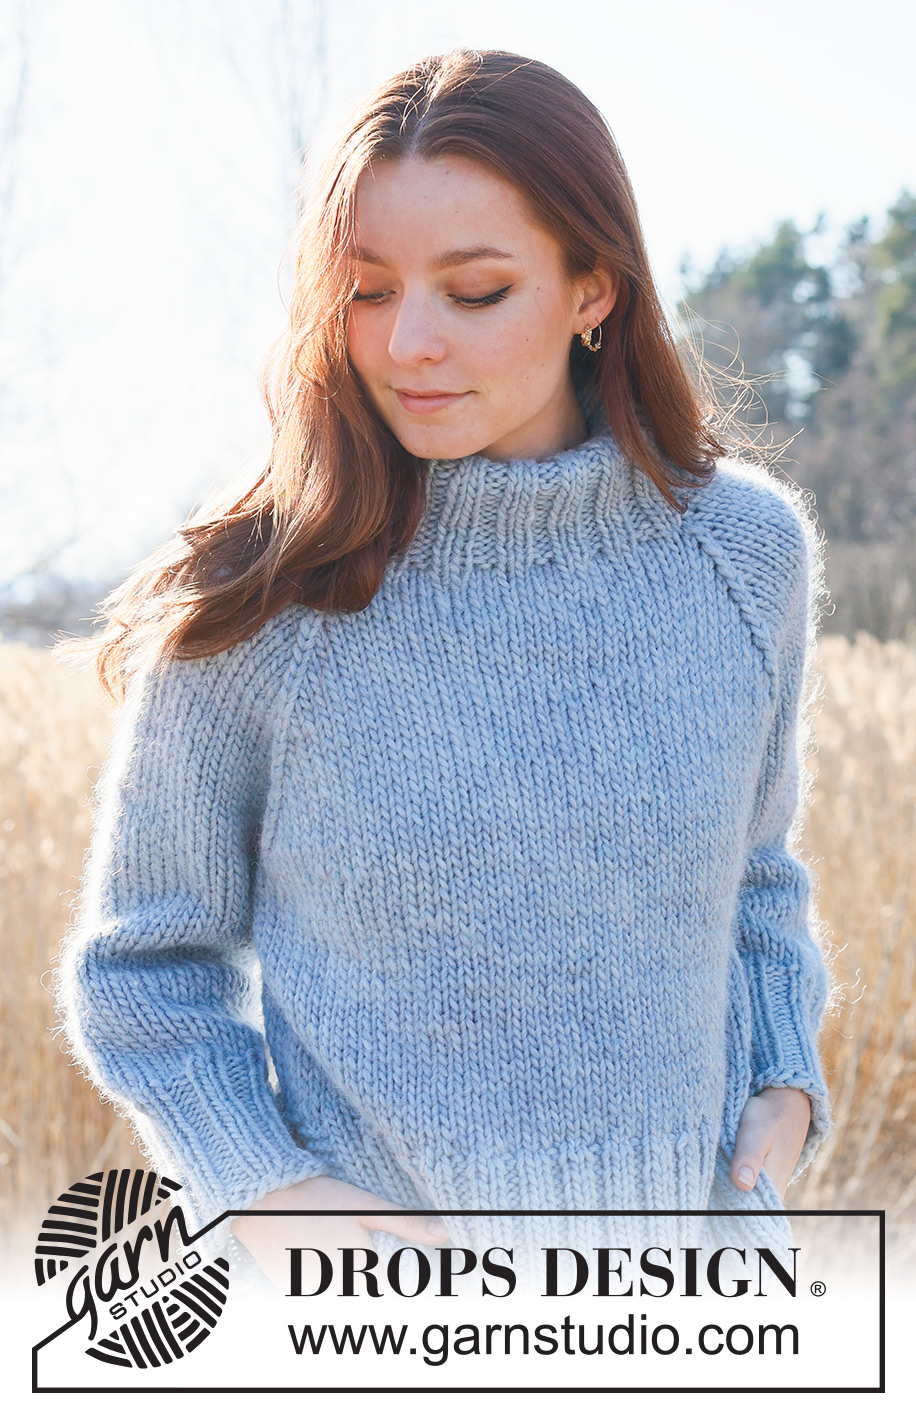
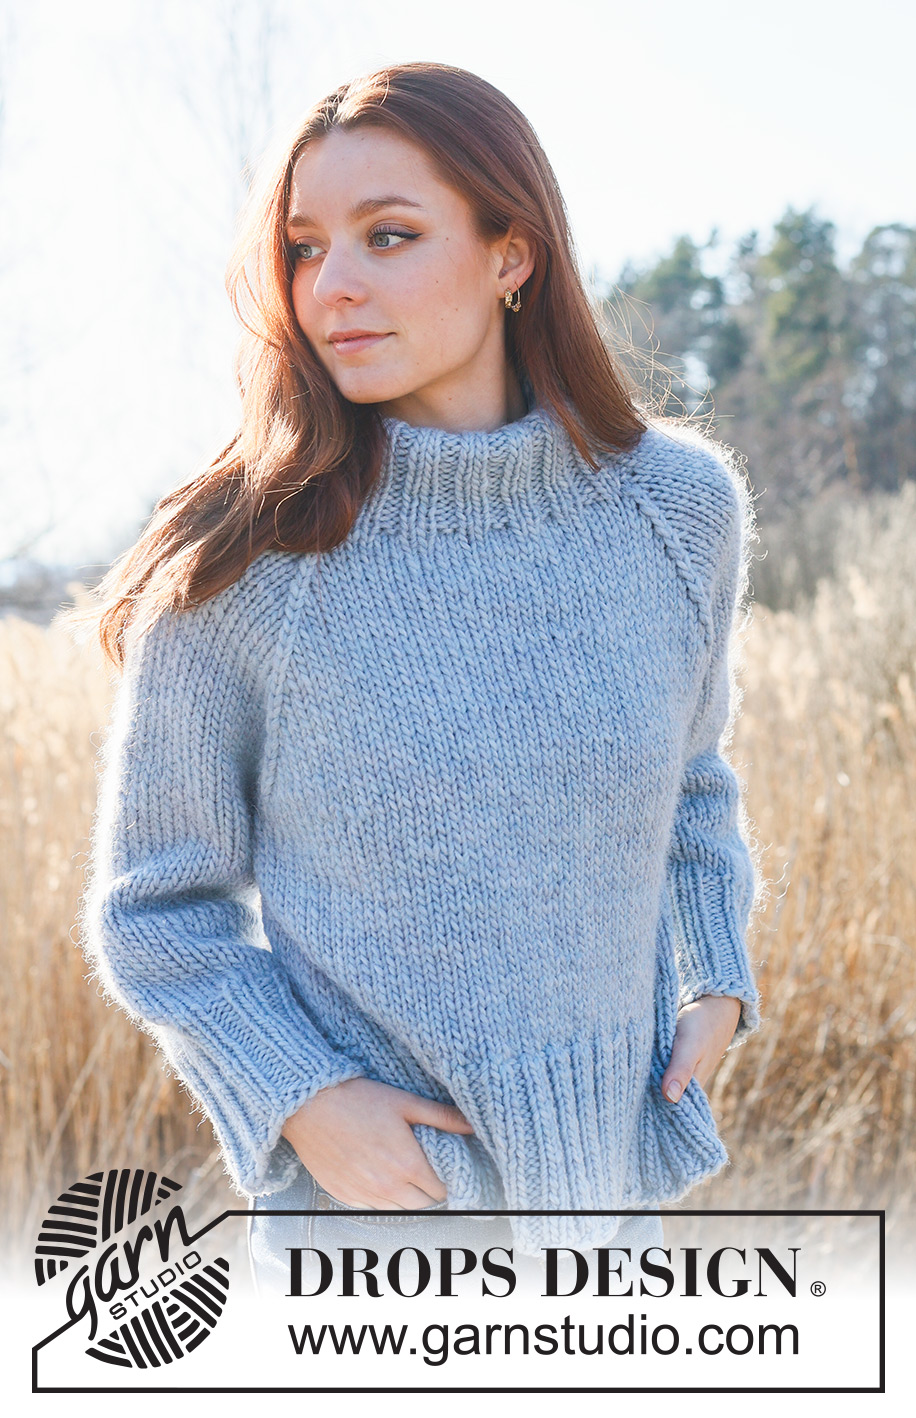
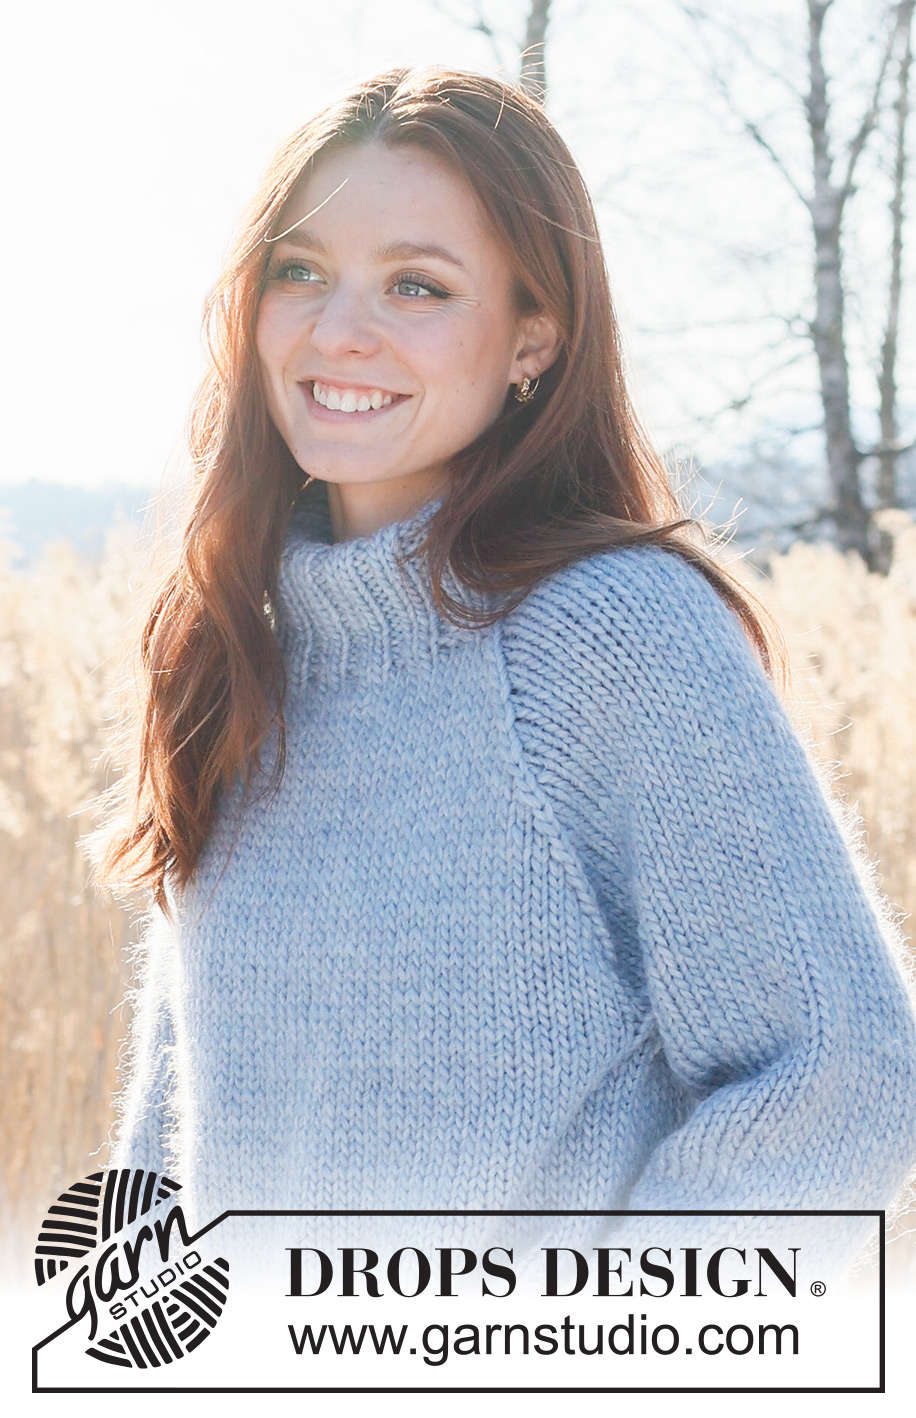
Clear Winter Sky#clearwinterskysweater |
|
 |
 |
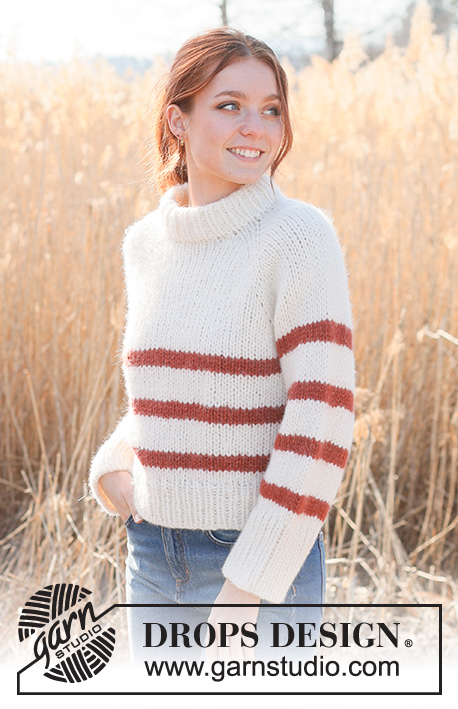
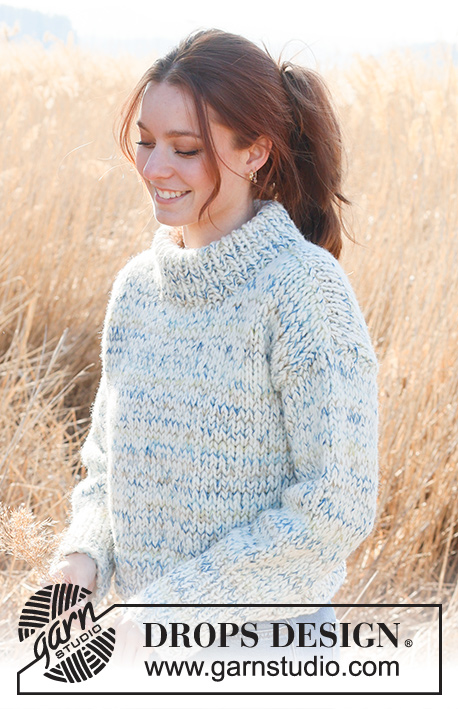
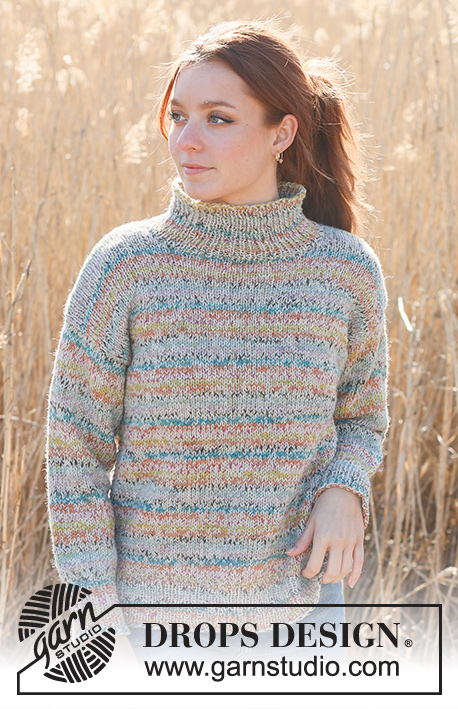
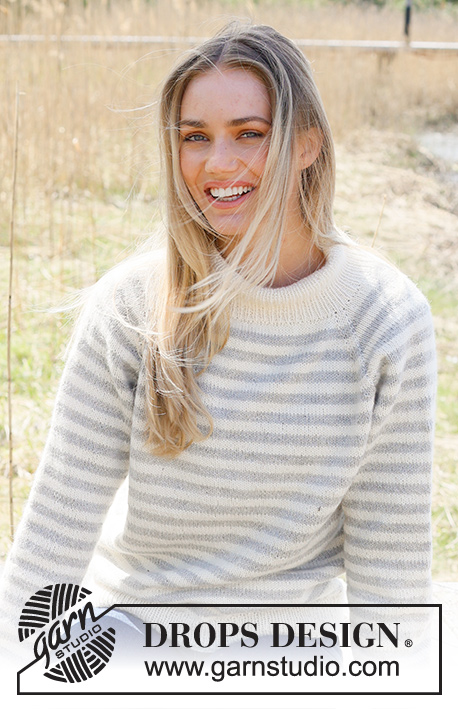
Maglione lavorato ai ferri in DROPS Snow. Lavorato dal basso verso l’alto a maglia rasata con raglan. Taglie: S - XXXL.
DROPS 236-24 |
|
|
------------------------------------------------------- TECNICHE IMPIEGATE: ------------------------------------------------------- COSTA/MAGLIA LEGACCIO (avanti e indietro): Lavorare tutti i ferri a diritto. 1 costa in altezza = 2 ferri diritto. SUGGERIMENTO PER GLI AUMENTI (applicato alle maniche): Lavorare fino a quando rimangono 2 maglie prima del segnapunti, 1 gettato, 4 maglie diritto (il segnapunti è al centro di queste 4 maglie), 1 gettato. Sul giro successivo lavorare il gettato a diritto ritorto per evitare buchi. Poi lavorare le nuove maglie a maglia rasata. RAGLAN: Diminuire per il raglan in ogni punto di passaggio tra il corpo e le maniche come segue: lavorare fino a quando rimane 1 maglia prima della maglia con il segnapunti, passare 2 maglie come per lavorarle insieme a diritto, 1 maglia diritto, accavallare le maglie passate sopra quella appena lavorata. Ripetere all’altezza di ogni segnapunti (8 maglie diminuite sul ferro). ------------------------------------------------------- INIZIO DEL LAVORO: ------------------------------------------------------- MAGLIONE – BREVE RIASSUNTO DEL LAVORO: Lavorare il davanti e il dietro in modo separato, in piano, dal basso verso l’alto fino alla fine dello spacco. Mettere entrambe le parti sullo stesso circolare e lavorare in tondo fino agli scalfi. Lavorare le maniche in tondo con i ferri a doppia punta/ferri circolari corti, dal basso verso l’alto, poi metterli sullo stesso ferro circolare del corpo. Lavorare lo sprone in tondo. Lavorare il collo alla fine. DIETRO: Avviare 62-70-74-78-86-94 maglie con i ferri circolari n° 7 mm e DROPS Snow. Lavorare 1 ferro rovescio dal rovescio del lavoro. Poi lavorare a coste come segue: 4 maglie a MAGLIA LEGACCIO – leggere la descrizione sopra, * 2 maglie diritto, 2 maglie rovescio *, lavorare *-* fino a quando rimangono 6 maglie, 2 maglie diritto e 4 maglie a maglia legaccio. Lavorare queste coste in piano e per 14 cm, finendo dopo un ferro dal rovescio del lavoro. Mettere il lavoro da parte. DAVANTI: Avviare e lavorare nello stesso modo del dietro. CORPO: Mettere il davanti e il dietro sullo stesso ferro circolare n° 8 mm e lavorare 1 giro diritto in cui diminuire 24-28-28-28-28-32 maglie in modo uniforme = 100-112-120-128-144-156 maglie. Inserire 1 segnapunti all’inizio del giro e 1 segnapunti dopo 50-56-60-64-72-78 maglie (lati). Lavorare a maglia rasata in tondo. FARE ATTENZIONE ALLA TENSIONE DE LAVORO! Quando il lavoro misura 31 cm, intrecciare 6-6-6-8-8-10 maglie per gli scalfi a ogni lato (intrecciare 3-3-3-4-4-5 maglie a ogni lato del segnapunti) = 44-50-54-56-64-68 maglie sul davanti e dietro. Mettere il lavoro da parte e lavorare le maniche. MANICHE: Avviare 32-32-36-36-40-40 maglie con i ferri a doppia punta n° 7 mm e DROPS Snow. Lavorare 1 giro diritto, poi lavorare a coste (2 maglie diritto, 2 maglie rovescio) in tondo per 10 cm. Passare ai ferri a doppia punta n° 8 mm. Inserire 1 segnapunti all’inizio del giro (centro sotto la manica). Lasciare che il segnapunti segua il lavoro; verrà usato durante gli aumenti sotto la manica. Lavorare a maglia rasata. Quando la manica 12 cm dal bordo di avvio; aumentare 1 maglia a ogni lato del segnapunti – leggere il SUGGERIMENTO PER GLI AUMENTI. Aumentare in questo modo ogni 8-6-7-4-3-2 cm per un totale di 4-5-4-6-7-10 volte = 40-42-44-48-54-60 maglie. Quando il lavoro misura 42-40-38-37-35-34 cm, intrecciare 6-6-6-8-8-10 maglie sotto la manica (3-3-3-4-4-5 maglie a ogni lato del segnapunti) = 34-36-38-40-46-50 maglie. Mettere il lavoro da parte e lavorare l’altra manica nello stesso modo. SPRONE: Mettere le maniche sullo stesso ferro circolare del corpo, dove sono state intrecciate le maglie per gli scalfi = 156-172-184-192-220-236 maglie. Inserire un segnapunti nella maglia più esterna a ogni lato del davanti e dietro (4 segnapunti). Verranno usati durante le diminuzioni per il raglan. Lavorare a maglia rasata in tondo. Quando lo sprone misura 4-4-5-6-4-3 cm, iniziare a diminuire per il RAGLAN – leggere la descrizione sopra. Diminuire in questo modo ogni 2 giri per un totale di 13-14-15-16-19-21 volte = 52-60-64-64-68-68 maglie. Alla fine di tutte le diminuzioni lo sprone misura 21-23-25-27-29-31 cm. Lavorare 1 giro diritto e aumentare 12 maglie in modo uniforme = 64-72-76-76-80-80 maglie. COLLO: Passare ai ferri circolari corti n° 7 mm e lavorare a coste in tondo (2 maglie diritto, 2 maglie rovescio) per 12 cm. Intrecciare con diritto su diritto e rovescio su rovescio. Si può piegare il collo a metà verso l’interno e affrancarlo con una maglia a ogni lato. CONFEZIONE: Cucire le aperture sotto le maniche. |
|
 |
|
Avete terminato questo modello?Allora taggate le vostre foto con #dropspattern #clearwinterskysweater o inviatele alla #dropsfan gallery. Avete bisogno di aiuto con questo modello?Troverete 30 video tutorial, una sezione per i commenti/domande e molto altro guardando il modello su www.garnstudio.com © 1982-2026 DROPS Design A/S. Ci riserviamo tutti i diritti. Questo documento, compreso tutte le sue sotto-sezioni, è protetto dalle leggi sul copyright. Potete leggere quello che potete fare con i nostri modelli alla fine di ogni modello sul nostro sito. |
|


Con oltre 40 anni di esperienza nel design di modelli di maglia e uncinetto, DROPS Design offre la più estesa collezione di modelli gratuiti su internet - tradotti in 17 lingue. Ad oggi vi possiamo fornire 324 cataloghi e 12290 modelli - 9561 dei quali sono tradotti in Italiano.
Ci stiamo impegnando molto per darvi il meglio che vi possiamo offrire in termini di maglia e uncinetto, ispirazioni e consigli così come filati di grande qualità ad un prezzo incredibile! Volete utilizzare i nostri modelli per qualcosa d'altro oltre al vostro uso personale? Potete leggere tutto ciò che è consentito nel testo sul Copyright in basso su tutte le pagine dei nostri modelli. Buon lavoro!
Lasciare un commento sul modello DROPS 236-24
Noi saremmo felici di ricevere i tuoi commenti e opinioni su questo modello!
Se vuoi fare una domanda, fai per favore attenzione a selezionare la categoria corretta nella casella qui sotto per velocizzare il processo di risposta. I campi richiesti sono indicati da *.