
Categorie popolari
State cercando un filato?


Commenti / Domande (14)
![]() Claudia Herzog ha scritto:
Claudia Herzog ha scritto:
Hey, ich stricke diese Mütze mit der Alpakawolle und Nadelstärke 3.25. Ich habe das Problem, dass das Maschenbild nach rechts geneigt ist . Ich stricke das Vollpatent genau nach Anleitung
25.11.2025 - 18:00DROPS Design ha risposto:
Liebe Frau Herzog, vielleicht kann Ihnen dieses Video helfen? Damit zeigen wir, wie man Vollpatent in der Runde strickt. Sonnst kann Ihnen Ihr Wollladen auch gerne -auch per E-Mail oder Telefon - weiterhelfen. Viel Spaß beim Stricken!
26.11.2025 - 08:56
![]() BARBRO ha scritto:
BARBRO ha scritto:
Stickar denna mössa som bäst, och det går bra att använda mobilen som mönster plats. En sak som jag saknar, som finns på vissa receptsidor tex är funktionen "stäng skärmsläckare". Det skulle underlätta! ☺️
24.08.2025 - 17:59
![]() Jenny ha scritto:
Jenny ha scritto:
Hello! I’m confused! On round 1 of English rib you increase a lot of stitches due to the yarn overs. In rows 2 and 3 you maintain this number of stitches as for every yarn over there is a knit or purl together. So how can you only have 96 stitches before starting the decreasing? I still have over 130 stitches. What have I missed? Many thanks!
28.11.2024 - 08:59DROPS Design ha risposto:
Dear Jenny, when working English rib the yarn overs are worked together with their respective stitches in the row after you make them, so they don't count as stitches. Therefore, you still have the 96 stitches (if you have a yarn over you count the yarn over and knit stitch as 1 stitch, instead of 2 separate stitches). Happy knitting!
07.12.2024 - 18:48
![]() Tina ha scritto:
Tina ha scritto:
Frage zu den Abnahmen: was ist mit „ in jeder 4. Runde“ gemeint. Das Muster hat doch nur 2 Runden (2. und 3. Runde). Danke für ihre Hilfe.
23.10.2024 - 09:54DROPS Design ha risposto:
Liebe Tina, um in jeder 4. Runde abzunehmen wird man so stricken: *1 Runde mit Abnahmen, 3 Runden ohne Abnahmen*, und diese 4 Runden insgesamt 6 oder 7 Mal (siehe Größe) stricken. Viel Spaß beim Stricken!
23.10.2024 - 13:07
![]() Charlotte ha scritto:
Charlotte ha scritto:
I'm a little confused in regards to the gauge/tension indications. This is my first time knitting in English rib but upon googling "english rib swtach" I found an article saying "When counting rows, count the knit stitches going up a knit column on the RS. When the pattern says “10 rows” you should count 10 knit column stitches when actually worked back and forth 10 times. Two worked rows = One counted row". Are the 44 rows in the gauge the worked rows or the counted rows?
11.01.2024 - 00:51DROPS Design ha risposto:
Dear Charlotte, the 44 rows for gauge are the number of rows really worked, but they will look like only 22 rows seen from RS counting only the K stitches. Happy knitting!
11.01.2024 - 08:28
![]() Jacinthe Poirier ha scritto:
Jacinthe Poirier ha scritto:
Merci de votre reponse mais pas certaine de bien comprendre .Je vous explique ce que je fais pour diminution Tour 2 tricot normal et mis marqueur Tour 3 diminution et apres diminue au 4 tours donc Tour 2 tricot normal et tour 3 sans diminuer Donc 1er tour Tour 2 tricot normal et tour 3 sans diminuer donc 2e tour Tour 2 tricot normal et tour 3 sans diminuer dinc 3e tour Tour 2 trucot normal et tour 3 je diminue ce qui est mon 4e tour Est ce que je suis correct Merci
30.11.2023 - 14:37DROPS Design ha risposto:
Bonjour Mme Poirier, vous devez diminuer sur un tour 3 des côtes anglaises, d'abord tous les 4 tours, tricotez ainsi: (le tour 3 des côtes anglaises en diminuant à chaque marqueur, tricotez 3 tours: le tour 2, le tour 3, le tour 2, comme avant), répétez de (à) 6 ou 7 fois selon votre taille, mais après le dernier tour de diminution, tricotez un tour sans diminuer = le tour 2, puis tricotez les mailles et leurs jetés ensemble (= côtes 1/1). Tricotez encore 1 tour de côtes. Tricotez toutes les mailles ensemble 2 par 2 à l'endroit. Tricotez 1 tour endroit et tricotez toutes les mailles ensemble 2 par 2 à l'endroit au tour suivant. Bon tricot!
30.11.2023 - 16:26
![]() Jacinthe Poirier ha scritto:
Jacinthe Poirier ha scritto:
Pour diminutiin au 4 rangs doit on compter le 2 rang etant donne qu’on diminue sur le 3 rang
29.11.2023 - 23:04DROPS Design ha risposto:
Bonjour Mme Poirier, quand on diminue tous les 4 tours, on procède ainsi (1 tour de diminutions, 3 tours sans diminuer) et on répète ces 4 tours; pour diminuer tous les 2 tours, on procède ainsi: (1 tour de diminutions, 1 tour sans diminuer). Bon tricot!
30.11.2023 - 10:15
![]() Jacinthe Poirier ha scritto:
Jacinthe Poirier ha scritto:
Tuque 234 30. Marqueur se place au 2 ou 3 ieme rang..Apres ma diminution il reste une maille que je replace sur aiguille droite. Apres marqueur c’est une maille sans jetee. Alors que le patron est glisse 1 maille et tricote l’autre avec son jette.Mais moi j’en ai 2 sans jetee. Merci
04.10.2023 - 15:16DROPS Design ha risposto:
Bonjour Mme Poirier, les marqueurs vont se placer la 1ère fois sur un rang 2 des côtes anglaises, pour faire la diminution au tour 3 des côtes anglaises. Vous diminuez ensuite en commençant 3 mailles avant le marqueur comme on le montre au time code environ 1:07 dans cette vidéo. Bon tricot!
05.10.2023 - 08:49
![]() Sarah Kelly ha scritto:
Sarah Kelly ha scritto:
Hello, I have just completed round 2 of the English rib and have 1 stitch left after working the **. I have the required 88 stitches in total on my circular needle. Please advise. Thank you.
01.09.2023 - 19:32DROPS Design ha risposto:
Dear Sarah, in the previous round, you should have had: 44 yarn overs, 44 slip stitches and 44knit stitches =132 stitches (including the yarn overs). Now, you work the 44 yarn overs together with the 44 slip stitches, make 44 new yarn overs and slip the 44 knit stitches purlwise = 132 stitches (including the yarn overs). On the final round, make a yarn over slip the worked together stitches purlwise and knit together the yarn overs and the stitches slipped purlwise on the previous round (132 stitches = 44 yarn overs and 88 stitches). If the numbers don't match at any point you may have missed a yarn over accidentaly. Please check your previous round. Happy knitting!
03.09.2023 - 19:38
![]() Blandine ha scritto:
Blandine ha scritto:
Après les diminutions je n'ai pas un total de 40 mailles mais 4x17 mailles. Il faut diminuer 14x et non pas 7 et le faire tous les 2 rangs et non pas tous les 4 rangs
22.12.2022 - 21:10DROPS Design ha risposto:
Bonjour Blandine, vous placez 4 marqueurs et diminuez 2 mailles à chaque marqueur 6-7 fois au total autrement dit: 88-96 mailles - (2 diminutions x 4 marqueurs)x6-7 fois au total = il reste 40 mailles dans les 2 tailles. Bon tricot!
23.12.2022 - 08:40
|
|
Soon Enough#soonenoughhat |
|
 |
 |
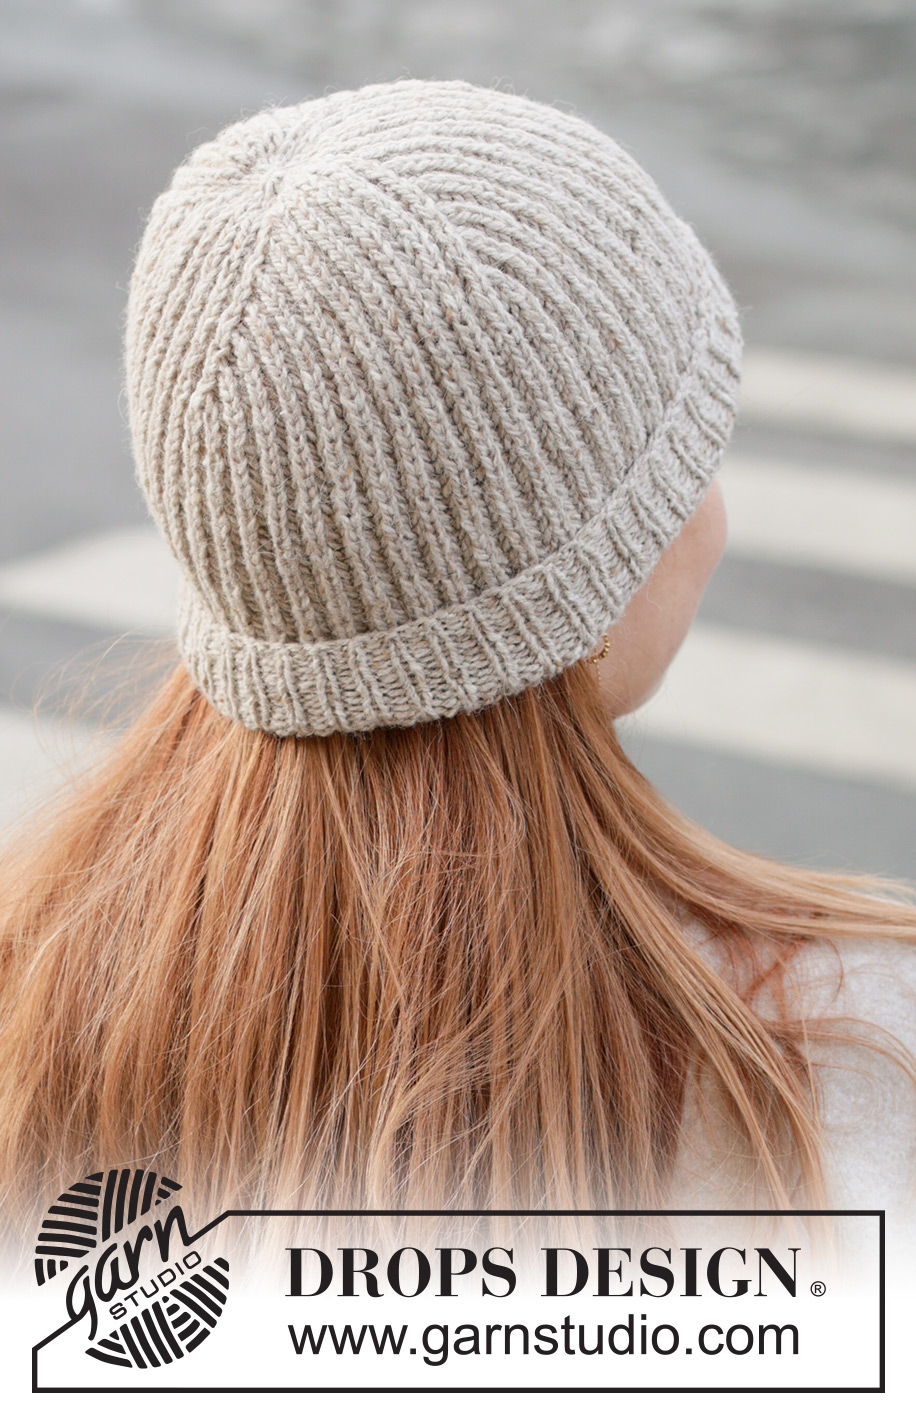
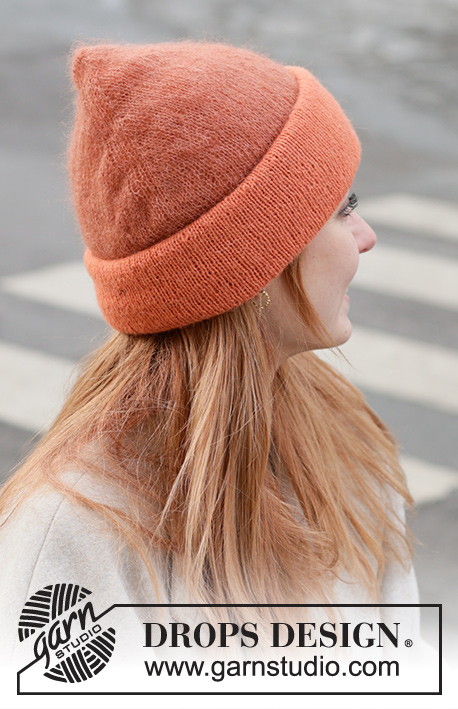
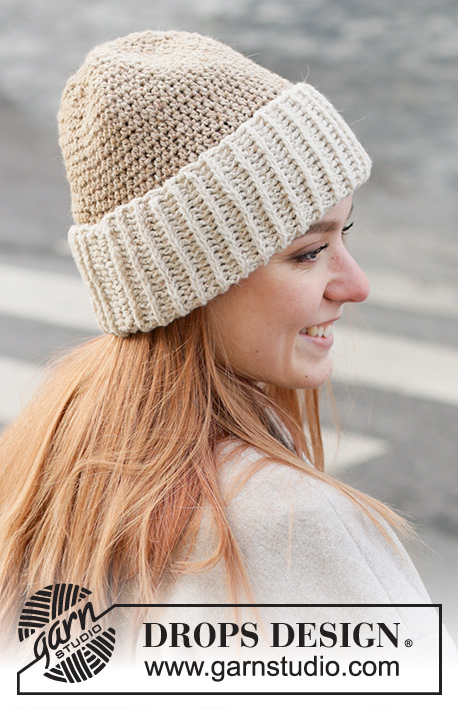
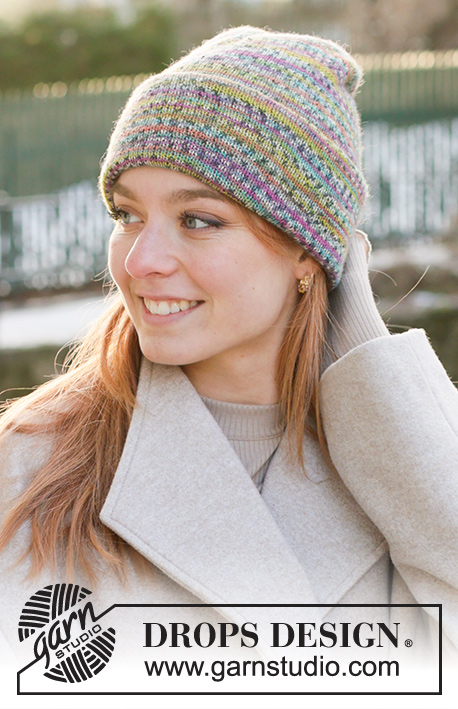
Cappello lavorato ai ferri in DROPS Soft Tweed. Lavorato dal basso verso l’alto a coste inglesi.
DROPS 234-30 |
|
|
------------------------------------------------------- TECNICHE IMPIEGATE: ------------------------------------------------------- COSTE INGLESI: GIRO 1: * 1 gettato, passare 1 maglia a rovescio senza lavorarla, 1 maglia diritto *, ripetere *-* fino alla fine del giro. GIRO 2: * lavorare insieme a rovescio il gettato e la maglia passata, fare 1 gettato, passare 1 maglia a rovescio senza lavorarla *, ripetere *-* fino alla fine del giro. GIRO 3: * 1 gettato, passare 1 maglia a rovescio senza lavorarla, lavorare insieme a diritto il gettato e la maglia passata *, ripetere *-* fino alla fine del giro. Ripetere i giri 2 e 3. SUGGERIMENTO PER LE DIMINUZIONI: Lavorare a coste inglesi come prima fino a quando rimangono 3 maglie prima del segnapunti (1 maglia diritto con il suo rispettivo gettato, 1 maglia rovescio e 1 maglia diritto con il suo rispettivo gettato). Passare 1 maglia diritto e il gettato sul ferro destro come per lavorarle insieme a rovescio, lavorare a diritto la maglia rovescio, accavallare la maglia diritto e il gettato sulla maglia diritto. Passare la maglia diritto sul ferro sinistro e accavallare la maglia diritto e il gettato su questa maglia diritto. Riportare la maglia diritto sul ferro destro. 2 maglie diminuite e la maglia diritto prima del segnapunti continua in modo pulito lungo il cappello. Ripetere all’altezza di tutti i segnapunti. ------------------------------------------------------- INIZIO DEL LAVORO: ------------------------------------------------------- CAPPELLO – BREVE RIASSUNTO DEL LAVORO: Lavorato dal basso verso l’alto in tondo, con i ferri accorciati. Passare ai ferri a doppia punta quando necessario. CAPPELLO: Avviare 88-96 maglie con i ferri circolari n° 3 mm e DROPS Soft Tweed. Lavorare a coste in tondo (1 maglia rovescio, 1 maglia diritto) per 4 cm. Passare ai ferri circolari n° 3,5 mm. Lavorare a COSTE INGLESI – leggere la descrizione sopra. FARE ATTENZIONE ALLA TENSIONE DEL LAVORO! Lavorare fino a quando il cappello misura 20-21 cm (7-8 cm alla fine del lavoro). Inserire 4 segnapunti, ognuno inserito dopo una maglia a diritto con 22-24 maglie tra ognuno. Fare in modo che il giro successivo sia lo stesso del giro 3 del motivo. Sul giro successivo diminuire all’altezza di ogni segnapunti – leggere il SUGGERIMENTO PER LE DIMINUZIONI nelle spiegazioni sopra. Ripetere le diminuzioni ogni 4 giri per un totale di 6-7 volte = 40 maglie. Lavorare 1 giro senza diminuzioni. Lavorare 1 giro e lavorare le maglie e il gettato insieme per ottenere delle coste normali. Lavorare 1 giro a coste. Lavorare tutte le maglie insieme 2 a 2 a diritto = 20 maglie. Lavorare 1 giro diritto. Lavorare tutte le maglie insieme 2 a 2 a diritto = 10 maglie. Tagliare il filo, farlo passare attraverso le maglie rimaste, tirare e affrancare bene. Il cappello misura circa 27-29 cm. Risvoltare il bordo a coste verso il diritto del lavoro. Il cappello misura circa 23-25 cm. |
|
Avete terminato questo modello?Allora taggate le vostre foto con #dropspattern #soonenoughhat o inviatele alla #dropsfan gallery. Avete bisogno di aiuto con questo modello?Troverete 9 video tutorial, una sezione per i commenti/domande e molto altro guardando il modello su www.garnstudio.com © 1982-2026 DROPS Design A/S. Ci riserviamo tutti i diritti. Questo documento, compreso tutte le sue sotto-sezioni, è protetto dalle leggi sul copyright. Potete leggere quello che potete fare con i nostri modelli alla fine di ogni modello sul nostro sito. |
|


Con oltre 40 anni di esperienza nel design di modelli di maglia e uncinetto, DROPS Design offre la più estesa collezione di modelli gratuiti su internet - tradotti in 17 lingue. Ad oggi vi possiamo fornire 324 cataloghi e 12290 modelli - 9561 dei quali sono tradotti in Italiano.
Ci stiamo impegnando molto per darvi il meglio che vi possiamo offrire in termini di maglia e uncinetto, ispirazioni e consigli così come filati di grande qualità ad un prezzo incredibile! Volete utilizzare i nostri modelli per qualcosa d'altro oltre al vostro uso personale? Potete leggere tutto ciò che è consentito nel testo sul Copyright in basso su tutte le pagine dei nostri modelli. Buon lavoro!
Lasciare un commento sul modello DROPS 234-30
Noi saremmo felici di ricevere i tuoi commenti e opinioni su questo modello!
Se vuoi fare una domanda, fai per favore attenzione a selezionare la categoria corretta nella casella qui sotto per velocizzare il processo di risposta. I campi richiesti sono indicati da *.