
Categorie popolari
State cercando un filato?


Commenti / Domande (18)
![]() Vivien ha scritto:
Vivien ha scritto:
If I make L Size, how many ball to make it.
26.03.2026 - 11:34DROPS Design ha risposto:
Dear Vivien, you'll find the total amount of yarn required for each size under tab "Pattern" at the top of the pattern page; select L to get all relevant numbers for this size, incl. 400 g DROPS Paris/50 g a ball = 8 balls DROPS Paris are required in size L. Happy knitting!
26.03.2026 - 16:01
![]() Anna ha scritto:
Anna ha scritto:
I have just started decreasing for the armholes on the back piece. Just for clarification, when it says to “decrease on each side for a total of 12 times” (I’m knitting a size xs), then that means I knit 6 rows with 2 decreases on each side of the piece, right?
08.06.2025 - 04:36DROPS Design ha risposto:
Dear Anna, you need to decrease 12 times on each side (not 12 stitches). So you work 12 rows with decreases on each side and decrease 12 stitches on each side (or 24 stitches in total). Happy knitting!
08.06.2025 - 15:36
![]() Mayzie ha scritto:
Mayzie ha scritto:
Hi ! I'm approaching the shoulders of the front piece. Rather than bind off the neck, the front is placed on a thread. I knit up to the middle stitches, slipped them onto a thread, but now my working yarn is stuck in the middle of the row and I don't know how to continue the row without knitting the shoulders together. how to I finish this row so I can start one of the shoulders?
30.03.2025 - 16:46DROPS Design ha risposto:
Dear Mayzie, you should have worked one shoulder before reaching the neck stitches. You can now work in two ways: 1) you work the neck stitches as you slip them. Therefore, the thread will move forward and reach the second shoulder, which you can now work. From now on, only work this second shoulder (the other shoulder's stitches will be on a separate thread) and, after finishing this shoulder, cut the thread and rejoin at the first shoulder and work this shoulder. 2) You slip the neck stitches to a thread without working them and place the stitches on the second shoulder in another thread. The thread should be at the end of the first shoulder; work this shoulder first. Happy knitting!
30.03.2025 - 19:20
![]() Danubis Perez ha scritto:
Danubis Perez ha scritto:
Hola. Yo soy talla L y me dicen que monte 108 ptos , sabiendo que la espalda y el delantero se hacen por separado. El gráfico me dice que para mi talla son 52 cm...no habra un error ?, ya que de acuerdo a la tensión, 108 puntos no corresponden 52 cm. Me podías explicar eso por favor? Igual que para las cenefas de las mangas me parece muchos puntos... no será que los puntos estan mal calculados? Gracias, esperando su pronta respuesta!!
10.03.2025 - 05:00
![]() Alicja ha scritto:
Alicja ha scritto:
Dzień dobry, zupełnie nie rozumiem fragmentu dotyczącego tyłu, który zaczyna się od "PRZED DALSZĄ PRACĄ NAD ROBÓTKĄ UWAŻNIE PRZECZYTAĆ DALSZĄ CZĘŚĆ OPISU:" - jakbym nie robila wychodzi mi jedno ramiączko, nie ma dekoltu, mogę prosić o doprecyzowanie jak zamykać na dekolt i ramiona, żeby faktycznie wyszły?
26.01.2025 - 13:43DROPS Design ha risposto:
Witaj Alicjo, Teraz będziesz przerabiać tylko 1 ramię - i zamykać oczka z każdej strony, czyli jednocześnie na formowanie podkroju rękawa i na dekolt. Jak zakończysz 1 ramię, to wykonujesz drugie, tylko zamykasz oczka na dekolt i podkrój rękawa z drugiej strony (aby robótka była symetryczna). Pozdrawiamy!
27.01.2025 - 14:48
![]() JO ha scritto:
JO ha scritto:
Hi, Are you including edge stitch in your stitch counts? Or is it separate. Im finding it confusing the way its written.
27.07.2024 - 13:52DROPS Design ha risposto:
Hi Jo, edge stitch is included in stitch count. Happy knitting!
28.07.2024 - 17:57
![]() Veronica ha scritto:
Veronica ha scritto:
Hi, on this section for the decreases do I still do the one edge stitch in garter stitch in the beginning and end of each row? “Continue with stockinette stitch and decrease 1 stitch on each side of every row from the right side 12-13-13-15-15-19 times.” Thank you!
27.05.2024 - 05:56DROPS Design ha risposto:
Hi Veronica, When decreasing for the armholes and neck, use Decrease Tip at the top of the page: decrease after 3 stitches at the beginning of the row by knitting 1, slipping 1 stitch and passing the slipped stitch over; decrease at the end of the row by knitting 2 together before the last 3 stitches. So, yes you continue the edge stitches. Happy knitting!
27.05.2024 - 06:38
![]() Amelia ha scritto:
Amelia ha scritto:
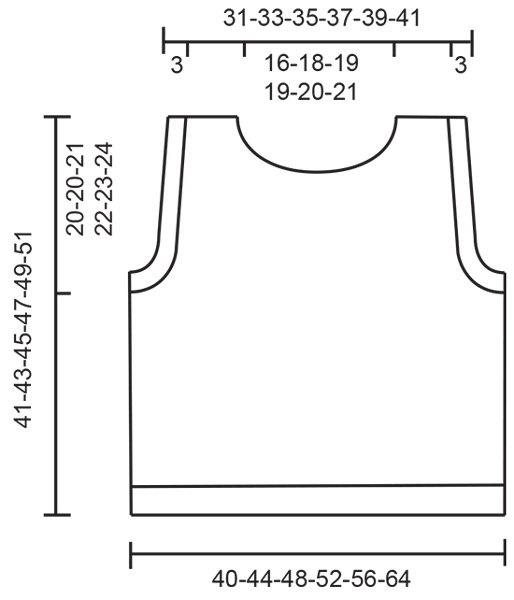
What are the finished measurements for this piece?
12.03.2024 - 08:59DROPS Design ha risposto:
Dear Amelia, you can find the finished measurements of the piece on the schematic drawing below the instructions. I hope this helps. Happy Knitting!
12.03.2024 - 09:57
![]() Sonja ha scritto:
Sonja ha scritto:
Nach Abnahme am Ende des Bündchens habe ich mit 84 Maschen weitergestrickt. Nach der entsprechenden Länge dann mit abketten für die Armausschnitte weitergemacht. Dies in Größe M 13 beidseitig (=26 Maschen). Es blieben noch 50 übrig. Dann 20 Maschen für den Halsausschnitt abgegettet. Damit bleiben pro Schulter noch 15 Maschen übrig. Nun habe ich nur noch 9 Maschen übrig, aber es fehlen noch 10cm Länge. Habe ich zuviel abgenommen?
11.06.2023 - 12:39DROPS Design ha risposto:
Liebe Sonja, Maschenanzahl stimmt so, Halsausschnitt beginnt nach 37cm + ca 6 cm Abnahmen (6 Mal in jeder 2. Reihe) sind ca 42,5 cm, es fehlt nur noch 2,5 cm nach der 1. Abnahmen bis Abketten (45 cm) (mit 22 Reihen glatt rechts = 10 cm) - kann das Ihnen helfen?
12.06.2023 - 08:54
![]() Addy ha scritto:
Addy ha scritto:
For the armhole section, it says "continue with stocking stitch". Should I stop doing the 1 edge stitch in garter stitch for this section? Thank you in advance!
09.04.2023 - 11:09DROPS Design ha risposto:
Dear Addy, you always work 1 edge stitch in garter stitch, since it will be necessary for the seams later on. Happy knitting!
09.04.2023 - 13:33
|
|
Bayou Belle#bayoubelletop |
|
 |
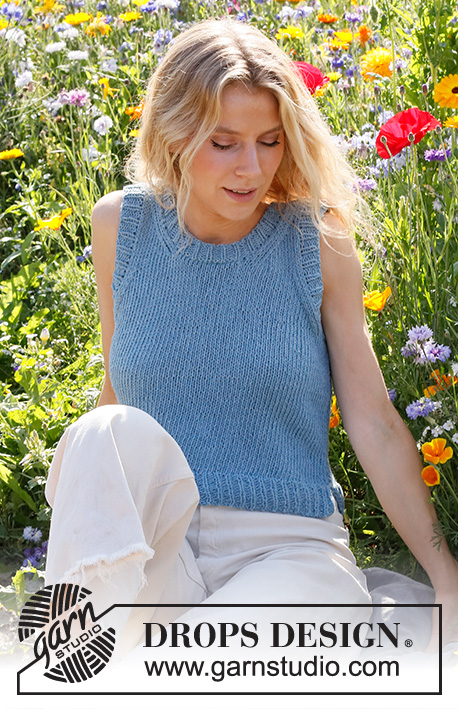 |
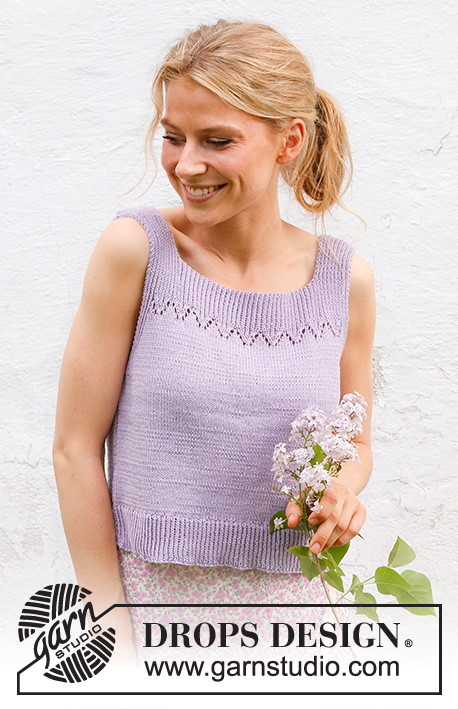
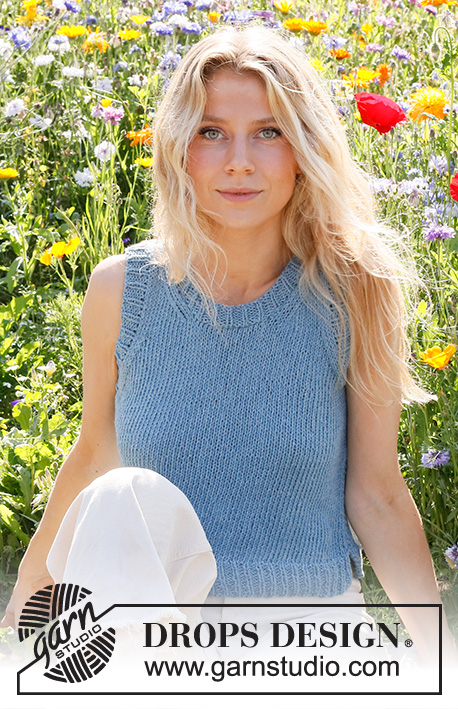
Top lavorato ai ferri in DROPS Paris. Lavorato dal basso verso l’alto, a maglia rasata. Taglie: XS - XXL.
DROPS 230-51 |
|
|
------------------------------------------------------- TECNICHE IMPIEGATE: ------------------------------------------------------- COSTA/MAGLIA LEGACCIO (avanti e indietro): Lavorare tutti i ferri a diritto. 1 costa in altezza = 2 ferri diritto. SUGGERIMENTO PER LE DIMINUZIONI (scalfi e collo): Lavorare tutte le diminuzioni dal diritto del lavoro. Diminuire dopo le prime 3 maglie all’inizio del ferro: Passare 1 maglia a diritto senza lavorarla, 1 maglia diritto e accavallare la maglia passata sopra quella appena lavorata (1 diminuzione). Diminuire prima delle ultime 3 maglie sul ferro: 2 maglie insieme a diritto (1 diminuzione). ------------------------------------------------------- INIZIO DEL LAVORO: ------------------------------------------------------- TOP – BREVE RIASSUNTO DEL LAVORO: Lavorare il davanti e il dietro in modo separato, in piano con i ferri circolari, dal basso verso l’alto. Cucire le parti all’altezza delle spalle e dei lati. Lavorare un bordo attorno agli scalfi e al collo per rifinire. DIETRO: Avviare 84-96-102-108-120-132 maglie con i ferri circolari n° 4 mm e DROPS Paris. Lavorare a coste dal diritto del lavoro come segue: 1 maglia di vivagno a MAGLIA LEGACCIO – leggere la descrizione sopra, coste (1 maglia diritto, 2 maglie rovescio) fino a quando rimangono 2 maglie, 1 maglia diritto e 1 maglia di vivagno a maglia legaccio. Lavorare con maglia legaccio su maglia legaccio, diritto su diritto e rovescio su rovescio per 5 cm – lavorare il ferro successivo dal diritto del lavoro. Passare ai ferri circolari n° 5 mm e lavorare il ferro successivo dal diritto del lavoro come segue: 1 maglia di vivagno a maglia legaccio, 82-94-100-106-118-130 maglie diritto e diminuire 14-20-18-18-22-22 maglie su queste maglie, 1 maglia di vivagno a maglia legaccio = 70-76-84-90-98-110 maglie. Continuare a maglia rasata e 1 maglia di vivagno a maglia legaccio fino a quando il lavoro misura 21-23-24-25-26-27 cm e il ferro successivo è dal diritto del lavoro. FARE ATTENZIONE ALLA TENSIONE DEL LAVORO! Intrecciare 2-2-4-4-6-6 maglie all’inizio dei 2 ferri successivi per gli scalfi = 66-72-76-82-86-98 maglie. LEGGERE LA SEZIONE SUCCESSIVA PRIMA DI CONTINUARE. Ora diminuire per gli scalfi, ma prima che siano finite si diminuisce anche per il collo. Leggere il SUGGERIMENTO PER LE DIMINUZIONI! Continuare a maglia rasata e diminuire 1 maglia a ogni lato di tutti i ferri dal diritto del lavoro 12-13-13-15-15-19 volte. ALLO STESSO TEMPO quando il lavoro misura 34-36-37-39-40-42 cm e il ferro successivo è dal diritto del lavoro. Intrecciare le 18-20-20-20-20-22 maglie centrali per il collo. Finire ogni spalla in modo separato. Continuare a diminuire per lo scalfo e diminuire 1 maglia per il collo su ogni ferro dal diritto del lavoro 5-5-6-6-7-7 volte – ricordarsi del SUGGERIMENTO PER LE DIMINUZIONI. Alla fine di tutte le diminuzioni per lo scalfo e il collo ci sono 7-8-9-10-11-12 maglie. Lavorare fino a quando il lavoro misura 41-43-45-47-49-51 cm. Intrecciare a diritto dal diritto del lavoro. Lavorare l’altra spalla nello stesso modo. DAVANTI: Avviare e lavorare nello stesso modo del dietro fino a quando il lavoro misura 21-23-24-25-26-27 cm e il ferro successivo è dal diritto del lavoro. Intrecciare 2-2-4-4-6-6 maglie all’inizio dei 2 ferri successivi per gli scalfi = 66-72-76-82-86-98 maglie. LEGGERE LA SEZIONE SUCCESSIVA PRIMA DI CONTINUARE. Ora diminuire per gli scalfi, ma prima che siano finite si diminuisce anche per il collo. Continuare a maglia rasata e diminuire 1 maglia a ogni lato di tutti i ferri dal diritto del lavoro 12-13-13-15-15-19 volte. ALLO STESSO TEMPO quando il lavoro misura 28-30-31-33-34-36 cm, mettere in sospeso le 10-12-14-14-16-18 maglie centrali per il collo. Finire ogni spalla in modo separato. Continuare a diminuire per lo scalfo e diminuire 1 maglia per il collo su ogni ferro dal diritto del lavoro 9 volte – ricordarsi del SUGGERIMENTO PER LE DIMINUZIONI! Alla fine di tutte le diminuzioni per lo scalfo e il collo ci sono 7-8-9-10-11-12 maglie. Lavorare fino a quando il lavoro misura 41-43-45-47-49-51 cm. Intrecciare a diritto dal diritto del lavoro. Lavorare l’altra spalla nello stesso modo. CONFEZIONE: Cucire i margini delle spalle. Cucire i margini laterali, lasciando uno spacco di 5 cm in basso. BORDO DELLE MANICHE: Iniziare dalla cucitura laterale, dal diritto del lavoro, usando i ferri circolari n° 4 mm e riprendere 75-84-93-96-105-117 maglie attorno allo scalfo – il n° di maglie dev’essere divisibile per 3. Lavorare a coste in tondo (1 maglia diritto, 2 maglie rovescio) per 3 cm. Intrecciare con diritto su diritto e rovescio su rovescio. Lavorare l’altro bordo della manica nello stesso modo. COLLO: Iniziare all’altezza della cucitura della spalla, dal diritto del lavoro, usando i ferri circolari n° 4 mm e riprendere 93-102-105-108-111-117 maglie attorno al collo (comprese le maglie in sospeso sul davanti) – il n° di maglie dev’essere divisibile per 3. Lavorare a coste in tondo (1 maglia diritto, 2 maglie rovescio) per 3 cm. Intrecciare con diritto su diritto e rovescio su rovescio. |
|
 |
|
Avete terminato questo modello?Allora taggate le vostre foto con #dropspattern #bayoubelletop o inviatele alla #dropsfan gallery. Avete bisogno di aiuto con questo modello?Troverete 29 video tutorial, una sezione per i commenti/domande e molto altro guardando il modello su www.garnstudio.com © 1982-2026 DROPS Design A/S. Ci riserviamo tutti i diritti. Questo documento, compreso tutte le sue sotto-sezioni, è protetto dalle leggi sul copyright. Potete leggere quello che potete fare con i nostri modelli alla fine di ogni modello sul nostro sito. |
|


Con oltre 40 anni di esperienza nel design di modelli di maglia e uncinetto, DROPS Design offre la più estesa collezione di modelli gratuiti su internet - tradotti in 17 lingue. Ad oggi vi possiamo fornire 324 cataloghi e 12290 modelli - 9561 dei quali sono tradotti in Italiano.
Ci stiamo impegnando molto per darvi il meglio che vi possiamo offrire in termini di maglia e uncinetto, ispirazioni e consigli così come filati di grande qualità ad un prezzo incredibile! Volete utilizzare i nostri modelli per qualcosa d'altro oltre al vostro uso personale? Potete leggere tutto ciò che è consentito nel testo sul Copyright in basso su tutte le pagine dei nostri modelli. Buon lavoro!
Lasciare un commento sul modello DROPS 230-51
Noi saremmo felici di ricevere i tuoi commenti e opinioni su questo modello!
Se vuoi fare una domanda, fai per favore attenzione a selezionare la categoria corretta nella casella qui sotto per velocizzare il processo di risposta. I campi richiesti sono indicati da *.