
Categorie popolari
State cercando un filato?


Commenti / Domande (24)
![]() Janet Bromlewe ha scritto:
Janet Bromlewe ha scritto:
Thank you for this lovely pattern
28.04.2026 - 06:18
![]() Christine ha scritto:
Christine ha scritto:
Je ne tricote pas avec des aiguilles circulaires, je n'en ai pas là où j'habite
17.12.2025 - 18:03DROPS Design ha risposto:
Bonjour Christine, cette leçon pourra alors vous aider à adapter les explications pour des aiguilles droites. Pour l'ourlet, procédez de la même façon: 2 cm jersey, 1 rang envers sur l'endroit ou bien endroit sur l'envers (en fonction de votre tension) et 2 cm jersey. Vous pouvez alors suivre la vidéo de l'ourlet de la réponse précédente. Bon tricot!
18.12.2025 - 18:00
![]() Christine ha scritto:
Christine ha scritto:
Je suis désolée mais je ne comprends toujours pas, pour la bordure vous dites de tricoter en jersey et le rang envers de cassure, je ne comprends pas, dois-je tricoter 2 rand envers ? merci
16.12.2025 - 23:52DROPS Design ha risposto:
Bonjour Christine, le béret se tricote en rond, on va donc tricoter à l'endroit pendant 2 cm, puis tricoter 1 tour en mailles envers et tricoter encore 2 cm à l'endroit (= jersey) pour la 2ème partie de l'ourlet. On obtient ainsi un ourlet (2 cm de part et d'autre du tour en mailles envers), on pliera au niveau de ce tour à la fin - dans cette vidéo nous montrons un ourlet similaire (tricoté en allers et retours). Bon tricot!
17.12.2025 - 17:44
![]() Christine ha scritto:
Christine ha scritto:
Bonjour, Vous dites au début 2cm de jersey, mais la bordure elle est en côte 1/1 ? Merci Cdlt
15.12.2025 - 23:23DROPS Design ha risposto:
Bonjour Christine, la bordure ne se tricote pas en côtes mais se compose de 2 cm jersey, 1 tour en mailles envers sur l'endroit (rang de cassure) et 2 cm jersey. Les 2 premiers cm jersey sont ensuite pliés en double et on les coud sur l'envers. Bon tricot!
16.12.2025 - 09:26
![]() Lilit ha scritto:
Lilit ha scritto:
The pattern worked out perfectly, I'm very happy with the design and the size. I'm saving this pattern to make another beret in a different color, thank you!
13.01.2025 - 16:22
![]() Joph ha scritto:
Joph ha scritto:
Hej! Jag har 54cm i huvudomkrets och stickade därför mönstret s/m. Dock blev mössan väldigt kort. Alltså inte alls som på bilden men veck. Jag behöver heller inget resårband då mössan sitter åt bra i början. Ska jag repa upp mössan och testa med större stickor 4 eller ska jag göra en storlek större? Mössan är till och med liten på mitt 7åriga barn. Kanske jag stickat för tajt?
04.01.2025 - 16:34DROPS Design ha risposto:
HeiJoph. Stemmer strikkefastheten din i høyden? Luen skal i str. S/M måle ca 23 cm fra toppen og ned til merke (+ 4,5 cm fra oppleggskanten). mvh DROPS Design
07.01.2025 - 14:53
![]() Nancy J Van Kirk ha scritto:
Nancy J Van Kirk ha scritto:
I bought my yarn to make this hat and it has just arrived. The alpaca is a good off white but the kid silk is colour No. 38 - Chalk. It is really a soft grey colour, not at all like the off white I thought I saw in the colour chart . I should have ordered colour No 01. Is there an easy way to return it and exchange for a better colour. I would like the hat to be really white.
19.12.2022 - 11:57DROPS Design ha risposto:
Dear Mrs Van Kirk, you are welcome to contact the store where you bought the yarn to check with them the possibilities of exchange the yarn. They will help you even per mail or telephone. Happy knitting!
19.12.2022 - 13:07
![]() Annette ha scritto:
Annette ha scritto:
Liebes Drops-Team, in der Anleitung wird mehrfach davon gesprochen, dass man die Länge ab dem Markieren messen soll. Ist dabei jeweils das untere oder das obere Ende des Markierers gemeint? Viele Grüße Annette
28.11.2022 - 14:37DROPS Design ha risposto:
Liebe Annette, messen Sie ab der Markierung, die Sie bei der letzten Runde mit Nadeln Nr 2,5 gestrickt haben, siehe: – die Arbeit wird nun ab diesem Markierer gemessen!. Viel Spaß beim stricken !
28.11.2022 - 16:46
![]() Sylvie Germain ha scritto:
Sylvie Germain ha scritto:
Bonjour, est-ce qu’on doit mettre le fil double pour tout le tricot?
13.11.2022 - 00:55DROPS Design ha risposto:
Bonjour Mme Germain, ce bonnet se tricote effectivement avec 2 fils: 1 fil Alpaca + 1 fil Kid-Silk - pensez à vérifier votre échantillon (21 m x 28 rangs en jersey avec ces 2 laines = 10 x 10 cm). Bon tricot!
14.11.2022 - 09:39
![]() Claudia ha scritto:
Claudia ha scritto:
¿Me pueden explicar como hacer el cordon al final? Después de tejer 5 puntos, los deslizo, tejo de nuevo? A que se refiere con estiirar la lana ? Gracias!
16.07.2022 - 18:30DROPS Design ha risposto:
Hola Claudia, puedes ver el siguiente vídeo para entender mejor como se trabaja el cordón en I: https://www.garnstudio.com/video.php?id=57&lang=es
24.07.2022 - 17:05
|
|
Streets of Paris#streetsofparishat |
|
 |
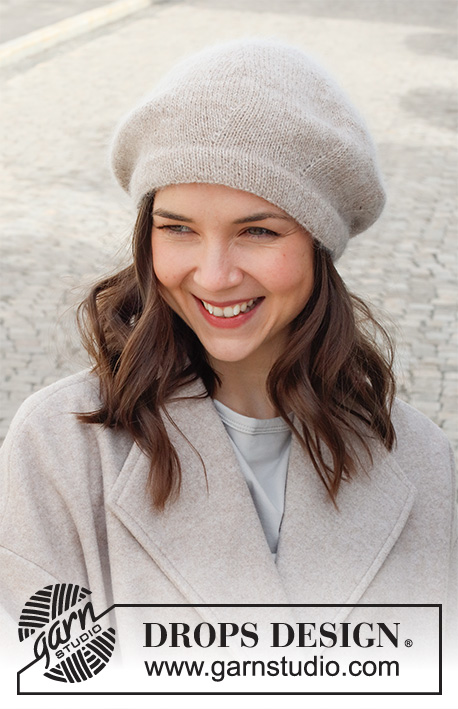 |
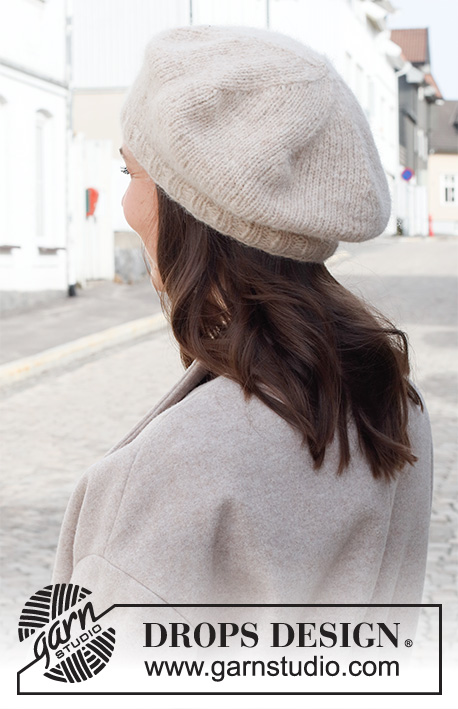
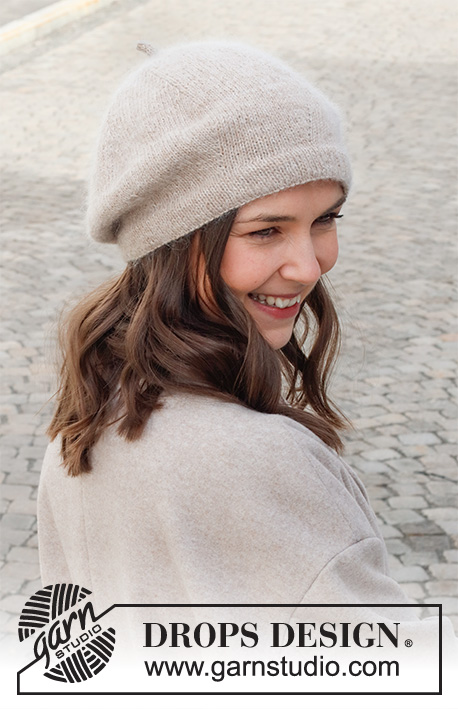
Berretto/cappello lavorato ai ferri n DROPS Alpaca e DROPS Kid-Silk.
DROPS 225-41 |
|
|
---------------------------------------------------------- TECNICHE IMPIEGATE: ---------------------------------------------------------- SUGGERIMENTO PER GLI AUMENTI: Aumentare 1 maglia facendo 1 gettato. Sul giro successivo lavorare il gettato a diritto ritorto per evitare buchi. SUGGERIMENTO PER LE DIMINUZIONI: Diminuire 1 maglia lavorando 2 maglie insieme a diritto dopo il segnapunti ---------------------------------------------------------- INIZIO DEL LAVORO: ---------------------------------------------------------- CAPPELLO – BREVE RIASSUNTO DEL LAVORO: Lavorato in tondo con i ferri circolari corti, dal basso verso l’alto. Passare ai ferri a doppia punta durante le diminuzioni. CAPPELLO: Avviare 112-120-128 maglie con i ferri circolari n° 3 mm con 1 capo di DROPS Alpaca nocciola chiaro e 1 capo di DROPS Kid-Silk panna (= 2 capi). Passare ai ferri circolari corti n° 2,5 mm e lavorare a maglia rasata in tondo per 2 cm, lavorare 1 giro rovescio (= bordo da piegare), e poi lavorare a maglia rasata in tondo per 2 cm. Passare ai ferri circolari corti n° 3 mm. Inserire 1 segnapunti sul giro – ora misurare il lavoro da questo segnapunti! Lavorare 1 giro a maglia rasata. Sul giro successivo inserire 8 nuovi segnapunti nel lavoro come spiegato sotto. Usare questi segnapunti durante gli aumenti e le diminuzioni. I segnapunti devono essere di colore diverso rispetto al segnapunti per le misure. Inserire il 1° segnapunti all’inizio del giro, poi inserire i 7 segnapunti successivi a 14-15-16 maglie di distanza. Lavorare a maglia rasata in tondo, e aumentare allo stesso tempo 1 maglia dopo ogni segnapunti – leggere il SUGGERIMENTO PER GLI AUMENTI-1 (= 8 aumenti). Aumentare in questo modo a giri alterni 7 volte in totale in verticale = 168-176-184 maglie. Lavorare a maglia rasata senza aumenti fino a quando il lavoro misura 8-8-9 cm dal segnapunti per le misure. Sul giro successivo iniziare le diminuzioni – diminuire 1 maglia dopo tutti i segnapunti – leggere il SUGGERIMENTO PER LE DIMINUZIONI (= 8 diminuzioni). Diminuire in questo modo a giri alterni 20-21-22 volte in totale = 8 maglie rimaste. Sul giro successivo diminuire 3 maglie in modo uniforme = 5 maglie rimaste. Il cappello misura circa 22-23-25 cm dalla cima fino al segnapunti. Lavorare la cima del cappello come segue: Usare 2 ferri a doppia punta n° 3 mm. Trasferire le 5 maglie su un ferro a doppia punta e lavorare con l’altro. * Lavorare 5 maglie diritto, spostare le maglie ancora sul davanti del ferro, tirare il filo *, lavorare *-* fino a quando la cima del cappello misura circa 2 cm. Tagliare il filo e farlo passare attraverso le 5 maglie, tirare bene e affrancare. CONFEZIONE: Piegare il bordo sulla parte inferiore del cappello a metà verso il rovescio del lavoro e affrancare, ma lasciare una piccola apertura per far passare un elastico – assicurarsi di evitare una cucitura tirata. Far passare l’elastico e aggiustare la lunghezza. Cucire l’apertura sul bordo da piegare. |
|
Avete terminato questo modello?Allora taggate le vostre foto con #dropspattern #streetsofparishat o inviatele alla #dropsfan gallery. Avete bisogno di aiuto con questo modello?Troverete 16 video tutorial, una sezione per i commenti/domande e molto altro guardando il modello su www.garnstudio.com © 1982-2026 DROPS Design A/S. Ci riserviamo tutti i diritti. Questo documento, compreso tutte le sue sotto-sezioni, è protetto dalle leggi sul copyright. Potete leggere quello che potete fare con i nostri modelli alla fine di ogni modello sul nostro sito. |
|


Con oltre 40 anni di esperienza nel design di modelli di maglia e uncinetto, DROPS Design offre la più estesa collezione di modelli gratuiti su internet - tradotti in 17 lingue. Ad oggi vi possiamo fornire 324 cataloghi e 12290 modelli - 9561 dei quali sono tradotti in Italiano.
Ci stiamo impegnando molto per darvi il meglio che vi possiamo offrire in termini di maglia e uncinetto, ispirazioni e consigli così come filati di grande qualità ad un prezzo incredibile! Volete utilizzare i nostri modelli per qualcosa d'altro oltre al vostro uso personale? Potete leggere tutto ciò che è consentito nel testo sul Copyright in basso su tutte le pagine dei nostri modelli. Buon lavoro!
Lasciare un commento sul modello DROPS 225-41
Noi saremmo felici di ricevere i tuoi commenti e opinioni su questo modello!
Se vuoi fare una domanda, fai per favore attenzione a selezionare la categoria corretta nella casella qui sotto per velocizzare il processo di risposta. I campi richiesti sono indicati da *.