
Categorie popolari
State cercando un filato?


Commenti / Domande (7)
![]() Mercedes Cuadra ha scritto:
Mercedes Cuadra ha scritto:
Thanks, this is my first knitting with a diagram. Now I understand well. Another thing that confuses me is if the "knit" symbol in the diagram means the same thing for the right side and the wrong side. The instruction says "knit from the right side, knit from the wrong side". In other words, you don't do a purl on the wrong side, on this 9 stitches. Is that correct? Cheers, Mercedes
20.07.2023 - 22:00DROPS Design ha risposto:
Hi Mercedes, there is 1 purl, second yarn over is purled. Happy knitting!
20.07.2023 - 22:27
![]() Mercedes Cuadra ha scritto:
Mercedes Cuadra ha scritto:
Hello, my question is about how to knit the wrong side of diagram A1. The pattern says that diagram A1 shows all rows from the right side. So, for example, in row 1, how should I knit those 9 stitches from the wrong side? Thank you. Mercedes
20.07.2023 - 17:27DROPS Design ha risposto:
Hi Mercedes, 1st row (on the right side; read the diagram from right to left): knit 3, yarn over, purl 2 together, between 2 stitches make 2 yarn overs, knit 2. 2nd row (on the wrong side; read the diagram from left to right): knit 2, knit 1 in the first yarn over, purl 1 in the 2nd yarn over, knit 2, yarn over, knit 2 twisted together, knit 1 twisted. More about how to read knitting diagrams you will find HERE. Happy knitting!
20.07.2023 - 19:42
![]() Mercedes Cuadra ha scritto:
Mercedes Cuadra ha scritto:
Hello, thank you for your previous answer. I am a beginner in knitting, so I appreciate your help with another question, When I finish the first row I have 86 stitches in total, I understand that there are 9, A1 stitches, (instead of 7), 76 stockinette and 1 garter. I understand that I am going to knit these 9 stitches like this: 3 garter stitch, 1 purl (2nd YO), and 5 garter stitches. Let me know is that's right. Have a nice day. Mercedes
19.07.2023 - 19:37DROPS Design ha risposto:
Dear Mercedes, the first row is correct. Now we work as follows: knit 3, purl 1 in the 2nd yo, knit 2, 1 yarn over, knit 2 stitches twisted together and knit 1 stitch twisted. Now work over the stockinette stitches and the garter stitch as before. Happy knitting!
20.07.2023 - 12:18
![]() Mercedes Cuadra ha scritto:
Mercedes Cuadra ha scritto:
Hi, its a pleasure to greet you! Thank you for your help. 1. When you say that I have to do 76 stockinette stitches on the first row, do you mean knit 76 stitches on the right side, and make purl stitches (84) on the back or 2nd row? 2. The diagram shows 7 stitches on the first row and 9 stitches on the next 3 rows. Does this mean that every four rows on the RS, I am going to repeat those stitches after knitting 76 or 74 stitches? Thank you again. Mercedes
09.07.2023 - 22:10DROPS Design ha risposto:
Hi Mercedes, Yes, stockinette is knitted on the right side and purled on the wrong side. You work 1 garter stitch at the beginning of the row, stockinette over the middle 76 stitches and A.1 over the last 7 stitches on the right side. This will be reversed from the wrong side, with A.1 first, then 76 stockinette (purl) and finish with 1 garter stitch. Happy knitting!
10.07.2023 - 07:41
![]() Cornelia ha scritto:
Cornelia ha scritto:
Hallo.Kann ein Fehler in der Strickschrift sein?In der 4.Reihe (Hinreihe) nach den zwei M rechts abketten ist es nicht möglich 4 M rechts zu Stricken, es ist eine zu viel angegeben. Zum abketten von 2 M am Rundenbeginn benötigt man 3 M nicht zwei. Zählt man das Muster kommt man auf 8 nicht auf 7 LG
12.05.2022 - 08:01DROPS Design ha risposto:
Liebe Cornelia, ja richtig, bei der 4. Reihe (= Rückreihe), ketten Sie 2 Maschen ab, dann stricken Sie insgesamt 4 Maschen links, aber die erste ist schon auf der Nadel nach der Abketten, so stricken Sie nur 3 Maschen links (es sind 4 glatt rechte Maschen auf der rechten Nadel). Viel Spaß beim stricken!
12.05.2022 - 09:16
![]() Agnes ha scritto:
Agnes ha scritto:
Hej Skulle ni vilja lägga upp en video på hur man stickar diagrammet. Får ingen rätsida på det
14.12.2021 - 09:20
![]() Hannelore Goormans ha scritto:
Hannelore Goormans ha scritto:
Wie kann ich eine Anleitung per PDF runter laden
16.07.2021 - 10:26DROPS Design ha risposto:
Liebe Frau Goormans, unsere Anleitungen können nur ausgedruckt werden, aber wenn Sie eine virtuelle Drucker wählen, dann können Sie als .PDF speichern. Viel Spaß beim stricken!
16.07.2021 - 11:42
|
|||||||||||||||||||||||||
Warm Delights#warmdelightsbag |
|||||||||||||||||||||||||
 |
 |
||||||||||||||||||||||||
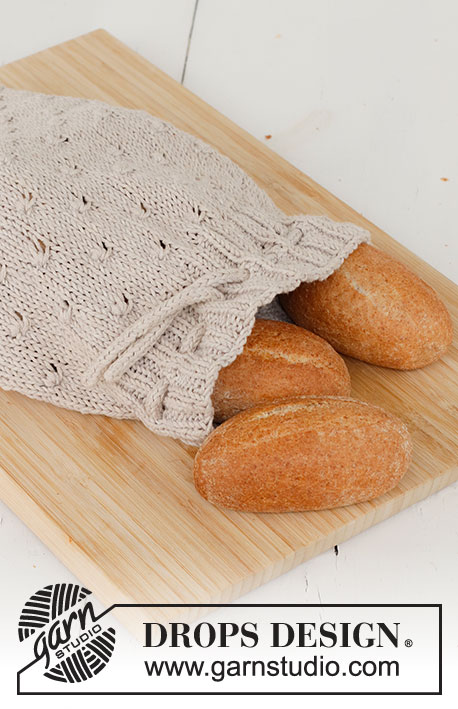
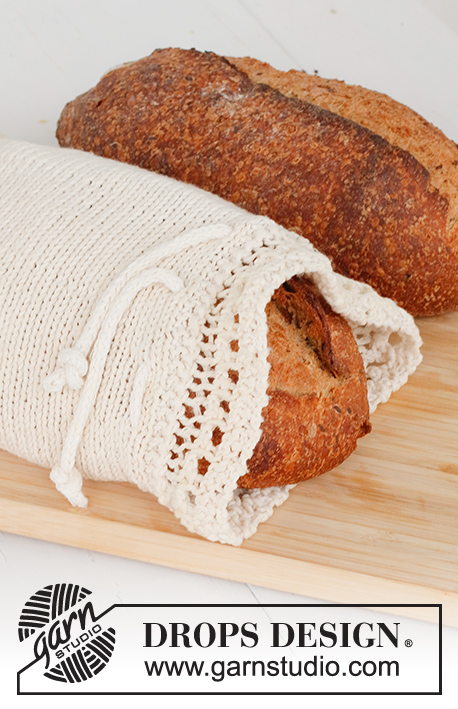
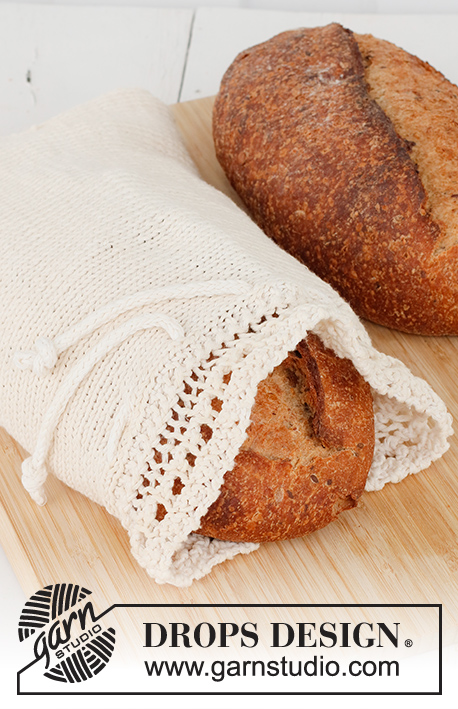
Borsa per il pane lavorata ai ferri con balze in DROPS Cotton Light.
DROPS 221-53 |
|||||||||||||||||||||||||
|
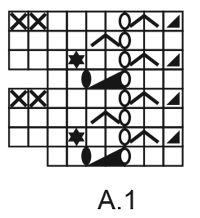
------------------------------------------------------- TECNICHE IMPIEGATE: ------------------------------------------------------- COSTA/MAGLIA LEGACCIO (avanti e indietro): Lavorare tutti i ferri a diritto. 1 costa in altezza = 2 ferri diritto. MOTIVO: Vedere il diagramma A.1. Il diagramma mostra tutti i ferri del motivo visti dal diritto del lavoro. ------------------------------------------------------- INIZIO DEL LAVORO: ------------------------------------------------------- BORSA PER IL PANE – BREVE RIASSUNTO DEL LAVORO: La borsa per il pane è lavorata da lato a lato, in piano ed è cucita lungo il lato e la parte inferiore. BORSA PER IL PANE: Avviare 84 maglie con i ferri n° 4,5 mm e DROPS Cotton Light. Lavorare 2 COSTE su tutte le maglie – leggere la descrizione sopra. Inserire un segnapunti – MISURARE IL LAVORO DA QUI. Lavorare il ferro successivo come segue dal diritto del lavoro: 1 maglia di vivagno a maglia legaccio, 76 maglie a maglia rasata e A.1 su 7 maglie. FARE ATTENZIONE ALLA TENSIONE DEL LAVORO! Continuare con il motivo A.1 a un lato, maglia rasata e maglia legaccio dall'altro lato fino a quando il lavoro misura circa 48 cm dal segnapunti – aggiustarlo per finire dopo il ferro 4 o 8 in A.1. Lavorare 2 coste su tutte le maglie. Intrecciare senza stringere, tagliare il filo. CORDINI: Lavorare in piano con i ferri circolari. Avviare 3 maglie con i ferri circolari n° 3,5 mm e DROPS Cotton Light. Lavorare 3 maglie diritto * non girare ma far scivolare le maglie all'altro lato del ferro, portare il filo dietro le maglie, tirare e lavorare ancora le maglie a diritto dal diritto del lavoro *, lavorare *-* fino a quando il cordino misura circa 60 cm, intrecciare e affrancare il filo. CONFEZIONE: Piegare il lavoro a metà in modo che le balze siano una verso l'altra; questa è l'apertura della borsa. Cucire il bordo di chiusura al bordo di avvio nel filo più esterno della maglia più esterna. Piegare il lavoro in modo che la cucitura laterale sia al centro del lavoro. Cucire la parte inferiore, all'interno della maglia di vivagno. Far passare il cordino dentro e fuori dal lavoro, attraverso le maglie a maglia rasata qualche cm sotto il motivo A.1 – vedere la foto. Fare un nodo a ogni estremità del cordino. |
|||||||||||||||||||||||||
Spiegazioni del diagramma |
|||||||||||||||||||||||||
|
|||||||||||||||||||||||||
 |
|||||||||||||||||||||||||
Avete terminato questo modello?Allora taggate le vostre foto con #dropspattern #warmdelightsbag o inviatele alla #dropsfan gallery. Avete bisogno di aiuto con questo modello?Troverete 18 video tutorial, una sezione per i commenti/domande e molto altro guardando il modello su www.garnstudio.com © 1982-2026 DROPS Design A/S. Ci riserviamo tutti i diritti. Questo documento, compreso tutte le sue sotto-sezioni, è protetto dalle leggi sul copyright. Potete leggere quello che potete fare con i nostri modelli alla fine di ogni modello sul nostro sito. |
|||||||||||||||||||||||||


Con oltre 40 anni di esperienza nel design di modelli di maglia e uncinetto, DROPS Design offre la più estesa collezione di modelli gratuiti su internet - tradotti in 17 lingue. Ad oggi vi possiamo fornire 324 cataloghi e 12290 modelli - 9561 dei quali sono tradotti in Italiano.
Ci stiamo impegnando molto per darvi il meglio che vi possiamo offrire in termini di maglia e uncinetto, ispirazioni e consigli così come filati di grande qualità ad un prezzo incredibile! Volete utilizzare i nostri modelli per qualcosa d'altro oltre al vostro uso personale? Potete leggere tutto ciò che è consentito nel testo sul Copyright in basso su tutte le pagine dei nostri modelli. Buon lavoro!
Lasciare un commento sul modello DROPS 221-53
Noi saremmo felici di ricevere i tuoi commenti e opinioni su questo modello!
Se vuoi fare una domanda, fai per favore attenzione a selezionare la categoria corretta nella casella qui sotto per velocizzare il processo di risposta. I campi richiesti sono indicati da *.