
Categorie popolari
State cercando un filato?


Commenti / Domande (24)
![]() Pauline ha scritto:
Pauline ha scritto:
I’m having trouble understanding how the collar works. Start with 2cm 1x1 ribbing then pattern for the body. Medium size 200 stitches. The last part says go back to add neck, knit up 88-120 st and work 1x1 rib for another 2cm. How does that work?
18.08.2025 - 15:35DROPS Design ha risposto:
Hi Pauline, the top is worked bottom up. The neck is knitted at the end. You have to cast on 88 to 120 stitches (number divisible by 2) around the neck from the right side and work rib (knit 1, purl 1) in the round for 2 cm. Happy knitting!
18.08.2025 - 15:59
![]() Antonia ha scritto:
Antonia ha scritto:
Hallo, ich fange gerade nach dem Rippenmuster A1 und A2 an, in der Anleitung steht Hinreihen werden von rechts nach links gelesen und Rückreihen von links nach rechts, wenn ich in der Reihe mit dem Pfeil anfange ist es also eine Rückreiheund ich muss von links nach rechts lesen obwohl ich in Runden stricke? Sehe ich das richtig?
17.08.2025 - 09:19DROPS Design ha risposto:
Liebe Antonia, wenn die Diagramme in der Runde gestrickt sind, liest man jede Reihe rechts nach links, erst wenn man später in Hin- und Rückreihen strickt, wird man die Rückreihen links nach rechts lesen. Viel Spaß beim Stricken!
18.08.2025 - 09:10
![]() Emmanuelle ha scritto:
Emmanuelle ha scritto:
Bonjour, Je n'ai toujours pas compris. Qu'appelez-vous "tricotez A2 au-dessus des 88 mailles en diminuant de 11 mailles"? Je dois faire 11 diminutions de façon harmonieuse et après les 88 premières mailles moins les 11 diminutions, je commence à tricoter les 5 premières mailles de A2?Dans ce cas pourquoi dire "au-dessus de" puisque nous ne faisons que des diminutions et non A2? Je vous remercie . A ce rythme je crois que je vais abandonner et faire autre chose avec.
26.04.2025 - 15:31DROPS Design ha risposto:
Bonjour Emmanuelle, vous tricotez les 88 mailles suivantes comme indiqué dans le 2ème rang du diagramme A.2 (celui avec la flèche) = vous allez ainsi répéter 11 fois les 8 mailles du diagramme, et, en même temps, vous diminuez 1 m comme indiqué par le symbole "/" soit: (1 m env, glissez 1 m à l'end, 1 m end, passez la m glissée par-dessus la m tricotée, 1 m end, 1 m env, 3 m end) = Il reste 7 m, répétez de (à) encore 10 fois (11 fois au total). Au tour suivant, tricotez le 3ème rang de A.2: 1 m env, 2 m end, 1 m env, 3 m end. Bon tricot!
28.04.2025 - 08:04
![]() Emmanuelle ha scritto:
Emmanuelle ha scritto:
Bonjour, Pourriez-vous m'aider s'il vous plait pour la taille L et la première ligne de A1 et de A2? J'obtiens 8 diminutions en tout. Ensuite, comment obtenez-vous 194 mailles alors qu'au départ il y avait 224 mailles? Cela fait donc 20 diminutions... Je suis perdue. Merci pour votre aide.
22.04.2025 - 07:45DROPS Design ha risposto:
Bonjour Emmanuelle, on va effectivement diminuer 1 maille dans A.1 et dans A.2 mais au 2ème rang = celui avec la flèche; tricotez ainsi * A.1 (= 7 m et on diminue 1 m), 6 m endroit en diminuant 1 m, tricotez A.2 au-dessus des 88 m suivantes (= on diminue 11 m au total = 1 dans chacun des 11 répétitions de A.2), tricoter les 5 premières mailles de A.2 (= on diminue 1 maille), 6 m endroit en diminuant 1 m*, répéter de *-* encore 1 fois = [(7-1)+(6-1)+(88-11)+(5-1)+(6-1)]x2= 194 mailles. Bon tricot!
22.04.2025 - 16:44
![]() Katt ha scritto:
Katt ha scritto:
Hello, I am stuck on the part where the piece measures 4-4cm. Increase stitch on each side part of A.3 part. I think I'm getting ready to do the sleeve or arm holes not too sure but am having a hard time as it's hard for me to read and understand most knitting patterns and I am a fairly beginner/novice knitter.
12.02.2025 - 16:10DROPS Design ha risposto:
Dear Katt, you work the increases as indicated in INCREASE TIP. You work 1 yarn over before and after each repeat of A.3 in the round. Start with 1 yarn over, work chart A.3, work 1 yarn over. Continue with knit stitches and A.4 over the other stitches and, when you reach the next A.3 chart (under the second sleeve) make 1 yarn over, work A.3, 1 yarn over. Continue with knit stitches and A.4 over the other stitches until the end of the round. Here you increase for the sleeves and then you will cast off to form the armhole. Happy knitting!
17.02.2025 - 00:17
![]() Sara Logue ha scritto:
Sara Logue ha scritto:
For the beginning of the Body the pattern says "Work the last round in A.1 and A.2, and knit the remaining stitches on round." What does this mean? Thank you.
17.01.2025 - 04:22DROPS Design ha risposto:
Dear Mrs Logue, you just have worked the row in A.1 and A.2 decreasing 1 stitch in each diagram and on this same round you knitted some stitches decreasing evenly; on the next round you will work the last row in À.1 and A.2 just as shown in diagram and knit all remaining stitches (just without decrease this time). Happy knitting!
17.01.2025 - 08:51
![]() Marjon ha scritto:
Marjon ha scritto:
Goedemiddag, Klopt het dat zowel de boord als het kantpatroon gebreid wordt met nldn 3 mm? Alleen de mouwtjes ( tricotsteek ) met 4 mm? Ik hoor het graag Alvast bedankt, Marjon
03.06.2024 - 18:06DROPS Design ha risposto:
Dag Marjon,
Nee, de boord wordt met naald 3 mm gebreid en de rest met 4 mm. Bij het lijf staat ook dat je op een gegeven moment over gaat naar rondbreinaald 4 mm. (Niet direct na de boordsteek, maar een beetje verderop.
03.06.2024 - 20:26
![]() Gail Stein ha scritto:
Gail Stein ha scritto:
My question is; In A1 and A2 the third row shows a blank space, over the decreased stitch. How do I handle this?. Is this meant to be a decrease in the pattern, or do you pick up a stitch to keep the stitch count?
09.04.2024 - 00:23
![]() Toni ha scritto:
Toni ha scritto:
The instructions are incorrect b/c you CANNOT cast off at the end of a row (ie both sides) unless you have finished. Instructions SHOULD BE ........sleeve cap back and forth, AT THE SAME TIME cast off beginning of each row as follows: 2 st 6-6-6-6-4-4 times, 1 st 4-6-10-16-28-28 times, 2 st 8-8-6-4-2-2 times and 4-3-3-4-3-3 st 2 times = 26-28-30-30-30-34 stitches. Cast off. The sleeve measures approx. 13-14-14-15-18-18 cm. I saw others had the same problem. Thanks!
30.03.2024 - 17:41
![]() Toni ha scritto:
Toni ha scritto:
I have too many st when finishing dec on the sleeve (sz lg) and it's too short 74 + 6 = 80 st, ok When piece is 5 cm long, -10 = 70 st, ok Then at beg of each (new) row, -2 x 3 = -6 =64 st (c/o 2 st beg next 3 rows {makes it non symmetrical}) -1 x 5 = -5 = 59 st -2 x 3 = -6 = 53 t -3 x 1 = -3 = 50 st but there should only be 30 st. And my piece is only 9cm long. Please clarify. Thanks so much - I really appreciate your quick response on my last qst!
30.03.2024 - 17:03DROPS Design ha risposto:
Dear Toni, cast off at the beginning of each row from each side (right and wrong sides). So 2 stitches on the next 3 rows from the right side and next 3 rows from the wrong side (so 12 stitches), 1 stitch 5 times from the right side and 5 times from the wrong side (so 10 stitches), 2 stitches 3 times from the right side and 3 times from the wrong side (so 12 stitches) and 3 stitches once from the right side and once from the wrong side (so 6 stitches). You have cast off 40 stitches and have 30 stitches left. At the same time, you should have worked 24 more rows which, according to the gauge should be approx. 8.5 cm. So your sleeve should measure almost 14cm. Happy knitting!
01.04.2024 - 01:00
|
||||||||||||||||||||||
Coral Gables#coralgablestop |
||||||||||||||||||||||
 |
 |
|||||||||||||||||||||
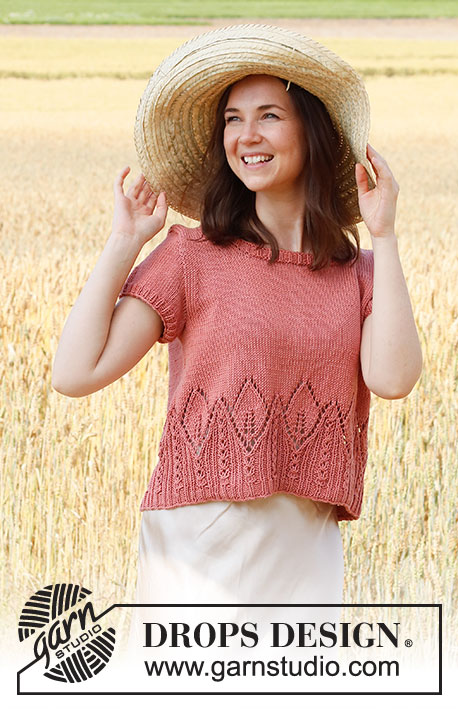
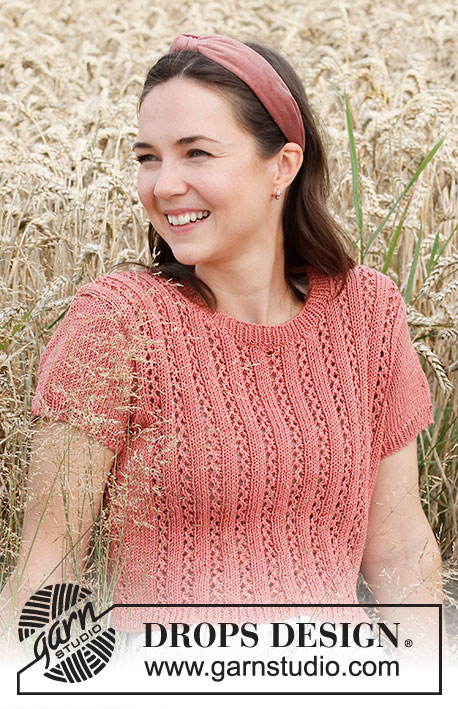
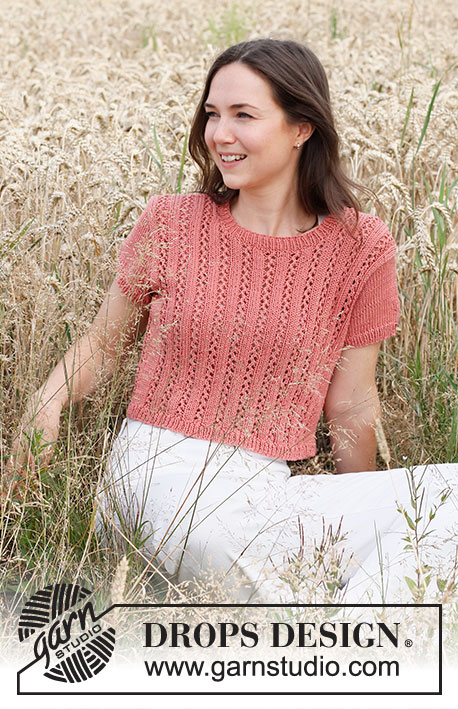
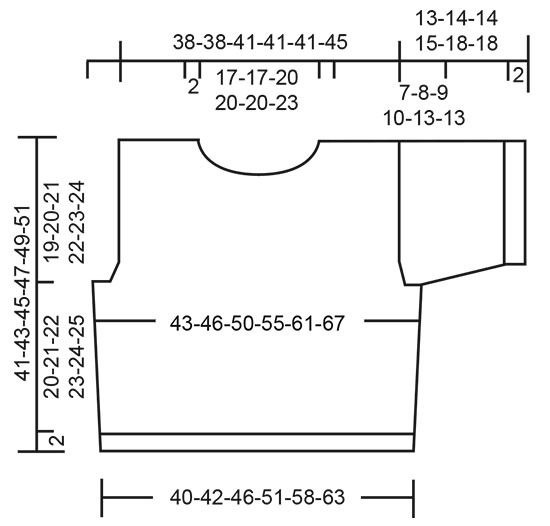
Maglietta lavorata ai ferri in DROPS Muskat. Lavorata con motivo traforato e maniche corte. Taglie: S - XXXL.
DROPS 220-27 |
||||||||||||||||||||||
|
------------------------------------------------------- TECNICHE IMPIEGATE: ------------------------------------------------------- MOTIVO: Vedere i diagrammi A.1 - A.4. I diagrammi mostrano tutti i ferri del motivo visti dal diritto del lavoro. SUGGERIMENTO PER GLI AUMENTI: Lavorare fino ad A.3, 1 gettato, lavorare A.3, 1 gettato. Sul giro successivo lavorare i gettati a ritorto per evitare buchi. Poi lavorare le nuove maglie a maglia rasata. ------------------------------------------------------- INIZIO DEL LAVORO: ------------------------------------------------------- MAGLIETTA – BREVE RIASSUNTO DEL LAVORO. Lavorare il corpo in tondo con i ferri circolari, fino agli scalfi. Poi finire il davanti e il dietro in piano, in modo separato. Lavorare le maniche in tondo con i ferri a doppia punta/ferri circolari corti fino agli scalfi, poi finire l’arrotondamento della manica in piano. Cucire le parti alla fine e finire il corpo in tondo alla fine. CORPO: Avviare 192-200-224-240-272-296 maglie con i ferri circolari n° 3 mm e Muskat. Lavorare 1 giro diritto. Poi lavorare a coste (1 maglia diritto, 1 maglia rovescio) in tondo per 2 cm. Lavorare il giro successivo come segue – iniziando sul giro con la freccia in ogni diagramma: * A.1 sulle prime 7 maglie (= 1 diminuzione), 2-4-6-10-18-20 maglie diritto e allo stesso tempo diminuire 0-0-1-0-1-1 maglie lavorando 2 maglie insieme a diritto, lavorare A.2 sulle 80-80-88-88-88-96 maglie successive (= 10-10-11-11-11-12 diminuzioni), lavorare le prime 5 maglie in A.2 (= 1 diminuzione), lavorare 2-4-6-10-18-20 maglie diritto e allo stesso tempo diminuire 0-0-1-0-1-1 maglie lavorando 2 maglie insieme a diritto *, lavorare un’altra volta = 168-176-194-214-242-264 maglie. Passare ai ferri circolari n° 4 mm. Lavorare l’ultimo giro di A.1 e A.2 e lavorare a diritto le maglie rimaste sul giro. Ora lavorare il motivo come segue: * A.3 su A.1 (= sotto la manica), lavorare 2-4-5-10-17-19 maglie diritto, lavorare A.4 sulle 70-70-77-77-77-84 maglie successive, lavorare le prime 4 maglie in A.4, lavorare 2-4-5-10-17-19 maglie diritto *, lavorare *-* un’altra volta. Continuare in questo modo. FARE ATTENZIONE ALLA TENSIONE DEL LAVORO! Quando il lavoro misura 4-5-5-5-5-5 cm, aumentare 1 maglia a ogni lato di A.3 sotto entrambe le maniche – leggere il SUGGERIMENTO PER GLI AUMENTI. Aumentare in questo modo ogni 7-5-5-5-5½-6 cm per un totale di 3-4-4-4-4-4 volte = 180-192-210-230-258-280 maglie. Quando il lavoro misura 22-23-24-25-26-27 cm, intrecciare per gli scalfi come segue: intrecciare 6-7-8-9-10-11 maglie, lavorare le 84-88-95-103-115-124 maglie successive, intrecciare 6-8-10-12-14-16 maglie, lavorare le 84-88-95-103-115-124 maglie successive, intrecciare le ultime 0-1-2-3-4-5 maglie. Finire il davanti e il dietro in modo separato. DIETRO: = 84-88-95-103-115-124 maglie. Continuare il motivo in piano, ALLO STESSO TEMPO intrecciare per gli scalfi a ogni lato all’inizio di ogni ferro come segue: 2 maglie 0-1-1-2-5-5 volte, poi 1 maglia 1-1-1-3-3-4 volte = 82-82-89-89-89-96 maglie. Quando il lavoro misura 17-18-19-20-21-22 cm dalla divisione (tutto il lavoro misura circa 39-41-43-45-47-49 cm dal bordo di avvio), intrecciare le 34-34-39-39-39-46 maglie centrali per il collo e finire ogni spalla in modo separato. Poi intrecciare 1 maglia sul ferro successivo dal collo = 23-23-24-24-24-24 maglie sulla spalla. Continuare a lavorare fino a quando il lavoro misura 41-43-45-47-49-49 cm. Intrecciare. Lavorare l’altra spalla nello stesso modo. DAVANTI: = 84-88-95-103-115-124 maglie. Continuare il motivo in piano, ALLO STESSO TEMPO intrecciare per gli scalfi a ogni lato all’inizio di ogni ferro come segue: intrecciare 2 maglie 0-1-1-2-5-5 volte, poi 1 maglia 1-1-1-3-3-4 volte = 82-82-89-89-89-96 maglie. Quando il lavoro misura 11-12-12-13-13-14 cm dalla divisione (tutto il lavoro misura circa 33-35-36-38-39-41 cm dal bordo di avvio), intrecciare 18-18-23-23-23-24 maglie per il collo e finire ogni spalla in modo separato. Poi intrecciare su ogni ferro dal collo come segue: 3 maglie 1 volta, 2 maglie 2-2-2-2-2-3 volte e 1 maglia 2-2-2-2-2-3 volte = 23-23-24-24-24-24 maglie sulla spalla. Continuare a lavorare fino a quando il lavoro misura 41-43-45-47-49-51 cm. Intrecciare. Lavorare l’altra spalla nello stesso modo. MANICHE: Avviare 66-70-74-80-84-90 maglie con i ferri a doppia punta n° 3 mm e Muskat. Lavorare 1 giro diritto. Poi lavorare a coste (1 maglia diritto, 1 maglia rovescio) in tondo per 2 cm. Lavorare 1 giro diritto in cui aumentare 6 maglie in modo uniforme = 72-76-80-86-90-96 maglie. Passare ai ferri a doppia punta n° 4 mm, e lavorare a maglia rasata. Quando la manica misura 6-6-5-5-5-5 cm, intrecciare 6-8-10-12-14-16 maglie al centro sotto la manica = 66-68-70-74-76-80 maglie. Poi lavorare l’arrotondamento della manica in piano, ALLO STESSO TEMPO intrecciare le maglie all’inizio di ogni ferro come segue: 2 maglie 3-3-3-3-2-2 volte, 1 maglia 2-3-5-8-14-14 volte, 2 maglie 4-4-3-2-1-1 volte e 4-3-3-4-3-3 maglie 1 volta = 26-28-30-30-30-34 maglie. Intrecciare. La manica misura circa 13-14-14-15-18-18 cm. Lavorare l’altra manica nello stesso modo. CONFEZIONE: Cucire i margini delle spalle. Attaccare le maniche. COLLO: Riprendere 88 - 120 maglie (n° divisibile per 2) attorno al collo dal diritto del lavoro, usando i ferri circolari corti n° 3 mm e Muskat. Lavorare a coste (1 maglia diritto, 1 maglia rovescio) in tondo per 2 cm. Intrecciare con diritto su diritto e rovescio su rovescio. |
||||||||||||||||||||||
Spiegazioni del diagramma |
||||||||||||||||||||||
|
||||||||||||||||||||||
 |
||||||||||||||||||||||
 |
||||||||||||||||||||||
Avete terminato questo modello?Allora taggate le vostre foto con #dropspattern #coralgablestop o inviatele alla #dropsfan gallery. Avete bisogno di aiuto con questo modello?Troverete 26 video tutorial, una sezione per i commenti/domande e molto altro guardando il modello su www.garnstudio.com © 1982-2026 DROPS Design A/S. Ci riserviamo tutti i diritti. Questo documento, compreso tutte le sue sotto-sezioni, è protetto dalle leggi sul copyright. Potete leggere quello che potete fare con i nostri modelli alla fine di ogni modello sul nostro sito. |
||||||||||||||||||||||


Con oltre 40 anni di esperienza nel design di modelli di maglia e uncinetto, DROPS Design offre la più estesa collezione di modelli gratuiti su internet - tradotti in 17 lingue. Ad oggi vi possiamo fornire 324 cataloghi e 12290 modelli - 9561 dei quali sono tradotti in Italiano.
Ci stiamo impegnando molto per darvi il meglio che vi possiamo offrire in termini di maglia e uncinetto, ispirazioni e consigli così come filati di grande qualità ad un prezzo incredibile! Volete utilizzare i nostri modelli per qualcosa d'altro oltre al vostro uso personale? Potete leggere tutto ciò che è consentito nel testo sul Copyright in basso su tutte le pagine dei nostri modelli. Buon lavoro!
Lasciare un commento sul modello DROPS 220-27
Noi saremmo felici di ricevere i tuoi commenti e opinioni su questo modello!
Se vuoi fare una domanda, fai per favore attenzione a selezionare la categoria corretta nella casella qui sotto per velocizzare il processo di risposta. I campi richiesti sono indicati da *.