
Categorie popolari
State cercando un filato?


Commenti / Domande (53)
![]() Giuseppina ha scritto:
Giuseppina ha scritto:
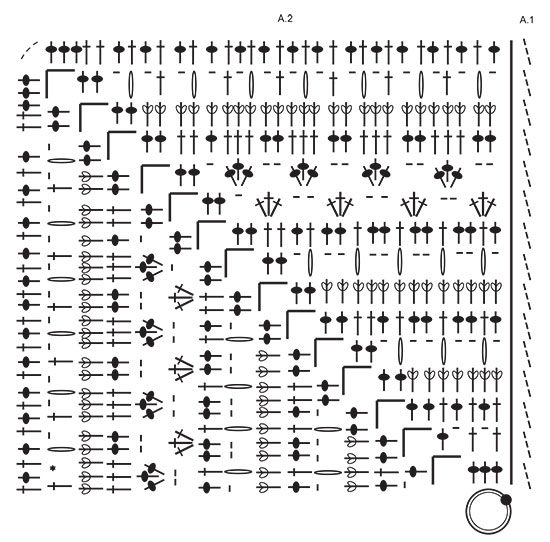
Buongiorno, ho difficoltà con l inizio dei giri il diagramma1 come devo leggerlo e mi direste da dove comincio a contare le maglie.grazie. se ci fosse un diagramma 2 intero e non un solo quarto.
11.09.2025 - 06:12DROPS Design ha risposto:
Buongiorno Giuseppina, il diagramma A.1 mostra l'inizio e la fine dei giri. Poi deve ripetere il diagramma 2. Buon lavoro!
14.09.2025 - 09:30
![]() Xondra ha scritto:
Xondra ha scritto:
Do you have a full square in diagram form please and is the pattern available in American terms
11.09.2025 - 04:21DROPS Design ha risposto:
Dear Xondra, here is the pattern with US terms. The square is worked according to chart A.1 (shows the beginning of the square) and chart A.2 (shows the rest of the square), which is repeated 4 times around the chain ring. Happy crochetting!
15.09.2025 - 01:42
![]() Monique ha scritto:
Monique ha scritto:
Bonjour, Je suis en train de réaliser cet ouvrage et personnellement la première bride en début de rangs je la remplace par 2 mailles en l'air au lieu de 3. Cela correspond mieux à une hauteur de bride. Bonne journée à tous.
20.06.2025 - 13:09
![]() Agathe B ha scritto:
Agathe B ha scritto:
Bonjour, J’ai du mal à comprendre le diagramme A1, est-ce que les 3 mailles en l’air remplacent la première bride de A2? Ou bien c’est en plus? Le résultat est bizarre pour les rangs 5/8/10/12/14 non? Cela créé une barre de 3 mailles au milieu du motif. Comment démarre-t-on ces rangs exactement (le texte n’est pas clair)? Merci beaucoup!
04.05.2025 - 21:55DROPS Design ha risposto:
Bonjour Agathe, les 3 premières mailles en l'air remplacent la 1ère maille de A.1 (cf légende 2ème symbole); aux rangs cités, vous pouvez considérer ces 3 mailles en l'air comme la dernière maille du tour, ainsi, vous n'aurez pas de décalage, ou bien faire ces 3 mailles en l'air en plus (sans qu'elles ne remplacent la 1ère maille) si vous le préférez. Bon crochet!
05.05.2025 - 08:44
![]() Sandra Gonzaga ha scritto:
Sandra Gonzaga ha scritto:
Existe algum video a explicar como unir os quadrados? Obrigada
08.03.2025 - 23:27DROPS Design ha risposto:
Bom dia, Existe, sim. No separador geral "Dicas e Ajuda" encontra vários vídeos separados por categorias. No link abaixo, encontra os tutoriais em vídeo relacionados com a montagem de quadrados em croché: https://www.garnstudio.com/videos.php?c=assembly&lang=pt Bons crochés!
11.03.2025 - 10:32
![]() Aline Jacquey ha scritto:
Aline Jacquey ha scritto:
Les trois mailles en l'air du début de chaque rang doivent-elles être rajouté sur le diagramme
31.12.2024 - 10:37DROPS Design ha risposto:
Bonjour Mme Jacquey, les 3 mailles en l'air de A.1 remplacent la 1ère maille/bride du tour - cf légende du 2ème symbole. Bon crochet!
02.01.2025 - 15:23
![]() CARYL ha scritto:
CARYL ha scritto:
CAN THE COMMENTS BE TRANSLATED INTO ENGLISH?
19.11.2024 - 13:41DROPS Design ha risposto:
Dear Caryl, you can try to use any online translator to see all previous comments & questions, but please feel free to ask your question here so that we can try to help you.
19.11.2024 - 15:59
![]() Sara ha scritto:
Sara ha scritto:
Varv nr. 10 vad innebär det? har försökt söka efter den symbolen tre kors tillsammans för att förstå hur den är gjord men hittar ingenting? sen undrar jag också om man ska lägga ihop dem för på diagonalen är det 4x2 st kors tillsammans och lodrät är det bara 3x2 st? ska det inte vara lika många på varje varv? och på varv nr.9 så visas det en utputande kant på bilden som på varv nr.7 men enligt diagrammet så blir det inte någon sån kant?
13.10.2024 - 23:32DROPS Design ha risposto:
Hej Sara. Symbolen 3 kors betyder att du virkar 3 stolpar i maskan under (dvs 5e symbolförklaringen, och så gör man den 3 gånger). Mvh DROPS Design
14.10.2024 - 09:14
![]() Michaela ha scritto:
Michaela ha scritto:
Ja, danke! Also doch in der 5. Reihe 3 Stäbchen je Gruppe in der 5. Reihe, und nicht 4 wie es in der Anleitung steht. Nochmals danke!
29.05.2024 - 11:19
![]() Michaela ha scritto:
Michaela ha scritto:
Das Problem ist die 4. Reihe, dort habe ich zu wenig Sstäbchen zum Zusammenhäkeln? 4 Stäbchen aus der 4. Reihe werden zu einem zusammengehäkelt, die nächsten 4 Stäbchen der 4. Reihe ebenfalls - damit sind 8 Stäbchen aus der 4. Reihe abgemascht, und es ist nur noch ein Stäbchen aus der 4. Reihe übrig - es sollten aber nochmal 4 Stäbchen zusammengehäkelt werden. Tut mir leid, wenn die Lösung offensichtlich ist, aber als Anfänger sehe ich sie einfach nicht.
27.05.2024 - 13:51DROPS Design ha risposto:
Liebe Michaela, in das 1. Teil von A.2 (vor der Ecke) haben Sie bei der 1. Reihe 3 Stächen, bei der 2. Reihe (1 Stb, 1 Lm) x 3, bei der 3. Reihe (1 Stb in das Stb, 1 Stb um die Lm) x 2 + 1 Stb in das letzte Stb + 2 Stb um die Lm = 7 Stb. bei der 4. Reihe: 1 Stb (relief Stb) in je die 7 Stb + 2 Stb um die Luftmaschenbogen; bei der 5. Reihe wie zuvor beschrieben =3 Stb-Gruppe/Noppe + 2 Stb um die Luftmaschenbogen, usw.. kann das Ihnen helfen?
27.05.2024 - 16:32
|
||||||||||||||||||||||||||||
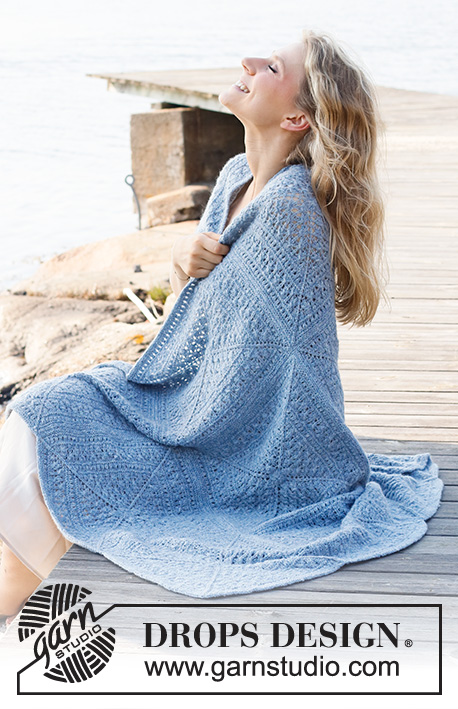
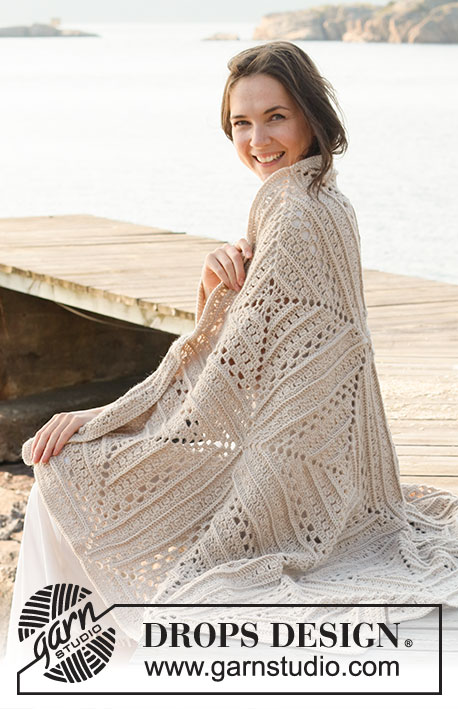
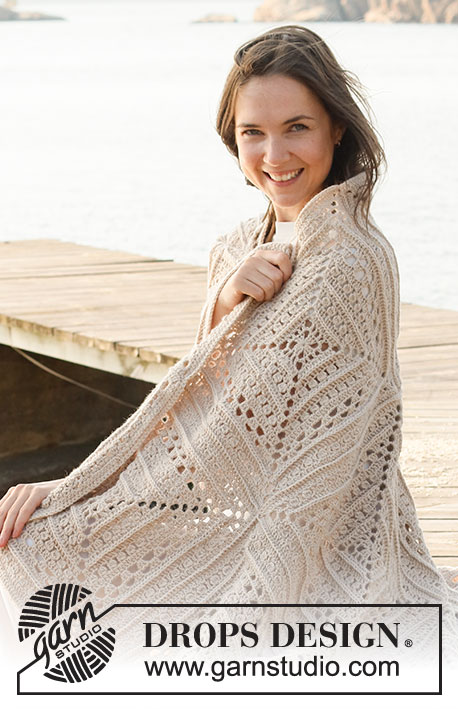
Day By The Sea#daybytheseablanket |
||||||||||||||||||||||||||||
 |
 |
|||||||||||||||||||||||||||
Coperta lavorata all’uncinetto in DROPS Lima.
DROPS 221-2 |
||||||||||||||||||||||||||||
|
------------------------------------------------------- TECNICHE IMPIEGATE: ------------------------------------------------------- MOTIVO: Vedere i diagrammi A.1 e A.2. Il diagramma A.1 mostra come iniziano e finiscono i giri. CATENELLE: Se lavorate prevalentemente sulla punta dell’uncinetto la catenella risulterà spesso troppo tirata; 1 catenella dev’essere lunga come la larghezza di 1 maglia alta. ------------------------------------------------------- INIZIO DEL LAVORO: ------------------------------------------------------- COPERTA – BREVE RIASSUNTO DEL LAVORO: La coperta è formata da 12 quadrati lavorati seguendo i diagrammi. I quadrati vengono poi uniti e si lavora un bordo all’uncinetto attorno alla coperta per rifinirla. QUADRATO: Usando l’uncinetto n° 4 mm e Lima. Leggere CATENELLE nella spiegazione sopra. Lavorare il diagramma A.2 per un totale di 4 volte attorno all’anello di catenelle - A.1 mostra come inizia e finisce il giro. FARE ATTENZIONE ALLA TENSIONE DEL LAVORO! Lavorare 12 quadrati in totale. CONFEZIONE: Disporre i quadrati con 3 quadrati in larghezza e 4 in altezza. Fare in modo che tutti i quadrati abbiano il diritto del lavoro in su. Usare il Lima e unire i quadrati, prima in larghezza e poi in lunghezza. Posizionare 2 quadrati insieme, rovescio contro rovescio, e lavorare attraverso entrambi gli strati dal diritto del lavoro come segue: Affrancare il filo con 1 maglia bassa attorno all’angolo di catenelle nell’angolo, * lavorare 1 maglia bassa in ogni maglia fino all’angolo successivo (= 3 catenelle), lavorare 1 maglia bassa attorno all’angolo, 2 catenelle e 1 maglia bassa attorno all’angolo successivo (= 3 catenelle). Lavorare *-* fino a quando sono stati uniti tutti i quadrati, ma sull’ultimo quadrato finire con 1 maglia bassa nell’ultimo angolo (= 3 catenelle). Ripetere lungo l’altra striscia in larghezza. Unire le strisce in lunghezza nello stesso modo. BORDO: Usare l’uncinetto n° 4 mm e Lima. Iniziare affrancando il filo con 1 maglia bassissima nel 1° angolo, poi lavorare come segue: lavorare 3 catenelle e 2 maglie alte attorno al 1° angolo. * Lavorare 1 maglia alta in ogni maglia fino agli angoli tra i quadrati, lavorare 1 maglia alta attorno a ogni angolo *, lavorare *-* fino all’ultimo angolo su questo lato della coperta. Attorno all’angolo 2 lavorare 3 maglie alte, lavorare *-* fino all’ultimo angolo su questo lato della coperta. Attorno all’angolo 3 lavorare 3 maglie alte, lavorare *-* fino all’ultimo angolo su questo lato della coperta. Attorno all’angolo 4 lavorare 3 maglie alte, lavorare *-* fino al 1° angolo e finire con 1 maglia bassissima nella 3° catenella all’inizi del giro. Tagliare e affrancare il filo. |
||||||||||||||||||||||||||||
Spiegazioni del diagramma |
||||||||||||||||||||||||||||
|
||||||||||||||||||||||||||||
 |
||||||||||||||||||||||||||||
Avete terminato questo modello?Allora taggate le vostre foto con #dropspattern #daybytheseablanket o inviatele alla #dropsfan gallery. Avete bisogno di aiuto con questo modello?Troverete 9 video tutorial, una sezione per i commenti/domande e molto altro guardando il modello su www.garnstudio.com © 1982-2026 DROPS Design A/S. Ci riserviamo tutti i diritti. Questo documento, compreso tutte le sue sotto-sezioni, è protetto dalle leggi sul copyright. Potete leggere quello che potete fare con i nostri modelli alla fine di ogni modello sul nostro sito. |
||||||||||||||||||||||||||||


Con oltre 40 anni di esperienza nel design di modelli di maglia e uncinetto, DROPS Design offre la più estesa collezione di modelli gratuiti su internet - tradotti in 17 lingue. Ad oggi vi possiamo fornire 324 cataloghi e 12290 modelli - 9561 dei quali sono tradotti in Italiano.
Ci stiamo impegnando molto per darvi il meglio che vi possiamo offrire in termini di maglia e uncinetto, ispirazioni e consigli così come filati di grande qualità ad un prezzo incredibile! Volete utilizzare i nostri modelli per qualcosa d'altro oltre al vostro uso personale? Potete leggere tutto ciò che è consentito nel testo sul Copyright in basso su tutte le pagine dei nostri modelli. Buon lavoro!
Lasciare un commento sul modello DROPS 221-2
Noi saremmo felici di ricevere i tuoi commenti e opinioni su questo modello!
Se vuoi fare una domanda, fai per favore attenzione a selezionare la categoria corretta nella casella qui sotto per velocizzare il processo di risposta. I campi richiesti sono indicati da *.