
Categorie popolari
State cercando un filato?


Commenti / Domande (13)
![]() Kath ha scritto:
Kath ha scritto:
Bonjour! Je ne suis pas certaine de bien saisir pourquoi en tricotant une housse de coussin carré, nous devons faire des augmentations suite au montage initial et des diminutions vers la fin du tricot avant le rabattage. S'il est carré, ne devrait-il pas y avoir un nombre de mailles constant. Merci beaucoup pour les précisions.
30.11.2025 - 22:29DROPS Design ha risposto:
Bonjour Kath, il faut plus de mailles pour tricoter des torsades que pour du jersey, ainsi, lorsque l'on monte le nombre de mailles requis, on va avoir la bonne largeur pour du jersey, mais il faudra ensuite augmenter pour conserver la même largeur quand on va faire les torsades, et, à la fin, il faudra donc diminuer les mailles augmentées pour éviter que le bord ne gondole/ne soit plus large que la partie torsades. Bon tricot!
01.12.2025 - 10:57
![]() Annabelle Garcia Y Vallejo ha scritto:
Annabelle Garcia Y Vallejo ha scritto:
Bonjour, Concernant le diagramme A1 ligne 1 : faut il tricoter les mailles sur lesquelles on fait passer la maille? Ligne 2 sur la torsade ,tricote-t-on à l'endroit où à l'envers? Merci pour votre réponse
18.02.2025 - 11:02DROPS Design ha risposto:
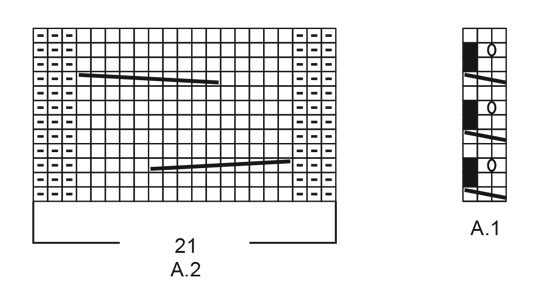
Bonjour Mme Garcia Y Vallejo, notez que la housse se tricote en rond = tous les tours à l'endroit; au 1er rang de A.1, tricotez les 3 mailles de A.1à l'endroit puis passez la 1ère de ces 3 mailles par-dessus les 2 autres, ainsi, il ne reste plus que 2 mailles. Au tour suivant, tricotez ces 2 mailles à l'endroit, puis au3ème tour, tricotez: 1 m end, 1 jeté, 1 m end = vous avez de nouveau 3 mailles, tricotez ces 3 mailles à l'endroit au rang suivant. Répétez ces 4 rangs. Retrouvez ici, en vidéo comment tricoter ce type de petite torsade. Bon tricot!
18.02.2025 - 17:17
![]() Rachel ha scritto:
Rachel ha scritto:
Hi. Am knitting Pillars of Valhalla . Am struggling with the no stitch squares. My reading about it seems to indicate that it balances out decreases, however there are no decreases only increases and I end up with extra stitches at the end of each row! Would love some help!!
18.01.2025 - 01:13DROPS Design ha risposto:
Dear Rachel, the A.1 pattern have differents stitchcount in different rows. In the first row, you have 3 stitches, from which you decrease 1, thus in the 2-3. row you ill have 2 stitches there, but in the 3rd row, you make a YO (the little O sign between the two stitches on the diagram) between the two stitches so you will have 3 stitches again. Happy Knitting!
18.01.2025 - 01:54
![]() Rose ha scritto:
Rose ha scritto:
Hi, How do we follow the A.1 and A.2 pattern? From top to bottom? How do we follow A.1? Would it be for example: 1st A.1: K3 2nd A.1: K3 3rd A.1: skip and KYOK or 1st A.1: K3 2nd A.1: skip KYOK 3rd A.1: skip and K2 Thank you!
22.09.2024 - 11:44DROPS Design ha risposto:
Dear Rose, you can read our lesson on knitting charts here: https://www.garnstudio.com/lesson.php?id=68&cid=19. The charts are read from the bottom up. Since it's worked in the round all rows of the chart are read from left to right. In the 1st row of A.1 you have: knit 3, pass the first stitch knitted over the other 2, so it lies around them (= 1 stitch decreased). On the next round, knit 2 (the black square is ignored, don't skip stitches). Happy knitting!
23.09.2024 - 01:11
![]() Genise Huey ha scritto:
Genise Huey ha scritto:
I am getting more decreases when I do as pattern says: I knit 2 stitches and then knit two together and then knit 3 and then knit two together. K2, k2tg k3, k2tg…..
17.09.2024 - 22:09DROPS Design ha risposto:
Dear Mrs Huey, adjust the number of stitches worked between each decrease so that you decrease the correct number of stitches - read more here. Happy knitting!
18.09.2024 - 08:26
![]() Maureen Gillespie ha scritto:
Maureen Gillespie ha scritto:
For the pattern repeat, on the wrong side (even) rows, should I reverse the stokinette stitch to be p1, k1? [Original instructions show "11-20 stitches in stockinette stitch (*k1, p1*)"] Thank you!
08.11.2023 - 21:58DROPS Design ha risposto:
Dear Mrs Gillepsie, there is no wrong side rows as the piece is worked in the round, diagrams are showing all the rows, so work all rows in diagram reading from right towards the left and knit all stitches in stocking stitch. Happy knitting!
09.11.2023 - 08:26
![]() Maureen ha scritto:
Maureen ha scritto:
NO STITCH: What do I do with the first stitch? K together with 2nd stitch? transfer to the right needle? drop? Thank you!
12.10.2023 - 22:05DROPS Design ha risposto:
Dear Maureen, after you have worked 1st row in A.1 (= knit 3 and pass the first of these 3 sts over the 2 sts), there are only 2 sts left, just knit these 2 sts . On next round, you will then work K1, YO, K1 (there are 3 sts again). Happy knitting!
13.10.2023 - 08:45
![]() Maureen ha scritto:
Maureen ha scritto:
Pattern repeat *A1, A2* If A1 is hold 3 sticthes on cable needle, k3, then k3 from cable needle = 28 stitches (not 25)
12.10.2023 - 19:46DROPS Design ha risposto:
Dear Maureen, A.1 is first worked over 3 stitches but on the first row you will decrease 1 stitch (knit 3, pass the first of these 3 sts over the next 2), and on row 2 you will make 1 yarn over to get 3 sts again - so that A.1 is counted over 3 sts. You will then work: A.1, A.2, A.1, A.2, A.1, A.2, A.1. = 3+21+3+21+3+21+3=75 sts in total. Happy knitting!
13.10.2023 - 08:35
![]() Judy ha scritto:
Judy ha scritto:
This pillow comes in two sizes which are accounted for in the two numbers of sts to cast on and work. However, when you get to the length of the pillow, there is only one number. Doesn't the larger pillow need to be made a little longer in order to make it square? I am assuming the 38 cm is for the smaller pillow. How long should I make it for the larger pillow?
06.10.2022 - 19:36DROPS Design ha risposto:
Hi Judy, for the larger pillow you should work until work measures 43 cm - added on pattern,thanks for nociting. Happy knitting!
18.11.2022 - 14:26
![]() UteEspunkt ha scritto:
UteEspunkt ha scritto:
Tolle Anleitung! Perfekt beschrieben u einfach zum Nacharbeiten! Und ein wunderbares Garn (Nepal) .. meine Freundinnen sind ganz neidisch auf mein Kissen 😁
03.02.2021 - 18:34
|
||||||||||||||||||||||
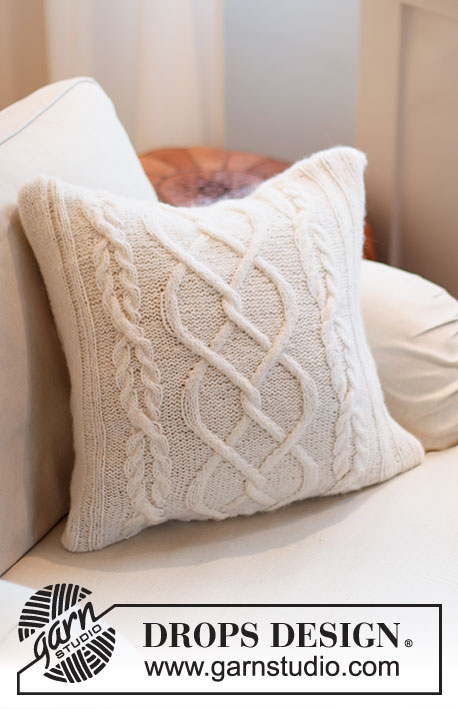
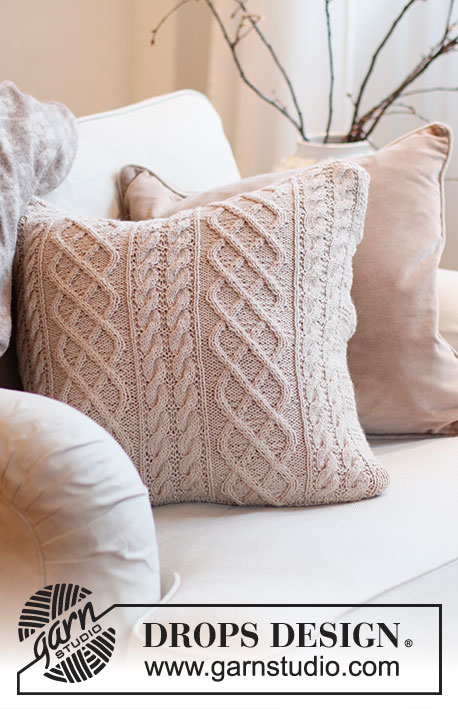
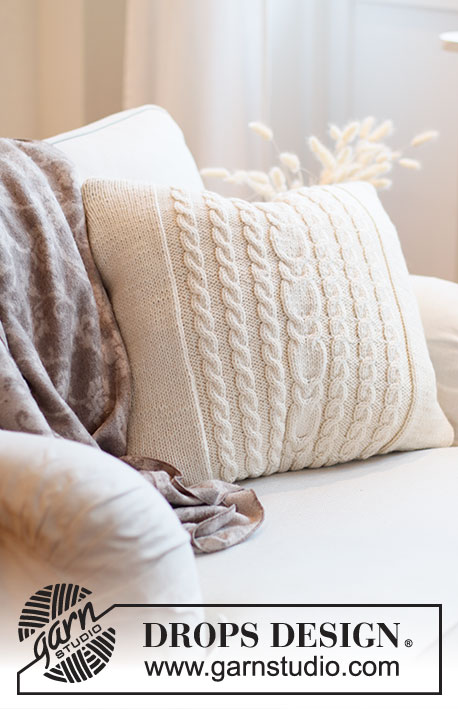
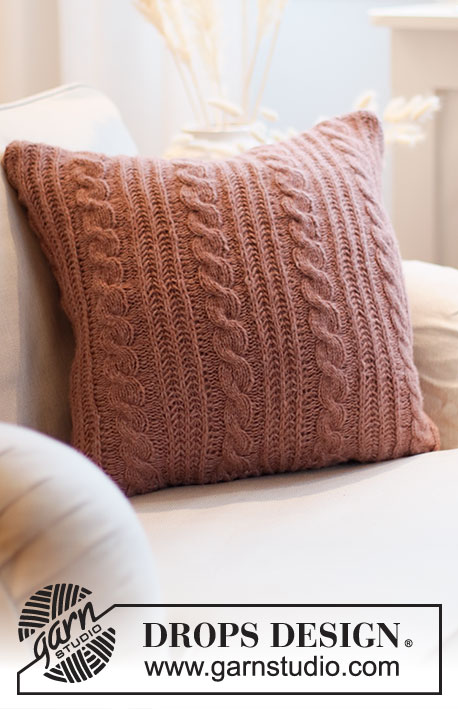
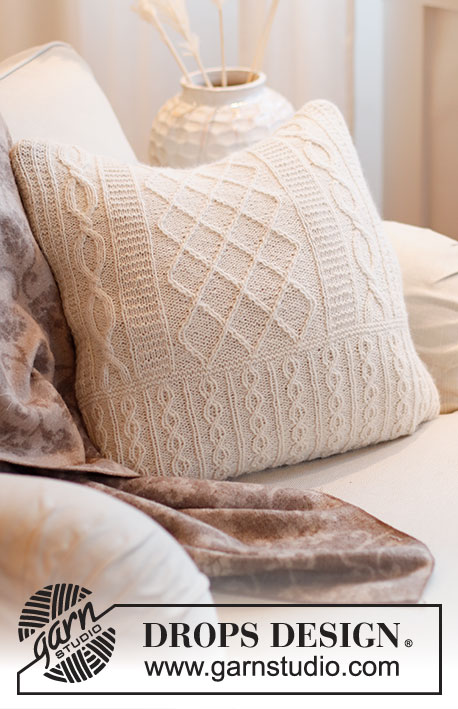
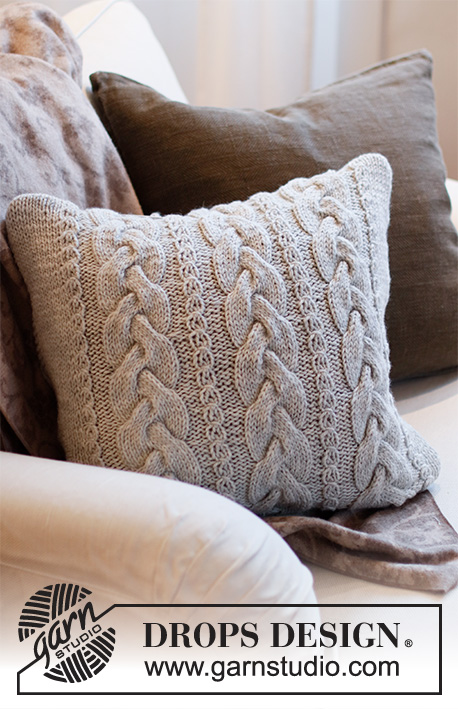
Columns of Valhalla Pillow#columnsofvalhallapillow |
||||||||||||||||||||||
 |
 |
|||||||||||||||||||||
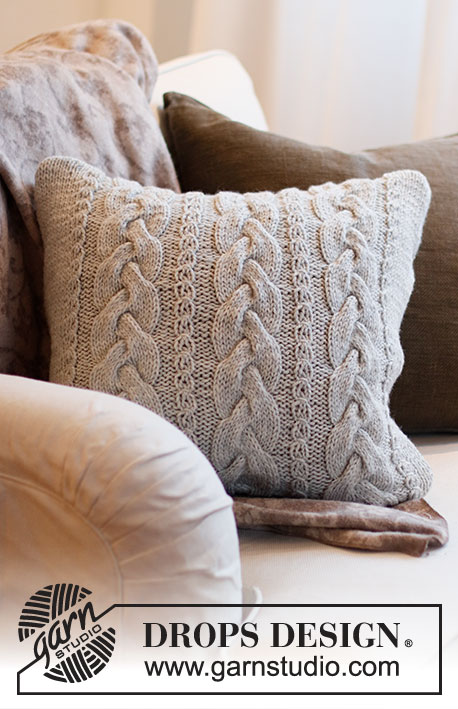
Copricuscino lavorato ai ferri a trecce in DROPS Nepal.
DROPS 215-42 |
||||||||||||||||||||||
|
------------------------------------------------------- TECNICHE IMPIEGATE: ------------------------------------------------------- COSTA/MAGLIA LEGACCIO (A) (lavorata in tondo): 1 costa = 2 giri. Lavorare 1 giro rovescio e 1 giro diritto. COSTA/MAGLIA LEGACCIO (B) (lavorata in tondo): 1 costa = 2 giri. Lavorare 1 giro diritto e 1 giro rovescio. SUGGERIMENTO PER GLI AUMENTI/DIMINUZIONI (distribuiti in modo uniforme): Per stabilire ogni quanto aumentare/diminuire in modo uniforme, prendere il n° totale di maglie sul ferro (ad esempio 61 maglie) e dividerlo per il n° di aumenti/diminuzioni da fare (ad esempio 14) = 4,3. AUMENTI: Fare un gettato in modo alternato dopo ogni 4° e 5° maglia. Sul ferro successivo lavorare i gettati a ritorto per evitare buchi. DIMINUIRE: Lavorare insieme a diritto in modo alternato ogni 3° e 4° maglia e ogni 4° e 5° maglia. RIPETIZIONI DEL MOTIVO: Vedere i diagrammi A.1 - A.2 – lavorare le 75 maglie successive come segue: A.1, A.2, A.1, A.2, A.1, A.2, A.1. ------------------------------------------------------- INIZIO DEL LAVORO: ------------------------------------------------------- COPRICUSCINO – BREVE RIASSUNTO DEL LAVORO: Lavorato in tondo, con i ferri circolari e dal basso verso l’alto. La parte superiore e inferiore sono cucite alla fine. Le trecce sono lavorate sul davanti e dietro. COPRICUSCINO: Avviare 144-162 maglie con i ferri circolari n° 4,5 mm e lavorare 2 COSTE (A) – leggere la descrizione sopra. Poi lavorare 1 giro diritto e ALLO STESSO TEMPO aumentare come segue: sulle prime 61 maglie aumentare 14 maglie in modo uniforme – leggere il SUGGERIMENTO PER GLI AUMENTI/DIMINUZIONI (= 75 maglie), 11-20 maglie diritto, poi sulle 61 maglie aumentare 14 maglie in modo uniforme (= 75 maglie), finire con 11-20 maglie diritto = 172-190 maglie. Continuare come segue: lavorare 75 maglie con le RIPETIZIONI DEL MOTIVO – leggere la descrizione sopra, 11-20 maglie a maglia rasata, 75 maglie delle ripetizioni del motivo e finire con 11-20 maglie a maglia rasata. FARE ATTENZIONE ALLA TENSIONE DEL LAVORO! Continuare in questo modo fino a quando il lavoro misura 38-43 cm – aggiustarlo alla fine del giro 4 o 12 delle ripetizioni del motivo. Sul giro successivo diminuire come segue: lavorare 1 giro diritto in cui diminuire 14 maglie in modo uniforme sulle prime 75 maglie - leggere il SUGGERIMENTO PER GLI AUMENTI/DIMINUZIONI (= 61 maglie), 11-20 maglie diritto e poi diminuire 14 maglie in modo uniforme sulle 75 maglie successive (= 61 maglie), finire con 11-20 maglie diritto = 144-162 maglie. Lavorare 2 COSTE B – leggere la descrizione sopra e intrecciare senza stringere. CONFEZIONE: Piegare il lavoro in modo che le trecce siano al centro davanti e al centro dietro. Cucire il bordo di avvio nel filo più esterno delle maglie più esterne, mettere il cuscino nel copricuscino e cucire il bordo di chiusura nello stesso modo. |
||||||||||||||||||||||
Spiegazioni del diagramma |
||||||||||||||||||||||
|
||||||||||||||||||||||
 |
||||||||||||||||||||||
Avete terminato questo modello?Allora taggate le vostre foto con #dropspattern #columnsofvalhallapillow o inviatele alla #dropsfan gallery. Avete bisogno di aiuto con questo modello?Troverete 18 video tutorial, una sezione per i commenti/domande e molto altro guardando il modello su www.garnstudio.com © 1982-2026 DROPS Design A/S. Ci riserviamo tutti i diritti. Questo documento, compreso tutte le sue sotto-sezioni, è protetto dalle leggi sul copyright. Potete leggere quello che potete fare con i nostri modelli alla fine di ogni modello sul nostro sito. |
||||||||||||||||||||||


Con oltre 40 anni di esperienza nel design di modelli di maglia e uncinetto, DROPS Design offre la più estesa collezione di modelli gratuiti su internet - tradotti in 17 lingue. Ad oggi vi possiamo fornire 325 cataloghi e 12298 modelli - 9569 dei quali sono tradotti in Italiano.
Ci stiamo impegnando molto per darvi il meglio che vi possiamo offrire in termini di maglia e uncinetto, ispirazioni e consigli così come filati di grande qualità ad un prezzo incredibile! Volete utilizzare i nostri modelli per qualcosa d'altro oltre al vostro uso personale? Potete leggere tutto ciò che è consentito nel testo sul Copyright in basso su tutte le pagine dei nostri modelli. Buon lavoro!
Lasciare un commento sul modello DROPS 215-42
Noi saremmo felici di ricevere i tuoi commenti e opinioni su questo modello!
Se vuoi fare una domanda, fai per favore attenzione a selezionare la categoria corretta nella casella qui sotto per velocizzare il processo di risposta. I campi richiesti sono indicati da *.