
Categorie popolari
State cercando un filato?


Commenti / Domande (100)
![]() Katie ha scritto:
Katie ha scritto:
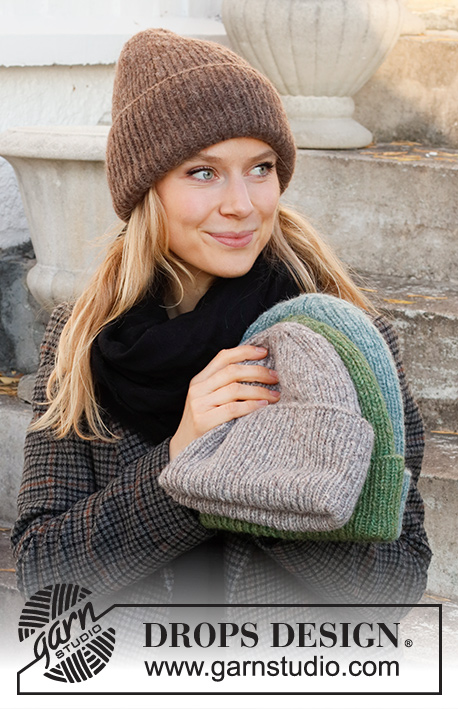
I was wondering if you know which yarn shade was used to make the green hat in the picture? It is lovely!
19.03.2026 - 10:25DROPS Design ha risposto:
Dear Katie, the green hat was made with DROPS Air colour 12. Happy knitting!
19.03.2026 - 16:23
![]() Camilla ha scritto:
Camilla ha scritto:
Mössa
11.03.2026 - 16:32
![]() Mary ha scritto:
Mary ha scritto:
Is a US4 needle size too small for the Winter Smiles hat? The suggested needle size on the label says US8.
08.03.2026 - 02:23DROPS Design ha risposto:
Dear Mary, the hat is worked with a tension tighter than usual to make a warm fabric, reason why we are using here needle size US4 - but remember to check your tension and adjust needle size if needed. Happy knitting!
09.03.2026 - 09:14
![]() Merlin ha scritto:
Merlin ha scritto:
Love the pattern. It is easy to fillow and hat turns out beautiful, fits good. I have made 7 hats already🤭
27.02.2026 - 12:12
![]() Size Question ha scritto:
Size Question ha scritto:
Hello, knitting size L/XL according to the measure of my head, but it looks very oversized, not sure if i need continue knitting or starts from beginning for M size instead. I did an example 10x10 and needles size 5mm was closer to the pattern gage
18.02.2026 - 18:27DROPS Design ha risposto:
Hello! The rib is very stretchy, and there is only a few cm difference in sizes. If you do not want the hat to be too loose around the head, it might be a good idea to make a smaller size. Happy knitting!
19.02.2026 - 08:37
![]() Lorena ha scritto:
Lorena ha scritto:
Estaba leyendo las instrucciones antes de empezar, mi pregunta es: ¿se teje el gorro por el lado revés y después se me da vuelta? Me confunde un poco la primera vuelta de puntos al revés, y en las fotos parece que esa vuelta de revés queda expuesta. ¡Gracias!
10.02.2026 - 16:52DROPS Design ha risposto:
Hola Lorena, el gorro se trabaja entero en punto elástico. La vuelta del revés es solo para la forma del borde. Así que el gorro debería tener el mismo punto elástico, que luego se dobla hacia arriba la parte inferior para llevar el gorro puesto. Pero no es una sección que requiere que se de la vuelta. Si no te gusta como queda el borde puedes omitir esta vuelta y trabajar en punto elástico desde la 1ª vuelta.
23.02.2026 - 00:09
![]() Catherine Lynn MacFarland ha scritto:
Catherine Lynn MacFarland ha scritto:
I am a novice knitter and this pattern seems to be easy to follow.
05.02.2026 - 18:13
![]() Josias ha scritto:
Josias ha scritto:
Can I use drop alpaca silk with the same needle to knit this hat?
17.01.2026 - 12:34DROPS Design ha risposto:
Dear Josiah, sure you can, texture might be just a bit different as yarns are different, but they do belong the same group so you could, just remember to check your tension (as always). Happy knitting!
19.01.2026 - 08:39
![]() Jeanette ha scritto:
Jeanette ha scritto:
Når man skal strikke 2 m sammen så kan jeg ikke få det til at passe med ret og vrang
09.01.2026 - 16:18DROPS Design ha risposto:
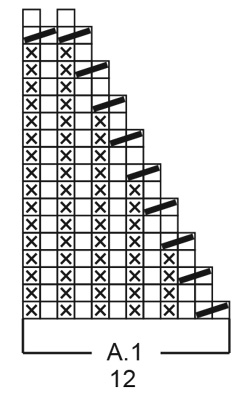
Hei Jeanette. Når du startet å strikke luen, startet du med 1 rett / 1 vrang, og når arbeidet måler 27-29 cm er fremdeles rettmaskene over rettmaskene og vrangmaskene over vrangmaskene. Start med å strikke de 2 første maskene rett sammen (1 rettmaske og 1 vrangmaske, de 2 første ikonene du ser i diagrammet, nederst til høyre). mvh DROPS Design
26.01.2026 - 10:55
![]() Ulrike Dieter ha scritto:
Ulrike Dieter ha scritto:
Liebes DROPS-Design-Team, ich habe eine Frage zum Abnahme-Diagramm: lt. Diagramm liegen bei der 1. Abnahme 3 Maschen rechts nebeneinander. Allerdings komme ich doch vom 1-er Rippenmuster, sodass ich bei der 1. Abnahme 1 re Masche mit 1 linken Masche rechts zusammen stricke, was unschön aussieht. Habe ich evtl. einen Zwischenschritt übersehen? Ich freue mich, wenn Sie meinen Knoten im Kopf lösen. Dankeschön vorab für Ihre Antwort. Viele Grüße Ulli
09.01.2026 - 13:05DROPS Design ha risposto:
Liebe Ulla, am Anfang der 1. Reihe A.1 wird man 2 Maschen rechts zusammen Stricken, dh 1 M rechts + 1 M links vom Rippenmuster stricken, dann weiter mit 1 re, 1 li stricken. Viel Spaß beim Stricken!
12.01.2026 - 08:12
|
||||||||||
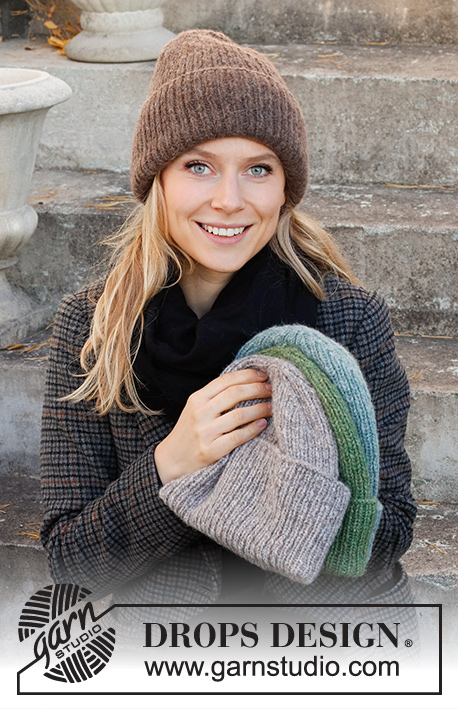
Winter Smiles Hat#wintersmileshat |
||||||||||
 |
 |
|||||||||
Berretto hipster lavorato ai ferri a coste in DROPS Air. Tema: Natale.
DROPS 214-67 |
||||||||||
|
------------------------------------------------------- TECNICHE IMPIEGATE: ------------------------------------------------------- MOTIVO: Vedere il diagramma A.1. ------------------------------------------------------- INIZIO DEL LAVORO: ------------------------------------------------------- CAPPELLO – BREVE RIASSUNTO DEL LAVORO: Lavorato in tondo con i ferri circolari, dal basso verso l’alto. Passare ai ferri a doppia punta quando necessario. CAPPELLO: Avviare 108-120 maglie con i ferri circolari n° 3,5 mm e Air. Lavorare 1 giro rovescio. Lavorare a coste in tondo (1 maglia diritto, 1 maglia rovescio). FARE ATTENZIONE ALLA TENSIONE DEL LAVORO! Continuare fino a quando il lavoro misura 27-29 cm; mancano circa 7 cm alla fine del lavoro. Ora lavorare A.1 (= 12 maglie) per un totale di 9-10 volte sul giro. Alla fine di A.1, ci sono 18-20 maglie sui ferri. Lavorare tutte le maglie insieme 2 a 2 a diritto = 9-10 maglie. Tagliare il filo e farlo passare attraverso le maglie rimaste, tirare e affrancare bene. Il cappello misura circa 34-36 cm. Risvoltare circa 10 cm sul diritto del lavoro. |
||||||||||
Spiegazioni del diagramma |
||||||||||
|
||||||||||
 |
||||||||||
Avete terminato questo modello?Allora taggate le vostre foto con #dropspattern #wintersmileshat o inviatele alla #dropsfan gallery. Avete bisogno di aiuto con questo modello?Troverete 10 video tutorial, una sezione per i commenti/domande e molto altro guardando il modello su www.garnstudio.com © 1982-2026 DROPS Design A/S. Ci riserviamo tutti i diritti. Questo documento, compreso tutte le sue sotto-sezioni, è protetto dalle leggi sul copyright. Potete leggere quello che potete fare con i nostri modelli alla fine di ogni modello sul nostro sito. |
||||||||||


Con oltre 40 anni di esperienza nel design di modelli di maglia e uncinetto, DROPS Design offre la più estesa collezione di modelli gratuiti su internet - tradotti in 17 lingue. Ad oggi vi possiamo fornire 324 cataloghi e 12290 modelli - 9561 dei quali sono tradotti in Italiano.
Ci stiamo impegnando molto per darvi il meglio che vi possiamo offrire in termini di maglia e uncinetto, ispirazioni e consigli così come filati di grande qualità ad un prezzo incredibile! Volete utilizzare i nostri modelli per qualcosa d'altro oltre al vostro uso personale? Potete leggere tutto ciò che è consentito nel testo sul Copyright in basso su tutte le pagine dei nostri modelli. Buon lavoro!
Lasciare un commento sul modello DROPS 214-67
Noi saremmo felici di ricevere i tuoi commenti e opinioni su questo modello!
Se vuoi fare una domanda, fai per favore attenzione a selezionare la categoria corretta nella casella qui sotto per velocizzare il processo di risposta. I campi richiesti sono indicati da *.