
Popular categories
Looking for a yarn?


Comments / Questions (2)
![]() Valerie Sauvage wrote:
Valerie Sauvage wrote:
Bonjour, Il est écrit de mettre un marqueur (pour le pouce) dans la troisième maille à partir de la fin du tour, est ce que cela veut dire : 3 mailles avant la fin du tour ou la 3ieme après la fin du tour( qui serait le début de l'autre tour) pourriez vous svp l'expliquer . Je suis perplexe. Merci de prendre le temps de me répondre, j'apprécie beaucoup Valérie
04.12.2024 - 03:56DROPS Design answered:
Bonjour Mme Sauvage, mettez le marqueur dans la 3ème maille à partir de la fin du tour, autrement dit, après cette maille avec un marqueur, il reste 2 mailles avant le début du tour. Bon tricot!
04.12.2024 - 08:03
![]() Freja Padkær wrote:
Freja Padkær wrote:
Hej! Jeg er lidt i tvivl om hvad det betyder når i skriver: “Maskeantallet i A.1 vil variere, men tælles altid som 6 masker.” Når jeg strikker det, så er det som om at det blive ulige. Der er altid to vrangmasker på højre side af A1, men på venstre side svinger det, og her er det bredere og ofte 3 vrangmasker. Er dette bare en del af opskriften? Eller gør jeg noget forkert?:) På forhånd tak! Venlig hilsen Freja
02.11.2024 - 02:28DROPS Design answered:
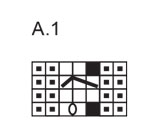
Hei Freja. A.1 skal alltid telles som 6 masker. Om du f.eks strikker str. S/M starter du med 45 masker, strikk de 7 første maskene i vrangbord (rett-vrang-rett-vrang-rett-vrang-rett), sett en maskemarkør (da har du en bedre oversikt) deretter A.1 (som starter og slutter med 2 vrang), sett en maskemarkør, så strikkes det vrangbord over 32 masker (start med rett og avslutt med vrang). Du vil da ha 2 vrangmasker før (de 2 første maskene i A.1) og etter (de 2 siste maskene i A.1) selve fletten i A.1. Når vrangborden er ferdig strikkes det glattstrikk + A.1, bruk maskemarkørene og du har en bedre oversikt. mvh DROPS Design
04.11.2024 - 08:33
|
||||||||||||||||
Rising Tide Mittens#risingtidemittens |
||||||||||||||||
 |
 |
|||||||||||||||
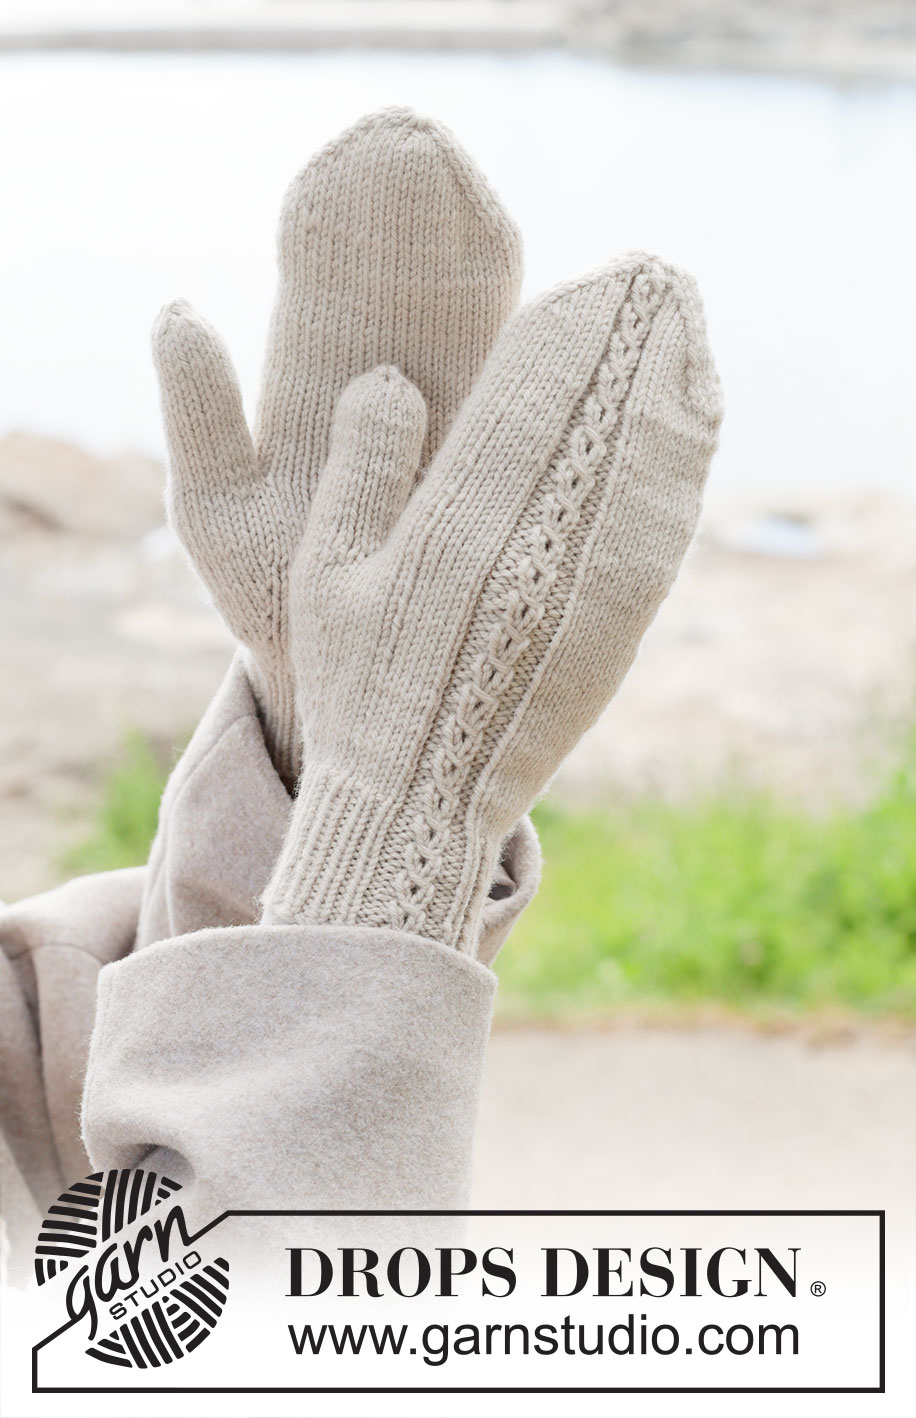
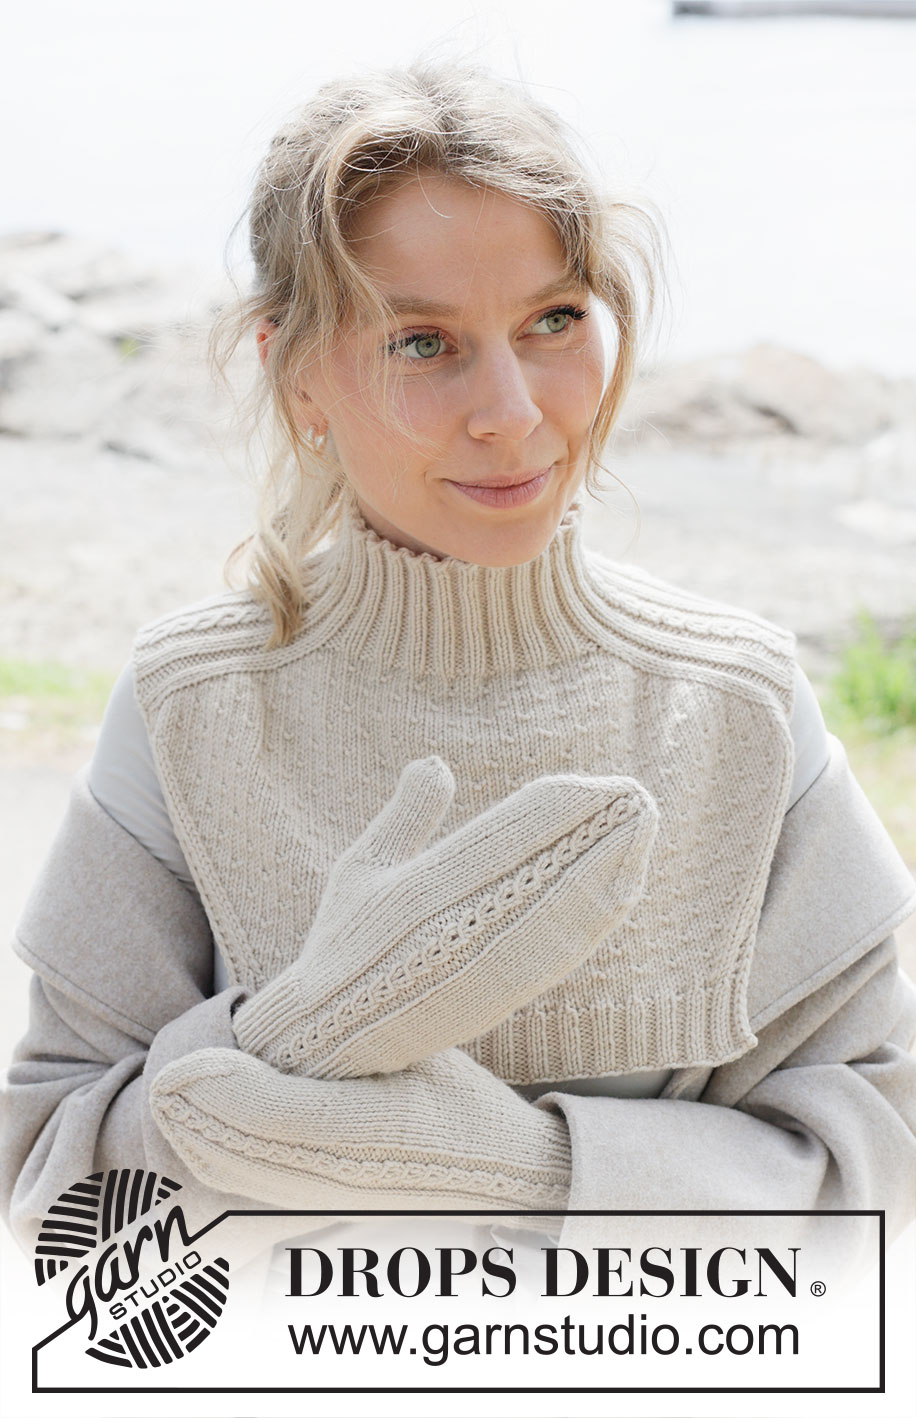
Knitted mittens with cables in DROPS Daisy or DROPS Merino Extra Fine.
DROPS 253-8 |
||||||||||||||||
|
EXPLANATIONS FOR THE PATTERN: ------------------------------------------------------- PATTERN: See diagram A.1. The number of stitches in A.1 will vary but always counted as 6 when making a stitch count. INCREASE TIP (for thumb-gusset): Work as far as the marker-stitch, make 1 yarn over, knit 1 (= marker-stitch), make 1 yarn over (= 2 increased stitches). On the next round work the yarn overs twisted as described below to avoid holes. On the next increase-round, work until there is 1 stitch left before the marker-stitch, make 1 yarn over, knit 3, make 1 yarn over (= 2 increased stitches). Continue increasing like this, always on the outside of the previously increased stitches. YARN-OVER BEFORE THUMB-STITCH: Slip the yarn-over off the left needle and replace it the other way round (insert the left needle through the back loop when replacing it). Knit the front loop. Then work the new stitch in stocking stitch. YARN-OVER AFTER THUMB-STITCH: Knit the back loop. Then work the new stitch in stocking stitch. DECREASE TIP: Decrease 1 stitch on each side of the marker-thread as follows: Work until there are 3 stitches left before the marker-thread, knit 2 together, knit 2 (marker-thread sits between these 2 stitches), slip 1 stitch knit-wise, knit 1 and pass the slipped stitch over the knitted stitch (2 stitches decreased). ------------------------------------------------------- START THE PIECE HERE: ------------------------------------------------------- MITTENS – SHORT OVERVIEW OF THE PIECE: The piece is worked in the round with double pointed needles, from the cuff upwards. A cable is worked mid-top of each mitten. LEFT MITTEN: Cast on 45-47-49 stitches with double pointed needles size 3 mm and DROPS Daisy or DROPS Merino Extra Fine. Change to double pointed needles size 2.5 mm. Work in the round as follows: Rib (knit 1, purl 1) over the first 7-9-9 stitches, work A.1, rib (knit 1, purl 1 over the last 32-32-34 stitches. Work this rib for 5 cm. Change to double pointed needles size 3 mm. Work stocking stitch and continue A.1 as follows: 7-9-9 stocking stitches, decreasing 0-1-1 stitch over these stitches (= 7-8-8 stitches), continue A.1, then work stocking stitch to end of round, decreasing 5-2-4 stitches evenly over these stitches = 40-44-44 stitches. Insert 1 marker in the third-to-last stitch on the round (= thumb-stitch –used when increasing for the thumb-gusset). Continue with stocking stitch and A.1 until the piece measures 1 cm from the rib. Remember to maintain the knitting tension. Now increase for the thumb-gusset, while continuing the stocking stitch and A.1: Increase 1 stitch on each side of the thumb-stitch – read INCREASE TIP. Increase like this every 3rd round a total of 4-5-6 times = 48-54-56 stitches. When the piece measures 5½-6½-7 cm from the rib, work the next round as follows: Continue with stocking stitch and A.1 until there are 5-6-7 stitches left before the thumb-stitch, place the next 11-13-15 stitches on a thread (marker-stitch + 5-6-7 stitches on each side), cast on 3 stitches behind the thumb-stitches, knit to end of round = 40-44-44 stitches. Continue with stocking stitch and A.1 until the piece measures 19-20-21 cm from the cast-on edge; approx. 3½-4-4 cm left to finished length. Adjust so you finish after the last round in A.1. Insert 1 marker-thread at the beginning of the round and 1 marker-thread after 20-22-22 stitches (equal numbers of stitches on top of and underneath the mitten). Continue with stocking stitch and decrease on each side of both marker-threads – read DECREASE TIP (= 4 stitches decreased). Decrease like this every 2nd round a total of 5-6-6 times = 20-20-20 stitches. Work 1 round with knit over knit and purl over purl. Work 1 round where all stitches are knitted together 2 and 2 = 10-10-10 stitches. Cut the strand, pull it through the remaining stitches, tighten and fasten well. THUMB: Place the 11-13-15 thumb-stitches from the thread on double pointed needles size 3 mm. In addition, knit up 3 stitches at the back of the thumb = 14-16-18 stitches. Work stocking stitch in the round for 5-5½-6 cm. Work 1 round where all stitches are knitted together 2 and 2 = 7-8-9 stitches. On the next round, knit 1-0-1, then knit the remaining stitches together 2 and 2 = 4-4-5 stitches. Cut the strand, pull it through the remaining stitches, tighten and fasten well. RIGHT MITTEN: Work in the same way as the left mitten until you mark for the thumb-stitch. Insert the marker in the 10th-11th-11th stitch after pattern A.1, with 17-19-19 stitches left on the round after the marker-stitch. Finish as for the left mitten. |
||||||||||||||||
Diagram explanations |
||||||||||||||||
|
||||||||||||||||
|
||||||||||||||||
Have you finished this pattern?Tag your pictures with #dropspattern #risingtidemittens or submit them to the #dropsfan gallery. Do you need help with this pattern?You'll find 20 tutorial videos, a Comments/Questions area and more by visiting the pattern on garnstudio.com. © 1982-2025 DROPS Design A/S. We reserve all rights. This document, including all its sub-sections, has copyrights. Read more about what you can do with our patterns at the bottom of each pattern on our site. |
||||||||||||||||


With over 40 years in knitting and crochet design, DROPS Design offers one of the most extensive collections of free patterns on the internet - translated to 17 languages. As of today we count 314 catalogues and 11822 patterns translated into English (UK/cm).
We work hard to bring you the best knitting and crochet have to offer, inspiration and advice as well as great quality yarns at incredible prices! Would you like to use our patterns for other than personal use? You can read what you are allowed to do in the Copyright text at the bottom of all our patterns. Happy crafting!
Post a comment to pattern DROPS 253-8
We would love to hear what you have to say about this pattern!
If you want to leave a question, please make sure you select the correct category in the form below, to speed up the answering process. Required fields are marked *.