
Oblíbené kategorie
Hledáte přízi?


Komentáře / Otázky (260)
![]() Ingrid napsala:
Ingrid napsala:
Bevor ich starte, würde ich gerne wissen, warum ich mit 38 M starte und dann z.B. bei Viereck 1 auf 50 Maschen zunehmen muss? Wird das nicht unten zu eng und überhaupt ein Quadrat?
27.11.2024 - 21:21Odpověď DROPS Design :
Liebe Ingrid, man braucht mehr Maschen für Zöpfe als für Krausrechts/Glattrechts für die selbe Breite, deshalb muss man nach den Krausrippen zunehmen. So hat das Quadrat die richtige Breite. Deshalb haben auch alle Quadrate nicht die selbe Maschenanzahl, da die verschiedene Muster nicht alle gleich sein. Viel Spaß beim Stricken!
28.11.2024 - 10:06
![]() Vibeke Johnsen Solberg napsala:
Vibeke Johnsen Solberg napsala:
På bildet til rute 1 ser det ut til å være perlestrikk i midten, det stemmer ikke med mønsteret. Den ruten blir også helt annerledes i mål enn de 3 andre...
17.11.2024 - 20:08Odpověď DROPS Design :
Hej Vibeke, Rude 1 strikkes ifølge diagram M.1. Snoningerne i diagrammet vil trække maskerne sammen, derfor behøver du flere masker. Jo prikkerne i diagrammet er vrang fra retsiden, og bliver til perlestrik imellem snoningerne.
22.11.2024 - 14:43
![]() Ros napsala:
Ros napsala:
Buongiorno, quanto misura la coperta finita? Grazie mille
12.11.2024 - 18:34Odpověď DROPS Design :
Buonasera Ros, le misure della coperta sono indicate appena prima dei materiali e sono 96 cm x 126 cm. Buon lavoro!
17.11.2024 - 20:01
![]() Carrias napsala:
Carrias napsala:
Bonjour, pour le diagramme m1 m2 m3 m4 Comment commencer le premier rang à droite du diagramme le deuxième rang à gauche du diagramme ? Merci pour votre réponse
03.11.2024 - 18:47Odpověď DROPS Design :
Bonjour Mme Carrias, quand vous tricotez les rangs pairs = sur l'envers, lisez le diagramme en suivant les symboles "sur l'envers" de la légende, autrement dit, 1 case blanche se tricote à l'envers sur l'envers et un rond noir à l'endroit sur l'envers - lisez les diagrammes de gauche à droite sur l'envers. Bon tricot!
04.11.2024 - 09:38
![]() Roming Andrea napsala:
Roming Andrea napsala:
Guten Morgen Ich komme mit der Aufteilung für Viereck 3 nicht klar. Es geht mir beim besten Willen mit der Maschenanzahl nicht auf. Herzlichen Dank für eure Hilfe. Liebe Grüße Andrea
02.10.2024 - 10:26Odpověď DROPS Design :
Liebe Andrea, so stricken Sie die 38 Maschen: 1 Randmasche krausrechts, dann die 8 Maschen vom Diagram A.3 wiederholen Sie insgesamt 4 Mal (über die nächsten 32 Maschen), dann stricken Sie die ersten 4 Maschen (so wird das Muster symmetrisch) und enden Sie mit 1 Randmasche Krausrechts. Viel Spaß beim Stricken!
02.10.2024 - 16:45
![]() `Jette napsala:
`Jette napsala:
Jeg har nøjagtig det samme spørgsmål, som andre har stillet, og som ikke er blevet forklaret endnu. Hvordan kan 1. pind efter opslag omtales som en retpind ?
17.09.2024 - 22:44Odpověď DROPS Design :
Hej Jette, det er en smags sag om første pind er fra retsiden, vi har valgt at gøre det sådan, men du må gerne vælge den anden side til retsiden :)
18.09.2024 - 13:42
![]() Claudia Bleeck napsala:
Claudia Bleeck napsala:
Drops 124-3 welche sricknadel nehme ich für die umrandung? da die decke länger als die stricknadel ist.. über eine antwort würde ich mich freuen
04.08.2024 - 12:53Odpověď DROPS Design :
Liebe Frau Beck, Sie können die längere Stricknadel für jede Kante (die jeweils separat gestrickt wird). Viel Spaß beim Stricken!
05.08.2024 - 07:51
![]() Hetty Stok napsala:
Hetty Stok napsala:
I have asked about joining the squares, joining “edge to edge in outer loops” as per pattern instructions. Your link is not this technique. Could you direct me to the correct instructions for this type of seam? Much obliged, Hetty
25.06.2024 - 02:46Odpověď DROPS Design :
Hi Hetty, Here is a video link for sewing squares together in the outer loops: https://www.garnstudio.com/video.php?id=1770&lang=en Happy crafting!
25.06.2024 - 06:39
![]() Hetty Stok napsala:
Hetty Stok napsala:
Could you please show me where you have a video to explain sewing together the side of one square to the top or bottom edge of another square?
09.06.2024 - 05:21Odpověď DROPS Design :
Dear Hetty, you could check something similar to this video: https://www.garnstudio.com/video.php?id=1473&lang=en. It shows you how to join together edges. Happy knitting!
09.06.2024 - 21:17
![]() Vicky napsala:
Vicky napsala:
If I block each square before assembling. What size should each be? Thanks
06.06.2024 - 19:05Odpověď DROPS Design :
Dear Vicky, since this is a blanket (and not a garment) the exct size is not that important, however, you should pay attention that the squares should be the same size. Happy Knitting!
06.06.2024 - 22:49
|
||||||||||||||||
Warm Hug#warmhugblanket |
||||||||||||||||
 |
 |
|||||||||||||||
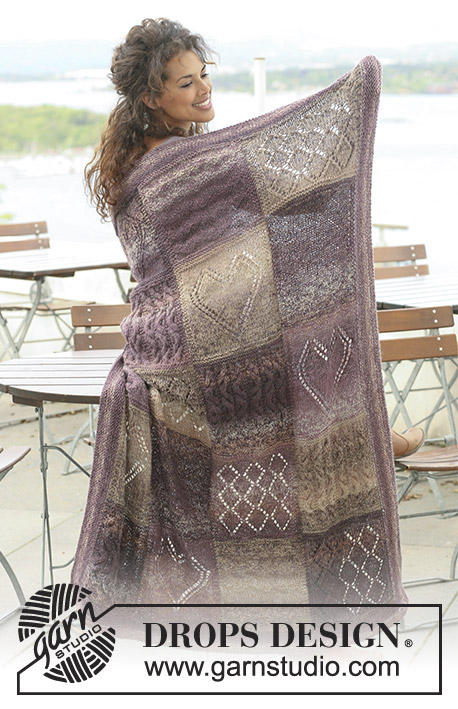
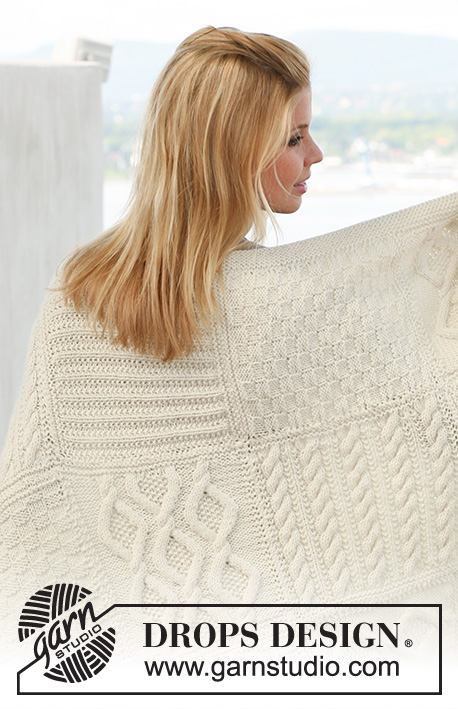
DROPS pletená deka s rozličnými vzory z příze „Nepal“.
DROPS 124-3 |
||||||||||||||||
|
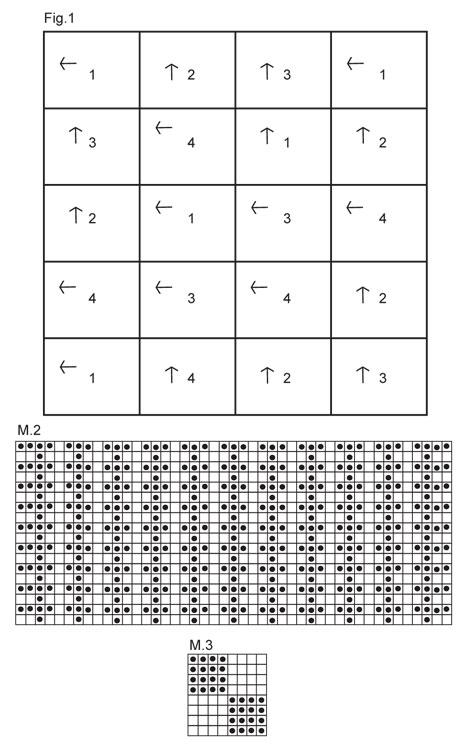
VZORY: Viz schémata M.1 – M.4; vzory jsou nahlíženy z lícové strany. VROUBKOVÝ VZOR: V řadách: pleteme stále hladce, lícové i rubové řady. ---------------------------------------------------------------------- DEKA: Každým ze 4 vzorů upleteme 5 čtverců = celkem 20 čtverců. 1. ČTVEREC: Na jehlice č.5 nahodíme přízí Nepal 38 ok a upleteme hladce 1 lícovou a 1 rubovou řadu. Nyní pleteme lícovou řadu hladce a SOUČASNĚ přidáme rovnoměrně 12 ok (nepřidáváme mezi 2 krajními oky na obou stranách!) = 50 ok. 1 rubovou řadu upleteme obrace a pak pleteme vzorem M.1. Po dokončení 1 celé sekvence vzoru (na výšku) upleteme 1 lícovou řadu hladce, SOUČASNĚ ujmeme rovnoměrně 12 ok (neujímáme mezi 2 krajními oky na obou stranách!) = 38 ok. Upleteme 1 rubovou a 1 lícovou řadu hladce. Pak oka z rubu hladce uzavřeme. 2. ČTVEREC: Na jehlice č.5 nahodíme přízí Nepal 38 ok a upleteme hladce 1 lícovou a 1 rubovou řadu. Nyní pleteme lícovou řadu hladce a SOUČASNĚ přidáme rovnoměrně 7 ok (nepřidáváme mezi 2 krajními oky na obou stranách!) = 45 ok. 1 rubovou řadu upleteme obrace a pak pleteme vzorem M.2 do výše asi o 1 cm kratší než u 1. čtverce. Upleteme 1 lícovou řadu hladce, SOUČASNĚ ujmeme rovnoměrně 7 ok (neujímáme mezi 2 krajními oky na obou stranách!) = 38 ok. Upleteme 1 rubovou a 1 lícovou řadu hladce. Pak oka z rubu hladce uzavřeme. 3. ČTVEREC: Na jehlice č.5 nahodíme přízí Nepal 38 ok a upleteme hladce 1 lícovou a 1 rubovou řadu. Pak 1 lícovou řadu hladce a 1 rubovou obrace. Nyní pleteme vzorem M.3 s 1 okem vroubkovým vzorem na obou stranách do výše asi o 1 cm kratší než u 1. čtverce (výšku přizpůsobíme tak, abychom měli dokončenu celou sekvenci vzoru nebo její polovinu). Upleteme 3 řady hladce. Pak oka z rubu hladce uzavřeme. 4. ČTVEREC: Na jehlice č.5 nahodíme přízí Nepal 38 ok a upleteme hladce 1 lícovou a 1 rubovou řadu. Nyní pleteme lícovou řadu hladce a SOUČASNĚ přidáme rovnoměrně 18 ok (nepřidáváme mezi 2 krajními oky na obou stranách!) = 56 ok. 1 rubovou řadu upleteme obrace a pak pleteme vzorem M.4 do výše asi o 1 cm kratší než u 1. čtverce (výšku přizpůsobíme tak, abychom končili 3 řady po copánkovém křížení). Upleteme 1 lícovou řadu hladce, SOUČASNĚ ujmeme rovnoměrně 18 ok (neujímáme mezi 2 krajními oky na obou stranách!) = 38 ok. Upleteme 1 rubovou a 1 lícovou řadu hladce. Pak oka z rubu hladce uzavřeme. DOKONČENÍ: Čtverce sešijeme podle nákresu – viz Fig.1. Číslo označuje druh vzoru a šipka směr pletení. Sešíváme vnější části ok, aby švy byly co nejjemnější. LEM: Pleteme vroubkovým vzorem, tj. stále hladce. Podél jedné kratší strany nabereme oka na jehlice č.5 přízí Nepal. Nabíráme vždy 1 oko z 1 oka deky a také v 1 oko v místech spojení dvou čtverců. Pleteme v řadách do výše lemu asi 8 cm. Pak oka uzavřeme. Stejným způsobem napleteme lem na protilehlé straně. Stejným způsobem nabereme oka podél jedné dlouhé strany, přičemž nabereme oka i podél 8 cm lemu a pleteme v řadách vroubkovým vzorem do výše lemu asi 4 cm. Pak oka uzavřeme a postup zopakujeme na protilehlé dlouhé straně. |
||||||||||||||||
Vysvětlivky ke schématu |
||||||||||||||||
|
||||||||||||||||
 |
||||||||||||||||
 |
||||||||||||||||
Dokončili jste tento model?Pak označte své fotky tagem #dropspattern #warmhugblanket nebo je pošlete do galerie #dropsfan. Potřebujete s tímto návodem poradit?Otevřete-li si návod na stránce garnstudio.com, najdete tam 14 výukových video-ukázek, Komentáře/Dotazy a další užitečné informace. © 1982-2026 DROPS Design A/S. Vyhrazujeme si veškerá práva. Tento dokument, včetně všech jeho dílčích částí, podléhá autorským právům. Podrobnější komentář k možnostem užití našich návodů najdete dole pod každým návodem na našich stránkách. |
||||||||||||||||


V oblasti pletené a háčkované módy působí DROPS Design více než 40 let. Díky tomu vám můžeme nabídnout jednu z nejrozsáhlejších kolekcí modelů s bezplatnými návody dostupnými na internetu - navíc v 17 jazycích. K dnešnímu dni máme na 324 katalogů a 12290 návodů celkem - z nich je už 7602 dostupných v [češtině].
We work hard to bring you the best knitting and crochet have to offer, inspiration and advice as well as great quality yarns at incredible prices! Would you like to use our patterns for other than personal use? You can read what you are allowed to do in the Copyright text at the bottom of all our patterns. Happy crafting!
Přidejte komentář k návodu DROPS 124-3
Rádi bychom věděli, co si o tomto modelu myslíte!
Pokud se chcete na něco zeptat, dbejte prosím na to, abyste ve formuláři níže vybrali správnou kategorii - díky tomu se dříve dozvíte, co potřebujete vědět. Povinná pole jsou označena *.