
Oblíbené kategorie
Hledáte přízi?


Komentáře / Otázky (28)
![]() R N napsala:
R N napsala:
Hei! Teen XL kokoa. Ohjeissa on virhe kun kainaloista lähdetään jatkamaan alaspäin. Kuviot eivät täsmää. Voitteko auttaa?
05.07.2024 - 10:56Odpověď DROPS Design :
Hei, etu-/takakappaleessa neulotaan mallineuletta piirroksen A.4 mukaisesti ja mallineule jatkuu siitä, mihin se kaarrokkeessa jäi. Mikäli neuletiheys täsmää, kaarroke on valmis, kun olet neulonut ylös piirrokseen kokosi nuolella merkittyyn kerrokseen.
05.07.2024 - 17:08
![]() Mary napsala:
Mary napsala:
But that’s precisely the problem! If I start the third line A4 from the underarm (the first stitch of the new round is basically the third stitch from the underarm) I get the mismatch because the triangle will be stitched earlier: I can’t understand where I am going wrong
09.04.2023 - 14:12Odpověď DROPS Design :
Dear Mary, you need to adjust the stitches before starting the triangle. In this case, you need to simply knit stitches (not just the amount indicated in the pattern) so that the triangle won't be mismatched. The pattern under the arm may get slightly mismatched initially but that isn't important, since it will later on match correctly. Happy knitting!
10.04.2023 - 13:34
![]() Mary napsala:
Mary napsala:
Yes, I can see that the pattern is the same. But if I follow the instructions from A4 third line, I should start the "triangle" after 3 stitches of the body, while according to the stitches I have after the line with the arrow, A1, I should start the triangle after 5 stitches but this means that it will be "anticipated" hence the mismatch. Does it mean that I have not divided the garment accordingly? Many thanks and Happy Easter!
09.04.2023 - 11:09Odpověď DROPS Design :
Dear Mary, take into account that you should have adjusted the start of the round in the body; you adjust so that the beginning of the round is in the middle stitch cast on under the sleeve. This should help adjust the pattern so that the triangle in A.4 won't get mismatched with the pattern in the yoke in A.1. Happy knitting!
09.04.2023 - 13:30
![]() Mary napsala:
Mary napsala:
Thanks! But I am still confused: the instructions say that the yoke is finished when I have 168 stitches (S size). If I had not knit the last row (the one with the arrow), I would not have got 168 stitches. In any case, once I have knit the row with the arrow, if I then start A4 from the third line I still get a mismatch in the pattern and I do not know where I get it wrong. Well, I know that I do something wrong while shifting from the yoke to the body but I can't figure out what.
07.04.2023 - 10:25Odpověď DROPS Design :
Dear Mary, after having worked the row with the arrow, you should have knitted round, where you separated the stitches for each part of the garment. Then, you should start the body with the third row of A.4. There shouldn't be a mismatch there. You can check that the third row of A.4 is exactly like the third row in A.1 after the row with the arrow, so they should be matching. Hope this helps!
08.04.2023 - 20:58
![]() Mary napsala:
Mary napsala:
Thanks! But I am still confused: the instructions say that the yoke is finished when I have 168 stitches (S size). If I had not knit the last row (the one with the arrow), I would not have got 168 stitches. In any case, once I have knit the row with the arrow, if I then start A4 from the third line I still get a mismatch in the pattern and I do not know where I get it wrong. Well, I know that I do something wrong while shifting from the yoke to the body but I can't figure out what.
07.04.2023 - 10:20Odpověď DROPS Design :
Dear Mary, after having worked the row with the arrow, you should have knitted round, where you separated the stitches for each part of the garment. Then, you should start the body with the third row of A.4. There shouldn't be a mismatch there. You can check that the third row of A.4 is exactly like the third row in A.1 after the row with the arrow, so they should be matching. Hope this helps!
08.04.2023 - 20:59
![]() Mary napsala:
Mary napsala:
Sorry, I am still unclear: I have finished the yoke knitting the A1-A3-A5 line with the arrow. Then I divided the work and I went for a knitted round. Now which line should I knit first and from which diagram?
05.04.2023 - 09:04Odpověď DROPS Design :
Dear Mary, the arrows in the chart mean that, if the gauge is correct, you should finish the raglan/yoke when you reach the arrow for your size (before working it). If you have worked this row, then you will need to start the new part by working the third row of the new chart (A.4). Happy knitting!
06.04.2023 - 23:29
![]() Mary napsala:
Mary napsala:
Hi! "Continue the pattern from yoke on body – making sure to continue with the correct row in the diagram after the yoke. " Does this mean that if I finish A1 (S size) with the line with the arrow, the next line for the body in A4 is in fact the thirs one of the diagram?
04.04.2023 - 08:59Odpověď DROPS Design :
Hi Mary, Yes, if you finished the diagram before separating for the body and sleeves, you continue with the first row in the diagram. Happy Easter!
05.04.2023 - 07:01
![]() Mary napsala:
Mary napsala:
"Knit as far as the middle stitch cast on under the sleeve. The round now starts here." Does it mean that the round starts after the second or after the third stitch under the sleeve? Many thanks!
08.03.2023 - 16:03Odpověď DROPS Design :
Dear Mary, yes correct: work the first 2 of the 5 stitches cast on under 1st sleeve, the rounds will now start here, before the middle of the new stitches. Happy knitting!
08.03.2023 - 16:08
![]() Mary napsala:
Mary napsala:
Following from your last answer: "...you will start the next round 1 stitch eariler. So, you need to not work the last stitch of the previous round". I interpret this as moving the stitch marker one stitch behind and working that stitch as the first one of the next round rather than the last one of the previous round. Is this correct? So it is basically just a matter of moving the stitch marker?
07.03.2023 - 12:16Odpověď DROPS Design :
Dear Mary, you will now work the dividing round, this means you don't need the markers anymore, you start working the dividing round when the last stitch on previous round remain on left needle, slip the next 39 sts (starting with the last stitch previous round + the first 38 sts next round). Happy knitting!
07.03.2023 - 14:37
![]() Mary napsala:
Mary napsala:
Hi, I have just finished all the increases on the raglan and I have 168 stitches (S size). I'll go now go for a knitted round but what does it mean " adjust so the round now starts 1 stitch earlier"? Plus, the 39 stitches I habe to put aside, correspond to the stiches that are within the first and the second marker?
04.03.2023 - 10:25Odpověď DROPS Design :
Dear Mary, after finishing the increases and reaching the indicated length (21cm from the marker), you will start the next round 1 stitch eariler. So, you need to not work the last stitch of the previous round. On the other hand, the first marker was inserted in the transition between the back and the sleeve and the second marker between the sleeve and the front. Since you have to put aside the stitches which correspond to the sleeve, these stitches are all in between the first and 2nd marker. Happy knitting!
05.03.2023 - 20:45
|
|||||||||||||||||||
Diamonds in the Sky#diamondsintheskysweater |
|||||||||||||||||||
 |
 |
||||||||||||||||||
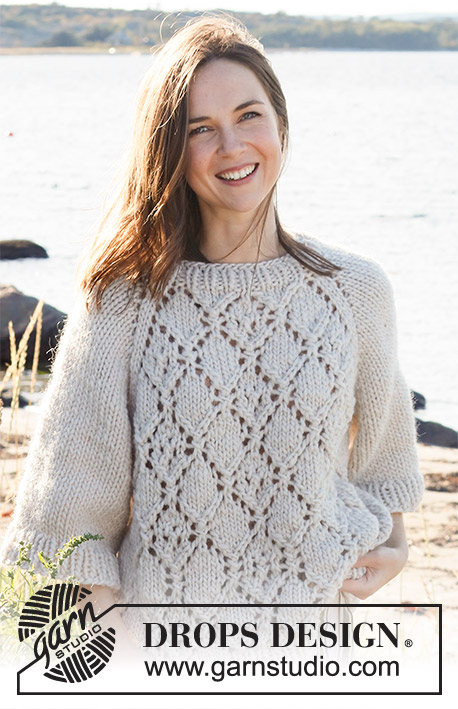
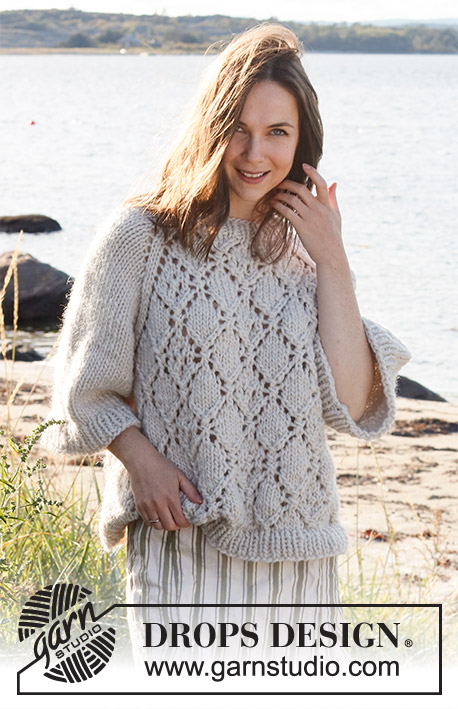
Raglánový pulovr s ažurovým vzorem a širokými ¾ rukávy pletený shora dolů z příze DROPS Snow nebo DROPS Wish. Velikost S - XXXL.
DROPS 221-29 |
|||||||||||||||||||
|
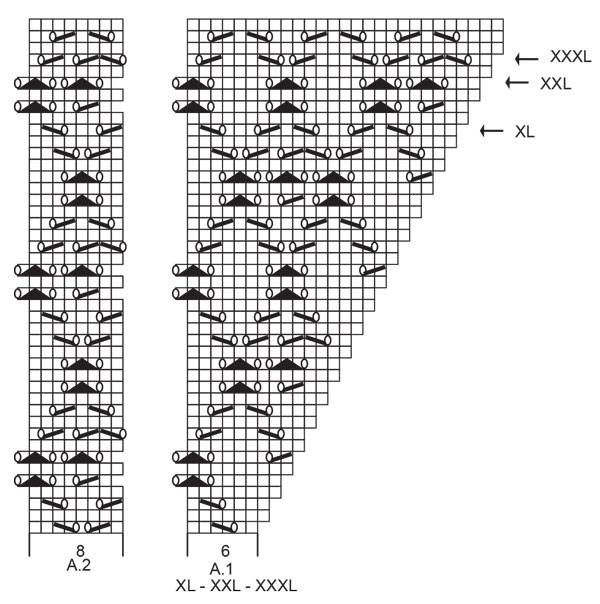
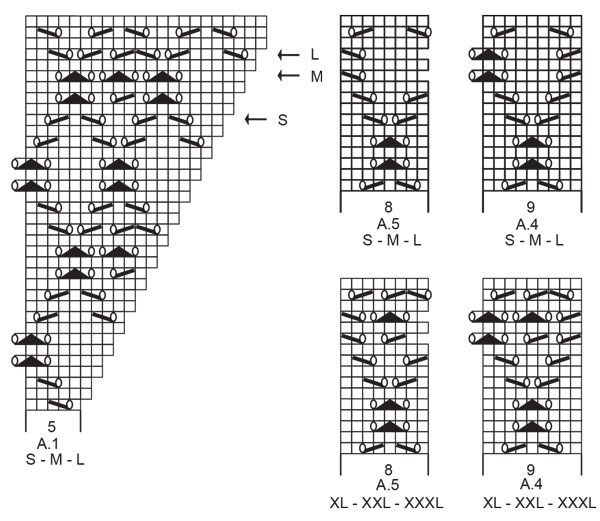
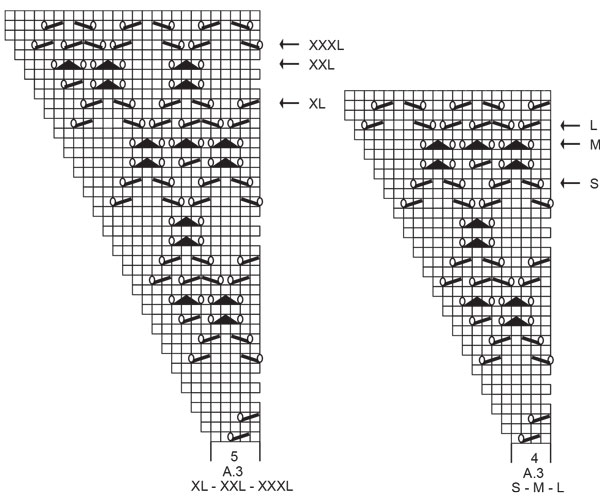
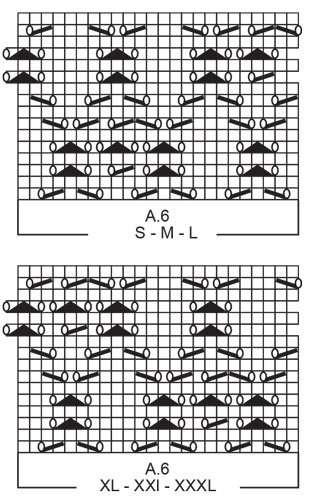
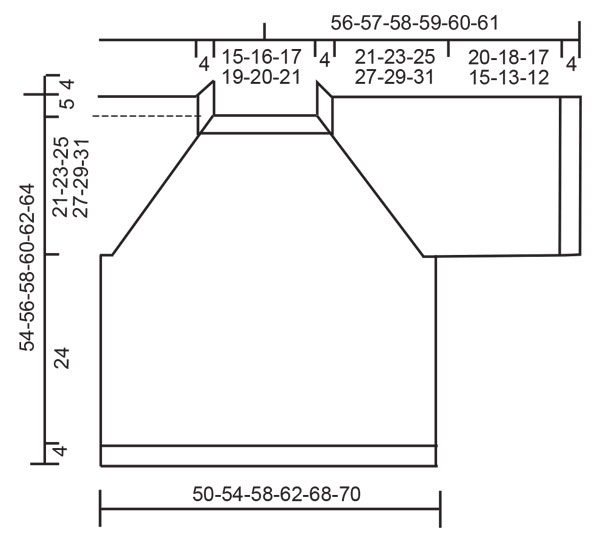
------------------------------------------------------- VYSVĚTLIVKY: ------------------------------------------------------- VZOR: Viz schémata A.1 až A.6. Zvolte si schéma pro požadovanou velikost. TIP - PŘIDÁVÁNÍ: Abychom vypočítali, v jakých rozestupech máme přidávat, vydělíme celkový počet ok na jehlici (tj. 46 ok) počtem ok, která potřebujeme přidat (např. 10), takže 46 : 10 = 4,6. V tomto případě tedy 1x nahodíme střídavě za každým 4. a každým 5. okem. V následující kruhové řadě pleteme nahození za zadní nit, aby se v pletenině netvořily dírky. RAGLÁNOVÉ ZKOSENÍ: Pro vytvarování raglánového zkosení průramků přidáváme ve všech místech, kde se rukávy stýkají s trupem (= v jedné kruhové řadě přidáme celkem 8 ok). Přidáváme nahozením na obou stranách 2 ok, která tvoří „šev“ (mezi těmito 2 oky leží značka). V následující kruhové řadě pleteme nahození hladce běžným způsobem (nikoli za zadní nit!) – v pletenině vzniknou ozdobné dírky. Nová oka pak zapracujeme do vzoru na předním a zadním dílu nebo je pleteme lícovým žerzejem (na rukávech). TIP - UZAVÍRÁNÍ: Abychom neměli uzavřený okraj moc stažený, můžeme na uzavírání ok použít silnější jehlice nebo za každým zhruba 4. okem 1x nahodíme – nahození hned uzavřeme jako běžné oko. ------------------------------------------------------- POPIS PRÁCE: ------------------------------------------------------- PULOVR – JAK BUDEME POSTUPOVAT: Pleteme v kruhových řadách na kruhové jehlici shora dolů. Sedlo pak rozdělíme na rukávy a trup a díly dopleteme odděleně, v kruhových řadách shora dolů. LEM PRŮKRČNÍKU: Na krátkou kruhovou jehlici č.8 nahodíme přízí Snow nebo Wish 46-48-50-54-56-58 ok a upleteme 1 kruhovou řadu hladce. Pokračujeme pružným vzorem 1/1 (tj. střídáme 1 oko hladce, 1 obrace). Ve výši 4 cm pleteme 1 kruhovou řadu hladce a SOUČASNĚ přidáme rovnoměrně 10-8-6-6-4-2 ok – viz TIP - PŘIDÁVÁNÍ = 56-56-56-60-60-60 ok. Upleteme 1 kruhovou řadu hladce. Pak převedeme pleteninu na kruhovou jehlici č.9. Za 20.-20.-20.-21.-21.-21. oko vložíme značku (= přibližně střed předního dílu) – SEDLO NYNÍ MĚŘÍME OD TOHOTO MÍSTA! SEDLO: Nyní pleteme vzor a SOUČASNĚ vložíme do pleteniny 4 značky v těchto rozestupech: 1. značkou označíme začátek kruhové řady (= přechod mezi zadním dílem a pravým rukávem), 1 oko upleteme hladce, 1x nahodíme, 7 ok hladce, 1x nahodíme, 1 oko hladce, vložíme 2. značku (= přechod mezi pravým rukávem a předním dílem), 1 oko hladce, 1x nahodíme, 5-5-5-6-6-6 ok vzorem A.1, 8 ok vzorem A.2, 4-4-4-5-5-5 ok vzorem A.3, 1x nahodíme, 1 oko hladce, vložíme 3. značku (= přechod mezi předním dílem a levým rukávem), 1 oko hladce, 1x nahodíme, 7 ok hladce, 1x nahodíme, 1 oko hladce, vložíme 4. značku (= přechod mezi levým rukávem a zadním dílem), 1 oko hladce, 1x nahodíme, 5-5-5-6-6-6 ok vzorem A.1, 8 ok vzorem A.2, 4-4-4-5-5-5 ok vzorem A.3, 1x nahodíme, 1 oko hladce. Právě jsme dokončili 1. přidávání pro RAGLÁNOVÉ ZKOSENÍ – viz výše. Pokračujeme v pletení vzoru a pro raglán přidáváme v každé 2. kruhové řadě, celkem 14-16-17-18-20-21x = 168-184-192-204-220-228 ok. Po dokončení posledního přidávání měří díl asi 20-23-24-26-29-30 cm od značky na průkrčníku. Pleteme dál jako dosud, ale už nepřidáváme, a to až do výše 21-23-25-27-29-31 cm od značky (pleteme tolik ok vzoru, na kolik máme místo až k raglánu, dbáme přitom na to, aby byl počet nahození a ujímaní stejný a celkový počet ok tedy zůstal beze změny – zbylá oka, která nám do vzoru nevyjdou, pleteme lícovým žerzejem). V následující kruhové řadě (pletené hladce) rozdělíme pleteninu na díly, takto – kruhová řada by teď měla začínat o 1 oko dříve: prvních 39-43-45-47-51-53 ok odložíme na pomocnou jehlici (= rukáv), nahodíme 5-5-7-7-9-9 nových ok (= podpaží), 45-49-51-55-59-61 ok upleteme jako dříve (= přední díl), dalších 39-43-45-47-51-53 ok odložíme na pomocnou jehlici (= rukáv), nahodíme 5-5-7-7-9-9 nových ok (= podpaží) a upleteme posledních 45-49-51-55-59-61 ok (= zadní díl). Trup a rukávy dokončíme odděleně. NYNÍ MĚŘÍME DÍL OD TOHOTO MÍSTA! TRUP: = 100-108-116-124-136-140 ok. Pleteme až po prostřední oko nahozené v podpaží. Kruhová řada nyní začíná zde. Pokračujeme v pletení vzoru, navazujeme na rozvržení, které jsme začali na sedle – dbáme na to, abychom pokračovali správnou řadou vzoru a vzor tak plynule pokračoval. Pleteme vzorem a na bocích lícovým žerzejem, takto: *1-3-5-3-6-7 oka hladce, 9 ok vzorem A.4 (zvolte si schéma pro požadovanou velikost), 24 ok vzorem A.6 (zvolte si schéma pro požadovanou velikost), pak upleteme prvních 8-8-8-16-16-16 ok vzoru A.6, 8 ok vzorem A.5 (zvolte si schéma pro požadovanou velikost) a 0-2-4-2-5-6 ok hladce*, *-* ještě 1x zopakujeme. Ve výši 24 cm pleteme 1 kruhovou řadu hladce a SOUČASNĚ přidáme rovnoměrně 10-10-12-12-14-14 ok = 110-118-128-136-150-154 ok. Pak pleteninu převedeme na kruhovou jehlici č. 8 a pleteme lem pružným vzorem 1/1 (tj. střídáme 1 oko hladce, 1 obrace). Když je lem vysoký 4 cm, všechna oka volně dle vzoru uzavřeme. Pulovr měří asi 54-56-58-60-52-64 cm (od ramene). RUKÁV: Odložených 39-43-45-47-51-53 ok jednoho rukávu převedeme z pomocné jehlice zpět na krátkou kruhovou jehlici č.9 a navíc k nim nabereme po 1 oku z každého z 5-5-7-7-9-9 nově nahozených ok v podpaží = 44-48-52-54-60-62 ok. Pleteme v kruhových řadách lícovým žerzejem. Ve výši 20-18-17-15-13-12 cm přidáme rovnoměrně 4-4-4-4-6-6 oka = 48-52-56-58-70-68 ok. Pak pleteninu převedeme na kruhovou jehlici č. 8 a pleteme lem pružným vzorem 1/1 (tj. střídáme 1 oko hladce, 1 obrace). Když je lem vysoký 4 cm, všechna oka volně dle vzoru uzavřeme. Rukáv měří asi 24-22-21-19-17-16 cm (od podpaží). Stejným způsobem upleteme i druhý rukáv. |
|||||||||||||||||||
Vysvětlivky ke schématu |
|||||||||||||||||||
|
|||||||||||||||||||
 |
|||||||||||||||||||
 |
|||||||||||||||||||
 |
|||||||||||||||||||
 |
|||||||||||||||||||
 |
|||||||||||||||||||
Dokončili jste tento model?Pak označte své fotky tagem #dropspattern #diamondsintheskysweater nebo je pošlete do galerie #dropsfan. Potřebujete s tímto návodem poradit?Otevřete-li si návod na stránce garnstudio.com, najdete tam 25 výukových video-ukázek, Komentáře/Dotazy a další užitečné informace. © 1982-2026 DROPS Design A/S. Vyhrazujeme si veškerá práva. Tento dokument, včetně všech jeho dílčích částí, podléhá autorským právům. Podrobnější komentář k možnostem užití našich návodů najdete dole pod každým návodem na našich stránkách. |
|||||||||||||||||||


V oblasti pletené a háčkované módy působí DROPS Design více než 40 let. Díky tomu vám můžeme nabídnout jednu z nejrozsáhlejších kolekcí modelů s bezplatnými návody dostupnými na internetu - navíc v 17 jazycích. K dnešnímu dni máme na 324 katalogů a 12291 návodů celkem - z nich je už 7611 dostupných v [češtině].
We work hard to bring you the best knitting and crochet have to offer, inspiration and advice as well as great quality yarns at incredible prices! Would you like to use our patterns for other than personal use? You can read what you are allowed to do in the Copyright text at the bottom of all our patterns. Happy crafting!
Přidejte komentář k návodu DROPS 221-29
Rádi bychom věděli, co si o tomto modelu myslíte!
Pokud se chcete na něco zeptat, dbejte prosím na to, abyste ve formuláři níže vybrali správnou kategorii - díky tomu se dříve dozvíte, co potřebujete vědět. Povinná pole jsou označena *.