
Leder du efter et garn?


Kommentarer / Spørgsmål (162)
![]() Yvonne Duckstein skrev:
Yvonne Duckstein skrev:
Hallo, das Häkeln des Reglan bedeutet nur das oberste Teil über der Brust? Man häkelt das Musterbild nur 1x ?! Und dann kommen in den letzten beiden Reihen die Zunahmen? Habe ich das so richtig verstanden? Danke und Beste Grüße Yvonne Duckstein
30.03.2026 - 14:32DROPS Design svarede:
Liebe Frau Duckstein, das Diagram A.z wird insgesamt 2 Mal in der Höhe gehäkelt. Die Zunahmen werden bei den 2 letzten Reihen vom 1. Rapport in der Höhe gehäkelt, dann bei den 2 letzten Reihen vom 2. Rapport in der Höhe (4 Reihen mit Zunahmen). Viel Spaß beim Häkeln!
07.04.2026 - 14:06
![]() Rebours skrev:
Rebours skrev:
Encolure beaucoup trop importante comment la diminuer Merci si vous avez une obtion0
19.12.2025 - 17:50
![]() Barre skrev:
Barre skrev:
Je me retrouve avec 12 A2
15.12.2025 - 17:50DROPS Design svarede:
Bonjour Mme Barre, vérifiez bien votre nombre de mailles et le décompte donné hier (on commence par A.1, on répète 10 fois A.2 et on termine par A.3, on aura ainsi 12 groupes de double-brides au total pour la manche. Bon crochet!
16.12.2025 - 08:57
![]() Barre skrev:
Barre skrev:
Sur les ms ont continu toujours en ms si non on a plus de 10 A1 MERCI
15.12.2025 - 17:27DROPS Design svarede:
Bonjour Mme Barre, en taille S/M vous avez sauté 40 m de l'empiècement pour la manche, vous allez crocheter ces 40 m dans le point fantaisie A.1-A.2-A.3 exactement comme avant + dans les 9 mailles crochetées sous la manche; si vous avez davantage de mailles, vous pouvez probablement ajuster en fonction de votre nombre; attention à ce que vous ayez suffisamment de mailles pour crocheter le point fantaisie. Bon crochet!
16.12.2025 - 08:56
![]() Barre skrev:
Barre skrev:
Je suis arrivée à la manche mais j'ai un problème j'ai mais 49 ms mais pourquoi après vous dites de continuer sur les 40 mailles sur les 9 mailles on fait quoi Merci
14.12.2025 - 19:40DROPS Design svarede:
Bonjour Mme Barre, on crochète le tout 1er rang des manches en mailles serrées: 1 ms dans la 1ère des 8 ml et 1 ms dans les 40 ms de l'empiècement = 49 ms. Crochetez ensuite: A.1 (= 6 m), répétez 10 fois A.2 (= 8 m x 10 = 40) et terminez par A.3 (= 3 m) = 6+40+3=49 m. Commencez les tours par 4 ml pour remplacer 1 double-bride / 1 ml pour remplacer 1 ms et terminez les tours par 1 mc dans la 4ème/la 1ère ml du début du tour. Bon crochet!
15.12.2025 - 15:17
![]() Barre skrev:
Barre skrev:
À la fin du 1er rang du dos quand on a crocheter les 60 mailles que fait on Merci
02.12.2025 - 18:59DROPS Design svarede:
Bonjour Mme Barre, lorsque vous divisez l'ouvrage, vous sautez les mailles des manches que vous remplacez par 8 mailles en l'air, et, au 2ème rang, vous crochetez les diagrammes comme avant en sautant les 8 mailles en l'air des emmanchures. Crochetez ainsi toutes les mailles comme avant: on va avoir ainsi, A.4, A.1 puis A.2 pour la fin du devant, tout le long du dos, au début de l'autre devant et on termine par A.4 et A.4 (vu sur l'endroit). Bon crochet!
03.12.2025 - 08:15
![]() Rebours skrev:
Rebours skrev:
Lorsque l'on a terminé le 1er A2il faut bien piquer dans 1maille il y a quelque chose qui m'échappe à ce moment la
12.11.2025 - 15:21DROPS Design svarede:
Bonjour Mem Rebours, à la fin du dernier A.2 (sur les 24 mailles), vous terminez A.2 par 3 ml, vous crochetez les 8 ml et vous sautez les mailles de la manche, puis vous reprenez A.2 dans le motif suivant (1 ml, vous sautez 1 ms, les double-brides, etc...). Quand vous crochèterez le rang suivant, crochetez les 5 double-brides dans l'arceau d'1 ml comme avant et tout le rang (donc rien dans les 8 mailles en l'air de chaque côté sous les manches. Bon crochet!
12.11.2025 - 16:52
![]() Rebours skrev:
Rebours skrev:
Lorsqu'on arrive à la 24 ème maille du devant l'on fait une maille serrée ou une double bride Merci
10.11.2025 - 11:59DROPS Design svarede:
Bonjour Mme Rebours, terminez le dernier A.2 en largeur par 3 mailles en l'air, sautez les 2 ms suivantes, puis crochetez 8 mailles en l'air, sautez les mailles indiquées pour la manche et commencez le A.2 du dos dans la maille suivante; au tour suivant, rappelez-vous que les 8 mailles en l'air ne seront pas crochetées. Bon crochet!
11.11.2025 - 15:59
![]() Barre skrev:
Barre skrev:
Excusez moi mais je ne comprend pas comment faire avec les 8 mailles en l'air
04.11.2025 - 08:31DROPS Design svarede:
Bonjour Mme Barre, lorsque vous crochetez le rang de division manches/dos et devants, vous les crochetez à la place des manches, et au rang suivant, vous sautez ces 8 mailles en l'air, vous ne les crochetez pas pour le bas du gilet, vous les crochèterez seulement quand vous ferez les manches. Bon crochet!
04.11.2025 - 17:12
![]() Barre skrev:
Barre skrev:
Les 8 mailles en l'air ne font pas 40 mailles
01.11.2025 - 19:35DROPS Design svarede:
Bonjour Mme Barre, les 8 mailles en l'air sont faites quand on saute les 40 mailles des manches, elles seront crochetées ensuite lorsque l'on termine les manches. Bon crochet!
03.11.2025 - 07:38
|
|||||||||||||||||||
Nevertheless#neverthelesscardigan |
|||||||||||||||||||
|
|
|||||||||||||||||||
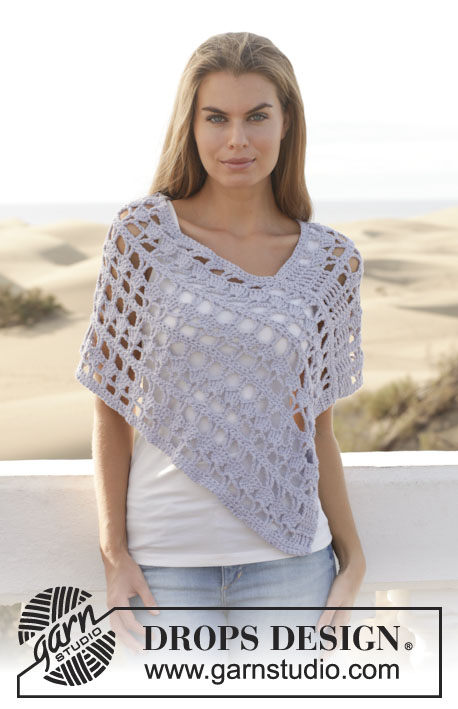
Hæklet DROPS jakke i ”Paris”. Str S - XXXL
DROPS 153-10 |
|||||||||||||||||||
|
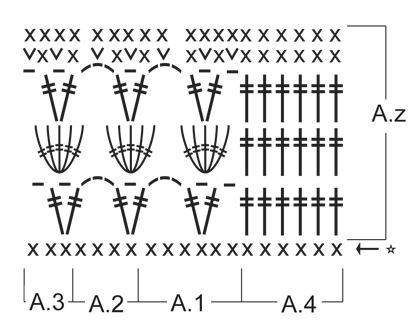
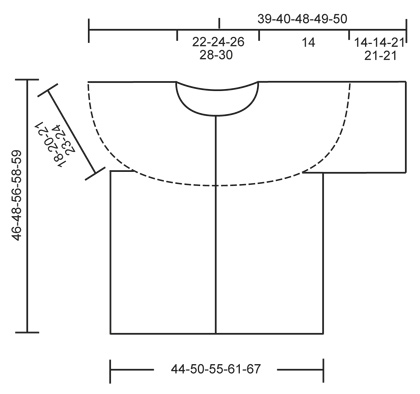
MØNSTER: Se diag A.1 til A.4. HÆKLEINFO: Første fm på hver række med fm erstattes med 1 lm. Første dbl-st på hver række med dbl-st erstattes med 4 lm. UDTAGNINGSTIPS: Tag ud ved at hækle 2 fm i 1 fm. ---------------------------------------------------------- JAKKE: Jakken hækles ovenfra og ned, frem og tilbage fra midt foran. BÆRESTK: Hækl 156-166-177-188-198 løse lm (inkl 1 lm til at vende med) på nål 5 med Paris. 1.række hækles således: Hækl 1 fm i 2.lm fra nålen, * 1 fm i hver af de 3 næste lm, spring over 1 lm *, gentag fra *-* og afslut med 1 fm i hver af de 2-4-3-2-4 sidste lm = 117-125-133-141-149 fm (= den første række i diag) – læs HÆKLEINFO. Videre hækles der således: A.4 (= forkant), A.1, A.2 over de næste 96-104-112-120-128 fm (= 24-26-28-30-32 gange i bredden), afslut med A.3 og A.4 (= forkant). Hækl diag A.z 1 gang i højden SAMTIDIG på de 2 sidste rækker tages der 24-28-32-36-40 m ud jævnt fordelt på hver række (= 48-56-64-72-80 nye m totalt) – læs UDTAGNINGSTIPS over. OBS: Der tages ikke ud over A.4 = 165-181-197-213-229 m. Derefter hækles A.z 1 gang i højden (A.2 hækles nu 36-40-44-48-52 gange i bredden) SAMTIDIG på de 2 sidste rækker tages der 22-26-30-34-38 m ud jævnt fordelt på hver række (= 44-52-60-68-76 m taget ud totalt). OBS: Der tages ikke ud over A.4 = 209-233-257-281-305 m. RYG- OG FORSTYKKE: HERFRA MÅLES ARB VIDERE. Videre hækles der således: A.4, A.1, A.2 over de næste 24-28-32-36-40 fm (= 6-7-8-9-10 gange i bredden) (forstk), 8 lm (under ærmet), spring over 40-44-48-52-56 fm fra forrige række (ærmegab, m skal bruges senere til ærme), A.2 over de næste 60-68-76-84-92 fm (rygstk), 8 lm (under ærmet), spring over 40-44-48-52-56 fm fra forrige række (ærmegab, m skal bruges senere til ærme), A.2 over de næste 24-28-32-36-40 fm (forstk) og afslut med A.3 og A.4. Videre hækles der således: Hækl A.4, A.1, A.2 over de næste 24-28-32-36-40 fm (= 6-7-8-9-10 gange i bredden) (forstk), spring over de 8 lm (under ærmet), A.2 over de næste 60-68-76-84-92 fm (rygstk), spring over de 8 lm (under ærmet), A.2 over de næste 24-28-32-36-40 fm (forstk) og afslut med A.3 og A.4. Fortsæt A.z til arb måler ca 28-28-35-35-35 cm, afslut efter en hel rapport af A.z. Klip og hæft tråden. Arb måler nu 46-48-56-58-59 cm fra skulderen. ÆRME: Arb hækles rundt. HERFRA MÅLES ARB VIDERE. Ærmet hækles ovenfra og ned. Start med at hækle midt under ærmet således: Hækl 2 fm i den første lm (af de 8 lm), 1 fm i hver af de 7 næste lm og 1 fm i hver af de 40-44-48-52-56 fm fra bærestk = 49-53-57-61-65 fm. Nu hækles der således: 4 lm, A.1, A.2 over de næste 40-44-48-52-56 m (= 10-11-12-13-14 gange i bredden), afslut med A.3 og 1 km i den fjerde lm. Fortsæt således til arb måler ca 14-14-21-21-21 cm, afslut efter en hel rapport af A.z. Klip og hæft tråden. MONTERING: Hækl en fm-kant rundt i halsen for at få en pæn afslutning således: Hækl * 1 fm i hver af de 3 næste lm, spring over 1 lm *, gentag fra *-* og afslut med 1 fm i hver af de 4-6-5-4-6 sidste lm = 118-126-134-142-150 fm. Sy knapperne i med ca 7 cm imellem på venstre forkant. |
|||||||||||||||||||
Diagram forklaring |
|||||||||||||||||||
|
|||||||||||||||||||
 |
|||||||||||||||||||
 |
|||||||||||||||||||
Har du lavet denne opskrift?Så tagger du dine billeder med #dropspattern #neverthelesscardigan eller send dem til #dropsfan galleriet. Behøver du hjælp med opskriften?Du finder 6 instruktionsvideoer, kommentarer/spørgsmål og mere i opskriften på www.garnstudio.com © 1982-2026 DROPS Design A/S. Alle rettigheder er reserveret. Dette dokument med tilhørende underdokumenter har copyright. Læs mere om hvad du kan gøre med vore opskrifter, nedert i alle vore opskrifter på hjemmesiden. |
|||||||||||||||||||


Med over 40 år i strikke- og hæklebranchen tilbyder DROPS Design en af de mest omfattende kollektioner med gratis opskrifter på internettet - oversat til 17 sprog. Dags dato har vi 325 kataloger og 12291 opskrifter på Dansk.
Vi arbejder hårdt for at kunne tilbyde Dig det bedste man kan få af strik og hækling, inspiration og gode råd men også kvalitetsgarn til fantastiske priser! Vil du bruge vore opskrifter til andet end for privat brug? Du kan læse om hvilke regler som gælder under teksten Copyright nederst på siden i alle vore opskrifter. God fornøjelse!
Kommentere opskrift DROPS 153-10
Vi vil gerne høre din mening om denne model!
Hvis du ønsker at stille et spørgsmål, så husk at vælge rigtig kategori i menuen under - det vil give dig hurtigere svar. Obligatoriske felter er markeret med *.