
Leder du efter et garn?


Kommentarer / Spørgsmål (19)
![]() Sally skrev:
Sally skrev:
Hello, I am stuck on the neck/armhole decreases for the back, knitting size XS. I have cast off my 18 middle stitches so I am now starting with 12 stitches for each shoulder. How am I supposed to decrease to end up with 7 stitches per shoulder, if I am decreasing both for the neck (beginning of row) and the armhole (end of row)? Wouldn't I end up with an even number?
02.05.2026 - 05:49DROPS Design svarede:
Dear Sally you will now decrease for neck as explained under DECREASE TIP ie always from RS: 5 sts 1 time towards neck, this means at the end of row from RS for right shoulder and at the beg of row from RS for left shoulder. Just remember to continue decrease for armholes if they are not finished yet (at the beg of row from RS for right shoulder/end of row from RS for left shoulder). Happy knitting!
04.05.2026 - 11:17
![]() Vivien skrev:
Vivien skrev:
If I make L Size, how many ball to make it.
26.03.2026 - 11:34DROPS Design svarede:
Dear Vivien, you'll find the total amount of yarn required for each size under tab "Pattern" at the top of the pattern page; select L to get all relevant numbers for this size, incl. 400 g DROPS Paris/50 g a ball = 8 balls DROPS Paris are required in size L. Happy knitting!
26.03.2026 - 16:01
![]() Anna skrev:
Anna skrev:
I have just started decreasing for the armholes on the back piece. Just for clarification, when it says to “decrease on each side for a total of 12 times” (I’m knitting a size xs), then that means I knit 6 rows with 2 decreases on each side of the piece, right?
08.06.2025 - 04:36DROPS Design svarede:
Dear Anna, you need to decrease 12 times on each side (not 12 stitches). So you work 12 rows with decreases on each side and decrease 12 stitches on each side (or 24 stitches in total). Happy knitting!
08.06.2025 - 15:36
![]() Mayzie skrev:
Mayzie skrev:
Hi ! I'm approaching the shoulders of the front piece. Rather than bind off the neck, the front is placed on a thread. I knit up to the middle stitches, slipped them onto a thread, but now my working yarn is stuck in the middle of the row and I don't know how to continue the row without knitting the shoulders together. how to I finish this row so I can start one of the shoulders?
30.03.2025 - 16:46DROPS Design svarede:
Dear Mayzie, you should have worked one shoulder before reaching the neck stitches. You can now work in two ways: 1) you work the neck stitches as you slip them. Therefore, the thread will move forward and reach the second shoulder, which you can now work. From now on, only work this second shoulder (the other shoulder's stitches will be on a separate thread) and, after finishing this shoulder, cut the thread and rejoin at the first shoulder and work this shoulder. 2) You slip the neck stitches to a thread without working them and place the stitches on the second shoulder in another thread. The thread should be at the end of the first shoulder; work this shoulder first. Happy knitting!
30.03.2025 - 19:20
![]() Danubis Perez skrev:
Danubis Perez skrev:
Hola. Yo soy talla L y me dicen que monte 108 ptos , sabiendo que la espalda y el delantero se hacen por separado. El gráfico me dice que para mi talla son 52 cm...no habra un error ?, ya que de acuerdo a la tensión, 108 puntos no corresponden 52 cm. Me podías explicar eso por favor? Igual que para las cenefas de las mangas me parece muchos puntos... no será que los puntos estan mal calculados? Gracias, esperando su pronta respuesta!!
10.03.2025 - 05:00
![]() Alicja skrev:
Alicja skrev:
Dzień dobry, zupełnie nie rozumiem fragmentu dotyczącego tyłu, który zaczyna się od "PRZED DALSZĄ PRACĄ NAD ROBÓTKĄ UWAŻNIE PRZECZYTAĆ DALSZĄ CZĘŚĆ OPISU:" - jakbym nie robila wychodzi mi jedno ramiączko, nie ma dekoltu, mogę prosić o doprecyzowanie jak zamykać na dekolt i ramiona, żeby faktycznie wyszły?
26.01.2025 - 13:43DROPS Design svarede:
Witaj Alicjo, Teraz będziesz przerabiać tylko 1 ramię - i zamykać oczka z każdej strony, czyli jednocześnie na formowanie podkroju rękawa i na dekolt. Jak zakończysz 1 ramię, to wykonujesz drugie, tylko zamykasz oczka na dekolt i podkrój rękawa z drugiej strony (aby robótka była symetryczna). Pozdrawiamy!
27.01.2025 - 14:48
![]() JO skrev:
JO skrev:
Hi, Are you including edge stitch in your stitch counts? Or is it separate. Im finding it confusing the way its written.
27.07.2024 - 13:52DROPS Design svarede:
Hi Jo, edge stitch is included in stitch count. Happy knitting!
28.07.2024 - 17:57
![]() Veronica skrev:
Veronica skrev:
Hi, on this section for the decreases do I still do the one edge stitch in garter stitch in the beginning and end of each row? “Continue with stockinette stitch and decrease 1 stitch on each side of every row from the right side 12-13-13-15-15-19 times.” Thank you!
27.05.2024 - 05:56DROPS Design svarede:
Hi Veronica, When decreasing for the armholes and neck, use Decrease Tip at the top of the page: decrease after 3 stitches at the beginning of the row by knitting 1, slipping 1 stitch and passing the slipped stitch over; decrease at the end of the row by knitting 2 together before the last 3 stitches. So, yes you continue the edge stitches. Happy knitting!
27.05.2024 - 06:38
![]() Amelia skrev:
Amelia skrev:
What are the finished measurements for this piece?
12.03.2024 - 08:59DROPS Design svarede:
Dear Amelia, you can find the finished measurements of the piece on the schematic drawing below the instructions. I hope this helps. Happy Knitting!
12.03.2024 - 09:57
![]() Sonja skrev:
Sonja skrev:
Nach Abnahme am Ende des Bündchens habe ich mit 84 Maschen weitergestrickt. Nach der entsprechenden Länge dann mit abketten für die Armausschnitte weitergemacht. Dies in Größe M 13 beidseitig (=26 Maschen). Es blieben noch 50 übrig. Dann 20 Maschen für den Halsausschnitt abgegettet. Damit bleiben pro Schulter noch 15 Maschen übrig. Nun habe ich nur noch 9 Maschen übrig, aber es fehlen noch 10cm Länge. Habe ich zuviel abgenommen?
11.06.2023 - 12:39DROPS Design svarede:
Liebe Sonja, Maschenanzahl stimmt so, Halsausschnitt beginnt nach 37cm + ca 6 cm Abnahmen (6 Mal in jeder 2. Reihe) sind ca 42,5 cm, es fehlt nur noch 2,5 cm nach der 1. Abnahmen bis Abketten (45 cm) (mit 22 Reihen glatt rechts = 10 cm) - kann das Ihnen helfen?
12.06.2023 - 08:54
|
|
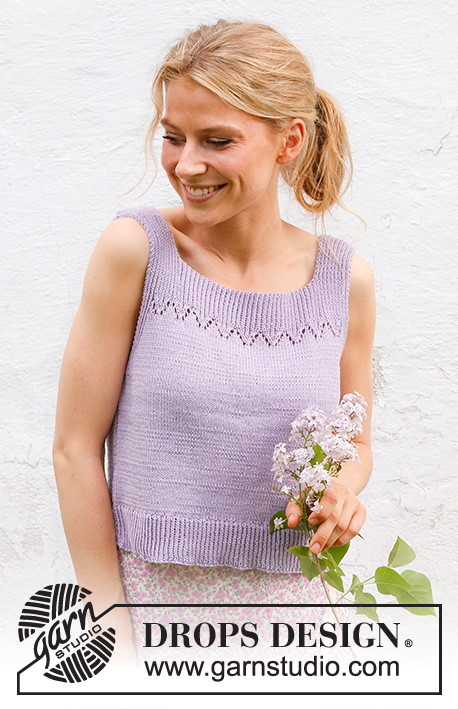
Bayou Belle#bayoubelletop |
|
 |
 |
Strikket top / singlet i DROPS Paris. Arbejdet strikkes nedefra og op i glatstrik. Størrelse XS - XXL.
DROPS 230-51 |
|
|
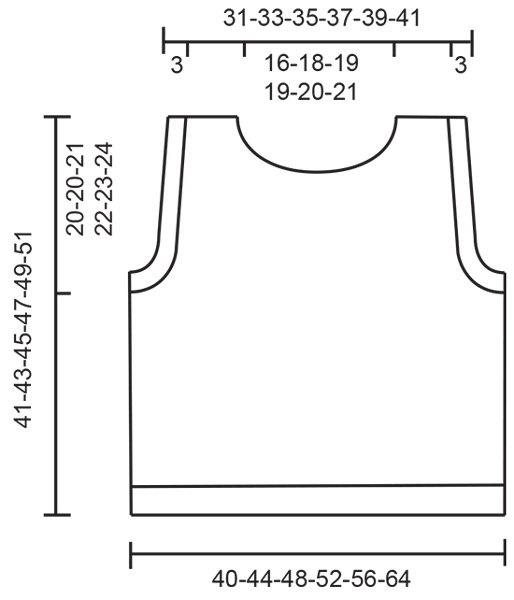
------------------------------------------------------- FORKLARING TIL OPSKRIFTEN: ------------------------------------------------------- RETSTRIK (strikkes frem og tilbage): Strik ret på hver pind. INDTAGNINGSTIPS (gælder ærmegab og hals): Alle indtagninger gøres fra retsiden. Tag ind indenfor 3 masker i starten af pinden således: Ta 1 maske løst af pinden, strik 1 masker ret og løft den løse maske over masken som blev strikket (1 maske taget ind). Tag ind indenfor 3 masker i slutningen af pinden således: Strik 2 masker ret sammen (1 maske taget ind). ------------------------------------------------------- START ARBEJDET HER: ------------------------------------------------------- TOP – KORT OVERSIGT OVER ARBEJDET: Forstykket og bagstykket strikkes frem og tilbage på rundpind, nedefra og op. Delene sys sammen på skuldrene og i siderne. Det strikkes ærmekanter og halskant rundt på rundpind. BAGSTYKKE: Slå 84-96-102-108-120-132 masker op på rundpind 4 med DROPS Paris. Strik rib således fra retsiden: Strik 1 kantmaske RETSTRIK - læs forklaring over, strik rib (1 ret / 2 vrang) til der er 2 masker tilbage, strik 1 maske ret og 1 kantmaske retstrik. Strik videre med retstrik over retstrik, ret over ret, vrang over vrang til arbejdet måler 5 cm og næste pind er fra retsiden. Skift til rundpind 5. På næste pind fra retsiden strikkes der og tages ind således: Strik 1 kantmaske retstrik, strik ret og tag 14-20-18-18-22-22 masker ind jævnt fordelt over de næste 82-94-100-106-118-130 masker og strik 1 kantmaske retstrik = 70-76-84-90-98-110 masker. Nu fortsættes der i glatstrik med 1 kantmaske retstrik i hver side. Strik til arbejdet måler 21-23-24-25-26-27 cm fra opslåningskanten, og næste pind er fra retsiden. HUSK PÅ STRIKKEFASTHEDEN! Luk 2-2-4-4-6-6 masker af i begyndelsen af de næste 2 pinde til ærmegab = 66-72-76-82-86-98 masker. LÆS HELE AFSNITTET UNDER FØR DET STRIKKES VIDERE. Nu skal der tages ind til ærmegab, men før alle indtagninger er færdige, skal det også tages ind til hals. Læs INDTAGNINGSTIPS! Fortsæt i glatstrik og tag 1 maske ind i hver side på hver pind fra retsiden totalt 12-13-13-15-15-19 gange. SAMTIDIG når arbejdet måler 34-36-37-39-40-42 cm, og næste pind er fra retsiden, lukkes de midterste 18-20-20-20-20-22 masker af til hals. Skuldrene strikkes færdig hver for sig. Fortsæt indtagningen til ærmegab og tag 1 maske ind til hals på hver pind fra retsiden til det er taget ind totalt 5-5-6-6-7-7 gange - husk INDTAGNINGSTIPS. Når alle indtagninger til ærmegab og hals er færdige, er det 7-8-9-10-11-12 masker på pinden. Strik til arbejdet måler 41-43-45-47-49-51 cm. Luk af med ret fra retsiden. Strik den anden skulder på samme måde. FORSTYKKE: Slå op og strik som bagstykket til arbejdet måler 21-23-24-25-26-27 cm fra opslåningskanten, og næste pind er fra retsiden. Luk 2-2-4-4-6-6 masker af i begyndelsen af de næste 2 pinde til ærmegab = 66-72-76-82-86-98 masker. LÆS HELE AFSNITTET UNDER FØR DET STRIKKES VIDERE. Nu skal det fortsættes med at tage ind til ærmegab, og før indtagningerne er færdige, skal det også tages ind til hals. Fortsæt i glatstrik og tag 1 maske ind i hver side på hver pind fra retsiden til ærmegab totalt 12-13-13-15-15-19 gange. SAMTIDIG når arbejdet måler 28-30-31-33-34-36 cm sættes de midterste 10-12-14-14-16-18 masker på en tråd til hals. Skuldrene strikkes videre hver for sig. Fortsæt indtagningen til ærmegab og tag 1 maske ind til hals på hver pind fra retsiden til det er taget ind totalt 9 gange – husk INDTAGNINGSTIPS! Når alle indtagninger til ærmegab og hals er færdige, er det 7-8-9-10-11-12 masker på pinden. Strik til arbejdet måler 41-43-45-47-49-51 cm. Luk af med ret fra retsiden. Strik den anden skulder på samme måde. MONTERING: Sy skuldersømmene. Sy sidesømmene og lad det være 5 cm slids nederst. ÆRMEKANT: Start ved sidesømmen og fra retsiden, brug rundpind 4 og strik ca 75-84-93-96-105-117 masker op rundt om hele ærmegabet - maskeantallet skal kunne deles med 3. Strik rundt i rib (1 ret / 2 vrang) i 3 cm. Luk af med ret over ret og vrang over vrang. Strik den anden ærmekant på samme måde. HALSKANT: Start med skuldersømmen og fra retsiden, brug rundpind 4 og strik ca 93-102-105-108-111-117 masker op rundt om hele halskanten (inklusive maskerne fra tråden midt foran) - maskeantallet skal kunne deles med 3. Strik rundt i rib (1 ret / 2 vrang) i 3 cm. Luk af med ret over ret og vrang over vrang. |
|
 |
|
Har du lavet denne opskrift?Så tagger du dine billeder med #dropspattern #bayoubelletop eller send dem til #dropsfan galleriet. Behøver du hjælp med opskriften?Du finder 29 instruktionsvideoer, kommentarer/spørgsmål og mere i opskriften på www.garnstudio.com © 1982-2026 DROPS Design A/S. Alle rettigheder er reserveret. Dette dokument med tilhørende underdokumenter har copyright. Læs mere om hvad du kan gøre med vore opskrifter, nedert i alle vore opskrifter på hjemmesiden. |
|


Med over 40 år i strikke- og hæklebranchen tilbyder DROPS Design en af de mest omfattende kollektioner med gratis opskrifter på internettet - oversat til 17 sprog. Dags dato har vi 325 kataloger og 12298 opskrifter på Dansk.
Vi arbejder hårdt for at kunne tilbyde Dig det bedste man kan få af strik og hækling, inspiration og gode råd men også kvalitetsgarn til fantastiske priser! Vil du bruge vore opskrifter til andet end for privat brug? Du kan læse om hvilke regler som gælder under teksten Copyright nederst på siden i alle vore opskrifter. God fornøjelse!
Kommentere opskrift DROPS 230-51
Vi vil gerne høre din mening om denne model!
Hvis du ønsker at stille et spørgsmål, så husk at vælge rigtig kategori i menuen under - det vil give dig hurtigere svar. Obligatoriske felter er markeret med *.