
Populaarsed kategooriad
Otsid lõnga?


Kommentaarid / Küsimused (126)
![]() Tara kirjutas:
Tara kirjutas:
I’ve made the front and back vent now moving onto the dress after vent it says continue with pattern first work stitches over front and then back but what stitches are they thanks
25.07.2025 - 22:48DROPS Design vastas:
Dear Tara, the stitches from the different pieces were set aside after finishing the vent. So, we will work over these stitches set aside, joining them to work in back and forth rounds. The stitches over the back piece and the front piece are worked in A.1, just as before, over those same stitches in the chart. So you start working this round over the front piece stitches, continuing with A.1 over them, then work the back piece stitches with A.1 as well and finally join the round with a stitch worked in A.2. Then continue back and forth over all stitches. Happy crochetting!
27.07.2025 - 18:39
![]() Alice kirjutas:
Alice kirjutas:
Hej, i mönstret står det att man ska virka diagram A.1 första biten efter sprundet. A1 har om man bortser från första redan virkade raden 12 rader i mönstret. A.3 består av 6 rader i mönstret. Tittar man på bilden av klänningen ser det ut som att A.1 egentligen ska bestå av A.1+A.3. Virkar man endast A.1 blir mönstret fortfarande väldigt fint men det kommer bli fler större hål i klänningen och upp mot bysten. Ni kanske vill kontrollera om detta stämmer och uppdatera mönstret?
14.07.2025 - 16:21DROPS Design vastas:
Hei Alice. Ja, A.1 burde kanskje stå på høyre siden av den loddrette streken. Oppskriften er oversendt til Design avd. for en dobbelt sjekk og evnt. korrigering. mvh DROPS Design
01.08.2025 - 11:24
![]() Coreen kirjutas:
Coreen kirjutas:
Beautiful pattern but I think I confused my right side and my wrong side. Which rows are right side? I was counting the first row of SC as a right side row and working from there, but I just read a response to a question about the fan row that makes me think I have it backwards.
04.07.2025 - 13:39DROPS Design vastas:
Dear Coreen, the first sc row in chart A.1 has been worked and explained in the written pattern instructions; you don't need to repeat it. This row had been worked from the wrong side. The fan row should be worked from the right side. Happy crochetting!
06.07.2025 - 22:58
![]() Julia kirjutas:
Julia kirjutas:
Hallo, Wie häkel ich die Rückreihe? Sind in der Rückreihe immer feste Maschen zu häkeln oder häkel ich das Muster einfach weiter?
29.06.2025 - 19:57DROPS Design vastas:
Liebe Julia, das Diagram zeigt alle Reihen, die Hinreihen lesen Sie rechts nach links und die Rückreihen links nach rechts. Viel Spaß beim Häkeln!
30.06.2025 - 09:23
![]() Karin kirjutas:
Karin kirjutas:
Eine super Anleitung, ein tolles Sommerkleid, ich finde es genial ,
22.06.2025 - 06:36
![]() Julia kirjutas:
Julia kirjutas:
Was bedeutet "1 Stäbchen zwischen 2 Stäbchen"?
20.06.2025 - 21:20DROPS Design vastas:
Liebe Julia, dieses Stäbchen häkeln Sie nicht wie normalerweise in das Stäbchen der vorigen Reihe sonder zwischen 2 Stäbchen der vorigen Reihe, dh zwischen den 2 Kreuzstäbchen der vorigen Reihe. Viel Spaß beim Häkeln!
23.06.2025 - 07:30
![]() Aude kirjutas:
Aude kirjutas:
Bonjour, Pardon d'avance mais moi je compte 12 rangs dans A1... pas 11 comme je le vois écrit à plusieurs reprises dans les commentaires. Donc quand on dit de suivre A1, on répète les 12 rangs du schéma. N'est-ce pas ? Bien à vous ! Et merci pour ce beau modèle.
16.06.2025 - 09:40DROPS Design vastas:
Bonjour Aude, vous avez tout à fait raison, A.1 se crochète bien sur 12 rangs. On répète ensuite effectivement ces 12 rangs jusqu'à ce qu'il soit indiqué de crocheter A.3 (quand la robe mesure 60-65 cm, cf taille). Bon crochet!
16.06.2025 - 16:26
![]() Sanne Lindvang kirjutas:
Sanne Lindvang kirjutas:
Jeg er næsten færdig med at hæklet Belladonna. Jeg er i tvivl om hvordan jeg hækler forstykket for på side 5 står der gentag indtagninger på hver række 2-2-2-3-4-5 hvordan skal det forstås. ?Hvordan hækler jeg det.?
11.05.2025 - 09:00DROPS Design vastas:
Hej Sanne du tager ind ved at hækle 2 masker sammen. Antal gange kommer an på hvilken størrelse du hækler :)
20.05.2025 - 13:58
![]() Ančka kirjutas:
Ančka kirjutas:
Hello, I am currently working on the front piece and am up to the fourth row of the A.1 diagram displaying single crochets and the star symbol beside it. Is this row an increase row or a decrease row? Thank you in advance :)
27.11.2024 - 02:22DROPS Design vastas:
Dear Ančka, you should increase/decrease evenly on the rows with the star symbol only when requested in the pattern, this means you will start decreasing evenly only when piece measures 30-35 cm, when you work the dress in the round, then increase evenly later, but not before (see your size for correct measurement). Happy crocheting!
27.11.2024 - 07:25
![]() Memo kirjutas:
Memo kirjutas:
Do you have a video how to make it
18.10.2024 - 01:26DROPS Design vastas:
Dear memo, we do not have ONE video on how to make the full dress, however we do have a bunch of videos, that can help you make this dress. All the relevant videos are linked under the "videos" button, just below the title. Happy Crafting!
18.10.2024 - 02:59
|
|||||||||||||||||||||||||||||||||||||
Belladonna#belladonnadress |
|||||||||||||||||||||||||||||||||||||
 |
 |
||||||||||||||||||||||||||||||||||||
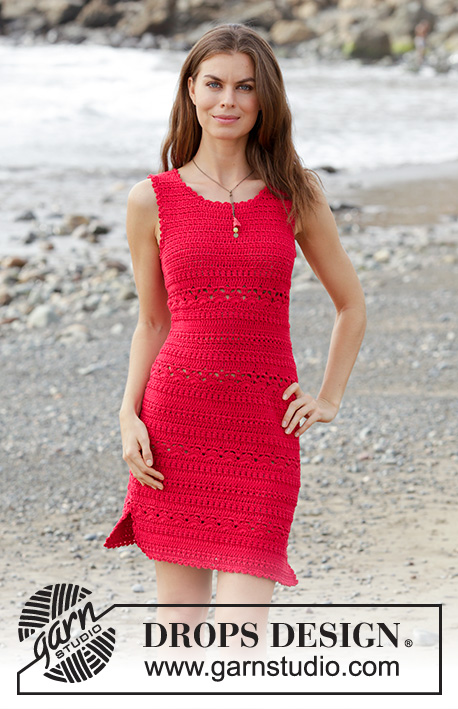
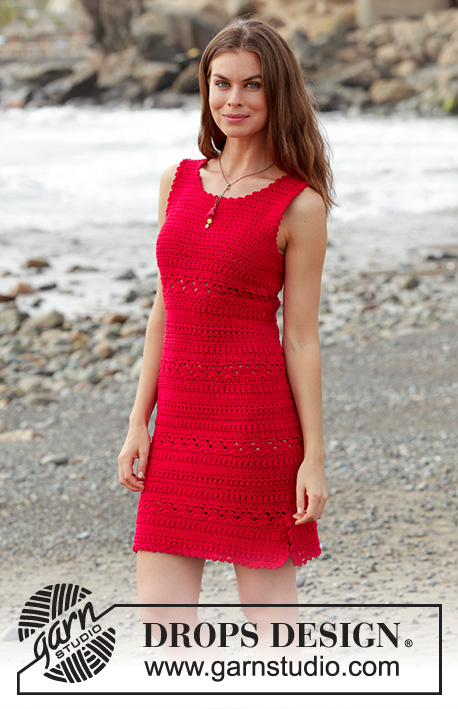
DROPS Muskat lõngast heegeldatud pitsmustriga kleit suurustele S kuni XXXL
DROPS 187-5 |
|||||||||||||||||||||||||||||||||||||
|
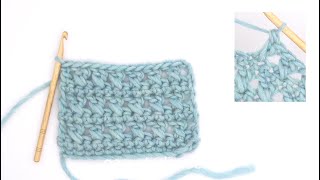
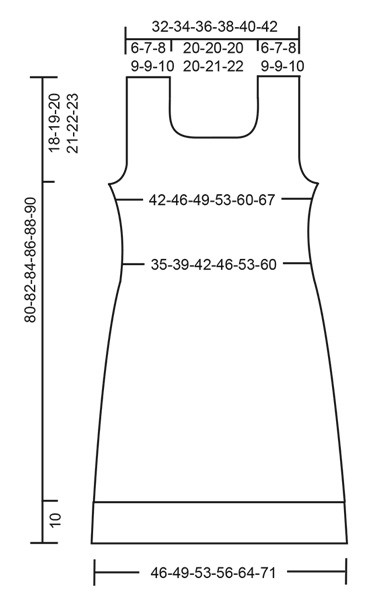
JUHEND MUSTER Vaata skeeme A.1, A.2 ja A.3. Skeem A.2 näitab ringi algust ja lõppu ringselt heegeldades. HEEGELDAMISE NIPP (edasi-tagasi kududes) Tee ühekordsete sammaste rea aguses 3 ahelsilmust (ei asenda esimest sammast). Tee kinnissilmuste rea aguses 1 ahelsilmus (ei asenda esimest kinnissilmust). KAHANDAMISE NIPP ÜHEKORDNE SAMMAS: Kahanda 1 ühekordne sammas, heegeldades 2 sammast kokku nii: tee 1 ühekordne sammas esimesse/ järgmisesse silmusesse, aga ära tee viimast lõnga läbitõmmet (= 2 aasa heegelnõelal), tee nii veel 1 sammas järgmisesse silmusesse ja siis tee viimane lõnga läbitõmme läbi kõigi 3 aasa heegelnõelal. KINNISSILMUS: Kahanda 1 kinnissilmus, heegeldades 2 silmust kokku nii: tee 1 kinnissilmus, aga ära tee viimast lõnga läbitõmmet (= 2 aasa heegelnõelal), tee järgmine kinnissilmus samamoodi ja siis tee viimane lõnga läbitõmme läbi kõigi 3 aasa heegelnõelal. KAHANDAMISE NIPP (ühtlaste vahedega) Arvutamaks, kui tihti kahandada ühtlaste vahedega, loe silmused vardal (näiteks 156 silmust) ja jaga kahanduste arvuga (näiteks 6) = 26. Selles näites heegelda iga 25. ja 26. silmus kokku. --------------------------------------------- KLEIT Kleidi allääres on 10 cm lõhik. Algul heegeldatakse edasi-tagasi kuni lõhik on tehtud, siis heegeldatakse ringselt, aga pööra igal ringil, et pind jääks ühtlane. Siis jagatakse kleit osadeks käeaukude jaoks ja heegeldatakse edasi-tagasi. ESIOSA Heegelda 90-97-104-111-125-139 ahelsilmust 4 mm heegelnõelaga ja Muskat lõngaga. Tee 1 kinnissilmus teise ahelsilmusesse heegelnõelast, tee 1 kinnissilmus igasse järgmisesse 4 ahelsilmusesse, * jäta vahele 1 ahelsilmus, tee 1 kinnissilmus igasse järgmisesse 6 ahelsilmusesse *, korda * kuni * tervel real = 78-84-90-96-108-120 kinnissilmust (ahelsilmust pööramiseks loetakse üheks kinnissilmuseks). Pööra ja tee 1 kinnissilmus igasse kinnissilmusesse. Nüüd heegelda skeemi A.1 – loe HEEGELDAMISE NIPPI. JÄLGI HEEGELDAMISE TUGEVUST! Kui töö pikkus on 10 cm, pane töö ootele ja tee seljaosa. SELJAOSA Heegelda 90-97-104-111-125-139 ahelsilmust 4 mm heegelnõelaga ja Muskat lõngaga. Tee 1 kinnissilmus teise ahelsilmusesse heegelnõelast, tee 1 kinnissilmus igasse järgmisesse 4 ahelsilmusesse, * jäta vahele 1 ahelsilmus, tee 1 kinnissilmus igasse järgmisesse 6 ahelsilmusesse *, korda * kuni * tervel real = 78-84-90-96-108-120 kinnissilmust (ahelsilmust pööramiseks loetakse üheks kinnissilmuseks). Pööra ja tee 1 kinnissilmus igasse kinnissilmusesse. Nüüd heegelda skeemi A.1. Kui töö pikkus on 10 cm, lõpeta sama reaga nagu esiosal. KLEIT pärast lõhikut: Jätka niimoodi mustriga, algul heegelda esiosa silmused, siis seljaosa silmused, siis ühenda silmused ringiks aassilmusega esimesse/kolmandasse silmusesse ringi algul, tee 1 silmus skeemi A.2, pööra tööd ja heegelda järgmine ring tagasi. Paigalda 1 silmusemärkija esi- ja seljaosa vahele mõlemale küljele. Jätka heegeldamist edasi-tagasi vastavalt skeemidele A.1 ja A.2. Kinnissilmuste või ühekordsete sammaste ringil on nüüd 156-168-180-192-216-240 silmust ringil (skeemi A.2 silmuseid ei loeta). Kui töö pikkus on umbes 30-31-32-33-34-35 cm - järgmine ring on kinnissilmuste või ühekordset sammaste ring (skeemil märgitud tärniga), kahanda 6 silmust ühtlaste vahedega - loe KAHANDAMISE NIPPI ja KAHANDAMISE NIPPI (ühtlaste vahedega). Korda kahandamist kokku 6 korda tärniga märgitud ringidel = 120-132-144-156-180-204 silmust on neil ringidel. Pärast viimast kahandust heegelda mustrit nagu enne umbes 3 cm - järgmine ring on tärniga märgitud ring (töö pikkus on umbes 48-49-50-51-52-53 cm). Nüüd kasvata 6 silmust ühtlaste vahedega ringil, tehes 2 silmust ühte silmusesse. Korda kasvatusi kokku 4 korda vertikaalselt tärniga märgitud ringidel = 144-156-168-180-204-228 silmust on neil ringidel pärast viimast kasvatust. Kui töö pikkus on umbes 60-61-62-63-64-65 cm – järgmine on tärniga ring, lõpeta kleit vastavalt skeemile A.3 (pöördel tee ikka skeemi A.2). Kui töö pikkus on 62-63-64-65-66-67 cm, jaga töö osadeks käeaukudes. ESIOSA Heegelda aassilmuseid esimesel 4-5-4-5-6-7 silmusel, siis heegelda kuni 4-5-4-5-6-7 silmust jääb enne silmusemärkijat küljel, pööra tööd. Järgmisel real heegelda 2 äärmist silmust kokku mõlemal küljel – loe KAHANDAMISE NIPPI. Korda kahandamist igal real veel 0-0-1-1-2-3 korda. Järgmisel real heegelda 2 äärmist silmust kokku, korda kahandamist igal real veel 2-2-2-3-4-5 korda. Kui kõik kahandused on tehtud, on 54-58-62-64-68-72 silmust ringil. Kui töö pikkus on 70-71-73-74-76-77 cm, heegelda õlad eraldi. ÕLG Heegelda ühekordseid sambaid esimesed 17-19-21-22-23-24 silmust töö paremal pool, pööra, heegelda esimesed 4 silmust kokku kahekaupa kaelaaugu jaoks, heegelda ülejäänud rida. Pööra, heegelda kuni jään 4 silmust enne kaelaauku, heegelda need silmused kokku kahekaupa, pööra. Järgmisel real heegelda esimesed 2 silmust kokku kaelaaugu jaoks, heegelda ülejäänud rida. Pööra, heegelda kuni jään 2 silmust enne kaelaauku, heegelda need silmused kokku kahekaupa. Pööra, heegelda esimesed 2 silmust kokku, heegelda ülejäänud rida = 10-12-14-15-16-17 silmust on õlal. Nüüd heegelda, kuni töö pikkus on 80-82-84-86-88-90 cm, katkesta ja kinnita lõng. Tee teine õlg samamoodi, aga peegelpildis, st. alusta töö paremal pool ja heegelda kahandamised kaelaaugu jaoks töö pahempoolse rea lõpus. SELJAOSA Heegelda aassilmuseid esimesel 4-5-4-5-6-7 silmusel, siis heegelda kuni 4-5-4-5-6-7 silmust jääb enne silmusemärkijat küljel, pööra tööd. Järgmisel real heegelda 4 äärmist silmust kokku kahekaupa – loe KAHANDAMISE NIPPI. Korda kahandamist igal real veel 0-0-1-1-2-3 korda. Järgmisel real heegelda 2 äärmist silmust kokku, korda kahandamist igal real veel 2-2-2-3-4-5 korda. Kui kõik kahandused on tehtud, on 54-58-62-64-68-72 silmust ringil. Jätka niimoodi kudumist, kuni töö pikkus on umbes 78-80-82-84-86-88 cm. Lõpeta õlad eraldi. Heegelda 1 rida esimesel 12-14-16-17-18-19 silmusel, pööra, heegelda 2 esimest silmust kokku, heegelda ülejäänud rida. Pööra, heegelda kuni jään 2 silmust enne kaelaauku, heegelda need 2 silmust kokku. Pööra, heegelda ülejäänud rida, katkesta ja kinnita lõng. Korda teisel õlal. VIIMISTLUS Õmble kokku õlaõmblused, servad vastastikku. ÄÄRIS Heegelda kaunistused pitsääris ümber kaelaaugu, käeaukude ja alläärde ning ümber lõhikute äärte järgmiselt: tee 1 kinnissilmus, * 3 ahelsilmust, 1 ühekordne sammas kolmandasse ahelsilmusesse heegelnõelast, jäta vahele umbes 1 cm ja tee 1 kinnissilmus *. Korda * kuni *, lõpus tee 1 aassilmus esimesse kinnissilmusesse ringi algul. |
|||||||||||||||||||||||||||||||||||||
Skeemi seletused |
|||||||||||||||||||||||||||||||||||||
|
|||||||||||||||||||||||||||||||||||||
 |
|||||||||||||||||||||||||||||||||||||
 |
|||||||||||||||||||||||||||||||||||||
Kas oled teinud seda mustrit?Lisa oma piltidele viide #dropspattern #belladonnadress või saada link projektile meie #dropsfan galeriisse. Vajad abi selle mustriga?Garnstudio.com kodulehel on 13 õppevideot, küsimuste/vastuste osa ja muudki. © 1982-2026 DROPS Design A/S. Kõik õigused kaitstud. See dokument, ning selle alajaotused on kaitsud autoriõigustega. Loe rohkem, mida meie mustritega võib teha, iga mustrilehe alt meie kodulehel. |
|||||||||||||||||||||||||||||||||||||


Tegeledes üle 40 aasta kudumise ja heegeldamise disainidega, pakub DROPS Design ühte suurimat tasuta mustrite kollektsiooni internetis - tõlgituna 17 keelde. Tänaseks on meil 324 kataloogi ja 12290 mustrit - millest 9431 on tõlgitud Eesti keelde.
Me anname endast parima, et tuua teieni kõike mida kudumine ja heegeldamine võib pakkuda - inspiratsiooni, nõuandeid ning ka kvaliteetseid lõngu parima hinnaga! Soovid kasutada mustreid muukski, kui ainult oma tarbeks? Loe infot meie Copyright osas iga lehekülje all. Rõõmsat loomist!
Jäta kommentaar mustrile DROPS 187-5
Ootame kommentaare selle mustri kohta!
Kui soovid midagi küsida, siis kiiremaks vastuse saamiseks veendu, et valid õige kategooria alloleval formil. Vajaliku väljad *.