
Populaarsed kategooriad
Otsid lõnga?


























Kommentaarid / Küsimused (106)
 Cindy Thomas kirjutas:
Before I get started I have one question my daughter is 34 DD So which do I do Large? The model is quite tiny And when I click on the sizing? It tries to call a number? Haha So which cup size she is also a 34 ❤️ Thank you in advance
09.03.2016 - 20:14DROPS Design vastas:
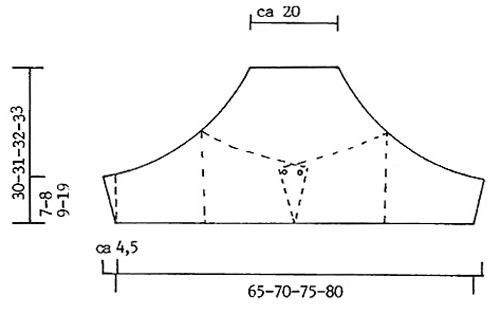
Dear Mrs Thomas, you will find all finished measurements at the end of the pattern, they are in cm, taken flat from side. Compare these to a similar garment she has and like the shape to find out the matching size. Check your setting in your browser, it may recognize all numbers looking like telephone as a telephone number. Happy crocheting!
10.03.2016 - 08:26
 Erika kirjutas:
Mon échantillon est aux bonnes dimensions. Mais l'ouvrage a des proportions beaucoup plus grande. 76 cm au lieu de 65 cm en largeur 9cm au lieu de 7cm en hauteur. Il doit y avoir une erreur. Car si 11 rangs font 10 cm les 53 rangs total ne peuvent pas faire 30 cm mais plutôt 48 cm (53*10/11). Merci de me ternir informée car pour le moment je mets en attente cet ouvrage. Quel domage!
01.03.2016 - 21:07DROPS Design vastas:
Bonjour Erika, Les explications correspondent bien au schéma: au 1er rang, on doit avoir 129 B soit approx. 65 cm dans la 1ère taille - le diagramme fait 25 rangs, soit 23 cm environ + les 7 cm avant le diagramme = 30 cm de hauteur. Bon crochet!
02.03.2016 - 08:51
 Natali kirjutas:
Hola yo el día gran lo entendí bien y lo hice lo que no entendí es el armado del cuerpo y demás, como lo puedo hacer?
09.02.2016 - 23:37DROPS Design vastas:
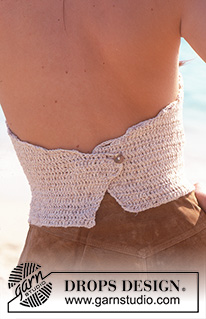
Hola Natali, se trabajan dos ojales o presillas en las dos puntas más externas del diagrama que luego se cierran en el centro de la espalda y luego se prueba la prenda para ver a que altura de cada lado debemos coser los botones para que se ajuste a nuestro contorno. Un botón irá por la parte interior y otro por la exterior ya que los extremos de la prenda se solapan en la espalda. Después se trabajara un cordón trenzado que servirá para ajustar la prenda al cuello y lo ataremos en la parte posterior de éste.
23.02.2016 - 18:21Aida kirjutas:
Hi as i start Dec on both sides as follows: 4 dc 2-3-6-8 times do i also start the diagram here or after i finish all of the decrease?
08.10.2015 - 10:22DROPS Design vastas:
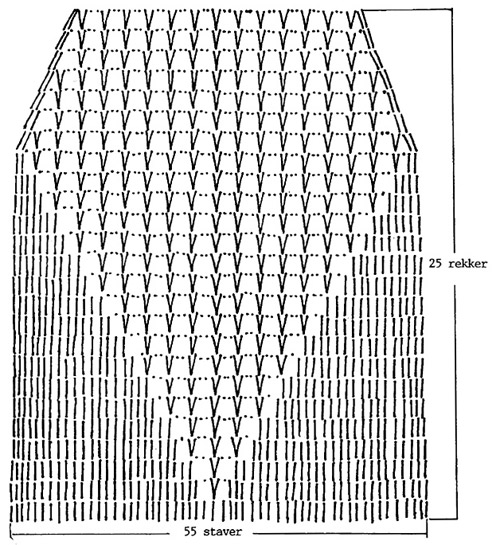
Dear Aida, start diagram when starting dec, ie at the same time as you start dec, the diagram is worked over the center 55 dc. Happy crocheting!
08.10.2015 - 17:23Carol kirjutas:
Why do you not have a video for the complete pattern.so we can look at the video like on youtube. Thank you.
26.07.2015 - 10:48DROPS Design vastas:
Dear Carol. It's not possible for us to publish videos of a complete pattern, we only make on techniques, stitches and pattern diagrams. If you need help with a specific part of the pattern, we will take a look at it.
27.07.2015 - 15:34
 Studer Brigitta kirjutas:
Hallo, das Abnehmen auf der linken Seite ist nicht beschrieben! Wie muss das gemacht werden mit den Luftmaschen? Diese Anleitung ist recht spärlich beschrieben, könnte eine Auffrischung brauchen.
21.07.2015 - 06:54DROPS Design vastas:
Die Abnahmen werden beidseitig gemacht, d.h. immer am Anfang jeder R. Die Anleitung wurde neu übersetzt und ist nun hoffentlich etwas deutlicher, ansonsten fragen Sie gerne noch einmal nach. Gutes Gelingen!
28.07.2015 - 16:56
Summer kirjutas:
How would you instead of having a button connect it in the back?
04.07.2015 - 04:56DROPS Design vastas:
Dear Summer, you can make 2 twisted strings or a ch and sew them at each end of piece then cross them and tie them with a knot. A button may be a good idea to hold both pieces tog. Happy crocheting!
04.07.2015 - 09:27
Tam kirjutas:
I don't understand the part that inc 1 dc on each side every row 8 times . That mean I'm do inc 8 times the hold row 1 from beginning 1 the end and another 6 during the row ????
24.06.2015 - 18:27DROPS Design vastas:
Dear Tam, you inc 1 st at the beg + 1 st at the end of row (= 2 sts inc per row) for 8 rows (1st size) = you have a total of 145 sts on row 9. Happy crocheting!
25.06.2015 - 10:24
Stephanie kirjutas:
After reading pattern and looking at the diagram for drops 65-13 pattern I don't understand the instructions right above the chart
04.06.2015 - 16:46DROPS Design vastas:
Dear Stephanie, you will find above measurement chart all diagram text, 1 symbol represent 1 st / 1 group of st - read more about diagrams here. Happy crocheting!
05.06.2015 - 09:48
Pam kirjutas:
I have just got rolling with no problem.Rows 2 through 9-10-11-12: 1 dc in each dc from the previous row--at the same time, inc 1 dc on each side every row 8-9-10-11 times. What does 8-9-10-11 times mean. It doesn't make sense to me. Does it mean to increase row 3 through row 12 ? Maybe if you clear up if I am understanding this part I will be able to get through the decreasing also.
09.04.2015 - 07:50DROPS Design vastas:
Dear Pam, this refers to the size, eg in 1st size, you work rows 2 through row 9, inc every row 8 times (in 2nd size through row 10, inc 9 times etc..). Happy crocheting!
09.04.2015 - 09:56
|
|||||||||||||
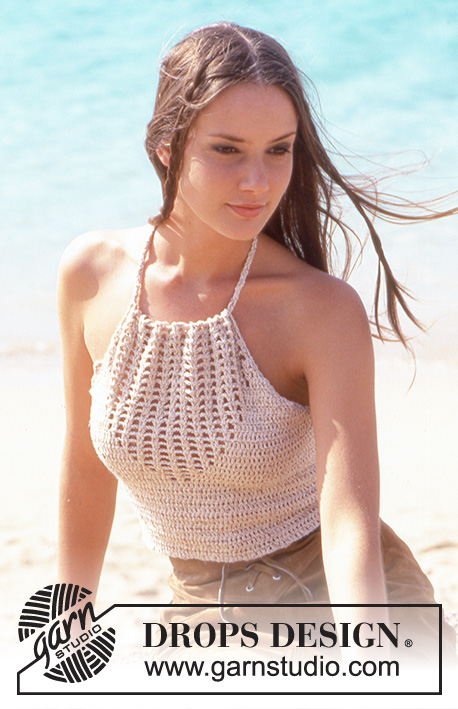
Mediterranean Love Top#mediterraneanlovetop |
|||||||||||||
 |
 |
||||||||||||
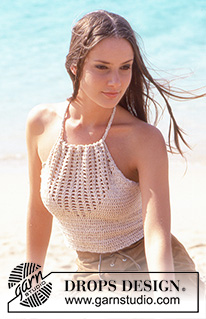
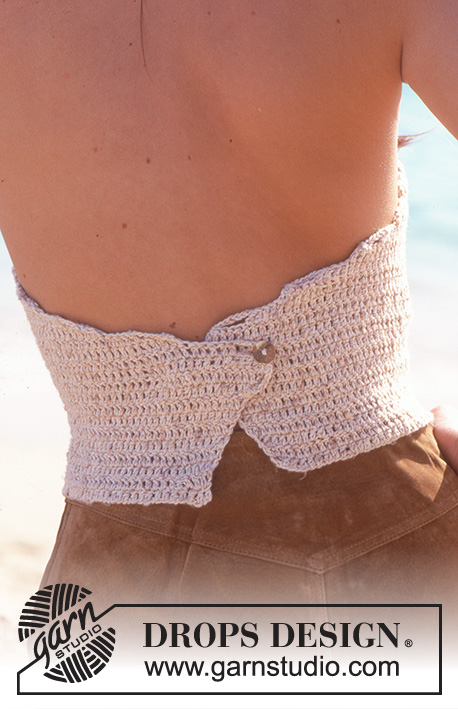
DROPS Safran lõngast heegeldatud lahtise seljaga topp
DROPS 65-13 |
|||||||||||||
|
MUSTER Vaata skeemi. Heegelda kõikidel suurustel terve skeem. HEEGELDAMISE NIPP Kahanda 4 sammast: tee rea alguses 6 ahelsilmust, jäta vahele esimesed 4 ühekordset sammast real ja alusta heegeldamist 5. silmusest ja heegelda kuni jääb 4 sammast, pööra tööd. Kahanda 3 sammast: tee rea alguses 5 ahelsilmust, jäta vahele esimesed 3 ühekordset sammast real ja alusta heegeldamist 4. silmusest ja heegelda kuni jääb 3 sammast, pööra tööd. Kahanda 2 sammast: tee rea alguses 4 ahelsilmust, jäta vahele esimesed 2 ühekordset sammast real ja alusta heegeldamist 3. silmusest ja heegelda kuni jääb 2 sammast, pööra tööd. --------------------------------------------------- KEHAOSA Heegelda 173-186-199-213 ahelsilmust 3 mm heegelnõelaga ja beežikaspruuni lõngaga. Järgmisel real tee ühekordseid sambaid ahelsilmustest ketile järgmiselt: tee 1 ühekordne sammas neljandasse ahelsilmusesse heegelnõelast (= 3 ahels asendavad esimest sammast), tee 1 ühekordne sammas järgmisesse ahelsse, * jäta vahele 1 ahels, tee 1 ühekordne sammas igasse järgmisesse 3 ahelsse *, korda * kuni * (st. tee 3 ühekordset sammast 4 ahelsilmuse kohale), tee 1 ühekordne sammas viimasesse 0-1-2-0 ahelsilmusesse = 129-139-149-159 ühekordset sammast real. JÄLGI HEEGELDAMISE TUGEVUST! Siis heegelda ühekordseid sambaid kõigil silmustel, samal ajal kasvata mõlemalt küljel igal real: 1 ühekordne sammas mõlemal küljel 8-9-10-11 korda = 145-157-169-181 ühekordset sammast on real. Töö pikkus on umbes 7-8-9-10 cm. Siis kahanda mõlemal küljel igal real – loe HEEGELDAMISE NIPPI, samal ajal alusta skeemi keskmisel 55 silmusel - jälgi, et muster oleks esiosa keskel. Siis kahanda mõlemal küljel järgmiselt: 4 ühekordset sammast 2-3-6-8 korda, 3 ühekordset sammast 3-7-7-7 korda, 2 ühekordset sammast 14-9-6-5 korda, jätka vastavalt skeemile. Pärast skeemi on töö pikkus umbes 30-31-32-34 cm. VIIMISTLUS Heegelda 1 nööpauk seljaosa ülemisse nurka järgmiselt: tee 1 kinnissilmus, 2 ahelsilmust, jäta vahele 0,5 cm, tee 1 kinnissilmus. Proovi toppi selga, et leida nööbile asukoht, õmble 1 nööp vasaku poole siseküljele ja 1 nööp parema poole peale. Tee 3 nööri ahelsilmustest pikkusega umbes 100 cm, punu need patsiks. Punu nöör läbi esiosa ülemise ääre. |
|||||||||||||
Skeemi seletused |
|||||||||||||
|
|||||||||||||
 |
|||||||||||||
 |
|||||||||||||
Kas oled teinud seda mustrit?Lisa oma piltidele viide #dropspattern #mediterraneanlovetop või saada link projektile meie #dropsfan galeriisse. Vajad abi selle mustriga?Garnstudio.com kodulehel on 4 õppevideot, küsimuste/vastuste osa ja muudki. © 1982-2026 DROPS Design A/S. Kõik õigused kaitstud. See dokument, ning selle alajaotused on kaitsud autoriõigustega. Loe rohkem, mida meie mustritega võib teha, iga mustrilehe alt meie kodulehel. |
|||||||||||||






Tegeledes üle 40 aasta kudumise ja heegeldamise disainidega, pakub DROPS Design ühte suurimat tasuta mustrite kollektsiooni internetis - tõlgituna 17 keelde. Tänaseks on meil 333 kataloogi ja 12532 mustrit - millest 9694 on tõlgitud Eesti keelde.
Me anname endast parima, et tuua teieni kõike mida kudumine ja heegeldamine võib pakkuda - inspiratsiooni, nõuandeid ning ka kvaliteetseid lõngu parima hinnaga! Soovid kasutada mustreid muukski, kui ainult oma tarbeks? Loe infot meie Copyright osas iga lehekülje all. Rõõmsat loomist!
Jäta kommentaar mustrile DROPS 65-13
Ootame kommentaare selle mustri kohta!
Kui soovid midagi küsida, siis kiiremaks vastuse saamiseks veendu, et valid õige kategooria alloleval formil. Vajaliku väljad *.