
Populaarsed kategooriad
Otsid lõnga?


Kommentaarid / Küsimused (23)
![]() Leeanne kirjutas:
Leeanne kirjutas:
Addtnl. info for my last comments: I was confused by the first sentence in the short rows instructions stating to do 6 rows over all stitches. I thought that was part of the directions and the piece started with 6 rows before starting the short row repeat cycle but that is incorrect. This sentence is just telling you that there are 6 rows included in the short row instruction cycle that are not, in fact, short rows – 6 full rows and 2 short rows (not in that order) are listed in the row cycle.
06.09.2025 - 15:15
![]() Leeanne kirjutas:
Leeanne kirjutas:
(Cont. from previous two comments) next row starts with R3 and finishes with L3 and last row starts with L4 and finishes with R4. Then you start the cycle again with the first short row. So yes, the short row cycle is short row, full row, short row, full row, full row, full row, full row, full row as the pattern states (1 SR followed by 1 full row followed by 1 SR followed by 5 full rows). There are no edges in which you are not doing a picot edge instruction which allows for an even 8 row cycle
06.09.2025 - 15:08
![]() Leeanne kirjutas:
Leeanne kirjutas:
(continued from my previous comment) work the L2 row to the first marker and turn to work back to the “beginning” of the left side row, ending with L3, turn and start a new row with L4, working all the way across, ending with R4, (all the remaining rows in the cycle go all the way across – no more short rows) next row begins with R1 and goes all the way across to the last 4 stitches, ending in L1, turn and start with L2 and go all the way across to finish with R2, (cont. in next comment)
06.09.2025 - 15:03
![]() Leeanne kirjutas:
Leeanne kirjutas:
For anyone that needs it, here is the cycle of rows, combining picot edge with short rows instructions (it helps to draw this out on paper): start with right side 1 (R1) and work a short row (to first marker only, not all the way across), turn and work back to the beginning and knit the last four with R2, turn to start next row beginning with R3 and knit all the way across, ending this row with L1, then start the second short row with L2, (continued in next comment)
06.09.2025 - 14:58
![]() Leeanne kirjutas:
Leeanne kirjutas:
I figured it out! It is definitely not too complicated but they could have written this pattern differently so it wouldn’t take weeks or trial and error to figure out how to work the short rows in with the picot edge. Maybe we were just making it too complicated. I don’t have enough room to write the pattern in this comment so I’ll start a new one. It is easier to draw your lines and mark each end with the picot line number but I’ll try to write it here in my next comment.
06.09.2025 - 14:55
![]() Leeanne kirjutas:
Leeanne kirjutas:
I think I get it! I will test it in the morning and comment again trying to explain it for others if I have it right. My last two comments are wrong for sure. It helps to draw the rows as a picture on paper and mark the ends with the line number.
06.09.2025 - 05:10
![]() Leeanne kirjutas:
Leeanne kirjutas:
Revising my last comment: I now have it written as: short row, R1 &L1 on the same row, short row, R2 & L2, short row, R3 & L3, short row, R4 & L4. But this adds up to 8 rows on the sides and only 4 rows in the middle, not 6. Also not sure why the short rows directions refers to the middle stitches as being 70 (for the second size) when it’s only 30 (if excluding 25 on each end) or 72 (if excluding only the outermost 4 on each end).
06.09.2025 - 04:26
![]() Leanne kirjutas:
Leanne kirjutas:
The directions for the short rows are difficult to figure out. I’ve been working at this for a few weeks with my MIL, have restarted my project 7 times and we still don’t have it right. So we are alternating between right and left rows 1, 2, etc. when doing full rows? We are not doing any picot edge instructions when doing short rows, correct? To incoorporate the short rows, does it go: left row 1, right row 1, short row, left row 2, right row 2, short row, etc. through all four edge rows?
06.09.2025 - 02:40
![]() Leeanne kirjutas:
Leeanne kirjutas:
In addition to my last comment, I’m also confused because it says for garter stitch to knit two rows. The main directions says start with the right Picot edge, then knit the directions for garter stitch for the rest of the row, except for the last four and then knit the directions for the left edge on the last four. How do you knit two rows for the garter stitch directions in between doing the right and left edges?
14.07.2025 - 19:22DROPS Design vastas:
Dear Leeanne, the garter stitch structure is 2 knit rows. So whenever most of the stitches in the row are knitted, both from the right side and the wrong side, the resulting texture will be garter stitch. In the picot edges we are already using garter stitch, since all other stitches except for the 4 stitches on each side for the picot are knitted from the right side and the wrong side. So you just need to work as indicated; the edges will have the picot texture while the remaining stitches are knitted. Happy knitting!
19.07.2025 - 17:47
![]() Leeanne kirjutas:
Leeanne kirjutas:
A video of the actual pattern, please! This is so confusing. I’ve now learned how to do picot edges and short rows, but I can’t understand how to do both at the same time. How do you know which row of the picot edge you’re on if you’ve turned around and gone the other direction halfway through a row? And then when you start the next row do you count as if half the row is row 5 and half is row 6 or just continue with the next direction for that edge in sequence, ignoring row numbers?
14.07.2025 - 19:18DROPS Design vastas:
Dear Leeanne, please remember to mark your comments as questions so that we can see them and answer sooner. When you are combining the short rows and the picot edges, count only the rows where you reach the edges; those rows where you turn before reaching the edges are not taken into account for the picot edges on that side. Happy knitting!
19.07.2025 - 17:48
|
|
Berry Kiss#berrykissvest |
|
 |
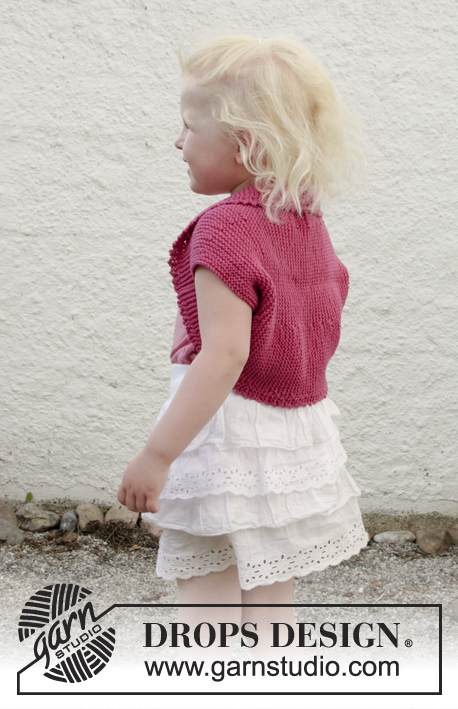 |
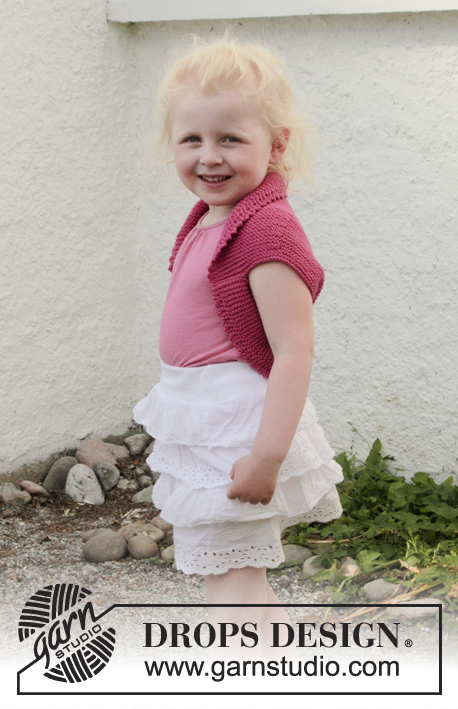
DROPS Cotton Merino lõngast ripskoes kootud lühendatud ridadega, pikooäärisega boolero suurustele 3-12 aastat
DROPS Children 28-7 |
|
|
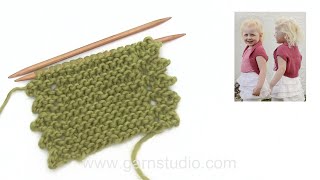
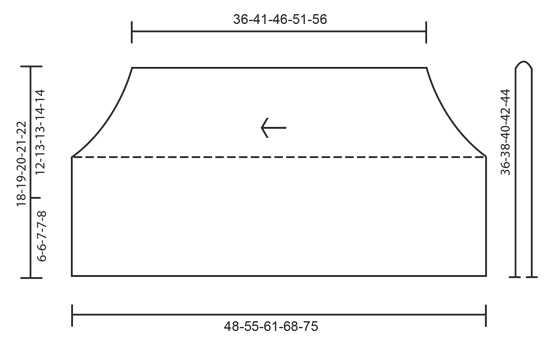
RIPSKUDE (edasi-tagasi kududes) 1 ripsivall = koo 2 rida parempidi silmuseid. PIKOOÄÄRIS (edasi-tagasi kududes) PAREM KÜLG 1. RIDA (= töö parem pool): koo parempidi silmuseid. 2. RIDA (= töö pahem pool): koo parempidi silmuseid, kuni jääb 4 silmust, koo need nii: koo 2 parempidi kokku, 1 õhksilmus, kahte viimasesse silmusesse koo mõlemasse 2 silmust = 2 uut silmust. 3. RIDA (= töö parem pool): tõsta 1 silmus kudumata parempidi võttega, 1 parempidi silmus, tõsta kudumata silmus üle äsja kootud silmuse; 1 parempidi silmus, tõsta eelmine silmus üle äsja kootud silmuse – 2 silmust kahandatud, koo ülejäänud rida. 4. RIDA (= töö pahem pool): koo parempidi silmuseid. Korda 1. kuni 4. rida. VASAK KÜLG 1. RIDA (= töö parem pool): koo parempidi silmuseid, kuni jääb 4 silmust, koo need nii: koo 2 parempidi kokku, 1 õhksilmus, kahte viimasesse silmusesse koo mõlemasse 2 silmust = 2 uut silmust. 2. RIDA (= töö pahem pool): tõsta 1 silmus kudumata parempidi võttega, 1 parempidi silmus, tõsta kudumata silmus üle äsja kootud silmuse; 1 parempidi silmus, tõsta eelmine silmus paremal vardal üle äsja kootud silmuse – 2 silmust kahandatud, koo ülejäänud rida. 3. RIDA (= töö parem pool): koo parempidi silmuseid. 4. RIDA (= töö pahem pool): koo parempidi silmuseid. Korda 1. kuni 4. rida. LÜHENDATUD READ Koo 6 rida kõigil silmustel, * koo 24-25-26-27-28 silmust (esimese silmusemärkijani), pööra, pinguta lõnga ja koo rea lõpuni. Koo 1 rida kõigil silmustel, pööra, koo 24-25-26-27-28 silmust (esimese silmusemärkijani), pööra, pinguta lõnga ja koo rea lõpuni. Koo 5 rida kõigil silmustel *, korda * kuni *. Teiste sõnadega, koo igal kordusel 6 rida ripskoes (= 3 ripsivalli) keskmisel 66-70-72-80-86 silmusel ning 8 rida ripskoes (= 4 ripsivalli) mõlemal küljel. -------------------------------------------------------- BOOLERO Kootakse küljelt küljele, edasi-tagasi ringvarrastega käeaugust käeauguni. Siis murtakse boolero kokku ja õmmeldakse küljeõmblused. Loo 76-80-84-88-92 silmust 4 mm ringvarrastele Cotton Merino lõngaga. Paigalda 1 silmusemärkija 24-25-26-27-28 silmuse kaugusele mõlemal küljel (= 28-30-32-34-36 silmust silmusemärkijate vahel). Nüüd koo töö paremal pool järgmiselt: PIKOOÄÄRIS PAREMAL KÜLJEL, siis RIPSKOES - vaata ülevalt, järgmised 68-72-76-80-84 silmust, koo PIKOOÄÄRIS VASAKUL KÜLJEL järgmised 4 silmust. JÄLGI KOETIHEDUST! Jätka ripskoes, tehes pikooäärise 4 silmusel mõlemal küljel, SAMAL AJAL koo LÜHENDATUD RIDU - vaata ülevalt. Kui töö pikkus on umbes 36-41-46-51-56 cm (mõõtes lühemast kohast), koo silmused maha. VIIMISTLUS Murra boolero pooleks – vaata joonist. Õmble alumised 6-6-7-7-8 cm kokku mõlemal küljel (= 12-13-13-14-14 cm on käeauk). |
|
 |
|
Kas oled teinud seda mustrit?Lisa oma piltidele viide #dropspattern #berrykissvest või saada link projektile meie #dropsfan galeriisse. Vajad abi selle mustriga?Garnstudio.com kodulehel on 18 õppevideot, küsimuste/vastuste osa ja muudki. © 1982-2026 DROPS Design A/S. Kõik õigused kaitstud. See dokument, ning selle alajaotused on kaitsud autoriõigustega. Loe rohkem, mida meie mustritega võib teha, iga mustrilehe alt meie kodulehel. |
|


Tegeledes üle 40 aasta kudumise ja heegeldamise disainidega, pakub DROPS Design ühte suurimat tasuta mustrite kollektsiooni internetis - tõlgituna 17 keelde. Tänaseks on meil 324 kataloogi ja 12290 mustrit - millest 9431 on tõlgitud Eesti keelde.
Me anname endast parima, et tuua teieni kõike mida kudumine ja heegeldamine võib pakkuda - inspiratsiooni, nõuandeid ning ka kvaliteetseid lõngu parima hinnaga! Soovid kasutada mustreid muukski, kui ainult oma tarbeks? Loe infot meie Copyright osas iga lehekülje all. Rõõmsat loomist!
Jäta kommentaar mustrile DROPS Children 28-7
Ootame kommentaare selle mustri kohta!
Kui soovid midagi küsida, siis kiiremaks vastuse saamiseks veendu, et valid õige kategooria alloleval formil. Vajaliku väljad *.