
Populaarsed kategooriad
Otsid lõnga?


Kommentaarid / Küsimused (54)
![]() Ada kirjutas:
Ada kirjutas:
Goedemiddag, ben de poncho in maat M/L aan het maken. Nu bij de 3e herhaling t/m toer 7 en ben 67 cm hoog (dus bijna bij de 71 cm). Zag dat je in ieder geval bij een toer met stokjes moet stoppen. 2 vragen: 1. Ik neem aan dat dit ook halverwege het patroon kan? 2. Maakt het nog uit of dit dan toer 12 of 13 is? Alvast bedankt voor de reactie. Groet, Ada
21.03.2020 - 14:41DROPS Design vastas:
Dag Ada,
Ja hoor, dit kan halverwege het patroon en toer 12 of 13 maakt ook niet uit want het zijn beide toeren met stokjes.
22.03.2020 - 16:53
![]() Cathie kirjutas:
Cathie kirjutas:
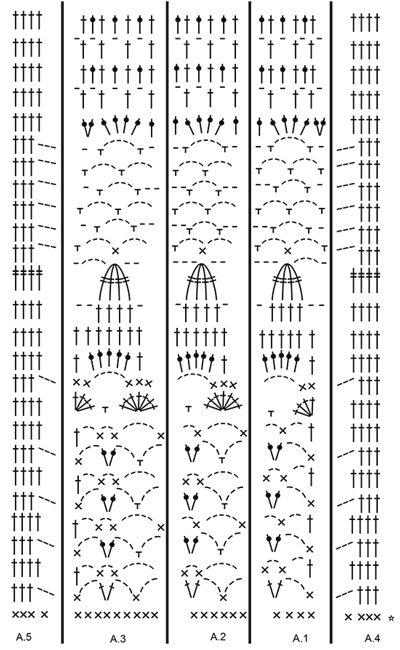
I have been crocheting for 50 years. I do not know how to read a diagram. I only use written instructions. However, I have no clue what you are talking about after the 2nd row. What is A.4 over the next 4 stitches, etc? What is the A. ? Help please. I am so lost!
08.03.2020 - 03:40DROPS Design vastas:
Dear Cathie, it is well worth the time and effort to figure out how to read pattern diagrams, because they not only tell you what to do at the very next step, but also show you how the stitches AND the rows relate to each other. In this case pattern A.4 shows you the trebles stitches at the right of the diagram. HERE you can find a lesson on how to read crochet diagrams, and do not forget, that you can always ask for help (in person or over teh phone) for help in the store where you bought your DROPS yarn from. Happy Crafting!
08.03.2020 - 22:56
![]() Imelda Parra Suarez kirjutas:
Imelda Parra Suarez kirjutas:
Quisiera elaborar el poncho con patron de calados en Paris pero no entiendo las abreviasiones que colocan me gustaría algo más claro o una fotografia donde se observe claramente las puntadas. Muchas gracias por su atención quedo atenta.
14.11.2019 - 21:03DROPS Design vastas:
Hola Imelda. No disponemos de más fotos que las que están publicadas de este modelo. Tienes bajo el patrón varios vídeos explicativos y el diccionario de abreviaturas está en este link https://www.garnstudio.com/dictionary.php?lang=es
17.11.2019 - 19:34
![]() Phoebe Musa kirjutas:
Phoebe Musa kirjutas:
Kindly give us the pattern in writing, diagrams are kind of confusing
15.10.2019 - 10:15DROPS Design vastas:
Dear Mrs Musa, when there are only diagrams in a pattern, such as this one for example, you will find help with crochet diagrams here. Happy crocheting!
15.10.2019 - 10:25
![]() Birgitta kirjutas:
Birgitta kirjutas:
Hej. Jag skulle vilja veta bredden på "halsduken". Mvh Birgitta
26.08.2019 - 11:08DROPS Design vastas:
Hej. Du hittar alla mått i de olika storlekarna på måttskissen längst ner på mönstret. Lycka till!
27.08.2019 - 08:15
![]() SAROJ kirjutas:
SAROJ kirjutas:
Hi there Is there any way I can get this pattern fully written out, I get extremely confused reading a diagram. Please assist.
23.07.2019 - 11:20DROPS Design vastas:
Dear Mrs Saroj, there are only diagrams to this pattern but you will find here how to read crochet diagrams, should you need any further assistance reading diagrams, feel free to contact your DROPS store even per mail or telephone. Happy crocheting!
06.08.2019 - 09:45
![]() Carrie kirjutas:
Carrie kirjutas:
Hello again! I’m just about to finish the first part of the diagram. When starting the diagram again, to get the length, do I start with the rows of single crochets at the very bottom, or do I start with the second row of 3 dc, chain 3 on top of the top most row of dc? Thank you! I think I’m going to like diagrams much better than the US way of writing every line out! :)
14.06.2019 - 02:57DROPS Design vastas:
Dear Carrie, when repeating the diagrams in height, start from 2nd row in diagram, ie skip the single crochets row from the very bottom. Happy crocheting!
14.06.2019 - 07:27
![]() Carrie kirjutas:
Carrie kirjutas:
I have gotten up to the 4th row above the row of single crochets and have torn it out 3 times. Where does the 4th DC in stitch go? The first of the chain 3 below? I am assuming that this row goes from A4-A5. I can’t tell where single crochets go between A1 and A2. Do they go into each of the DC around chain below? The diagram looks like one DC in the first DC around and the second in the first of chain 3. That just doesn’t seem right. Thank you, Carrie
11.06.2019 - 02:20DROPS Design vastas:
Dear Carrie, on row 3 (5, 7..) in A.4/A.5 the 4th dc (in A.4) and the first dc (in A.5) will be worked in the first chain (A.4)/last chain (= next to the dc) in A.5. So that there are either 3 or 4 dc in A.4/A.5. Happy crocheting!
11.06.2019 - 12:32
![]() Hedi kirjutas:
Hedi kirjutas:
Ich möchte wissen wie ich dieses teil zusammen nähe
02.05.2019 - 21:49DROPS Design vastas:
Liebe Hedi, dieses Video zeigt wie man einen gestrickten Poncho zusammennäht - beim gehäkelten wird es die gleiche Technik. Viel Spaß beim häkeln!
03.05.2019 - 09:00
![]() Gemma kirjutas:
Gemma kirjutas:
Leuk patroon. Om de juiste hoogte, 84 cm voor maat XXL, te krijgen, veronderstel ik dat ik na de gegeven toeren ik weer ergens aan het begin van de tekening werder moet haken. Klopt dat? Bij welke toer moet ik dan weer verder haken? Alvast bedankt voor jullie antwoord.
20.04.2019 - 21:50DROPS Design vastas:
Dag Gemma,
Je kan inderdaad, nadat je A.x 1 keer in de hoogte hebt gebreid, gewoon weer opnieuw beginnen onderaan, dus bij de eerste toer na de toer met het sterretje.
21.04.2019 - 16:51
|
|||||||||||||||||||||||||||||||
Sky Love#skyloveponcho |
|||||||||||||||||||||||||||||||
 |
 |
||||||||||||||||||||||||||||||
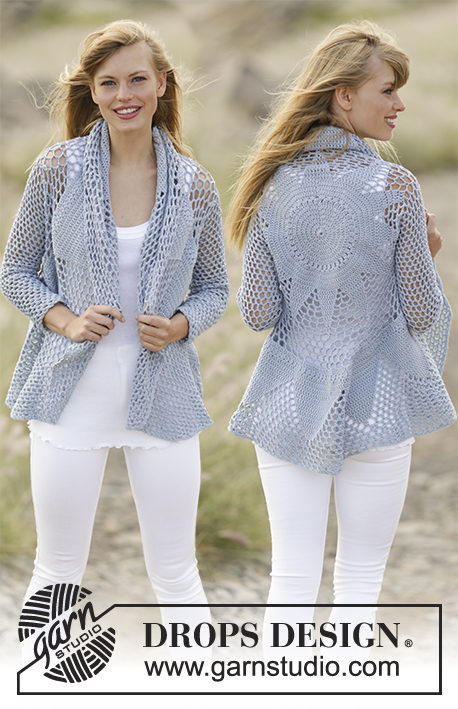
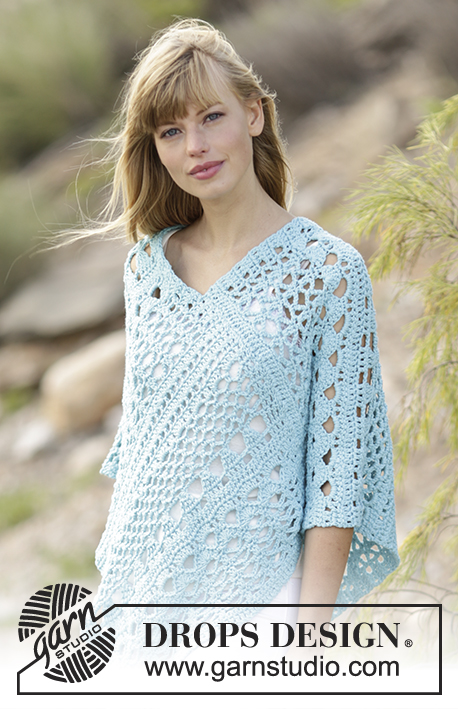
DROPS Paris lõngast heegeldatud pitsmustriga pontšo suurustele S kuni XXXL
DROPS 168-13 |
|||||||||||||||||||||||||||||||
|
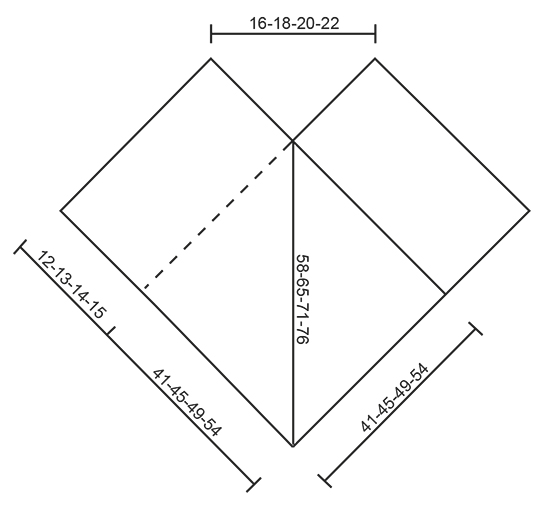
HEEGELDAMISE INFO Asenda esimene kinnissilmus (ks) rea alguses 1 ahelsilmusega. Asenda esimene ühekordne sammas (sm) rea alguses 3 ahelsilmusega. Asenda esimene kahekordne sammas (2xsm) rea alguses 4 ahelsilmusega MUSTER Vaata skeeme A.1 kuni A.5. ---------------------------------- PONTŠO Töö heegeldatakse kahes osas, pärast õmmeldakse kokku. Heegelda 77-85-93-101 ahels 5 mm heegelnõelaga ja Paris lõngaga. Tee 1 ühekordne sammas (sm) neljandasse ahels-sse heegelnõelast (= 2 sm), 1 sm järgmisesse ahels-sse, * jäta vahele 1 ahels, tee 1 sm igasse järgmisesse 3 ahels-sse *, korda * kuni* ülejäänud real = 57-63-69-75 sammast. Tee 1 ks igasse sm-sse (töö PH pool) - LOE HEEGELDAMISE INFOT = 57-63-69-75 ks. Siis heegelda nii: skeem A.4 esimese 4 ks kohale, skeemi A.1 järgmise 4 ks kohale, skeemi A.2 järgmisesse 36-42-48-54 ks-sse (= 6-7-8-9 korda laiuses), skeemi A.3 järgmisesse 9 ks-sse, lõpus tee A.5 viimasel 4 kinnissilmusel. Jätka niimoodi mustriga. JÄLGI HEEGELDAMISE TUGEVUST! Heegelda, kuni töö pikkus on 65-71-77-84 cm, lõpeta sammaste reaga skeemil, katkesta ja kinnita lõng. Heegelda teine pool samamoodi. VIIMISTLUS Paiguta esimese osa mahakudumise rida vastu teise osa parema poole pikemat serva - loomise rea poolt 41-46-50-54 cm ülespoole – ära venita serva, (vaata pilti). Õmble kaks osa kokku väikeste pistetega. Siis õmble teise osa mahakudumise serv kokku esimese osa parema küljega samamoodi. |
|||||||||||||||||||||||||||||||
Skeemi seletused |
|||||||||||||||||||||||||||||||
|
|||||||||||||||||||||||||||||||
 |
|||||||||||||||||||||||||||||||
 |
|||||||||||||||||||||||||||||||
Kas oled teinud seda mustrit?Lisa oma piltidele viide #dropspattern #skyloveponcho või saada link projektile meie #dropsfan galeriisse. Vajad abi selle mustriga?Garnstudio.com kodulehel on 8 õppevideot, küsimuste/vastuste osa ja muudki. © 1982-2026 DROPS Design A/S. Kõik õigused kaitstud. See dokument, ning selle alajaotused on kaitsud autoriõigustega. Loe rohkem, mida meie mustritega võib teha, iga mustrilehe alt meie kodulehel. |
|||||||||||||||||||||||||||||||


Tegeledes üle 40 aasta kudumise ja heegeldamise disainidega, pakub DROPS Design ühte suurimat tasuta mustrite kollektsiooni internetis - tõlgituna 17 keelde. Tänaseks on meil 324 kataloogi ja 12290 mustrit - millest 9431 on tõlgitud Eesti keelde.
Me anname endast parima, et tuua teieni kõike mida kudumine ja heegeldamine võib pakkuda - inspiratsiooni, nõuandeid ning ka kvaliteetseid lõngu parima hinnaga! Soovid kasutada mustreid muukski, kui ainult oma tarbeks? Loe infot meie Copyright osas iga lehekülje all. Rõõmsat loomist!
Jäta kommentaar mustrile DROPS 168-13
Ootame kommentaare selle mustri kohta!
Kui soovid midagi küsida, siis kiiremaks vastuse saamiseks veendu, et valid õige kategooria alloleval formil. Vajaliku väljad *.