
Populaarsed kategooriad
Otsid lõnga?


Kommentaarid / Küsimused (173)
![]() Coosje Schol kirjutas:
Coosje Schol kirjutas:
Of is het meteen 11steken en een omslag aan beide kanten? Dus meteen het telpatroon? Alvast bedankt , Groetjes Coosje
14.07.2016 - 18:51DROPS Design vastas:
Hoi Coosje. Je breit de raglanmeerdering als volgt: begin 3 st voor elke A.2 aan elke kant en brei als volgt: 1 omsl, 1 r, 1 omsl, 2 r (markeerder staat in midden tussen deze st), A.2 (= 11 st = 1 omslag, 11 r, 1 omslag = dus volgende nld heb je hier 13 st), 2 r (markeerder staat in midden tussen deze st), 1 omsl, 1 r, 1 omsl.
15.07.2016 - 16:15
![]() Coosje Schol kirjutas:
Coosje Schol kirjutas:
Prachtig patroon, alleen begrijp ik de eerste toer waarbij je de markeerders plaatst niet helemaal. Als ik het volgens de beschrijving doe kom ik op 8 meerderingen uit maar bij de beschrijving van de raglan begin je met 12?
14.07.2016 - 17:41DROPS Design vastas:
Hoi Coosje. Ja, maar je meerdert meer op de voorpanden dan op de mouwen = 4 st op elke pand en 2 op elke mouw.
15.07.2016 - 16:13
![]() EVEN kirjutas:
EVEN kirjutas:
Merci de ne plus tenir compte de mon message du 09/07, en poursuivant mon tricot j'ai résolu mon problème.
11.07.2016 - 14:29
![]() EVEN kirjutas:
EVEN kirjutas:
Bonjour, encore moi, les diminutions du diagramme 3 sont inversées par rapport a celui du 2, ça commence par un jeté puis une maille glissée, est-ce que j'aurai la même continuité de dessin qu'au début de ma manche? D'autre part me conseillez vous de finir ma manche en diagramme 2 ne Serait-ce pas plus logique?Merci encore bon week-end
09.07.2016 - 11:10DROPS Design vastas:
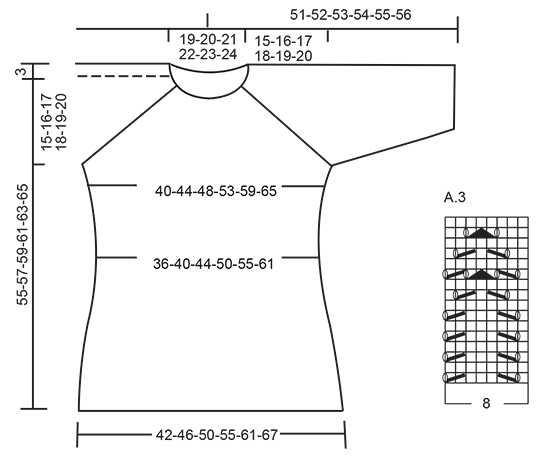
Bonjour Mme Even, il vous faut effectivement commencer A.3 en fonction de là où vous avez arrêté A.2 pour que le motif se suive à la transition empiècement/manche. A.3 est le même motif que A.2 mais sans les augmentations du raglan, ajustez simplement pour commencer A.3 sur le nbe de m indiqué pour votre taille tout en continuant le motif des manches de l'empiècement. Bon tricot!
11.07.2016 - 09:03
![]() EVEN kirjutas:
EVEN kirjutas:
Bonjour, les 8 Mailles reprise sous les manches doivent elles être tricotées en jersey ou Continuer les jours, diagramme 3 qui correspond aux nombres de mailles. Merci
08.07.2016 - 14:57DROPS Design vastas:
Bonjour Mme Even, en fonction de la taille, les 8 m sous la manche vont se tricoter soit en jersey, soit en point fantaisie (A.2), c'est-à-dire que l'on a, à partir du milieu sous la manche: 6-7-1-2-4-6 m jersey, A.3 et on termine par 7-8-2-3-5-7 m jersey. Soit 13-15-3-5-9-13 m jersey au milieu sous la manche, les autres mailles se tricotent en A.3. Bon tricot!
08.07.2016 - 15:07
![]() Toetie kirjutas:
Toetie kirjutas:
Ik heb dit truitje een maand geleden gemaakt en ben er enorm blij mee. Muscat is zalig om te breien, gemakkelijk om te wassen en het model is erg leuk om te dragen. Groetjes .
07.07.2016 - 22:09
![]() Hanna kirjutas:
Hanna kirjutas:
Hei! Ohjeessa on selitetty sanallisesti A2-kuvion ensimmäinen kerros. Lisääntyykö silmukoiden lukumäärä 8:lla vai 12:lla? Minä en saanut lisättyä kuin 8s ja raglan lisäys-ohjeessa sanotaan, että pitäisi lisätä 12s. Onko A2:n ensimmäisellä rivillä siis vain 11 oikeaa silmukkaa, vai pitääkö mallikuvion molemmin puolin tehdä langankierrot? Näin saisin silmukkamäärän täsmäämään. Kiitoksia avusta!!! Ihana malli :)
27.06.2016 - 10:14DROPS Design vastas:
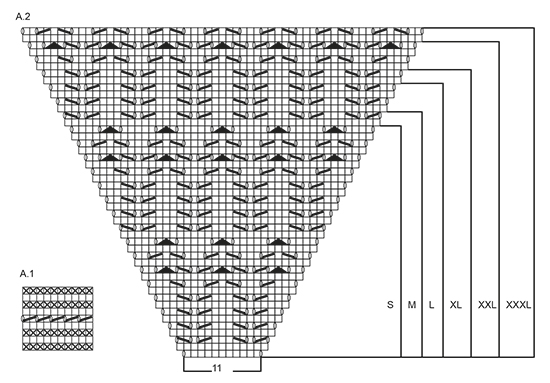
Hei! Ohjeessa selitetään vain etu- ja takakappaleen raglanlisäykset. Lisäksi kumpaankin hihaan lisätään 2 s, eli juuri nämä 2 langankiertoa, joita näet piirroksen reunoissa. Kaikki hihojen lisäykset on merkitty piirrokseen.
29.06.2016 - 17:02
![]() Aud Berge kirjutas:
Aud Berge kirjutas:
Har strikket første omg.etter A1. Skal da neste omg strikkes rett.alle masker. Syns det var mye uklart i denneoppskriften
23.06.2016 - 20:05DROPS Design vastas:
Hei Aud. Der staar i opskriften: "Videre strikkes det slik – fra midt bak: Strikk 17-18-19-20-21-22 m rett, 1 kast, 1 m rett, 1 kast, 2 m rett (sett en merketråd mellom disse m), A.2 (= 11 m), 2 m rett (sett en merketråd mellom disse m), 1 kast, 1 m rett, 1 kast, 34-36-38-40-42-44 m rett, 1 kast, 1 m rett, 1 kast, 2 m rett (sett en merketråd mellom disse m), A.2, 2 m rett (sett en merketråd mellom disse m), 1 kast, 1 m rett, 1 kast, 17-18-19-20-21-22 m rett. Fortsett dette mønsteret, og øk til RAGLAN som forklart over..." Du kan se hvordan du strikker diagrammene i symbolforklaringen nederst. Og husk naar du strikker rett rundt som her = glatstrikk
24.06.2016 - 10:42
![]() Humbert kirjutas:
Humbert kirjutas:
Bonjour, Explications raglan compliquées. À chaque rang pair, tous les jetés sont tricotés à l'endroit quand on augmente pas les 4m dos et devant ou faut il faire avec torse Merci d'avance
08.06.2016 - 16:39DROPS Design vastas:
Bonjour Mme Humbert, quand on augmente 4 m pour le dos et le devant, on tricote ainsi: 1 jeté (à tricoter torse au tour suivant), 1 m end, 1 jeté (à tricoter à l'end au tour suivant = jour), 2 m end (le marqueur est entre ces m), A.2, 2 m end (marqueur), 1 jeté (à tricoter à l'end au tour suivant = jour), 1 m end, 1 jeté (= à tricoter torse au tour suivant). c'est-à-dire que les jetés les plus près des marqueurs vont se tricoter à l'endroit pour former des jours, les 2 autres se tricoteront torse à l'end pour éviter les trous. Pour les manches, on tricote les jetés à l'end = jours. Bon tricot!
08.06.2016 - 18:52
![]() Mariolina Motta kirjutas:
Mariolina Motta kirjutas:
Buongiorno, sono arrivata alle maniche, ma non riesco a capire come fare: una volta riprese le 8 maglie sotto la manica e rimesse sul ferro le maniche già lavorate, da dove comincio a lavorare? Io sto lavorando la taglia L e quindi dovrei cominciare a lavorare una maglia dritta (dopo ilsegnapunti?) e poi A3, ma così A3 comincia 3maglie prima di A2 (manicha già lavorata) e non è quindi dove comincia A2 (come è scritto nelle spiegazioni)... Non riesco proprio a capire....
04.06.2016 - 13:09DROPS Design vastas:
Buongiorno Mariolina. Posiziona il segnapunti al centro delle 8 m riprese e inizia il giro dalla m dopo il segnapunti. Lavora 1 m dir e poi inizia il diagramma A3. Deve sovrapporre il diagramma A3 con il diagramma A2 iniziando il diagramma A3 da dove ha finito il diag A2, in modo che il motivo prosegua correttamente in verticale. Buon lavoro!
04.06.2016 - 14:18
|
|||||||||||||||||||
Sea Nymph#seanymphsweater |
|||||||||||||||||||
 |
 |
||||||||||||||||||
DROPS Muskat lõngast ülevalt alla kootud, pitsmustriga ja kolmveerand raglaanvarrukatega džemper suurustele S kuni XXXL
DROPS 168-1 |
|||||||||||||||||||
|
RIPSKUDE (ringselt kududes) Koo 1 ring parempidi, 1 ring pahempidi, korda neid kahte ringi. 1 ripsivall = 2 ringi ripskoes. MUSTER Vaata skeeme A.1 kuni A.3. Vaata suurusele vastavat skeemi. RAGLAAN Kasvata igal teisel ringil nii: kasvata 4 s seljaosal, 4 s esiosal ja 2 s mõlemal varrukal (= 12 s kasvatatud, varrukakasvatused on mustri sees) – alusta 3 s enne skeemi A.2 ja koo järgmiselt: tee 1 õs, 1 pr 1 õs, 2 pr (SM on nende silmuste vahel), skeemi A.2, 2 pr (SM on nende silmuste vahel), 1 õs, 1 pr, 1 õs. Koo järgmisel ringil õhksilmused SM-i kõrval pr, et tekiks auk; koo järgmised õhksilmused keerdsilmustena, et ei tekiks auku. Kasvata niimoodi 12 s veel 0-2-3-7-10-14 korda (= kokku 1-3-4-8-11-15 korda, esimesed kasvatatused on kirjeldatud juhendis allpool). Siis kasvata igal teisel ringil nii: kasvata 2 s seljaosal, 2 s esiosal ja 2 s mõlemal varrukal (= 8 s kasvatatud, varrukakasvatused on mustri sees) – alusta 2 s enne skeemi A.2 ja koo järgmiselt: tee 1 õs, 2 pr (SM on nende silmuste vahel), skeemi A.2, 2 pr (SM on nende silmuste vahel), 1 õs. Koo õs järgmisel real nagu tavaline pr silmus, et tekiks auk. Kasvata niimoodi 8 s kokku 16-15-16-13-12-9 korda. --------------------------------- DŽEMPER Kootakse ringselt ülevalt alla. PASSE Loo 4 mm ringvarrastele 87-91-95-99-103-107 silmust Muskat lõngaga. Koo 1 ring pr, siis koo skeemi A.1, viimasel ringil skeemi A.1 kasvata 15 s ühtlaste vahedega = 102-106-110-114-118-122 s. Siis koo nii, alustades seljaosa keskelt: koo 17-18-19-20-21-22 pr, 1 õs, 1 pr, 1 õs, 2 pr (paigalda SM nende silmuste vahele), skeemi A.2 (= 11 s), 2 pr (paigalda SM nende silmuste vahele), 1 õs, 1 pr, 1 õs, koo 34-36-38-40-42-44 pr, 1 õs, 1 pr, 1 õs, 2 pr (paigalda SM nende silmuste vahele), skeemi A.2, 2 pr (paigalda SM nende silmuste vahele), 1 õs, 1 pr, 1 õs, 17-18-19-20-21-22 pr. Jätka niimoodi mustriga ja kasvata raglaani jaoks - vaata ülevalt, esimesed kasvatused on nüüd tehtud. JÄLGI KOETIHEDUST! Kui skeem A.2 on tehtud vertikaalselt (kõrguses) - lõpeta suurusele sobival real, on ringil 242-262-286-314-346-374 s. Kasvatused on nüüd tehtud. Järgmine ring: koo 38-42-46-52-58-64 s (= pool seljaosa), tõsta järgmised 45-47-51-53-57-59 s silmustehoidjale (= varrukas), loo 8 uut silmust varruka alla, koo järgmised 76-84-92-104-116-128 s (= esiosa), tõsta järgmised 45-47-51-53-57-59 s silmustehoidjale (= varrukas), loo 8 uut silmust varruka alla, koo järgmised 38-42-46-52-58-64 s (= pool seljaosa). KEHAOSA Kehaosal on 168-184-200-224-248-272 s. Jätka parempidises koes. Paigalda SM mõlemale küljele, loodud 8 silmuse keskele. EDASI MÕÕDA SIIT! Kui töö on 4 cm pikkune, kahanda 1 s mõlemal pool mõlemat SM-i (= 4 s kahandatud) iga 4-4-4-5-5-5 cm järel veel 3 korda = 152-168-184-208-232-256 s. Kui töö pikkus on 22-23-24-25-26-27 cm, kasvata 1 s mõlemal pool mõlemat SM-i mõlemal küljel (= 4 s kasvatatud), korda kasvatamist iga 2 cm järel veel 5 korda = 176-192-208-232-256-280 s. Kui töö pikkus on 36-37-38-39-40-41 cm, koo 4 ringi ripskoes kõigil silmustel. Koo silmused maha 1 pr/1 ph (et äär ei lainetaks), töö pikkus on u. 55-57-59-61-63-65 cm loomise reast. VARRUKAS Kootakse ringselt. Tõsta varruka silmused silmustehoidjalt 4 mm varrastele, korja lisaks 1 s igast käeaugu 8 loodud silmusest = 53-55-59-61-65-67 s. Paigalda SM ringi algusesse = varruka alune keskkoht. EDASI MÕÕDA SIIT! Edasi koo järgmiselt: koo 6-7-1-2-4-5 s parempidises koes, skeemi A.3 järgmise 40-40-56-56-56-56 s kohale (alusta skeemi A.3 kus A.2 lõpeb vastavalt suurusele), 7-8-2-3-5-6 s parempidises koes. Kui töö kõrgus on 4 cm, kahanda 1 s mõlemal pool SM-i. Koo silmused, mis ei lähe mustrisse parempidises koes, jälgi, et kahanduste ja kasvatuste arv klapib. Korda kahandamist iga 7-7-5-5-3-3 cm veel 2-2-3-3-4-4 korda = 47-49-51-53-55-57 s. Kui töö pikkus on 24-23-23-22-22-21 cm, koo skeemi A.1 kõigil silmustel ja siis koo silmused maha. Tee teine varrukas samamoodi. |
|||||||||||||||||||
Skeemi seletused |
|||||||||||||||||||
|
|||||||||||||||||||
 |
|||||||||||||||||||
 |
|||||||||||||||||||
Kas oled teinud seda mustrit?Lisa oma piltidele viide #dropspattern #seanymphsweater või saada link projektile meie #dropsfan galeriisse. Vajad abi selle mustriga?Garnstudio.com kodulehel on 25 õppevideot, küsimuste/vastuste osa ja muudki. © 1982-2026 DROPS Design A/S. Kõik õigused kaitstud. See dokument, ning selle alajaotused on kaitsud autoriõigustega. Loe rohkem, mida meie mustritega võib teha, iga mustrilehe alt meie kodulehel. |
|||||||||||||||||||


Tegeledes üle 40 aasta kudumise ja heegeldamise disainidega, pakub DROPS Design ühte suurimat tasuta mustrite kollektsiooni internetis - tõlgituna 17 keelde. Tänaseks on meil 324 kataloogi ja 12290 mustrit - millest 9431 on tõlgitud Eesti keelde.
Me anname endast parima, et tuua teieni kõike mida kudumine ja heegeldamine võib pakkuda - inspiratsiooni, nõuandeid ning ka kvaliteetseid lõngu parima hinnaga! Soovid kasutada mustreid muukski, kui ainult oma tarbeks? Loe infot meie Copyright osas iga lehekülje all. Rõõmsat loomist!
Jäta kommentaar mustrile DROPS 168-1
Ootame kommentaare selle mustri kohta!
Kui soovid midagi küsida, siis kiiremaks vastuse saamiseks veendu, et valid õige kategooria alloleval formil. Vajaliku väljad *.