
Populaarsed kategooriad
Otsid lõnga?


Kommentaarid / Küsimused (38)
![]() Hana Mikulandová kirjutas:
Hana Mikulandová kirjutas:
Dobrý den,chtěla bych se zeptat kolik řetízkových ok mám udělat na velikost 0/1 měsíců?
01.02.2016 - 13:09DROPS Design vastas:
Dobrý den, čepeček začínáme pro všechny velikosti stejně, tj. 4 řo. U nejmenší velikosti 0/1 měsíc končíme s rozšiřováním po dokončení 8. kruhové řady (= 48 KS), pak postupujeme podle popisu v odstavci VŠECHNY VELIKOSTI. Hodně zdaru! Hana
01.02.2016 - 18:23
![]() Bianca kirjutas:
Bianca kirjutas:
Super tolle Anleitung, die Mütze gehört bei mir zu einem Taufkleid
30.01.2016 - 13:54
![]() Willow kirjutas:
Willow kirjutas:
Please disregard my earlier posts as I have already figured them out! Now, in the Fan Edge sec. do I start at the corner where at bottom of Eyelet sec. or 5 rows in to exclude the Eyelet sec.? With the eyelet sec. it is 72 stitches w/o it is 62. Either way, do I need to adjust my stitches for R1? 72 is a multiple of 3 with no room for first sc. 62 is multiple of 3 with 2 left over, should I just do sc in beginning and end. Please help.
07.12.2015 - 05:17DROPS Design vastas:
Dear Willow, the fan edge is worked along last row on hat, ie 62 sts in 1st size, inc 2 sts evenly on 1st row to get 64 sts: work then a total of 21 times (sc, ch3, skip 2 sts) (= 21 ch-loops) and finish with 1 sc in last st. Happy crocheting!
07.12.2015 - 11:40
![]() Willow kirjutas:
Willow kirjutas:
Please clarify the 5+1 under the eyelet section. I am just beginning the the eyelet section and I have 10, 6, and 10 (26). If I add 2dc in each dc, I will have 36 stitches. My stitches aren't working out on the "Work next row as follows: ch 1, 1 sc in each of the first 2 sc, * skip 2 sc, ch 2, 1 sc in each of the next 3 sc *, repeat from *-* until 4 sts remain, skip 2 sc, ch 2 and work 1 sc in each of the last 2 sc." Please help.
04.12.2015 - 04:40DROPS Design vastas:
Dear Willow, see below how to crochet this row over 36 sc. Happy crocheting!
04.12.2015 - 09:18
![]() Willow kirjutas:
Willow kirjutas:
I am beginning the Eyelet Tie section. I have 10 stitches on my short sides and 6 stitches in middle, a total of 26. If I do 2 dc in each dc I will have total of 36. This is divisible by 5, 7 times with 1 stitch remaining. But at "ch 1, 1 sc in each of the first 2 sc, * skip 2 sc, ch 2, 1 sc in each of the next 3 sc *, repeat from *-* until 4 sts remain, skip 2 sc, ch 2 and work 1 sc in each of the last 2 sc." , it won't work with 36 stitches. Where am I messing up?
04.12.2015 - 04:27DROPS Design vastas:
Dear Willow, work as follows over 36 sc: 2 sc (over 2 sc), repeat a total of 6 times: *skip 2 sc, ch 2, 1 sc in each of the next 3 sc* (= you work over 5 sc a total of 6 times = 30 sc from previous row), finish with skip 2 sc, ch2 and 1 sc in each of the last 2 sc (4 sc at the end of row), so that you have worked over 2+30+4=36 sc from previous row. Happy crocheting!
04.12.2015 - 09:17
![]() Willow kirjutas:
Willow kirjutas:
Please clarify "do not work over sc in 6 btwn two markers". Thank you!!
19.11.2015 - 17:02DROPS Design vastas:
Dear Willow, these 6 sts are between both markers on mid back: 1st marker = beg of round, 1nd marker is inserted after the 6th st from beg of round seen from RS. Happy crocheting!
20.11.2015 - 09:47
![]() Willow kirjutas:
Willow kirjutas:
Thank you so much for getting back to me quickly. I almost put a marker after every 6 stitches. It says to dc in every sc but round 8 was dc so I'm confused where sc are. What does "increase at the same time mean". Where are am I increasing 20? If round 8 is all dc then do I just crochet 2 dc in each of the first 6 stitches? That would only be an increase of 6. What do I do in the remaining 42 stitches? And how do I get 60? That would be an increase of 12....
19.11.2015 - 16:57DROPS Design vastas:
Dear Willow, on round 8 you worked 1 sc in every dc (=48 sc). Then place 2 markers from RS: 1st one at beg of round and 2nd one after 6 sts. Starting from WS from marker at beg of round work 1 dc in each of the next 42 st (48 sts from previous row less 6 sts unworked) to 2nd marker (= you leave 6 sts unworked at mid back), at the same time inc 20 sts evenly to get 62 dc at the end of this row between both markers - see here how to inc evenly. Happy crocheting!
20.11.2015 - 09:45
![]() Willow kirjutas:
Willow kirjutas:
I am stuck. I finished round 8. I have 48 stitches. I don't understand what to do next? Under All sizes, what does this section mean? Beg from WS at marker at beg of round and work 1 dc in every sc until second marker AT THE SAME TIME inc 20-26-20-28 (20-22) dc evenly over these sts – READ INCREASE TIP = 62-68-74-80 (84-86) dc on row (do not work over the 6-6-6-8 (8-8) sc between the 2 markers).
19.11.2015 - 06:23DROPS Design vastas:
Dear Willow, after you have 48 sts (1st size), go to "All sizes" and insert 2 markers: 1 at the beg of round and 1 after 6 sts. Then work as stated, and follow instructions for 1st size (= 1st of the numbers). Happy crocheting!
19.11.2015 - 10:11
![]() AUJOGUE kirjutas:
AUJOGUE kirjutas:
Bonjour, a la seconde étape du bonnet j'ai du mal a comprendre certaines phrases, pourriez vous m'expliquer s'il vous plait. "1 autre marqueur après 6-6-6-8 (8-8) m (vu sur l'endroit)." Que veulent dire les 8-8 entre parenthèse et cette phrase non plus "augmenter 20-26-20-28 (20-22) B à intervalles réguliers" en vous remerciant sincerement
12.10.2015 - 19:20DROPS Design vastas:
Bonjour Mme Aujogue, ce bonnet existe en 6 tailles: du 0/1 mois au 12/18 mois avant la parenthèse et les 2 plus grandes tailles: 2 et 3/4 ans dans la parenthèse. Chaque chiffre/nombre se réfère à la taille dans l'ordre indiqué. Voir ici comment répartir des augmentations. Bon crochet!
13.10.2015 - 09:34
![]() Louise Tremblay kirjutas:
Louise Tremblay kirjutas:
Bonjour; je ne comprends pas du tout quoi faire avec l'arrière du bonnet; avez-vous une photo pour voir comment faire? Merci.
20.08.2015 - 17:25DROPS Design vastas:
Bonjour Mme Tremblay, le fond du bonnet est un simple rond fait de ms et de brides: on commence par un rond de 12 B, puis 12 ms, puis on augmente tous les 2 tours: 24 B, puis 24 ms, puis 36 B, 36 ms et ainsi de suite jusqu'à la taille souhaitée. Bon crochet!
20.08.2015 - 18:24
|
||||||||||
Camille#camillebonnet |
||||||||||
|
|
||||||||||
DROPS BabyAlpaca Silk lõngast heegeldatud beebi müts ristimiseks suurustele 0 - 4 aastat
DROPS Baby 25-14 |
||||||||||
|
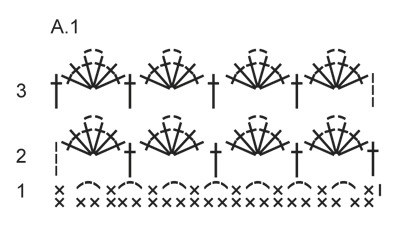
HEEGELDAMISE INFO Asenda iga ringi/rea esimene kinnissilmus (ks) 1 ahels-ga. Lõpeta ring 1 aassilmusega ahelsilmusess ringi algul. Lõpeta rida 1 ks-ga kolmandasse ahelsilmusesse eelmise rea algul. Asenda iga ringi/rea esimene ühekordne sammas (sm) 3 ahels-ga. Lõpeta ring 1 aassilmusega kolmandsse ahelsilmusesse ringi algul. Lõpeta rida 1 aassilmusega ahelsilmusesse eelmise rea algul. TEKSTUURNE RIDA * 1 rida kinnissilmuseid töö PH pool, 1 rida sambaid töö PP pool *, korda * kuni * (1 rida ks + 1 rida sm = 1 tekstuurne rida). KASVATAMISE NIPP Kasvata 1 ks/sm, tehes 2 ks/sm samasse silmusesse. MUSTER Vaata skeemi A.1. ---------------------------- MÜTS Müts heegeldatakse ringselt, alustades tagant keskelt ja siis edasi-tagasi üle pea. Heegelda 4 ahels 3,5 mm heegelnõelaga roosa lõngaga ja ühenda ringiks, tehes 1 aass esimesse ahels-sse. 1. RING: LOE HEEGELDAMISE INFOT! Tee 12 sm ahels-ringi. 2. RING: tee 1 ks igasse sm-sse = 12 ks. 3. RING: tee 2 sm igasse ks-sse = 24 sm. 4. RING: tee 1 ks igasse sm-sse = 24 ks. 5. RING: * tee 1 sm esimesse ks-sse, 2 sm järgmisesse ks-sse *, korda * kuni * tervel ringil = 36 sm. 6. RING: tee 1 ks igasse sm-sse = 36 ks. 7. RING: * tee 1 sm igasse esimesse 2 ks-sse, 2 sm järgmisesse ks-sse *, korda * kuni * tervel ringil = 48 sm. 8. RING: tee 1 ks igasse sm-sse = 48 ks. Lõpeta siin SUURUSTEL 0/1 + 1/3 kuud. 9. RING: * tee 1 sm igasse esimesse 3 ks-sse, 2 sm järgmisesse ks-sse *, korda * kuni * tervel ringil = 60 sm. 10. RING: tee 1 ks igasse sm-sse = 60 ks. Lõpeta siin SUURUSTEL 6/9 + 12/18 kuud. 11. RING: * tee 1 sm igasse esimesse 4 ks-sse, 2 sm järgmisesse ks-sse *, korda * kuni * tervel ringil = 72 sm. 12. RING: tee 1 ks igasse sm-sse = 72 ks. Lõpeta siin SUURUSTEL 2 + 3/4 aastat. KÕIK SUURUSED: Paigalda 1 silmusemärkija (SM) ringi algusesse ja 1 SM pärast 6-6-6-8 (8-8) s (vaadates töö PP). Alusta töö paremalt poolt SM-i juurest ringi alguses ja tee 1 sm igasse ks-sse, kuni teise SM-ni, SAMAL AJAL kasvata 20-26-20-28 (20-22) sm ühtlaste vahedega neil silmustel – loe kasvatamise nippi = 62-68-74-80 (84-86) sm real (ära kasvata 6-6-6-8 (8-8) ks kohal kahe silmusemärkija vahel). Siis heegelda tekstuurseid ridu edasi-tagasi – vaata ülevalt, kuni töö pikkus on u. 8-9-10-11 (12-13) cm silmusemärkijast – lõpeta pärast kinnissilmuste rida töö PH pool. Katkesta lõng. AUGURIDA Heegelda mütsi alläärde roosa lõngaga ääris järgmiselt: alusta töö PP poolt ja tee kinnissilmuseid mööda mütsi alumist lühemat serva (tee 1 ks igasse ks-ritta ja 2-3 ks igasse sm-ritta), siis heegelda 1 ks igasse 6-6-6-8 (8-8) ks-sse kahe SM vahel ringil ja tee kinnissilmuseid mööda teist lühemat serva allääres (1 ks igasse ks-ritta ja 2-3 ks igasse sm-ritta). Pööra tööd ja tee veel 1 rida kinnissilmuseid, SAMAL AJAL kohanda silmuste arvu nii, et nende arv jaguks 5-ga + 1. Heegelda järgmine rida nii: 1 ahels, 1 ks igasse järgmisesse 2 ks-sse, * jäta vahele 2 ks, 2 ahels, 1 ks igasse järgmisesse 3 ks-sse *, korda * kuni *, kuni jääb 4 s, jäta vahele 2 ks, tee 2 ahels ja 1 ks igasse viimasesse 2 ks-sse. Heegelda 2 rida kinnissilmuseid edasi-tagasi (1 ks igasse ks-sse ja 2 ks igasse ahels-kaarde). Katkesta lõng. PAELAD Lõika 4 lõngajuppi valgest lõngast pikkusega 2,5 meetrit. Keeruta lõngad kokku kuni suudad, murra pooleks ja lase keerduda. Tee sõlmed otstesse. Punu pael läbi augurea. LEHVIKUTEGA ÄÄRIS Võta valge lõng ja tee 1 rida kinnissilmuseid töö PH pool mütsi esiserva, SAMAL AJAL kasvata silmuste arv kuni 64-70-76-82 (88-94) ks – loe kasvatamise nippi. Siis heegelda lehvikumustrit skeemi A.1 järgi, st. heegelda nii: 1. RIDA (= töö PP): 1 ahels, 1 ks esimesse ks-sse, * 3 ahels, jäta vahele 2 s, 1 ks järgmisesse silmusesse *, korda * kuni * tervel real = 21-23-25-27 (29-31) ahels-kaart, pööra. 2. RIDA (= töö PH): 3 ahels (= 1 sm), 3 sm + 2 ahels + 3 sm esimesse ahels-kaarde, * 1 sm järgmisesse ahels-kaarde, 3 sm + 2 ahels + 3 sm järgmisesse ahels-kaarde *, korda * kuni * tervel real ja lõpetuseks tee 1 sm esimesse ks-sse eelmise rea algul = 11-12-13-14 (15-16) sm-gruppi ja 1 sm iga grupi vahel, pööra tööd. 3. RIDA (= töö PP): 3 ahels (= 1 sm), 3 sm + 2 ahels + 3 sm ahels-kaarde esimeses grupis, * 1 sm järgmisesse sm-sse, 3 sm + 2 ahels + 3 sm ahels-kaarde järgmises grupis *, korda * kuni * tervel real ja lõpetuseks tee 1 sm esimesse ks-sse eelmise rea algul = 11-12-13-14 (15-16) sm-gruppi ja 1 sm iga grupi vahel, pööra tööd. |
||||||||||
Skeemi seletused |
||||||||||
|
||||||||||
 |
||||||||||
Kas oled teinud seda mustrit?Lisa oma piltidele viide #dropspattern #camillebonnet või saada link projektile meie #dropsfan galeriisse. Vajad abi selle mustriga?Garnstudio.com kodulehel on 10 õppevideot, küsimuste/vastuste osa ja muudki. © 1982-2026 DROPS Design A/S. Kõik õigused kaitstud. See dokument, ning selle alajaotused on kaitsud autoriõigustega. Loe rohkem, mida meie mustritega võib teha, iga mustrilehe alt meie kodulehel. |
||||||||||


Tegeledes üle 40 aasta kudumise ja heegeldamise disainidega, pakub DROPS Design ühte suurimat tasuta mustrite kollektsiooni internetis - tõlgituna 17 keelde. Tänaseks on meil 324 kataloogi ja 12290 mustrit - millest 9431 on tõlgitud Eesti keelde.
Me anname endast parima, et tuua teieni kõike mida kudumine ja heegeldamine võib pakkuda - inspiratsiooni, nõuandeid ning ka kvaliteetseid lõngu parima hinnaga! Soovid kasutada mustreid muukski, kui ainult oma tarbeks? Loe infot meie Copyright osas iga lehekülje all. Rõõmsat loomist!
Jäta kommentaar mustrile DROPS Baby 25-14
Ootame kommentaare selle mustri kohta!
Kui soovid midagi küsida, siis kiiremaks vastuse saamiseks veendu, et valid õige kategooria alloleval formil. Vajaliku väljad *.