
Populaarsed kategooriad
Otsid lõnga?


Kommentaarid / Küsimused (112)
![]() Deni kirjutas:
Deni kirjutas:
My question was how to work work increases and maintain double moss stitch
06.01.2021 - 09:07DROPS Design vastas:
Hi Deni, you will add 2 stitches in one side, so just adjust them accordingly, to maintain double moss stitch. Happy knitting!
06.01.2021 - 09:19
![]() Deni kirjutas:
Deni kirjutas:
I'm knitting size xl and is at 16 cm.can you tell me how to proceed with increasing.how to work yarn over through back loop in the next round (when to make purl when to make knit twisted)
06.01.2021 - 08:24
![]() Stephanie kirjutas:
Stephanie kirjutas:
I am not sure if I am working the side of the collar that I think I am...when being assembled, does the long side or the short side of the collar get sewn to the body of the sweater?
12.11.2020 - 00:17DROPS Design vastas:
Hi Stephanie, You will sew the shorter side of the collar to the yoke. Happy knitting!
12.11.2020 - 08:23
![]() Myriam Wittler kirjutas:
Myriam Wittler kirjutas:
Ich habe ein Männerpullover der Größe 48 stricken wollen und entsprechend die Anleitung mit anfänglichen 51cm verfolgt. Meine Umrechnung der Maschenprobe ergab dass für eine 10x10 cm. 17,25 M. notwendig waren. Diese Maschenprobe wurde \"fälschlicherweise\" glatt rechts gestrickt. Denn nun ist der gestrickte Pullover, da es ein sehr dehnbarer Muster hat, nicht 51 cm an der Basis sondern nur 48 cm. Dadurch dass es sehr dehnbar ist, kann ich auch 51 cm messen, aber wird es nicht zu eng?
15.10.2020 - 11:00DROPS Design vastas:
Liebe Frau Wittler, bei dieser Anleitung wird die Maschenprobe in der Breite gleich glatt rechts gestrickt und mit Doppeltem Perlmuster, dh nach Bündchen haben Sie in die 4. Größe 216 Maschen/2 Teilen = 108 M - mit 21 M = 10 cm sind diese 108 M ca 51 cm. Viel Spaß beim stricken!
15.10.2020 - 12:08
![]() Stephanie kirjutas:
Stephanie kirjutas:
What is the ease of the measurements? Is it positive or negative?
26.06.2020 - 22:08DROPS Design vastas:
Dear Stephanie, measure a similar garment you/he likes and compare the measurements to those in the chart to find out the best matching size - read more about sizing here. Happy knitting!
29.06.2020 - 07:30
![]() Toty kirjutas:
Toty kirjutas:
Cuando hago los dos aumentos a cada lado de los MP, al hacer el punto retorcido en ambas hebras igual me queda el espacio. No se cómo hacer ese par de aumentos sin que me quede ese espacio.
24.05.2020 - 02:56
![]() Kristina kirjutas:
Kristina kirjutas:
Denne oppskriften oppgir ikke riktig garnmengde. Jeg har vært sparsom med den lysegrå fargen og strikket stripene litt kortere enn anvist, likevel har jeg ikke nok til å gjøre ferdig den siste armen. Strikkefastheten stemmer så dette er en feil i mønsteret og utrolig kjedelig å oppdage mot slutten av prosjektet. Det er ikke lett å få tak i drops garn i butikk så da må jeg vel bestille et enkelt nøste og 3 ganger nøstes verdi i porto en gang til...
15.12.2019 - 12:48
![]() Rosa kirjutas:
Rosa kirjutas:
Buenas noches, me he quedado bloqueada en la parte de las sisas, no entiendo como y cuantos se menguan , me gustarían me aclarasen la explicación , gracias
06.11.2019 - 21:49DROPS Design vastas:
Hola Rosa. Para las sisas cerrar 3 puntos a cada lado de la espalda , después cerrar cada 2ª fila 2 puntos 0-1-2-4-6-8 veces ( el número de veces depende de la talla trabajada , es decir para la talla S no se cierran 2 puntos, para la talla M cerrar 2 puntos 1 vez, para la talla L - 2 veces etc.) . Después cerramos 1 pt 1-2-3-4-5-6 veces de la misma manera.
10.11.2019 - 17:29
![]() Isaline kirjutas:
Isaline kirjutas:
Bonjour, je ne comprends pas bien les mesures du diagramme. J'ai mesuré un bras de la personne pour qui je veux faire ce modèle, qui est un homme assez costaud et de taille moyenne. De l'épaule au poignet, son bras mesure 54 cm. Hors sur le diagramme, dans les mesures épaule-poignet, ça commence à 65 cm... Il y a quelque chose de pas logique il me semble... Merci !
15.08.2019 - 03:17DROPS Design vastas:
Bonjour Isaline, pour trouver la taille idéale, mesurez un pull similaire qui lui va et qu'il aime, vous pourrez ensuite ajuster si besoin les différentes longueurs. Votre magasin DROPS pourra volontiers vous assister, même par mail ou téléphone. Bon tricot!
15.08.2019 - 10:24
![]() Kathy kirjutas:
Kathy kirjutas:
Hola, necesito ayuda con el aumento que hay que hacer en el cuerpo. Entiendo que el la primera fila hago un aumento al principio y después de marcar ciertos números, pero en la segunda fila no entiendo bien a donde debo de hacer el aumento. Y luego dice terminar los aumentos dividir la pieza en los MP para continuar por separado.Gracias por su ayuda.
01.07.2019 - 16:12DROPS Design vastas:
Hola Kathy. Son los aumentos en los lados. Primero marcamos los lados con los marcapuntos (según la talla). Aumentamos (trabajando una lazada) a cada lado del marcapuntos. En total, se aumentan 4 puntos en la vuelta. los marcapuntos suben con la labor y los siguientes aumentos se trabajan de la misma manera (= 1 lazada a cada lado del marcapuntos) = 4 puntos aumentados en la vuelta en total.
10.07.2019 - 23:45
|
|
Limestone#limestonesweater |
|
 |
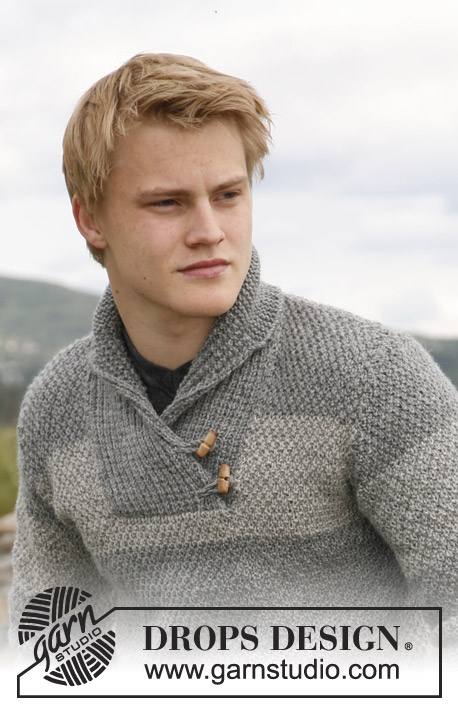 |
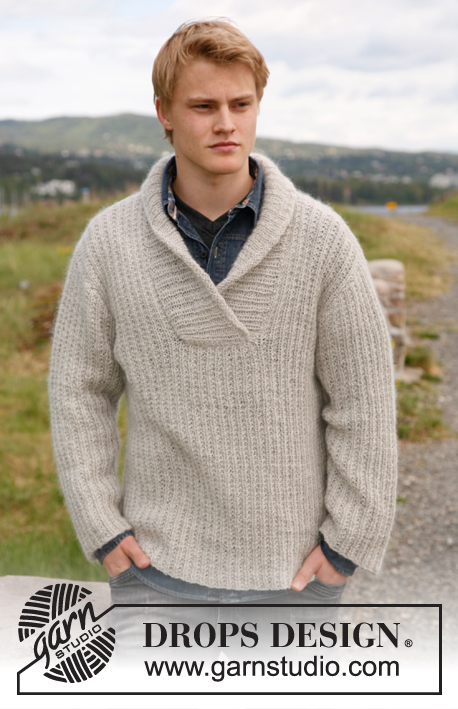
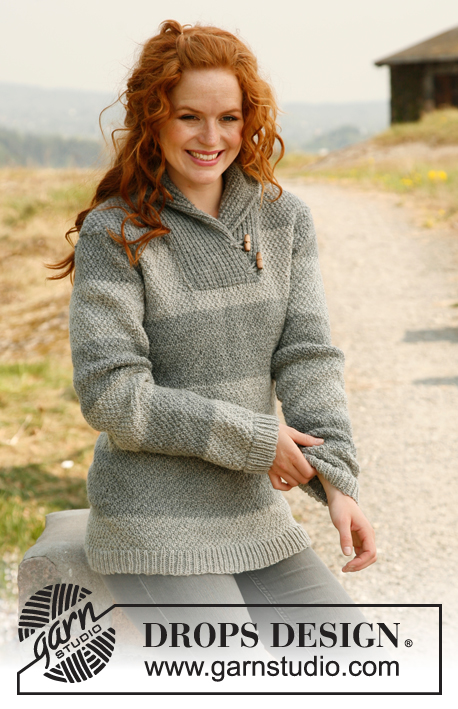
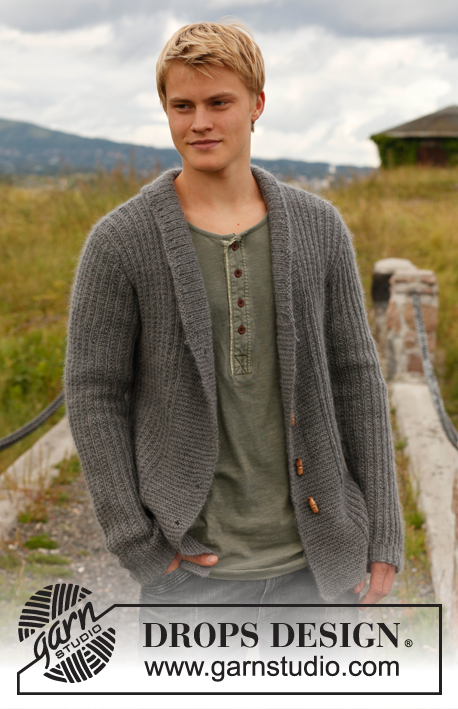
DROPS Karisma või DROPS Merino Extra Fine lõngast kootud sallkraega, tiipudega ja pärlkoes meeste dzemper suurustele S - XXXL
DROPS 135-1 |
|
|
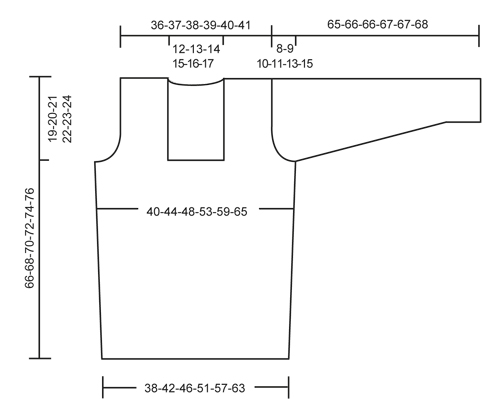
TOPELT PÄRLKUDE 1. RING: * 1 pr, 1 ph *, korda *-*. 2. RING: koo pr parempidi ja ph silmus pahempidi. 3. RING: * 1 ph, 1 pr *, korda *-*. 4. RING: koo parempidi pr silmuse kohale ja pahempidi ph silmuse kohale. Korda ringe 1-4. TRIIBUD Koo kordamööda halli ja helehalliga iga 11-11-11,5-12-12-12,5 cm järel. NB! Mööda esimest triipu alates loomisreast. Koo viimast triipu halli lõngaga kehaosal ja varrukal kuni valmismõõtudeni. KASVATAMISE NIPP Kasvata 1 silmus, tehes 1 õs, järgmisel ringil koo õs keerdsilmusena (st. koo läbi silmuse tagumise aasa), et ei tekiks auku. MUSTER 1. RIDA (= töö PP): koo kõik silmused parempidi. 2. RIDA (= töö VP): * 1 pr, 1 ph *, korda *-*. Korda 1. ja 2. rida. RIPSKUDE (edasi-tagasi kududes): koo kõik read parempidi. -------------------------- KEHAOSA Kootakse ringselt ringvarrastega. Loo üles 3,5 mm varrastele 213-234-255-288-318-351 silmust helehalli lõngaga. Koo soonikut 1 pr/ 2 ph. Kui töö pikkus on 4 cm, koo 1 ring parempidi, SAMAL AJAL kahanda 53-58-63-72-78-87 s ühtlaste vahedega (kahanda kududes u. iga 3. ja 4. silmus kokku) = 160-176-192-216-240-264 s. Võta 4 mm ringvardad ja jätka ringselt topeltpärlkoes ja triipudega - vaata ülevalt. JÄLGI KOETIHEDUST! Kui töö pikkus on 15-15-16-16-17-17 cm, paigalda 2 silmusemärkijat (SM), 1 ringi algusesse ja teine pärast 80-88-96-108-120-132 s (küljed). Järgmisel ringil kasvata 1 s mõlemal pool mõlemat SM-i - loe kasvatamise nippi = 4 uut silmust ringil. NB! Koo uued silmused topeltpärlkoes. Korda kasvatamist, kui töö pikkus on 30-30-32-32-34-34 cm = 168-184-200-224-248-272 s. Kui töö pikkus on 47-48-49-50-51-52 cm, jaga töö SM-de juurest kaheks ja lõpeta osad eraldi. SELJAOSA = 84-92-100-112-124-136 s (1. rida = töö PP). Jätka triipudega ja topeltpärlkoes, SAMAL AJAL koo maha käeaukude jaoks mõlemal küljel igal teisel real järgmiselt: koo maha 3 s kokku 1 korda, 2 s kokku 0-1-2-4-6-8 korda ja 1 s kokku 1-2-3-4-5-6 korda = 76-78-80-82-84-86 s. Kui on kootud 64-66-68-70-72-74 cm, koo maha keskmised 24-26-28-30-32-34 s kaelaaugu jaoks ja lõpeta mõlemad õlad eraldi. Nüüd kahanda 1 s järgmisel real kaela poolt (kahanda kududes 2 kaelapoolset silmust kokku) = 25 s jääb õlale kõigil suurustel. Koo silmused maha, kui töö on 66-68-70-72-74-76 cm pikkune. ESIOSA = 84-92-100-112-124-136 s. Jätka triipudega ja topeltpärlkoes. Alusta käeaukude tegemist nagu seljaosal (1.rida = töö PP) - SAMAL AJAL tõsta esiosa keskmised 26-28-30-32-34-36 s silmusehoidjale kaelaaugu jaoks ja lõpeta õlad eraldi. Kui kõik kahandamised on tehtud, jääb õlale 25 s. Jätka triipudega ja topeltpärlkoes. Koo silmused maha, kui töö on 66-68-70-72-74-76 cm pikkune. VARRUKAS Kootakse ringselt sukavarrastega. Loo üles 63-66-69-72-75-78 s 3,5 mm sukavarrastele helehalli lõngaga. Koo soonikut järgmiselt: * 1 pr, 2 ph *, korda * kuni *. Kui töö pikkus on 4 cm, koo 1 ring parempidi, SAMAL AJAL kahanda 15-16-17-18-19-20 s ühtlaste vahedega (kahanda kududes u. iga 3. ja 4. silmus kokku) = 48-50-52-54-56-58 s. Võta 4 mm sukavardad, paigalda SM ringi algusesse. Jätka ringselt triipudega ja topeltpärlkoes. Kui töö kõrgus on 8-8-7-7-7-6 cm, kasvata 1 s mõlemal pool mõlemat SM-i = 2 uut silmust. Korda kasvatamist iga 5-4,5-3,5-3-2,5-2,5 cm järel kokku 10-11-13-15-17-18 korda = 68-72-78-84-90-94 s. Kui töö pikkus on 57-57-56-56-54-53 cm (lühem mõõt suurematel suurustel, kuna õlg on laiem ja õlakaar pikem), koo maha 6 s varruka sisekülje keskel (3 s mõlemal pool SM-i). Edasi koo edasi-tagasi ringvarrastega. Koo maha varrukaarel mõlemal küljel igal teisel real järgmiselt: 2 s 2-2-3-3-5-5 korda ja siis 1 s 3-4-4-5-5-6 korda. Siis koo maha 2 s mõlemal küljel kuni varruka pikkus on 64-65-65-66-66-67 cm, siis koo maha 3 s 1 kord mõlemal küljel. Siis koo kõik silmused lõdvalt maha. Töö pikkus on u. 65-66-66-67-67-68 cm. ÜHENDAMINE Õmble õlaõmblused. Ühenda külge varrukad. PAREM KRAEPOOL Kootakse edasi-tagasi 4 mm ringvarratega halli lõngaga. Koo silmused vardale silmusehoidjalt esiosa keskel (aga jäta silmused alles ka silmusehoidjale) = 26-28-30-32-34-36 s, koo 1 rida pahempidi töö VP. Edasi koo mustri järgi töö PP - vaata ülevalt. Kui krae pikkus on 19-20-21-22-23-24 cm (viimane rida = 2. rida mustris = töö VP), paigalda SM rea lõppu (vaadatuna töö PP). Jätka ripskoes kuni valmismõõtudeni, SAMAL AJAL koo lühendatud ridu järgmiselt: * koo 2 rida kõigil silmustel, koo 2 rida välimisel 20 silmusel *, korda *-* kuni töö pikus on 8-9-9-10-10-11 cm SM-st (lühemal küljel). Koo silmused maha. VASAK KRAEPOOL Koo vardale silmused silmusehoidjalt parema kraeosa tagant (töö PP) = vasak kraepool jääb parema krae alla. Koo nagu paremat kraepoolt, aga peegelpildis (koo lühendatud ridu 20 esiserva silmusel). ÜHENDAMINE Õmble parem kraeosa parema hõlma külge ja vasak vasaku külge, mööda ääresilmuseid. Õmble krae tagant kokku ja kinnita kaelakaarele. NÖÖR Tee 1 kinnitusnööri järgmiselt: lõika 2 40 cm pikkust halli lõngajuppi ja muura need kokku. Tee teine kinnitusnöör samamoodi. Kinnita nöörid u. 4 ja 11 cm kaugusele parema kraeosa alläärest (u. 1 cm esiservast). Tõmba lõngaotsad läbi krae ja kinnita tagaküljel. Õmble nööbid vasakule kraepoolele u. 2 ja 4 cm kaugusele vasaku hõlma õmblusest. |
|
 |
|
Kas oled teinud seda mustrit?Lisa oma piltidele viide #dropspattern #limestonesweater või saada link projektile meie #dropsfan galeriisse. Vajad abi selle mustriga?Garnstudio.com kodulehel on 17 õppevideot, küsimuste/vastuste osa ja muudki. © 1982-2026 DROPS Design A/S. Kõik õigused kaitstud. See dokument, ning selle alajaotused on kaitsud autoriõigustega. Loe rohkem, mida meie mustritega võib teha, iga mustrilehe alt meie kodulehel. |
|


Tegeledes üle 40 aasta kudumise ja heegeldamise disainidega, pakub DROPS Design ühte suurimat tasuta mustrite kollektsiooni internetis - tõlgituna 17 keelde. Tänaseks on meil 325 kataloogi ja 12298 mustrit - millest 9442 on tõlgitud Eesti keelde.
Me anname endast parima, et tuua teieni kõike mida kudumine ja heegeldamine võib pakkuda - inspiratsiooni, nõuandeid ning ka kvaliteetseid lõngu parima hinnaga! Soovid kasutada mustreid muukski, kui ainult oma tarbeks? Loe infot meie Copyright osas iga lehekülje all. Rõõmsat loomist!
Jäta kommentaar mustrile DROPS 135-1
Ootame kommentaare selle mustri kohta!
Kui soovid midagi küsida, siis kiiremaks vastuse saamiseks veendu, et valid õige kategooria alloleval formil. Vajaliku väljad *.