
Populaarsed kategooriad
Otsid lõnga?


Kommentaarid / Küsimused (80)
![]() DROPS Design kirjutas:
DROPS Design kirjutas:
R2 : K1, *place yarn in front of work, slip next st as if to P, K tog yo + sl st from previous row (the yarn will wrap the right needle = yo)*, end with placing yarn in front of work, sl 1 as if to P, K1. R3: K1, *K tog yo + sl st from previous row, place yarn in front of work, slip next st as if to P (yarn will wrap the right needle)*, end with K tog yo and sl st, K1. Happy knitting!
10.01.2013 - 10:58
![]() DROPS Design kirjutas:
DROPS Design kirjutas:
This is how to work English ribs with yarn in the right hand and yos : R1 : K1, *K1, place yarn in front work, slip next st as if to P* (the yarn will wrap the right needle and you'll get the yo), end with K2. (set up row)
10.01.2013 - 10:58Renée kirjutas:
I checked the video before I sent my first question to you & it's very confusing. Furthermore, it is not English/Fisherman's rib that's being knitted in the video. As previously stated, no k1b (knit 1 into stitch below) is being performed in the video, so I do not see how this is English/Fisherman's rib. Also, I knit in the English not continental style, so your videos can be hard to follow for English style knitters. Also, I do not see the function of the YO in English/Fisherman's rib?
10.01.2013 - 10:07DROPS Design vastas:
Dear Renée, English ribs can be worked different ways, either with K1b, or with yos. We use that method with yos, and I'll explain you row after row in the comments. Hope it will help you ! Happy knitting !
10.01.2013 - 10:54Renée kirjutas:
This pattern states English/Fisherman's rib. These are 2 different types of knitting that use p1, k1 and k1b stitches in different alternating formats. This pattern does not resemble either of these and does not use the classic k1b stitch which forms both English and Fisherman's rib. Can you please explain what type of stitch you are advocating here and why it does not include the k1b stitch? Thank you!
09.01.2013 - 16:52DROPS Design vastas:
Dear Renée, there is a video linked at the very bottom of the pattern explaining how to work this kind of English rib. It should help you to figure out how to work this pattern. Happy Knitting !
09.01.2013 - 17:50Renée kirjutas:
On row 1 of the pattern it states: 1 garter stitch. I am assuming this mean to do 1 knit stitch, as garter stitch is not an actual type of stitch but a type of knitting composed of only knit stitches. Your patterns though quite creative and beautiful are unfortunately very vague and often quite poorly translated into English and consequentially often difficult to follow. Therefore, clarification would be greatly appreciated. Thank you.
09.01.2013 - 16:21DROPS Design vastas:
Dear Renée, 1 garter st means actually K1 from RS and from WS. Please have a look on the video linked if it can help. Happy knitting !
09.01.2013 - 17:42
![]() Caro-H kirjutas:
Caro-H kirjutas:
P.S.: Das Patentmuster kommt wunderbar fluffig raus, ist nur insgesamt zu eng. Werde es mit ein paar Maschen mehr versuchen.
04.01.2013 - 13:29
![]() Caro-H kirjutas:
Caro-H kirjutas:
...nein, nicht rundgestrickt. Anschlag auf 2 Nadeln Nr. 3. Keine Ahnung warum das bei mir nicht richtig rauskommt. Aber danke für deine Mühe.
04.01.2013 - 13:00
![]() Marion kirjutas:
Marion kirjutas:
Caro,hast du das doch rundgestrickt? Da würde das Muster nicht fluffig rauskommen u.nicht stimmen. Habs eben ausprobiert---Anschlag auf 2 Nadeln?
03.01.2013 - 13:48
![]() Caro-H kirjutas:
Caro-H kirjutas:
Danke Marion! Bei mir hat das Bündchen - ungedehnt - leider nur 30cm und der Patentteil ca. 46cm. Werde ich wohl noch mal aufmachen müssen, sitzt sehr stramm. Ich versteh trotzdem nicht, warum die Maschenprobe bei mir ok war...
03.01.2013 - 12:25
![]() Caro-H kirjutas:
Caro-H kirjutas:
Danke für die rasche Info, dann werde ich erst mal weitermachen, obwohl ein Rest Skepsis bleibt, optisch und rechnerisch: Bei 21M=10cm lande ich mit 95M nur bei 45cm und in der Anleitung für das Modell Nr. U-605 (das ich mir zunächst ausgesucht hatte) schlägt man immerhin bei gleicher Maschenprobe 117-129M an. Ziehen sich die Muster so verschieden in die Breite?
02.01.2013 - 19:14DROPS Design vastas:
Liebe Caro, da haben Sie natürlich recht! Dennoch dehnt sich das Patentmuster enorm und die Maschenprobe wird ungedehnt gemessen. Ich habe diese Mütze selbst schon nachgearbeitet und sie sitzt sehr gut – das Bündchen liegt an und der obere Teil hat Volumen durch das Patentmuster.
03.01.2013 - 10:35
|
|
Cathrine#cathrinehat |
|
|
|
|
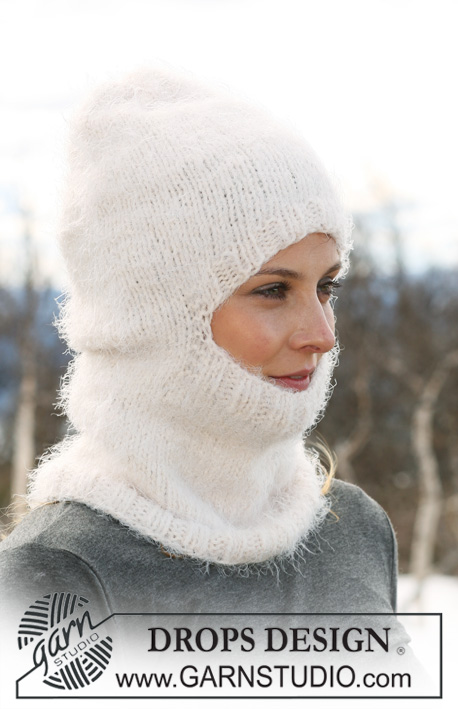
Kootud DROPSi patentkoes triibuline müts lõngast ”Karisma” või "Garnstudio DROPS ♥ You #3".
DROPS 114-30 |
|
|
RIPSKUDE (edasi-tagasi kududes): koo kõik read parempidi. PATENTKUDE (edasi-tagasi kududes): 1. RIDA (= PP): 1 ripskoes silmus, * 1 pr, 1 õs, tõsta 1 silmus kudumata pahempidise võttega üle, korda * kuni *, kuni kududa jääb 2 silmust, koo 1 pr ja 1 ripskoes. 2. RIDA (= VP): 1 silmus ripskoes, *1 õs, tõsta 1 silmus kudumata pahempidise võttega üle, koo pr kokku õs ja üle tõstetud silmus *, korda * kuni *, kuni kududa jääb 2 silmust: 1 õs, tõsta 1 silmus kudumata pahempidise võttega üle, 1 ripskoes silmus. 3. RIDA (= PP): 1 silmus ripskoes, * koo pr kokku õs ja üle tõstetud silmus, 1 õs, tõsta 1 silmus kudumata pahempidise võttega üle, korda * kuni *, kuni kududa jääb 3 silmust, koo pr kokku õs ja üle tõstetud silmus, 1 ripskoes silmus. Korda 2. ja 3. rida. --------------------------- MÜTS Kootakse edasi-tagasi. Loo üles 89-95 silmust 3 mm ringvardale beežikirju lõngaga. Koo 1 rida pahempidi, töö VP ja edasi koo järgmiselt, töö PP: koo 1 silmus ripskoes – vaata ülevalt, soonikut 1 pr/1 ph, kuni jääb kududa 2 silmust, lõpetuseks koo 1 pr ja 1 silmus ripskoes. Kui sooniku kõrgus on 3 cm, vaheta värv naturaalvalge värvi vastu. Kui sooniku kõrgus on 6 cm (säti nii, et viimane rida oleks töö VP), vaheta beežikirju värvi ja 4 mm ringvarraste vastu. Järgmisest reast, töö PP, koo patentkoes – vaata ülevalt! SAMAL AJAL vaheta lõnga värvi iga 3 cm järel, kuni töö lõpuni (säti nii, et viimane rida ühe värviga on töö VP). JÄLGI KOETIHEDUST! Kui töö kõrgus on 24 cm (pärast 1 värvi triipu), vaheta värvi, SAMAL AJAL koo soonikut 1 pr/1 ph ja mõlema serva 1 silmus koo ripskoes. Koo soonikut 3 cm. Nüüd koo 1 rida parempidises koes sama värviga, SAMAL AJAL koo 2 pr kokku tervel real. Töö kõrgus on umbes 28 cm. Katkesta lõng, tõmba läbi ällesjäänud silmustest ja õmble müts serv servaga kokku. |
|
Kas oled teinud seda mustrit?Lisa oma piltidele viide #dropspattern #cathrinehat või saada link projektile meie #dropsfan galeriisse. Vajad abi selle mustriga?Garnstudio.com kodulehel on 11 õppevideot, küsimuste/vastuste osa ja muudki. © 1982-2026 DROPS Design A/S. Kõik õigused kaitstud. See dokument, ning selle alajaotused on kaitsud autoriõigustega. Loe rohkem, mida meie mustritega võib teha, iga mustrilehe alt meie kodulehel. |


Tegeledes üle 40 aasta kudumise ja heegeldamise disainidega, pakub DROPS Design ühte suurimat tasuta mustrite kollektsiooni internetis - tõlgituna 17 keelde. Tänaseks on meil 324 kataloogi ja 12290 mustrit - millest 9431 on tõlgitud Eesti keelde.
Me anname endast parima, et tuua teieni kõike mida kudumine ja heegeldamine võib pakkuda - inspiratsiooni, nõuandeid ning ka kvaliteetseid lõngu parima hinnaga! Soovid kasutada mustreid muukski, kui ainult oma tarbeks? Loe infot meie Copyright osas iga lehekülje all. Rõõmsat loomist!
Jäta kommentaar mustrile DROPS 114-30
Ootame kommentaare selle mustri kohta!
Kui soovid midagi küsida, siis kiiremaks vastuse saamiseks veendu, et valid õige kategooria alloleval formil. Vajaliku väljad *.