
Categorias populares
Procura um fio?


Comentários / Perguntas (92)
![]() Linda escreveu:
Linda escreveu:
Det står i oppskriften at en skal strikke to riller over et vist antall masker på midten, men når en skal strikke forstykke og bakstykke for seg selv, skal en fortsette med de rillene på midten?
18.12.2025 - 21:34DROPS Design respondeu:
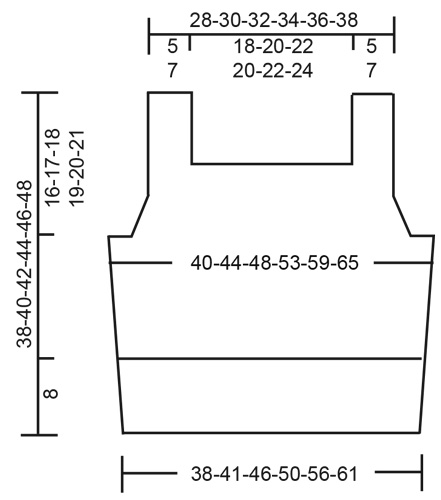
Hei Linda. Det strikkes 2 riller over de midterste maskene i hver side (under ermene), om du ser på bildet (der modellen løfter armen), ser du rillene. mvh DROPS Design
22.12.2025 - 09:38
![]() Audrey escreveu:
Audrey escreveu:
Where does the pattern indicate the finished size measurements? I read they are at the bottom of the pattern but I do not see them there.
20.11.2025 - 08:16DROPS Design respondeu:
Dear Audrey, you will find all finished measurements for each size in the chart at the bottom of the page; read more about chart, measurements and sizes here. Happy knitting!
20.11.2025 - 10:27
![]() Annika escreveu:
Annika escreveu:
Fin!
24.06.2025 - 13:12
![]() Libby escreveu:
Libby escreveu:
I’m currently knitting the straps and the only length stated is for the entire piece - do you have a suggested strap length by itself? I feel like if the rest of the front piece varied from the pattern then I can no longer judge when to stop the straps (especially when only knitting one side first)
26.05.2025 - 12:41DROPS Design respondeu:
Dear Libby, we only have here the total length of piece, so that you can measure from where you stopped towards the measurement for your size to get the height of the strap. You can also count for your size the number of rows required for decreasing + the 3 cm ribbing - remove this from the total length to get the approximate length for straps. Happy knitting!
26.05.2025 - 14:26
![]() Hanna escreveu:
Hanna escreveu:
Hi I just have a question about the back part of the piece. If I am decreasing every 4th row, and decreasing the same amount as in the front, won't the back piece be twice as long? Is that supposed to be the case? This does not appear to be the case in the diagram, so I am a little confused.
22.05.2025 - 12:57DROPS Design respondeu:
Dear Hanna, correct, back piece will be higher than front piece as you will decrease the same number of times than on front piece but on every 4th row instead of on every 2nd row. Happy knitting!
22.05.2025 - 15:49
![]() Luna escreveu:
Luna escreveu:
So, when I start working back and forth. Should I have 4 sts (for the garter stitch edge) then SKPO, knit til the last 6 sts where 4 sts is for the garter stitch and then K2tog? Is this the correct way to decrease? Or should it be K2tog then the last 4 sts for the garter edge.
18.05.2025 - 20:47DROPS Design respondeu:
Hi Luna, The 4 garter stitches are the first 4 stitches and the last 4 stitches on each row. You decrease as you say, after the first 4 stitches at the beginning of the row, then before the last 4 stitches at the end of the row. Regards, Drops Team.
19.05.2025 - 06:57
![]() Luna escreveu:
Luna escreveu:
Please explain when do I start to cast off. So, I have a marker for both sides. Should I start to cast off after each marker? I have one marker as from BOR and the other which marks the side.
18.05.2025 - 20:04DROPS Design respondeu:
Dear Luna, you mean for armholes? From the beginning of the row cast off the first 3, 5, 8 or 10 sts (see size), work the next stitches as stated until 3,5,8 or 10 sts remain before next marker then cast off the next 6,10,16 or 20 sts, work until 3,5,8or 10 sts remain before end of the round and cast off these stitches, cut the yarn and pull it through the last stitch. Now work the 62-90 sts on front piece back and forth (back piece will be worked afterwards). Happy knitting!
19.05.2025 - 08:44
![]() Anna Eriksson escreveu:
Anna Eriksson escreveu:
Jag har svårt att förstå vilken storlek jag ska sticka. Brukar vara s och ibland m, hur räknar jag ut lättast vilken storlek jag ska sticka? Är det bystmåttet som avses i diagrammet (där jag antar att halva måttet står)?
06.05.2025 - 06:46DROPS Design respondeu:
Hei Anna. Se på målene som er oppgitt på målskissen til toppen, finn frem en topp du allerede har og liker passformen på og sammenlign med målene i målskissen med din topp for å finne den størrelsen du ønsker å strikke etter. Målene 40-44-48-53-59-65 er brystmålene på toppen, og ja, det er halve målet. mvh DROPS Design
12.05.2025 - 08:53
![]() Ali escreveu:
Ali escreveu:
Hello I would like some advice/help on the front piece: Work 2 edge stitches in garter stitch, * knit 2, purl 2 *, work from *-* 1-1-1-2-2-2 times in total, knit 2 and 2 stitches in garter stitch, then cast off the next 34-38-42-38-42-46 stitches for neck (cast off with knit over knit and purl over purl) So I have to work 2 in garter stitch then do I knit a few more or directly cast off the 34 stitches (for size S)? And is there a special technique for casting off purl and knit?
25.03.2025 - 23:11DROPS Design respondeu:
Hi Ali, You cast off the correct number of stitches straight away after the 2 garter stitches. Here is a video showing how to cast off in rib: https://www.garnstudio.com/video.php?id=228&lang=en Happy knitting!
26.03.2025 - 06:55
![]() Ali escreveu:
Ali escreveu:
Hello I would like some advice/help on the front piece: Work 2 edge stitches in garter stitch, * knit 2, purl 2 *, work from *-* 1-1-1-2-2-2 times in total, knit 2 and 2 stitches in garter stitch, then cast off the next 34-38-42-38-42-46 stitches for neck (cast off with knit over knit and purl over purl) So I have to work 2 in garter stitch then do I knit a few more or directly cast off the 34 stitches (for size S)? And is there a special technique for casting off purl and knit stitches?
25.03.2025 - 23:11DROPS Design respondeu:
Dear Ali, in size S you first work: 2 sts in garter stitch, K2, P2, K2, 2 sts in garter stitch = 10 sts for first shoulder, then cast off the next 34 sts and work the last 10 sts with 2 sts in garter stitch, K2, P2, K2, 2 sts in garter stitch. See how to cast off in rib here or find more techniques to cast off here. Happy knitting!
26.03.2025 - 08:36
|
|
Spiced Breeze#spicedbreezetop |
|
 |
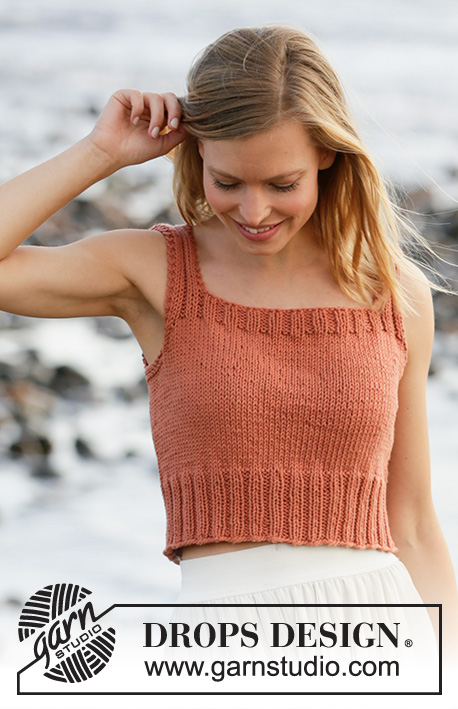 |
Top tricotado em DROPS Paris, em ponto meia com orlas em canelado. Do S ao XXXL
DROPS 211-15 |
|
|
---------------------------------------------------------- TÉCNICAS USADAS: ---------------------------------------------------------- PONTO JARRETEIRA (em redondo): 1 barra jarreteira em altura = 2 carreiras, ou seja tricotar 1 volta meia e 1 volta liga. PONTO JARRETEIRA (em idas e voltas): Tricotar todas as carreiras em meia. 1 barra jarreteira em altura = tricotar 2 carreiras meia. DIMINUIÇÕES (cavas): Diminuir para as cavas a 2 malhas de orla em ponto jarreteira dos rebordos. Todas as diminuições são feitas pelo direito. Diminuir da seguinte maneira depois de 2 malhas de orla em ponto jarreteira: Deslizar 1 malha em meia, 1 malha meia, passar a malha deslizada por cima da malha tricotada (= diminui-se 1 malha). Diminuir da seguinte maneira antes de 2 malhas de orla em ponto jarreteira: Começando 2 malhas antes das 2 malhas de orla, tricotar 2 malhas juntamente em meia (= diminui-se 1 malha). ---------------------------------------------------------- A PEÇA COMEÇA AQUI: ---------------------------------------------------------- TOP - SUMÁRIO DA PEÇA: Tricota-se de cima para baixo, em redondo na agulha circular até às cavas. Tricotar então a frente e as costas separadamente em idas e voltas na agulha circular. Terminar então pela costura das alças. COSTAS & FRENTE: Montar 136-148-164-180-200-220 malhas com a agulha circular 4,5 mm em Paris. Tricotar 1 volta meia. Tricotar então em canelado em redondo (= 2 malhas meia/2 malhas liga) durante 8 cm. Colocar 1 fio marcador no princípio da carreira + 1 outro fio marcador depois de 68-74-82-90-100-110 malhas. Os fios marcadores servem para marcar os lados do top. Continuar com a agulha circular 5 mm em ponto meia em redondo. MANTER A MESMA TENSÃO DA INDICADA PARA A AMOSTRA! Quando a peça medir 21-22-23-24-25-26 cm, tricotar 2 barras jarreteira - ver explicações acima - por cima das 10-10-14-14-20-24 malhas de cada lado da peça (os fios marcadores estão a meio dessas 10-10-14-14-20-24 malhas - tricotar as outras malhas em ponto meia). Na 1.ª carreira depois das 2 barras jarreteira, arrematar para as cavas da seguinte maneira: Arrematar 3-3-5-5-8-10 malhas, tricotar 62-68-72-80-84-90 malhas em ponto meia, arrematar 6-6-10-10-16-20 malhas (o fio marcador fica a meio dessas 6-6-10-10-16-20 malhas), tricotar 62-68-72-80-84-90 malhas em ponto meia, e arrematar as 3-3-5-5-8-10 últimas malhas. Cortar o fio. Terminar a frente e as costas separadamente. FRENTE: = 62-68-72-80-84-90 malhas. Começando pelo avesso, continuar em idas e voltas em ponto meia, com 2 malhas de orla em ponto jarreteira de cada lado da peça. AO MESMO TEMPO, na 1.ª carreira pelo direito, diminuir 1 malha de cada lado da peça para as cavas - ver DIMINUIÇÕES. Diminuir desta maneira 4-5-5-7-7-8 vezes ao todo de cada lado da peça a cada 2 carreiras (ou seja, em todas as carreiras pelo direito) = restam 54-58-62-66-70-74 malhas. Depois da última diminuição das cavas, tricotar 1 carreira liga pelo avesso com 2 malhas de orla em ponto jarreteira de cada lado da peça. Continuar com a agulha circular 4,5 mm e tricotar a carreira seguinte pelo direito da seguinte maneira: 2 malhas de orla em ponto jarreteira, *2 malhas meia, 2 malhas liga*, repetir de * a * até restarem 4 malhas, 2 malhas meia e terminar com 2 malhas de orla em ponto jarreteira. Continuar em canelado desta maneira durante 3 cm. Na carreira seguinte pelo direito, arrematar para o decote da seguinte maneira: 2 malhas de orla em ponto jarreteira, *2 malhas meia, 2 malhas liga*, tricotar de * a * 1-1-1-2-2-2 vezes ao todo, 2 malhas meia e 2 malhas em ponto jarreteira, arrematar as 34-38-42-38-42-46 malhas seguintes para o decote (arrematar as malhas como elas se apresentam), tricotar 2 malhas em ponto jarreteira, *2 malhas meia, 2 malhas liga*, tricotar de *-*1-1-1-2-2-2 vezes ao todo, 2 malhas meia e terminar com 2 malhas de orla em ponto jarreteira. Há, então, 10-10-10-14-14-14 malhas de cada lado da peça para as alças. Terminar as alças separadamente. ALÇAS: = 10-10-10-14-14-14 malhas. Tricotar em idas e voltas como antes em canelado com 2 malhas de orla em ponto jarreteira de cada lado da peça até a alça medir 38-40-42-44-46-48 cm a partir da carreira de montagem (ou até ao comprimento desejado). Arrematar. Tricotar a outra alça da mesma maneira. COSTAS: = 62-68-72-80-84-90 malhas. Começando pelo avesso, continuar em idas e voltas em ponto meia com 2 malhas de orla em ponto jarreteira de cada lado da peça. AO MESMO TEMPO, na 1.ª carreira pelo direito, diminuir 1 malha de cada lado da peça para as cavas - ver DIMINUIÇÕES. Diminuir desta maneira 4-5-5-7-7-8 vezes ao todo de cada lado da peça a cada 4 carreiras (e não a cada 2 carreiras como se fez para a frente) = 54-58-62-66-70-74 malhas. Depois da última diminuição, tricotar 1 carreira liga pelo avesso com 2 malhas de orla em ponto jarreteira de cada lado da peça. Continuar com a agulha circular 4,5 mm e tricotar a carreira seguinte pelo direito da seguinte maneira: 2 malhas de orla em ponto jarreteira, *2 malhas meia, 2 malhas liga*, repetir de * a * até restarem 4 malhas, 2 malhas meia e terminar com 2 malhas de orla em ponto jarreteira. Continuar em canelado desta maneira durante 3 cm. Na carreira seguinte pelo direito, arrematar para o decote da seguinte maneira: 2 malhas de orla em ponto jarreteira, *2 malhas meia, 2 malhas liga*, tricotar de *-*1-1-1-2-2-2 vezes ao todo, tricotar 2 malhas meia e 2 malhas em ponto jarreteira, e arrematar as 34-38-42-38-42-46 malhas seguintes para o decote (arrematar as malhas como elas se apresentam), tricotar 2 malhas em ponto jarreteira, *2 malhas meia, 2 malhas liga*, tricotar de *-*1-1-1-2-2-2 vezes ao todo, tricotar 2 malhas meia e terminar 2 malhas de orla em ponto jarreteira. Há, então, 10-10-10-14-14-14 malhas de cada lado da peça para as alças. Tricotar as alças separadamente como as da frente. MONTAGEM: Costurar os ombros. |
|
 |
|
Terminou este projecto?Então, identifique as suas fotos com as tags #dropspattern #spicedbreezetop ou mostre-as na galeria #dropsfan. Precisa de ajuda para este modelo?Encontrará 21 turotiais em vídeo, uma rubrica Comentários/Perguntas e muito mais ao visitar a página do modelo em www.garnstudio.com © 1982-2026 DROPS Design A/S. Todos os direitos reservados. Este documento, incluuindo as suas su-secções, tem copyrights. Saia mais o que pode fazer com os nossos modelos no fim de cada uma das páginas do nosso site. |
|


Com mais de 40 anos no design de modelos de tricô e de croché, a DROPS Design oferece uma das mais vastas colecções demodelos gratuitos na Internet - traduzidos em 17 línguas. Neste dia de hoje, temos 324 catálogos e 12290 modelos - dos quais 12271 estão traduzidos em português.
Trabalhamos com muito empenho para lhe proporcionar o melhor que o tricô e o croché têm para oferecer, para lhe fornecer inspiração e conselhos bem como fios da mais elevada qualidade a preços incríveis! Gostaria de usar os nossos modelos para outros fins que não uso pessoal? Pode ler o que lhe é permitido fazer no Copyright texto que se encontra na parte de baixo de todos os nossos modelos. Bom tricô! Bom croché!
Deixe um comentário acerca do modelo DROPS 211-15
Gostaríamos muito de saber o que tem a dizer-nos acerca deste modelo!
Se deixar uma pergunta acerca do modelo, certifique-se de que escolhe a categoria adequada no formulário abaixo para acelerar o processo relativo à resposta. Os campos obrigatórios estão assinalados com um *.