
Categorias populares
Procura um fio?


Comentários / Perguntas (26)
![]() Karen Dainter escreveu:
Karen Dainter escreveu:
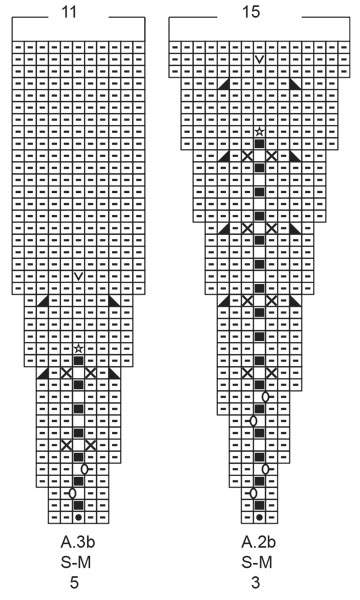
The filled in square is meant to be worked from the wrong side but I’m in the right side. What do I do?
23.02.2025 - 15:07DROPS Design respondeu:
Dear Karen, the filled in square is only worked on wrong side rows: you can check that this symbol is only worked on even rows: row 2, row 4, row 6, e.t.c. in the charts. Since you start working the charts on a right side row (as indicated at the end of the neck) the even rows of the charts will be worked always on the wrong side. Happy knitting!
23.02.2025 - 23:26
![]() Karen Dainter escreveu:
Karen Dainter escreveu:
You have just stated the second row of neck. I’ve already done this. I’m on the first row of the yoke now and the issue is as stated below. Please help Thanks
23.02.2025 - 14:27DROPS Design respondeu:
Dear Karen, if you had 87 stitches at the neck you would have 87 stitches now as well. In the first row of the yoke you work A.1b over A.1a (both are only 1 stitch), A.2b over A.2a (so a 3 stitch pattern over a 3 stitch pattern) and A.3b over A.3a (so a 5-stitch pattern over a 5-stitch pattern). The number of stitches doesn't change between the end of the neck and the yoke; the increases start from this round onwards. Happy knitting!
23.02.2025 - 23:25
![]() Karen escreveu:
Karen escreveu:
Hi 87 stitches. Just started yoke. There is one more stitch than the instructions. I have 87 as stated but the instructions actually require one less 86. Please help
12.02.2025 - 15:15
![]() Karen Dainter escreveu:
Karen Dainter escreveu:
Hi 87 stitches. Just started yoke. There is one more stitch than the instructions. I have 87 as stated but the instructions actually require one less 86. Please help
12.02.2025 - 15:14DROPS Design respondeu:
Dear Mrs Dainter, work the 87 sts as follows: 5 sts garter stitch, A.1a (= 1 st), then work *A.2a (= 3 sts), A.3a (= 5 sts) a total of 9 times (= 8 sts x 9 )=72 sts, then work A.2a (3 sts), A.1a (1 st) and 5 sts in garter stitch = 5+1+72+3+1+5=87 sts. Happy knitting!
12.02.2025 - 16:18
![]() Karen escreveu:
Karen escreveu:
Both really. I’m from the UK and our instructions are very different. I’m starting the cardigan September story and am not getting very far even though I’ve knitted all my life. When you say continue this pattern after the first two rows am I to think I just repeat the second row? If I included the first row it wouldn’t look like a rib. I can see that this will take me some time. Help
06.02.2025 - 20:40DROPS Design respondeu:
Dear Karen, after you have worked Row 2 with first row diagrams A.1a to A.3a continue like this means read the digrams from the left towards the right from WS: 5 front band sts in gartrer st, A.1a, A.2a, repeat (A.3a, A.2a) and finish with A.1a and 5 sts garter stitch - reading diagrams from the left towards the right from WS. Happy knitting!
07.02.2025 - 15:39
![]() Fiona escreveu:
Fiona escreveu:
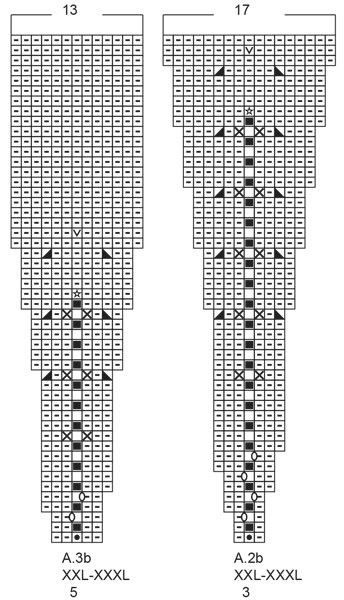
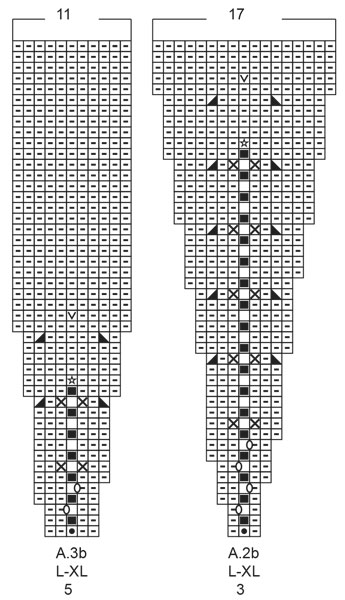
Grid A2b & A3b 1 box with 0 on the line of next stitch but there is no instruction for this. The last instruction on diagram says between 2 stitches make 1 yarn over but no matching symbol on grid A2b or A3b. What do these symbols mean, please. Thank you
19.11.2024 - 18:42DROPS Design respondeu:
Dear Fiona, the 0 is matching the last symbol => yarn over to increase the number of stitches in each repeat, so that you can see on next row there is one extra stitch on the same side of middle stitch as you made this yarn over. Happy knitting!
20.11.2024 - 07:47
![]() Fiona escreveu:
Fiona escreveu:
Grid A2b & A3b 1 box with 0 on the line of next stitch but there is no instruction for this. The last instruction on diagram says between 2 stitches make 1 yarn over but no matching symbol on A2b or A3b. Thank you
18.11.2024 - 12:01DROPS Design respondeu:
Dear Fiona, the 0 = between 2 stitches make 1 yarn over; yarn over is worked twisted on next row to avoid a hole. It's the same oval; when the 0 is not worked twisted then it's drawn as a black-filled 0 (which is not used in these charts). So you make 1 yarn over between the symbol of the square to the right and the symbol of the square to the left of the 0 (or inversed when you work from the wrong side: first the left square and then the right square). Happy knitting!
24.11.2024 - 18:18
![]() Fiona escreveu:
Fiona escreveu:
I am following Medium pattern Thank you
17.11.2024 - 21:15
![]() Fiona escreveu:
Fiona escreveu:
For row 3 "continue this pattern? what exactly do you mean ? what pattern? If you mean the grids what grid. Thank you
17.11.2024 - 21:11DROPS Design respondeu:
Dear Fiona, it means that you work as established in row 2, with the garter stitches on each side and the charts. Work garter stitch over garter stitch, row 2 of A.1a over row 1 of A.1a, row 2 of A.2a over row 1 of A.2a and row 2 of A.3a over row 2 of A.3a. Happy knitting!
18.11.2024 - 00:15
![]() Fiona escreveu:
Fiona escreveu:
Could you explain these instructions please ,Work A.1b over A.1a, A.2b over A.2a and A.3b over A.3a. Thank you
09.11.2024 - 19:16DROPS Design respondeu:
Dear Fiona, it means that, over the stitches that were worked according to chart A.1a you will now work A.1b; the stitches worked according to chart A.2a will now be worked according to chart A.2b and the stitches worked according to chart A.3a will now be worked according to chart A.3b. Happy knitting!
10.11.2024 - 19:59
|
|||||||||||||||||||||||||||||||
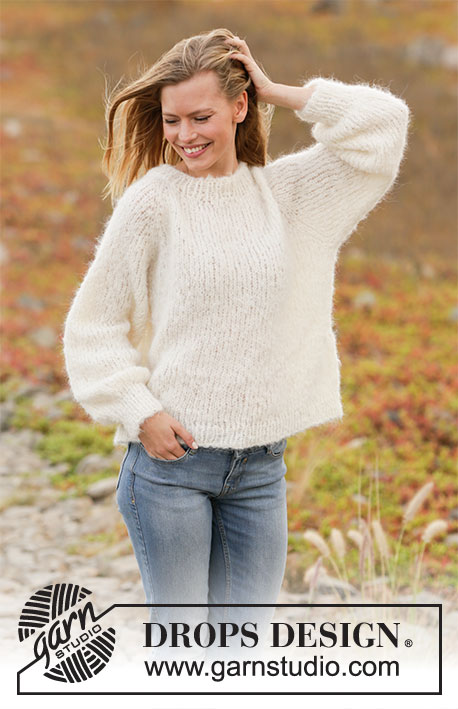
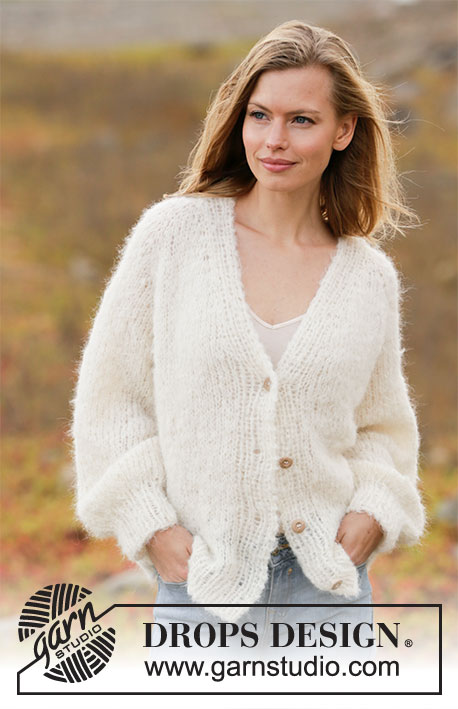
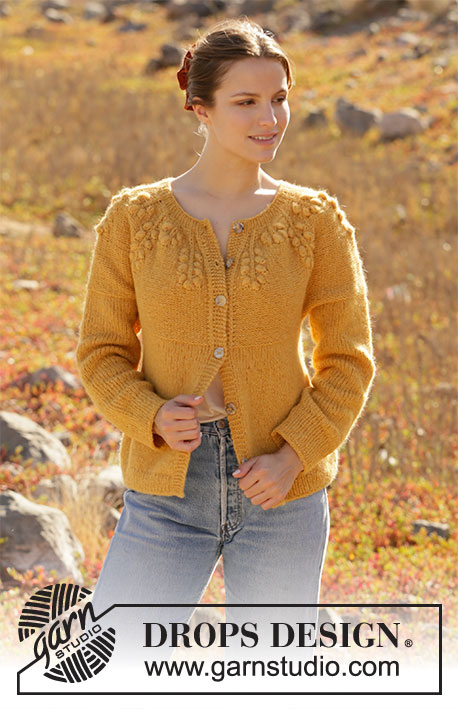
September Story#septemberstorycardigan |
|||||||||||||||||||||||||||||||
 |
 |
||||||||||||||||||||||||||||||
Casaco tricotado de cima para baixo com encaixe arredondado e borbotos, em DROPS Air. Do S ao XXXL.
DROPS 213-26 |
|||||||||||||||||||||||||||||||
|
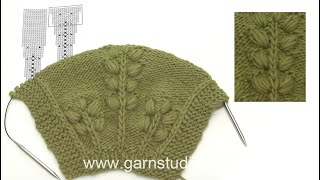
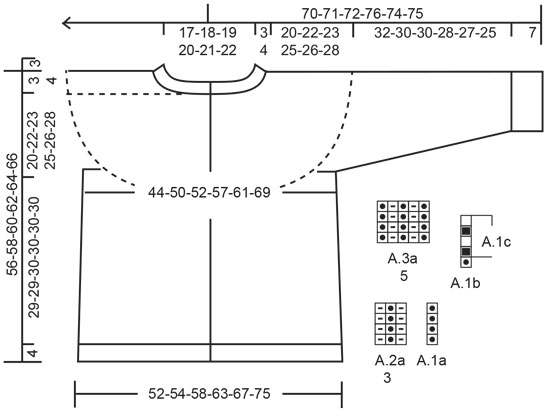
------------------------------------------------------- TÉCNICAS USADAS: ------------------------------------------------------- PONTO JARRETEIRA (em idas e voltas): Tricotar todas as carreiras em meia. 1 barra jarreteira = Tricotar 2 carreiras meia. PONTO FANTASIA: Ver os diagramas A.1 a A.3. Ver diagrama indicado para a tamanhos. Os diagramas mostram todas as carreiras do ponto fantasia, vistas pelo direito. AUMENTOS (lados costas/frentes): Tricotar até restarem 2 malhas antes o fio marcador, fazer 1 laçada, 4 malhas meia (o fio marcador fica entre estas 4 malhas) fazer 1 laçada (= aumenta-se 2 malhas). Na carreira seguinte, tricotar as laçadas torcidas para evitar buracos. Tricotar as novas malhas em ponto meia. DIMINUIÇÕES (mangas): Diminuir 1 malha de cada lado do fio marcador da seguinte maneira: Tricotar até restarem 3 malhas antes do fio marcador, tricotar 2 malhas juntamente em meia, 2 malhas meia (o fio marcador fica entre estas 2 malhas), deslizar 1 malha em meia, 1 malha meia e passar a malha deslizada por cima da malha tricotada (= diminui-se 2 malhas). DICA PARA ARREMATAR: Para evitar que as malhas arrematadas fiquem demasiado apertadas, pode-se arrematar com uma agulha um tamanho acima. Se as malhas arrematadas continuarem apertadas, fazer 1 laçada depois de cerca de cada 4.ª malha e arrematar as laçadas como malhas normais. CASAS: Fazer as casas na orla da frente direita (quando se usa o casaco). Tricotar pelo direito até restarem 3 malhas e terminar a carreira da seguinte maneira: Fazer 1 laçada, tricotar 2 malhas juntamente em meia e tricotar a última malha em meia. Na carreira seguinte, tricotar a laçada em meia para que forme um buraco. Fazer a 1.ª casa quando a gola medir 1½-2 cm. Fazer as 5-5-6-6-7-7 outras casas com um espaço de cerca de 8½-8½-8-8-7-7½ cm entre elas. ------------------------------------------------------- A PEÇA COMEÇA AQUI: ------------------------------------------------------- CASACO – SUMÁRIO DA PEÇA: Tricota-se em idas e voltas na agulha circular a partir do meio da frente e de cima para baixo. As mangas tricotam-se em redondo com as agulhas de pontas duplas, de cima para baixo. GOLA: Montar 79-87-87-95-95-103 malhas (incluindo 5 malhas de orla da frente de cada lado da peça) com a agulha circular 4,5 mm em Air. CARREIRA 1 (= pelo avesso): Tricotar 5 malhas de orla da frente em ponto jarreteira – ver acima - , 69-77-77-85-85-93 malhas liga e 5 malhas de orla da frente em ponto jarreteira. CARREIRA 2 (= pelo direito): 5 malhas de orla da frente em ponto jarreteira, A.1a (= 1 malha), *A.2a (= 3 malhas), A.3a (= 5 malhas)*, repetir de * a * até restarem 9 malhas (= 8-9-9-10-10-11 vezes em largura), A.2a por cima das 3 malhas seguintes, A.1a por cima da malha seguinte e terminar com 5 malhas de orla da frente em ponto jarreteira. Continuar desta maneira. Não esquecer as CASAS na orla da frente direita – ver acima. Quando a peça medir 3-3-3-3-4-4 cm, ajustar a altura para que a carreira seguinte seja pelo direito, continuar com a agulha circular 5,5 mm. Colocar 1 marcador depois da orla da frente no princípio da carreira; medir o encaixe a partir deste marcador! ENCAIXE: Tricotar A.1b por cima de A.1a, A.2b por cima de A.2a e A.3b por cima de A.3a. Tricotar as orlas das frentes em ponto jarreteira até ao fim. Quando A.1b tiver sido tricotado 1 vez em altura, repetir A.1c. MANTER A MESMA TENSÃO DA INDICADA PARA A AMOSTRA! Quando A.2b e A.3b tiverem sido tricotados 1 vez em altura, temos 235-261-281-309-329-359 malhas. Tricotar em ponto liga (= em meia pelo avesso e em liga pelo direito), com 5 malhas de orla da frente em ponto jarreteira de cada lado da peça até a peça medir 20-22-23-25-26-28 cm a partir do marcador. Dividir, então, o encaixe para as costas/as frentes e as mangas pelo avesso da seguinte maneira: Tricotar 37-42-44-48-51-57 malhas meia, colocar as 48-52-58-64-68-70 malhas seguintes em espera em 1 fio para a manga, montar 6 malhas (= lado, sob a manga), tricotar 65-73-77-85-91-105 malhas meia (= costas), colocar as 48-52-58-64-68-70 malhas seguintes em espera em 1 fio para a manga, montar 6 malhas (= lado, sob a manga) e tricotar as 37-42-44-48-51-57 últimas malhas em meia. Terminar as costas/as frentes e as mangas separadamente. MEDIR A PEÇA A PARTIR DAQUI! COSTAS & FRENTES: = 151-169-177-193-205-231 malhas. Colocar 1 fio marcador a 40-45-47-51-54-60 malhas do rebordo de cada lado da peça (= lados do casaco). Temos 71-79-83-91-97-111 malhas para as costas entre os fios marcadores. Fazer seguir os fios marcadores; irão servir para marcar os aumentos dos lados. Tricotar em ponto meia com 5 malhas de orla da frente em ponto jarreteira de cada lado da peça. Quando a peça medir 3 cm a partir da separação, aumentar 1 malha de cada lado dos 2 fios marcadores – ver AUMENTOS (= aumenta-se 4 malhas). Aumentar desta maneira 6-4-5-5-5-5 vezes ao todo a cada 4 cm = 175-185-197-213-225-251 malhas. Quando a peça medir 29-29-30-30-30-30 cm a partir da separação, continuar com a agulha circular 4,5 mm em canelado, pelo direito, da seguinte maneira: 5 malhas de orla da frente em ponto jarreteira, *1 malha meia, 1 malha liga*, repetir de * a * até restarem 6 malhas, 1 malha meia e 5 malhas de orla da frente em ponto jarreteira. Quando o canelado medir 4 cm, arrematar em meia pelo direito – Ver DICA PARA ARREMATAR. MANGAS: Retomar as 48-52-58-64-68-70 malhas em espera num dos lados da peça para a pequena agulha circular 5,5 mm e levantar 1 malha em cada uma das 6 malhas montadas sob a manga = 54-58-64-70-74-76 malhas. Colocar um fio marcador a meio das 6 malhas sob a manga. Fazer seguir o fio marcador, irá servir para marcar as diminuições sob a manga. Começar no fio marcador e tricotar em meia em redondo. Quando a manga medir 3 cm a partir da separação, diminuir 2 malhas a meio sob a manga – ver DIMINUIÇÕES. Diminuir desta maneira 5-7-9-11-12-12 vezes ao todo a cada 6-3-2½-2-1½-1½ cm = 44-44-46-48-50-52 malhas. Continuar até a manga medir 32-30-30-28-27-25 cm a partir da separação, (restam cerca de 7 cm antes do fim; pode-se experimentar o pulôver e tricotar até ao comprimento desejado). Continuar com as agulhas de pontas duplas 4,5 mm em canelado (= 1 malha meia, 1 malha liga). Arrematar quando as o canelado medir 7 cm. A manga medir cerca de 39-37-37-35-34-32 cm a partir da separação. Tricotar a outra manga da mesma maneira. MONTAGEM: Costurar os botões na orla da frente esquerda. |
|||||||||||||||||||||||||||||||
Explicações do diagrama |
|||||||||||||||||||||||||||||||
|
|||||||||||||||||||||||||||||||
 |
|||||||||||||||||||||||||||||||
 |
|||||||||||||||||||||||||||||||
 |
|||||||||||||||||||||||||||||||
 |
|||||||||||||||||||||||||||||||
Terminou este projecto?Então, identifique as suas fotos com as tags #dropspattern #septemberstorycardigan ou mostre-as na galeria #dropsfan. Precisa de ajuda para este modelo?Encontrará 28 turotiais em vídeo, uma rubrica Comentários/Perguntas e muito mais ao visitar a página do modelo em www.garnstudio.com © 1982-2026 DROPS Design A/S. Todos os direitos reservados. Este documento, incluuindo as suas su-secções, tem copyrights. Saia mais o que pode fazer com os nossos modelos no fim de cada uma das páginas do nosso site. |
|||||||||||||||||||||||||||||||


Com mais de 40 anos no design de modelos de tricô e de croché, a DROPS Design oferece uma das mais vastas colecções demodelos gratuitos na Internet - traduzidos em 17 línguas. Neste dia de hoje, temos 324 catálogos e 12290 modelos - dos quais 12271 estão traduzidos em português.
Trabalhamos com muito empenho para lhe proporcionar o melhor que o tricô e o croché têm para oferecer, para lhe fornecer inspiração e conselhos bem como fios da mais elevada qualidade a preços incríveis! Gostaria de usar os nossos modelos para outros fins que não uso pessoal? Pode ler o que lhe é permitido fazer no Copyright texto que se encontra na parte de baixo de todos os nossos modelos. Bom tricô! Bom croché!
Deixe um comentário acerca do modelo DROPS 213-26
Gostaríamos muito de saber o que tem a dizer-nos acerca deste modelo!
Se deixar uma pergunta acerca do modelo, certifique-se de que escolhe a categoria adequada no formulário abaixo para acelerar o processo relativo à resposta. Os campos obrigatórios estão assinalados com um *.