
Categorias populares
Procura um fio?


Comentários / Perguntas (44)
![]() Jasmin escreveu:
Jasmin escreveu:
Danke für die schnelle Antwort. Ich habe meinen Fehler jetzt auch gefunden. Hatte die Strickschrift falschherum gelesen und bei A1 von oben und nicht von unten angefangen. Jetzt läuft es aber super. Das Videos sind sehr gut gemacht und wirklich hilfreich, sodass man auch als Anfänger die Anleitungen gut nachstricken kann. Danke auch dafür.
04.05.2020 - 19:06
![]() Jasmin escreveu:
Jasmin escreveu:
Ich bin jetzt an der Stelle angekommen, an der man zum Halbpatent wechselt (also mit A.1 anfängt). Aber irgendwie kommt es bei mir mit dem Muster nicht hin... Kann es sein, dass bei der ersten Reihe von A.1 ein Kästchen für eine linke Masche häkeln fehlt? Also dass es sein müsste einen Umschlag+abheben und dann zwei linke Maschen? Oder gehört das so und man sieht das nach dem zusammenstricken in der dritten Reihe nicht mehr?
03.05.2020 - 23:45DROPS Design respondeu:
Liebe Jasmin, bei der 1. Reihe in A.1a stricken Sie: 2 M links zusammen, 1 Umschlag + 1 Masche abheben (= es sind nur noch 2 Maschen denn der Umschlag nnicht als Masche gerechnet wird (der Umschlag "gehört" zu den abgehonbenen Maschen). Und dies stets wiederholen. Bei der 2. Runde stricken Sie (1 Masche links, Umschlag + abgehobene Masche rechts zusammen stricken) - siehe auch dieses Video. Viel Spaß beim stricken!
04.05.2020 - 15:49
![]() Mariona escreveu:
Mariona escreveu:
Hola! Los 33cm de cintura de la talla pequeña en el esquema corresponde a la prenda puesta o a la prenda tejida? Entiendo por lo indicado que sería puesta, pero 33cm de ancho de cintura se me hace una talla de mujer MUY pequeña.
03.05.2020 - 14:50DROPS Design respondeu:
Hola Mariona. Las medidas en el diagrama bajo el patrón son las medidas de la prenda tejida.
19.11.2020 - 20:19
![]() Kristen escreveu:
Kristen escreveu:
No you misunderstand what I'm saying. The wrong side of the pattern is showing up on the outside when I switch to the A1 pattern. The hem is accurate with the rib on the outside of the skirt, but once I begin A1 and *P2 tog, then yarn over, slip 1 as if to P* and then continue on with the false english rib, the rib pattern is sowing up on the inside of the skirt. I pulled the whole project and started again and once I get to this point it happened again.
23.02.2020 - 18:51DROPS Design respondeu:
Dear Kristen, sorry I may still misundertand what you mean here. After you have worked the first 3 rows in A.1 you should continue working A.1a = round 1: P1, Ktog YO and slipped st - round 2: P1, YO, slip st as if to P. Ie the first st in A.1 will always be purled and the 2nd st in A.1 (= the k stitch from the rib) will be worked alternately slipped with YO and knit tog with YO. Happy knitting!
24.02.2020 - 09:36
![]() Sissel escreveu:
Sissel escreveu:
Hej, jeg tænker lige som Paula på miljøet i forhold til polyamid, men jeg tænker også på om rent uld vil gøre at nederdelen hurtigere bliver slidt og/eller bliver filtet til især på siddefladen?
12.12.2019 - 20:48DROPS Design respondeu:
Hej Sissel, garn med polyamid vil være mere slidstærkt end det uden, men vi har også nederdele i ren Alpaca... :)
16.12.2019 - 15:36
![]() Paula escreveu:
Paula escreveu:
Hei, jeg vil gjerne strikke dette skjørtet med ren ullgarn, et miljøvennlig alternativ, vil med andre ord unngå polyamid. Har forsøkt å finne garnalternativ på kalkulatoren, men fant ingen. Har du noen forslag til alternativ? Mvh Paula
05.12.2019 - 19:28DROPS Design respondeu:
Hej Paula, jo men du kan vælge både, Drops Alpaca, BabyAlpaca Silk, Baby Merino og Flora ingen af dem indeholder polyamid :)
06.12.2019 - 08:05
![]() Sue escreveu:
Sue escreveu:
Hi. I have watched repeatedly the video for false English rib but I still can’t work out what is happening with the purl stitch on row 1. Is it knitted into twice somehow? Or through the back loop twisted? I don’t knit continental style so find it very difficult to follow. The written instructions don’t seem to give specific instructions on how to knit this stitch. Thanks.
27.10.2019 - 11:47DROPS Design respondeu:
Hello Sue! Purl stitches are just purled. Happy knitting!
30.10.2019 - 14:47
![]() Renee escreveu:
Renee escreveu:
I'm having trouble understanding why there are two gauges and what worn means on the second gauge. Could you please clarify these two things?
29.06.2019 - 16:01DROPS Design respondeu:
Dear Renee, the pattern the piece is knitted in streches over time, so the first gauge is given, what you should get, when you first knitted the piece and it is fat on a surface. The second gauge given imeasured after the piece is worn for a while and slightly streched. Happpy Knitting!
30.06.2019 - 01:10
![]() Ingrid Mørkeseth escreveu:
Ingrid Mørkeseth escreveu:
I understand that, but the very first increase has to be from a knit stitch, not a purl stitch.. If I increase every 11th stitch half of them will be increased from a purl stitch. It has to be an even number, like it is for most of the sizes..
25.03.2019 - 17:17DROPS Design respondeu:
Dear Mrs Mørkeseth, marker should be inserted in every 11th knit stitch, not in every 11th stitch, so that the stitch with a marker with will a knit stitch. Happy knitting!
05.04.2019 - 08:29
![]() Arnoux Guylaine escreveu:
Arnoux Guylaine escreveu:
Bonjour es ce que je peut realisèe ce modele avec des aiguylles droite merci
26.02.2019 - 15:12DROPS Design respondeu:
Bonjour Mme Arnoux, vous trouverez ici quelques informations pour ajuster un modèle sur aiguilles droites, dans le cas présent, il vous faudra également ajuster le point fantaisie qui est ici décrit en rond (= tous les tours sur l'endroit). Bon tricot!
26.02.2019 - 15:48
|
||||||||||||||||
See You In Dublin#seeyouindublinskirt |
||||||||||||||||
 |
 |
|||||||||||||||
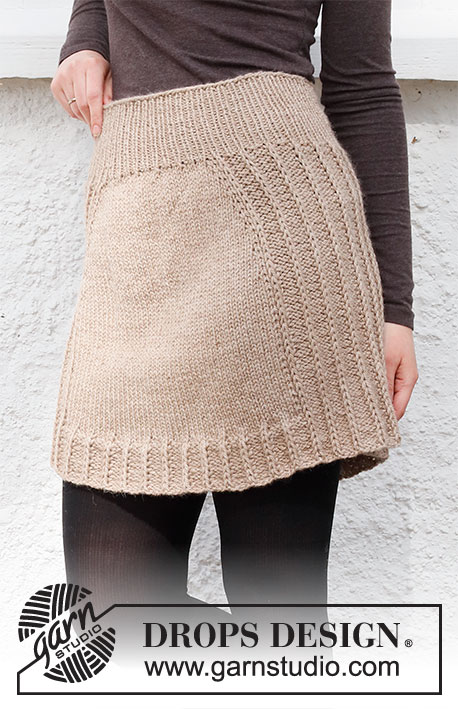
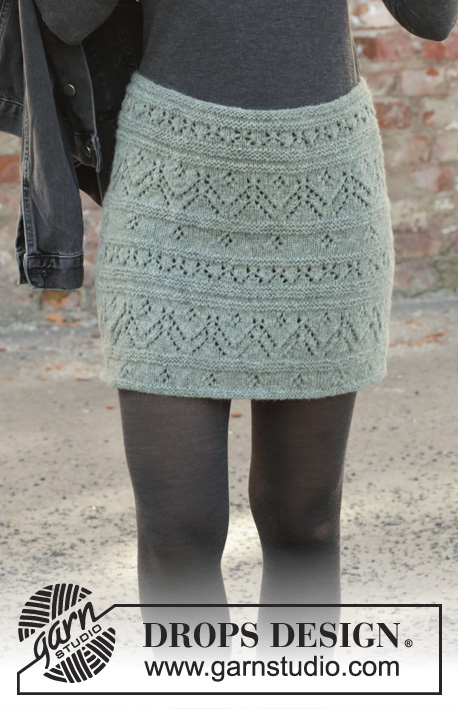
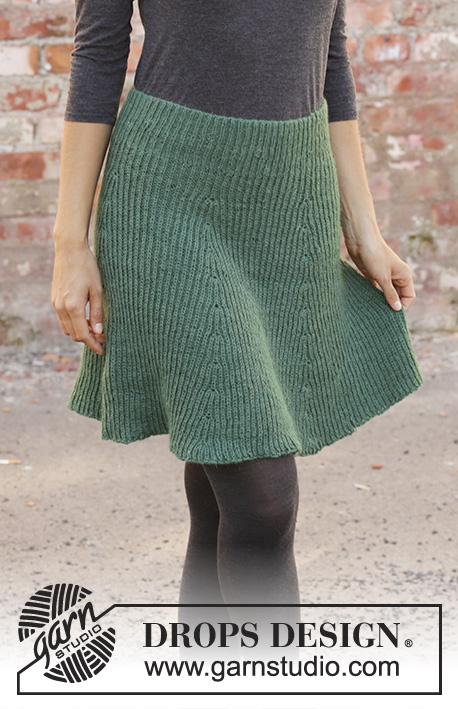
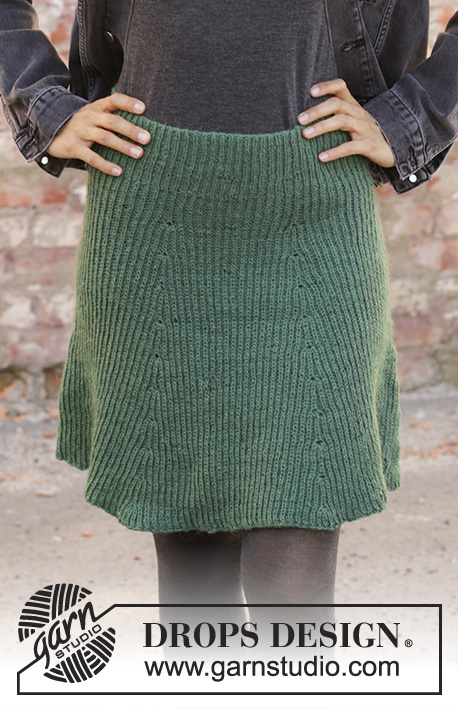
Saia tricotada em DROPS Nord, de cima para baixo, em falso canelado inglês. Do S ao XXXL
DROPS 196-37 |
||||||||||||||||
|
---------------------------------------------------------- TÉCNICAS USADAS: ---------------------------------------------------------- AMOSTRAS: A textura da saia vai alargar quando a usarmos e por conseguinte tem 2 tipos de amostras. Tensão-1: Quando se tricota a saia e se tira as medidas na horizontal. A saia deve ter esta tensão quando a fazemos. Tensão-2: tensão medida na cintura quando usamos a saia. A tension em altura é indicada seguindo as malhas meia, que se tricotam numa carreira a menos do que as malhas liga, porque as malhas meia são deslizadas frouxamente a cada 2 carreiras. Ou seja, 24 carreiras em altura contadas nas malhas meia para 10 cm = 48 carreiras contadas nas malhas liga para 10 de altura. As medidas do esquema são indicadas em cm, quando se usa a saia. AUMENTOS-1 (a intervalos regulares): Para calcular quando aumentar, contar o número total de malhas (por ex. 172 malhas) e dividi-lo pelo número de aumentos a fazer (por ex. 26) = 6.6. Neste exemplo, vai-se aumentar fazendo 1 laçada alternadamente depois de cerca decada 6.ª e 7.ª malha. Na carreira seguinte, tricotar as laçadas torcidas para evitar um buraco. AUMENTOS-2: Todos os aumentos são feitos numa carreira onde a laçada e a malha meia são tricotadas juntamente em meia. Tricotar 5 vezes a malha meia e a laçada da seguinte maneira: Tricotar juntamente em meia a laçada e a malha meia mas manter a malha e a laçada na agulha esquerda, * fazer 1 laçada na agulha direita e tricotar juntamente em meia a laçada e a malha meia*, repetir de * a * 2 vezes ao todo = 5 malhas (= aumenta-se 4 malhas) PONTO FANTASIA: Ver diagrama A.1. ---------------------------------------------------------- A PEÇA COMEÇA AQUI: ---------------------------------------------------------- SAIA – SUMÁRIO DA PEÇA: Tricota-se de cima para baixo, em redondo na agulha circular. Tricotar primeiro uma bainha para enfiar o elástico da cintura. Continuar então em canelado e falso canelado inglês. A textura da saia vai ser diferente quando a usarmos – ver AMOSTRA. BAINHA: Montar 172-188-202-228-250-292 malhas com a agulha circular 2,5 em Nord. Tricotar 1 carreira em malhas liga. Tricotar então 4 carreiras em ponto meia. Tricotar 1 carreira em malhas liga aumentando 26-28-32-36-38-44 malhas a intervalos regulares (= carreira de dobra) – ver AUMENTOS-1 = 198-216-234-264-288-336 malhas. Colocar 1 fio marcador. MEDIR A PARTIR DAQUI! SAIA: Tricotar em canelado (2 malhas liga/1 malha meia) durante 8 cm. Continuar com a agulha circular 3 mm e tricotar A.1 em todas as malhas (= 66-72-78-88-96-112 vezes em toda a carreira). Quando a 1.ª carreira de A.1 tiver sido tricotada, temos 132-144-156-176-192-224 malhas – não contar as laçadas como malhas. Quando A.1 tiver sido tricotado 1 vez em altura, repetir A.1a até ao fim. MANTER A MESMA TENSÃO DA INDICADA PARA A AMOSTRA! Quando a peça medir 10 cm a partir do fio marcador, colocar 1 marcador em cada 11.ª-12.ª-13.ª-11.ª-12.ª-14.ª malha meia (= 6-6-6-8-8-8 marcadores). Aumentar então 4 malhas em cada uma das malhas com um marcador – ver AUMENTOS-2 (= aumenta-se 24-24-24-32-32-32 malhas). Continuar em redondo em ponto fantasia e tricotar os aumentos no ponto fantasia. Aumentar desta maneira a cada 4-4-4-4½-4½-4½ cm até a peça medir 48-50-52-54-56-58 cm a partir do fio marcador – temos cerca de 348-384-396-464-512-544 malhas – ajustar a altura para que a última carreira seja uma carreira com laçadas. Arrematar então as malhas meia em meia e as malhas liga em liga, MAS arrematar as laçadas como se fossem malhas meia para evitar que as malhas arrematadas fiquem demasiado apertadas. MONTAGEM: Dobrar a bainha pelo avesso e costurar deixando uma pequena abertura para enfiar o elástico. |
||||||||||||||||
Explicações do diagrama |
||||||||||||||||
|
||||||||||||||||
 |
||||||||||||||||
Terminou este projecto?Então, identifique as suas fotos com as tags #dropspattern #seeyouindublinskirt ou mostre-as na galeria #dropsfan. Precisa de ajuda para este modelo?Encontrará 18 turotiais em vídeo, uma rubrica Comentários/Perguntas e muito mais ao visitar a página do modelo em www.garnstudio.com © 1982-2026 DROPS Design A/S. Todos os direitos reservados. Este documento, incluuindo as suas su-secções, tem copyrights. Saia mais o que pode fazer com os nossos modelos no fim de cada uma das páginas do nosso site. |
||||||||||||||||


Com mais de 40 anos no design de modelos de tricô e de croché, a DROPS Design oferece uma das mais vastas colecções demodelos gratuitos na Internet - traduzidos em 17 línguas. Neste dia de hoje, temos 324 catálogos e 12290 modelos - dos quais 12271 estão traduzidos em português.
Trabalhamos com muito empenho para lhe proporcionar o melhor que o tricô e o croché têm para oferecer, para lhe fornecer inspiração e conselhos bem como fios da mais elevada qualidade a preços incríveis! Gostaria de usar os nossos modelos para outros fins que não uso pessoal? Pode ler o que lhe é permitido fazer no Copyright texto que se encontra na parte de baixo de todos os nossos modelos. Bom tricô! Bom croché!
Deixe um comentário acerca do modelo DROPS 196-37
Gostaríamos muito de saber o que tem a dizer-nos acerca deste modelo!
Se deixar uma pergunta acerca do modelo, certifique-se de que escolhe a categoria adequada no formulário abaixo para acelerar o processo relativo à resposta. Os campos obrigatórios estão assinalados com um *.