
Categorias populares
Procura um fio?


Comentários / Perguntas (48)
![]() María Fernanda Yáñez escreveu:
María Fernanda Yáñez escreveu:
Hola! Para la talla M, los 95 puntos de A2 no encajan con el sentido de los 7 puntos centrales de A3 (para que encajen tendría que tener 43 puntos a un lado y 45 en el otro). Hago el comentario para saber si es que hay un error en el patrón. Gracias por la respuesta.
15.03.2022 - 05:30
![]() Irene Simeone escreveu:
Irene Simeone escreveu:
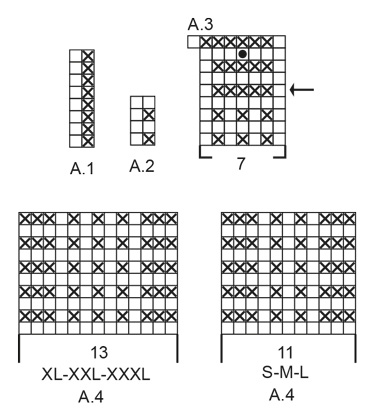
Buongiorno, un'altra domanda. Quando si deve iniziare il diagramma A.3, le istruzioni dicono di iniziare dalla riga indicata dalla freccia su un ferro sul rovescio del lavoro. Questo significa che le 7 maglie centrali devono essere lavorati così: 1 dir, 5 rov, 1 dir? Grazie ancora. Irene
03.03.2022 - 15:43DROPS Design respondeu:
Buonasera Irene, dal rovescio del lavoro deve lavorare come indicato nella legenda e cioè 1 maglia rovescio, 5 maglie diritto e 1 maglia rovescio. Buon lavoro!
05.03.2022 - 22:09
![]() Irene Simeone escreveu:
Irene Simeone escreveu:
Buongiorno, sto seguendo le istruzioni ma sono un po' confusa :( il davanti del lavoro è quello in cui si vedono le coste oppure quello in cui ci sono una specie di nodini? spero riusciate a capire cosa intendo. Grazie mille! Irene
03.03.2022 - 15:24DROPS Design respondeu:
Buonasera Irene, il davanti del lavoro è quello in cui inizia a lavorare a coste sul dietro. Buon lavoro!
04.03.2022 - 17:46
![]() Stella escreveu:
Stella escreveu:
When it says to work 4 rows over 10 garter stitches, does is mean 4 rows with the 10 garter stitches or the 10 garter stitches with 4 rows of A2 over it?
03.01.2022 - 21:52DROPS Design respondeu:
Dear Stella, this means you work the next 4 rows with the 10 sts in garter stitch instead of pattern and the remaining stitches as before. Happy knitting!
04.01.2022 - 07:26
![]() Angela Beaty escreveu:
Angela Beaty escreveu:
In the Back Piece section, work from arrow in A.3 over the middle 7 stitches on row, Is this actually in the middle of the 96 stitches? So you skip the first 4 rows and just do the arrow row? Then work A.3 over the first 48 stitches do you start from the bottom of the diagram or from the arrow?
19.08.2021 - 10:21DROPS Design respondeu:
Dear Angela, when you work from the arrow, yes, you're working over the middle 7 stitches of the 96 stitches and you skip the first 4 rows and start from the arrow row. In the rest of the stitches, you work A.2. After finishing A.3, in the next row, there is a split for the opening. The rows under the arrow are actually from A.2 and are there just to give a context or to make it continuous visually.
30.08.2021 - 19:26
![]() Katzilicious escreveu:
Katzilicious escreveu:
I'm still confused, can you explain "work from arrow in A.3 over the middle 7 stitches on row - adjust so that this row marked with arrow is worked from wrong side. On first row from right side after A.3 work over the first 44-48-52-57-63-70 stitches on row and slip the remaining 44-48-52-57-63-70 stitches on 1 stitch holder"? So how do I read the chart? From the right bottom? And when i work from arrow A.3 do i start with RS or WS? Thank you
18.05.2021 - 12:06DROPS Design respondeu:
Dear Katzilicious, you read the diagram from right to left and from bottom up, from the right side. Here you have a lesson on how to read a diagram: https://www.garnstudio.com/lesson.php?id=68&cid=19 A.3 begins from the wrong side. Work 5 rows of A.3, which is in the center of the front or the back. The next step is to separate this part into two. You work one part with the V-neck and then you work the second part from the stitch holder. Happy knitting!
07.08.2021 - 11:30
![]() Jessica escreveu:
Jessica escreveu:
Hi again! Thanks for the help, it clears things up, but I’m still not sure what I should be doing when I switch to the A.3 chart. It says the row marked by the arrow should be worked from the WS, but to do that, I’d have to work the row below from the RS, meaning I’d be doing a row of knitting. But the A.2 pattern states that for RS rows I should P1 K1. I’m not sure how these two charts fit together. Any help would be great.
07.05.2021 - 13:32
![]() Jessica escreveu:
Jessica escreveu:
Hi! I’m a little confused about what to do once I’ve done the first 8 rows in A.1. I’m finishing on the WS so starting A.2 on the RS with a P1 K1 and 3 garter stitches at each end, then on the WS purling all stitches, but from previous comments that doesn’t seem to be the correct pattern, and after I got to switching to A.3, doing the row indicated by the arrow on the WS indicates that the previous RS row should be all knitted, not P1 K1 as I have done. Any help would be appreciated.
07.05.2021 - 11:22DROPS Design respondeu:
Dear Jessica, the garter stitches in A.2 (= P from RS, P from WS) should be worked over the P stitches in A.1, so that you will work A.2 from RS: 3 sts in garter st, K1, (P1, K1) repeat from (to) and finish with 3 sts in garter stitch and from WS: K3, P to the last 3 sts, P3. Happy knitting!
07.05.2021 - 13:00
![]() Katzilicious escreveu:
Katzilicious escreveu:
I'm confuse about worked A.1 until it had been vertically worked and work A.2 over A.1 can you please explain? Thank you
06.05.2021 - 07:39DROPS Design respondeu:
Dear Katzilicious, work first the 8 rows in A.1 as explained: (from RS = 3 sts in garter stitch, knit 1, repeat A.1 (read from the right towards the left= P1, K1), 3 sts in garter st / from WS: 3 sts in garter st, A.1 (read from the left towards the right = P1, K1), P1, 3 sts in garter st). Then work: 3 sts in garter st, knit 1, repeat A.2 (= 1 st in garter st, 1 st in stocking st), and finish with 3 sts in garter st, from WS: 3 sts in garter st, repeat A.1 (=1 st in stocking st = P, 1 st in garter st = K), P1, 3 sts in garter st. Hope this help. Happy knitting!
06.05.2021 - 07:45
![]() Diana escreveu:
Diana escreveu:
I prefer written instructions as opposed to charts. Is there anyone who has written out the instructions? Also, there are no instructions on how many inches or rows we need to knit for each diagram. I am a long time knitter but find almost all of the patterns here quite confusing with no written instructions or actual row/inches for each size. I understand the patterns are translated from Norwegian and it is not an easy task to ensure everything is explained in detail.
29.03.2021 - 22:35DROPS Design respondeu:
Dear Diana, we use charts insted of written out instructions not only because they are available in many languages, but also because we believe that with charts one can see not only the very next step, but one can see teh larger picture, as how stitches and rows relate to each other en large. We also have a lesson about how to read diagrams here, and one can always ask for help in the store where they bought their DROPS yarn from (over the phone or in person). We have many knitters who actually prefer diagrams to written instructions. Happy Knitting!
30.03.2021 - 11:50
|
|||||||||||||
Mazo#mazotop |
|||||||||||||
 |
 |
||||||||||||
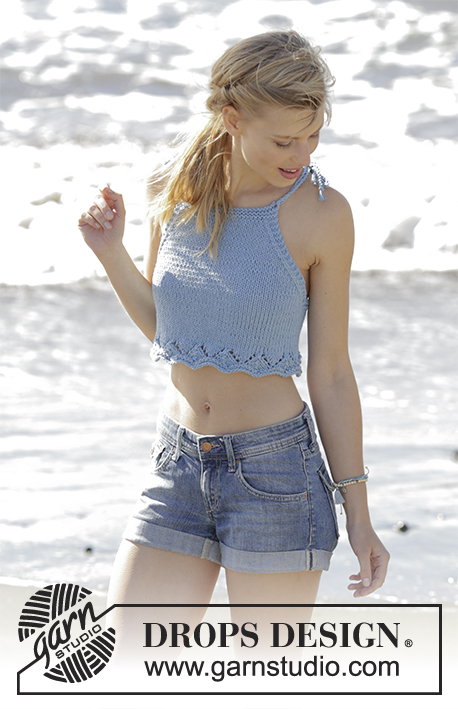
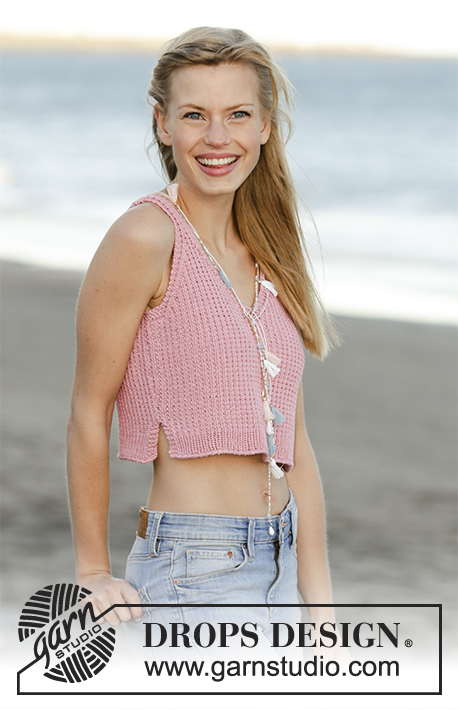
Top com decote em V, ponto texturado e fendas dos lados, tricotado de cima para baixo em DROPS Muskat. Do S ao XXXL.
DROPS 178-66 |
|||||||||||||
|
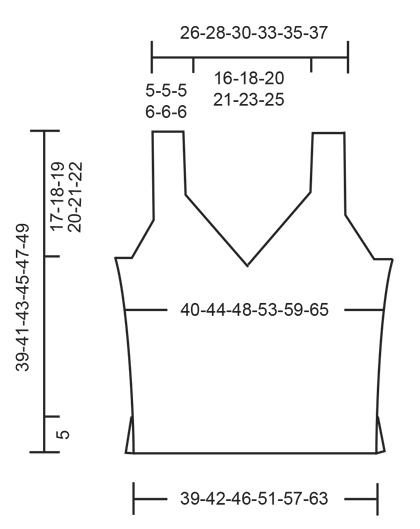
---------------------------------------------------------- PONTO JARRETEIRA (em idas e voltas): Tricotar todas as carreiras em meia. 1 barra jarreteira = tricotar 2 carreiras meia. PONTO FANTASIA: Ver os diagramas A.1 a A.4. Os diagramas mostram todas as carreiras do motivo, vistas pelo direito. Ver diagrama indicado para cada tamanho. AUMENTOS: Para aumentar 1 malha, fazer 1 laçada. Na carreira seguinte, tricotar a laçada torcida em meia para evitar um buraco. NOTA: Tricotar as novas malhas no ponto fantasia A.2 à medida que for tricotando. DIMINUIÇÕES: Diminuir 1 malha depois de/antes de 3 malhas de orla em ponto jarreteira. Todas as diminuições são feitas pelo direito. Diminuir da seguinte maneira depois de 3 malhas de orla em ponto jarreteira: Deslizar 1 m/p em meia, 1 malha meia, passar a malha deslizada por cima da malha tricotada. Diminuir da seguinte maneira antes de 3 malhas de orla em ponto jarreteira: Começar 2 malhas antes das 3 malhas de orla em ponto jarreteira e tricotar 2 malhas juntamente em meia. ---------------------------------------------------------- TOP: Tricota-se em idas e voltas em 2 partes que são unidas entre elas no fim. COSTAS: Montar 81-89-97-107-119-133 malhas com a agulha circular 4 mm em Muskat. Tricotar 1 carreira liga pelo avesso. Tricotar então em canelado/barra da seguinte maneira (1.ª carreira = pelo direito): 3 malhas em PONTO JARRETEIRA - ver acima -, 1 malha meia, repetir A.1 (= 2 malhas) até restarem 3 malhas, terminar com 3 malhas em ponto jarreteira. Continuar desta maneira em idas e voltas até A.1 ter sido tricotado 1 vez em altura. Tricotar então A.2 (= 2 malhas) por cima de A.1. MANTER A MESMA TENSÃO DA INDICADA PARA A AMOSTRA! Quando a peça medir 5 cm, montar 1 malha no fim das 2 carreiras seguintes (marca o fim das fendas) = 83-91-99-109-121-135 malhas. Tricotar então da seguinte maneira: 1 malha ourela em ponto jarreteira, 1 malha meia, A.2 até restar 1 malha, 1 malha ourela em ponto jarreteira. Quando a peça medir 7 cm, aumentar 1 malha a 1 malha ourela em ponto jarreteira dos rebordos de cada lado da peça - VER AUMENTOS! Repetir estes aumentos quando a peça medir 10 cm = 87-95-103-113-125-139 malhas. Quando a peça medir 19-20-21-22-23-24 cm, tricotar a partir da flecha de A.3 por cima das 7 malhas do meio da carreira - ajustar a altura para a carreira com a flecha seja pelo avesso. Na 1.ª carreira pelo direito depois de A.3, tricotar as 44-48-52-57-63-70 primeiras malhas da carreira e deslizar as 44-48-52-57-63-70 últimas malhas para 1 alfinete de malhas. LADO DIREITO DAS COSTAS: = 44-48-52-57-63-70 malhas. LER COM ATENÇÃO ANTES DE CONTINUAR - diminui-se para o decote e para a cava ao mesmo tempo, da seguinte maneira: Tricotar A.2 como antes com 3 malhas de orla em ponto jarreteira no lado do decote e 1 malha ourela em ponto jarreteira no lado. DECOTE: Na 1.ª carreira pelo direito começar a diminuir para o decote. Diminuir 1 malha a 3 malhas em ponto jarreteira do rebordo - VER DIMINUIÇÕES. Diminuir desta maneira 16-18-20-22-24-26 vezes ao todo a cada 2 carreiras (ou seja, em todas as carreiras pelo direito). CAVAS: Quando a peça medir 21-22-23-24-25-26 cm, tricotar em ponto jarreteira por cima das 10-10-12-11-11-14 malhas no lado (incluindo 1 malha ourela em ponto jarreteira). Quando 4 carreiras (= 2 barras jarreteira) tiverem sido tricotadas nestas malhas, arrematar as 7-7-9-8-8-11 primeiras malhas do princípio da carreira para a cava. Tricotar as 3 malhas seguintes em ponto jarreteira (= orla da cava). Diminuir 1 malha depois das 3 malhas de orla em ponto jarreteira no lado da cava. Diminuir desta maneira 10-12-12-14-18-20 vezes ao todo a cada 2 carreiras (ou seja, em todas as carreiras pelo direito). Quando todas as malhas tiverem sido arrematadas e diminuídas para a cava e o decote, restam 11-11-11-13-13-13 malhas para a alça. Continuar como antes com 3 malhas de orla em ponto jarreteira de cada lado da peça. Tricotar a alça como indicado em A.4 - ver diagrama indicado para cada tamanho. Quando a peça medir 39-41-43-45-47-49 cm, arrematar todas as malhas. LADO ESQUERDO DAS COSTAS: Retomar as 44-48-52-57-63-70 malhas do alfinete de malhas do outro lado das costas para a agulha circular 4 mm e tricotar como se fez para o lado direito das costas, mas em sentido contrário – NOTA: Quando se forma a cava no lado, arrematar no princípio da carreira pelo avesso (em vez de ser no princípio da carreira pelo direito). As diminuições restantes para a cava e o decote são feitas pelo direito. FRENTE: Montar e tricotar como se fez para as costas. MONTAGEM: Costurar as 2 alças juntamente na técnica de grafting para evitar que a costura fique demasiado grossa. Fazer a costura dos lados nas malhas ourela em ponto jarreteira de cada lado da peça a partir da cava até à fenda das lados. Repetir no outro lado. Arrematar. |
|||||||||||||
Explicações do diagrama |
|||||||||||||
|
|||||||||||||
 |
|||||||||||||
 |
|||||||||||||
Terminou este projecto?Então, identifique as suas fotos com as tags #dropspattern #mazotop ou mostre-as na galeria #dropsfan. Precisa de ajuda para este modelo?Encontrará 23 turotiais em vídeo, uma rubrica Comentários/Perguntas e muito mais ao visitar a página do modelo em www.garnstudio.com © 1982-2026 DROPS Design A/S. Todos os direitos reservados. Este documento, incluuindo as suas su-secções, tem copyrights. Saia mais o que pode fazer com os nossos modelos no fim de cada uma das páginas do nosso site. |
|||||||||||||


Com mais de 40 anos no design de modelos de tricô e de croché, a DROPS Design oferece uma das mais vastas colecções demodelos gratuitos na Internet - traduzidos em 17 línguas. Neste dia de hoje, temos 324 catálogos e 12290 modelos - dos quais 12271 estão traduzidos em português.
Trabalhamos com muito empenho para lhe proporcionar o melhor que o tricô e o croché têm para oferecer, para lhe fornecer inspiração e conselhos bem como fios da mais elevada qualidade a preços incríveis! Gostaria de usar os nossos modelos para outros fins que não uso pessoal? Pode ler o que lhe é permitido fazer no Copyright texto que se encontra na parte de baixo de todos os nossos modelos. Bom tricô! Bom croché!
Deixe um comentário acerca do modelo DROPS 178-66
Gostaríamos muito de saber o que tem a dizer-nos acerca deste modelo!
Se deixar uma pergunta acerca do modelo, certifique-se de que escolhe a categoria adequada no formulário abaixo para acelerar o processo relativo à resposta. Os campos obrigatórios estão assinalados com um *.