
Categorias populares
Procura um fio?


Comentários / Perguntas (84)
![]() Kim Oliver escreveu:
Kim Oliver escreveu:
At body increases every 10th row - I have done the arithmetic and don't think these should include side increases, just those on either side of the cables? Thanks for your ongoing help, Kim
11.07.2019 - 14:29DROPS Design respondeu:
Dear Mrs Oliver, on body you increase first in the P-sections you first decreased (= 6 sts increased), then increase every 10th row on each side of the cables: 18 sts increased a total of 7 times. There were 144-160-172 sts + 6 + (18 sts x 7) = 276-292-304 sts in size S-M-L. Happy knitting!
11.07.2019 - 14:55
![]() Kim Oliver escreveu:
Kim Oliver escreveu:
Hallo again, just checking the pattern correction for the body. I cannot see what is different in the correction. Do I work straight for 4cm before beg my decreases? Many thanks, Kim
07.07.2019 - 13:46DROPS Design respondeu:
Dear Kim, our pattern texts are updated immediately as there appears some correction - thats why you cant see any difference, i.e. pattern is correct, tab with correction details is for info what was corrected. Decreasing: after dividing piece you just continue with knitting pattern as before until piece measures 4 cm (from dividing); afterwards you start decreasing. Happy knitting!
07.07.2019 - 22:09
![]() Kim Oliver escreveu:
Kim Oliver escreveu:
Hello looking for advice with this pattern. I am knitting the smallest size and have charted the instructions starting at: ‘Now work pattern as follows from RS: 4 band sts in garter st, P 1, A.1 (= 4 sts) 2-2-2-3-3-3 times, P…’ the instructions that indicate where the garment is divided into sections, such as left front and then sleeve do not appear to be correct. Additionally, the instructions for increasing refer to A2 on raglan body and sleeve however if you read the pattern as
19.06.2019 - 15:10DROPS Design respondeu:
Dear Mrs Oliver, in size S you will work and increase for raglan as follows: 4 band sts in garter st, P1, A.1 (= 4 sts) 2 times, P1, K1, increase for raglan on front piece here (= left front piece), A.2 (= 8 sts on 1st row), increase on sleeve here, K14 increase on sleeve here (= sleeve), A.2, increase on back piece here K1, P1, A.1 5 times, P1, K1, increase on back piece here (= back piece), A.2, K14, increase on sleeve here (= sleeve), A.2, increase on front piece hereK1, P1, A.1 2 times, P1, 4 band sts in garter st. - see increase on body and sleeve for your size. Happy knitting!
19.06.2019 - 15:43
![]() Kim Oliver escreveu:
Kim Oliver escreveu:
Thank you. I understand the way to read the diagram - it is the stitches in between that I am unsure about. On the WS how should I interpret the pattern? Do I use the same instructions and repeat the stitches except for the changes to diagram stitches? Should I be purling where I previously knitted? Thanks! Kim.
06.05.2019 - 16:00DROPS Design respondeu:
Dear Mrs Oliver, the stitches between diagrams should be worked with K over K and P over P, ie where you worked at the end of RS row: P1, band sts, you will work band sts, K1 - and the sts worked K from RS will be P from WS. Happy knitting!
06.05.2019 - 16:05
![]() Kim Oliver escreveu:
Kim Oliver escreveu:
Yoke: 'Work one row from WS same way' - how do I read the instructions for the stitches between the chart. Do I begin : Band, P1, A1 - or do I change all purl stitches between the chart to knit?
06.05.2019 - 12:30DROPS Design respondeu:
Dear Mrs Oliver, from WS work the diagrams reading from the left towards the right (= 2nd row = WS), and K over K, P over P remaining stitches (with the 4 front band sts in garter st as before). Read more about diagrams here. Happy knitting!
06.05.2019 - 14:48
![]() Kim Oliver escreveu:
Kim Oliver escreveu:
Yoke: First set of elevations, then a purl row. My garment suggests the next row should be knit, not purl after elevations have been worked. Am I wrong? Thanks - Kim
30.04.2019 - 15:33DROPS Design respondeu:
Dear Mrs Oliver, the last short row on elevation is worked over 24-24-28-28-32-32 sts from WS, then turn and work from RS to the end of the row, turn and purl next row from WS over all sts (with 4 sts in garter st on each side), next row is now from RS. Happy knitting!
30.04.2019 - 16:52
![]() Bonita Poirier escreveu:
Bonita Poirier escreveu:
Please disregard previous question. I tried to delete it but could not. Thank you!
04.04.2019 - 19:22
![]() Bonita Poirier escreveu:
Bonita Poirier escreveu:
I have tried to alter the pattern to a size between what is given in the instructions. I am now at the part where I need to divide for sleeves. I am unable to tell from pictures whether or not the pattern on the raglan continues down the sleeve. I.e. when setting aside the stitches for the sleeve, are the pattern raglan stitches included? One raglan - from the front, or back or both?
04.04.2019 - 18:32DROPS Design respondeu:
Dear Mrs Poirier, when you divide piece for sleeves the raglan stitches will be divided in two, one part for sleeve and one part for front/back pieces, ie you divide in the middle of the raglan stitches. Happy knitting!
05.04.2019 - 09:10
![]() Ingrid escreveu:
Ingrid escreveu:
In A1, the K between cables instead of P, is this every 11th row until the end? Thank you
08.02.2019 - 10:31DROPS Design respondeu:
Dear Ingrid, correct, you will K the sts between cables every 11 row, ie every time you work row 11 in A.1 to the end. Happy knitting!
08.02.2019 - 11:59
![]() Chris Durb escreveu:
Chris Durb escreveu:
BODY: Inc 2 sts every other row 4-4-5-6-7-9 times and 1 st every other row 11-14-14-14-15-14 times ; Do I knit all 2 sts increase rows (row 1, 3, 5, 7 for Small) before I start the inc 1 st (for example starting with row 9 for small? Or am I to alternate 2 sts inc with the 1 st increase rows?
27.01.2019 - 22:18DROPS Design respondeu:
Dear Mrs Durb, on the first increase row in size S, inc 2 sts on front pieces + on back piece and only 1 st on sleeves (=12 sts inc) 1 time, then inc 1 st on body and sleeves (= 8 sts inc) on every other round. Happy knitting!
28.01.2019 - 12:03
|
|||||||||||||||||||
Lobelia#lobeliacardigan |
|||||||||||||||||||
 |
 |
||||||||||||||||||
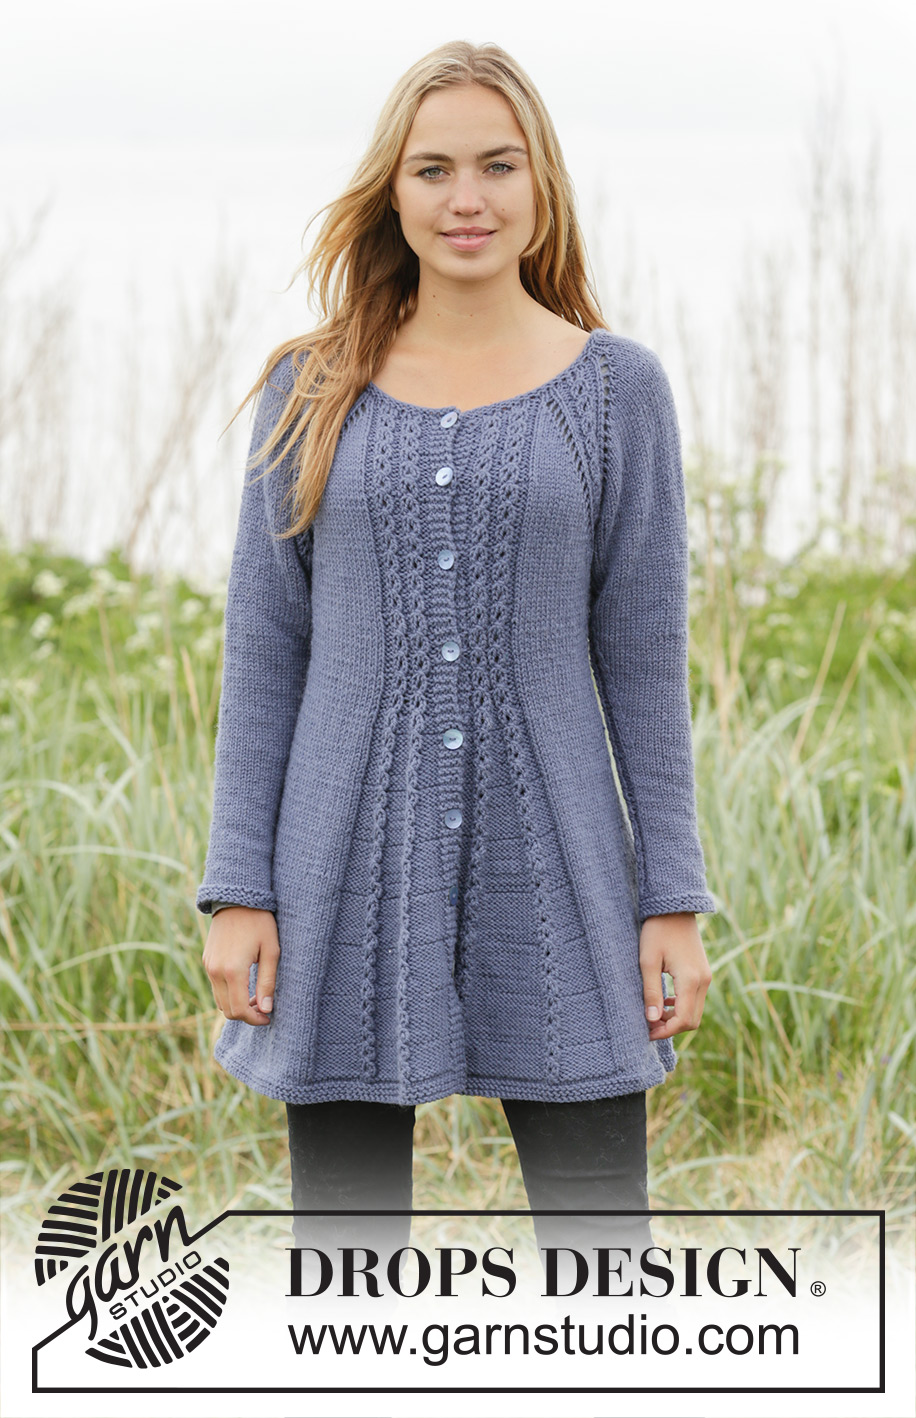
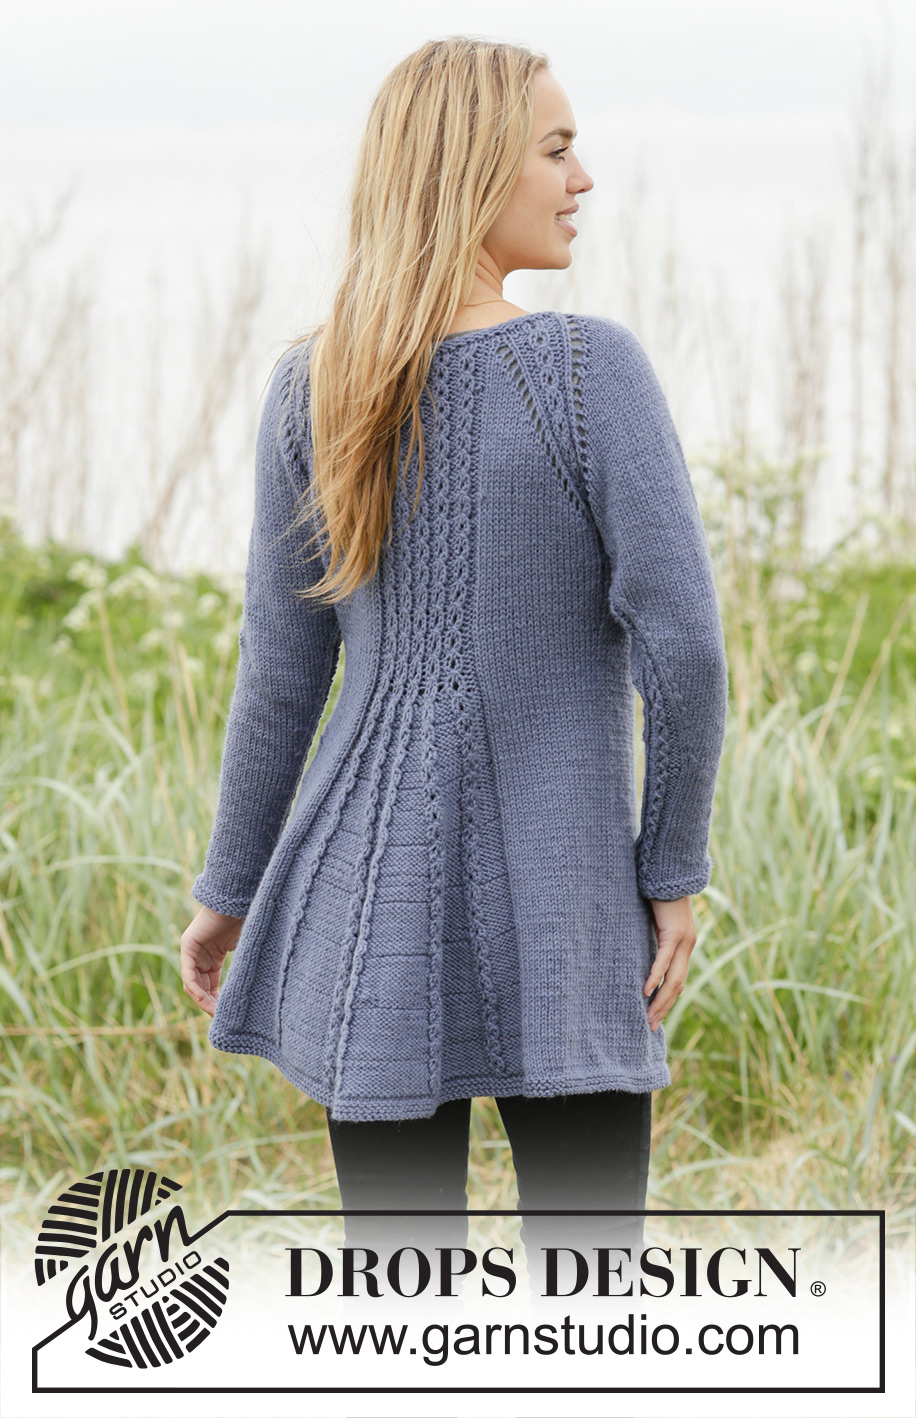
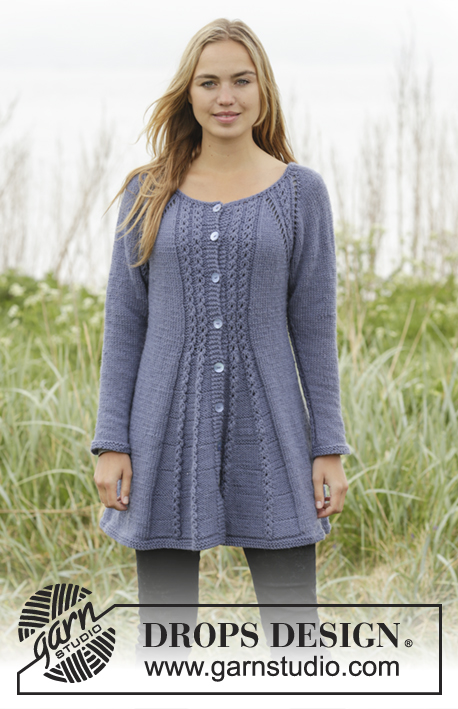
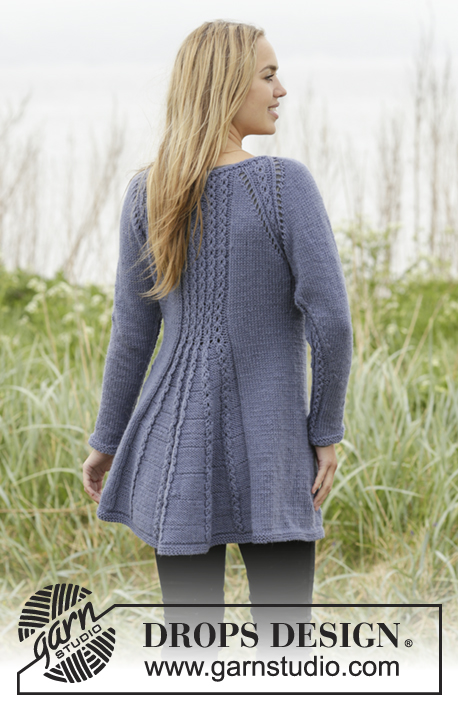
Casaco raglan DROPS com torcidos, tricotado de cima para baixo, em ”Nepal”. Do S ao XXXL.
DROPS 171-14 |
|||||||||||||||||||
|
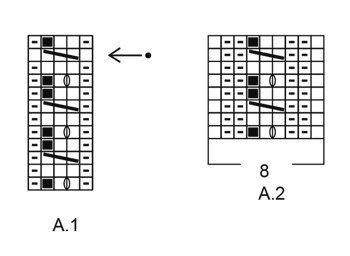
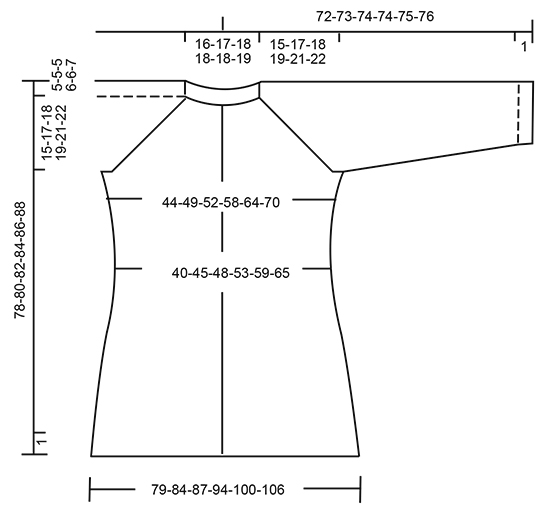
---------------------------------------------------------- NOTA: Existem termos diferentes de tricô e croché em português de Portugal e do Brasil. Tricô: Malha = Ponto Canelado = Barra Ponto Jarreteira = Cordões de Tricô Ponto Liga = Ponto Tricô Croché: mpa - meio ponto alto pa - ponto alto pad - ponto alto duplo pat - ponto alto triplo pb - ponto baixo pbx - ponto baixíssimo pc - ponto corrente ---------------------------------------------------------- PONTO JARRETEIRA (em redondo): 1 barra jarreteira = 2 carreiras. Tricotar: * 1 carreira meia, 1 carreira liga/tricô*, repetir de * a *. PONTO JARRETEIRA (em idas e voltas): Tricotar todas as carreiras em meia. 1 barra jarreteira = 2 carreiras meia. PONTO FANTASIA: Ver os diagramas A.1 e A.2. Os diagramas mostram todas as carreiras do ponto fantasia, vistas pelo direito. AUMENTOS-1 (a intervalos regulares): Para calcular quando aumentar, dividir o número total de ms/pts (por ex. 97 ms/pts), menos as ms/pts das orlas das frentes (por ex. 8 ms/pts) pelo número de aumentos a fazer (por ex. 20) = 4.4. Ou seja, neste exemplo, aumenta-se 1 m/p alternadamente a cada 4 e 5 ms/pts (não aumentar por cima das orlas da frente). AUMENTOS-2 (costas & frentes): Todos os aumentos são feitos pelo direito. Para aumentar 1 m/p liga/tricô, fazer 1 laçada. Na carreira seguinte, tricotar a laçada torcida em meia (= na alça de trás e não na alça da frente) para evitar buracos. RAGLAN MANGAS: Aumentar para as mangas 1 m/p depois de/antes de A.2 fazendo 1 laçada (= 2 aumentos para cada manga). Na carreira seguinte, tricotar as laçadas em liga/tricô para criar ajours. RAGLAN COSTAS & FRENTES: Aumentar primeiro 2 ms/pts antes/depois de A.2 nas frentes e nas costas (= 8 aumentos ao todo), aumentar, então, 1 m/p antes/depois de A.2 nas frentes e nas costas (= 4 aumentos ao todo). Aumentar 2 ms/pts antes de A.2 da seguinte maneira: Tricotar até restar 1 m/p antes de A.2, 1 laçada, 1 m/p meia, 1 laçada. Aumentar 2 ms/pts depois de A.2 da seguinte maneira: 1 laçada, 1 m/p meia, 1 laçada. NOTA: Na carreira seguinte, tricotar em liga/tricô as laçadas que estão mais perto de A.2 para criar ajours. Tricotar as outras laçadas em liga/tricô torcida (= na alça de trás e não na alça da frente) para evitar buracos. Aumentar 1 m/p antes/depois de A.2 da seguinte maneira: Para aumentar 1 m/p, fazer 1 laçada. Na carreira seguinte, tricotar as laçadas em liga/tricô para criar ajours. DIMINUIÇÕES-1 (costas & frentes): Tricotar até restarem 4 ms/pts antes do marcador, 2 ms/pts tricotadas juntamente em meia, 4 ms/pts meia (o marcador fica entre estas ms/pts), deslizar a m/p seguinte em meia, 1 m/p meia, passar a m/p deslizada por cima da m/p tricotada. Repetir do outro lado (= 4 diminuições). DIMINUIÇÕES-2 (mangas): Tricotar até restarem 2 ms/pts antes de A.2, 2 ms/pts tricotadas juntamente em meia, A.2, deslizar a m/p seguinte em meia, 1 m/p meia, passar a m/p deslizada por cima da m/p tricotada (= 2 diminuições). CASAS: Fazer as casas na orla da frente direita. Ou seja, na orla da frente no fim da carreira, visto pelo direito. 1 casa = tricotar juntamente em meia a 3.ª e a 4.ª m/p a partir do rebordo e fazer 1 laçada. Fazer as casas quando a peça medir (em cm de altura total) (a partir da carreira de montagem e ao longo da orla da frente): TAMANHOS S: 2, 11, 20, 29, 38 e 47 cm. TAMANHOS M: 2, 11, 20, 29, 38 e 47 cm. TAMANHOS L: 2, 12, 21, 31, 40 e 50 cm. TAMANHOS XL: 2, 12, 21, 31, 40 e 50 cm. TAMANHOS XXL: 2, 12, 22, 32, 42 e 52 cm. TAMANHOS XXXL: 2, 12, 22, 32, 42 e 52 cm. DICA PARA ARREMATAR: Para evitar que as ms/pts arrematadas fiquem demasiado apertadas, pode-se usar uma agulha ½ tamanho acima. ---------------------------------------------------------- CASACO: Tricota-se em idas e voltas na agulha circular, de cima para baixo. ENCAIXE: Montar 97-99-103-109-111-117 ms/pts (incluindo 4 ms/pts de orla da frente em ponto jarreteira de cada lado da peça) com a agulha circular 4.5 mm. Tricotar 2 barras em ponto jarreteira - ver acima - distribuindo 17-19-19-25-27-25 aumentos na última carreira pelo direito - VER AUMENTOS-1 = 114-118-122-134-138-142 ms/pts. Continuar com a agulha circular 5 mm. Tricotar, então, uma elevação em ponto meia para o decote das costas da seguinte maneira: Tricotar as 61-63-67-73-77-79 primeiras ms/pts, virar e tricotar 16-16-20-20-24-24 ms/pts, virar e tricotar 20-20-24-24-28-28 ms/pts, virar e tricotar 24-24-28-28-32-32 ms/pts, virar e tricotar as restantes ms/pts da carreira. Tricotar então 1 carreira liga/tricô com 4 ms/pts de orla da frente em ponto jarreteira de cada lado da peça. NÃO ESQUECER AS CASAS! Tricotar, então, no ponto fantasia da seguinte maneira pelo direito: 4 ms/pts de orla da frente em ponto jarreteira, 1 m/p liga/tricô, 2-2-2-3-3-3 vezes A.1 (= 4 ms/pts), 1 m/p liga/tricô, 1-2-2-1-2-3 ms/pts meia (= frente esquerda), A.2 (= 8 ms/pts na 1.ª carreira), 14-14-16-16-16-16 ms/pts meia (= manga), A.2, 1-2-2-1-2-3 ms/pts meia, 1 m/p liga/tricô, 5-5-5-7-7-7 vezes A.1, 1 m/p liga/tricô, 1-2-2-1-2-3 ms/pts meia, (= costas) A.2, 14-14-16-16-16-16 ms/pts meia (= manga), A.2, 1-2-2-1-2-3 ms/pts meia, 1 m/p liga/tricô, 2-2-2-3-3-3 vezes A.1, 1 m/p liga/tricô, 4 ms/pts de orla da frente em ponto jarreteira. Tricotar 1 carreira pelo avesso da mesma maneira. NÃO ESQUECER DE MANTER A MESMA TENSÃO DA INDICADA PARA A AMOSTRA! Na carreira seguinte pelo direito, começar os aumentos para o RAGLAN COSTAS & FRENTES e o RAGLAN MANGAS – ver acima. NOTA: aumenta-se de forma diferente nas mangas e nas frentes/nas costas. COSTAS & FRENTES: Aumentar 2 ms/pts 4-4-5-6-7-9 vezes a cada 2 carreiras e 1 m/p 11-14-14-14-15-14 vezes a cada 2 carreiras (= 15-18-19-20-22-23 vezes ao todo). MANGAS: Aumentar 15-18-19-20-22-23 vezes 1 m/p a cada 2 carreiras. Quando todos os aumentos estiverem feitos, temos 250-278-294-318-342-362 ms/pts. Tricotar, então, da seguinte maneira pelo avesso: Tricotar as 38-42-44-49-53-57 primeiras ms/pts (= frente direita), colocar as 52-58-62-64-68-70 ms/pts seguintes num alfinete de ms/pts (= manga), montar 6-6-8-8-10-12 ms/pts sob a manga, tricotar as 70-78-82-92-100-108 ms/pts seguintes (= costas), colocar as 52-58-62-64-68-70 ms/pts seguintes num alfinete de ms/pts (= manga), montar 6-6-8-8-10-12 ms/pts sob a manga, tricotar as 38-42-44-49-53-57 ms/pts restantes (= frente esquerda). A peça mede cerca de 15-17-18-19-21-22 cm ao longo da orla da frente. COSTAS & FRENTES: Temos, então, 158-174-186-206-226-246 ms/pts para as costas e as frentes. PASSAR A MEDIR A PARTIR DAQUI. Continuar em idas e voltas como antes e colocar um marcador a meio das novas ms/pts sob a manga de cada lado. Diminuir então de cada lado da peça e no ponto fantasia da seguinte maneira: DIMINUIÇÕES LADOS: A 4 cm, diminuir 1 m/p de cada lado do marcador dos lados - VER DIMINUIÇÕES-1 (costas & frentes). Repetir estas diminuições 2 vezes ao todo a cada 8 carreiras = 8 diminuições ao todo. DIMINUIÇÕES NO PONTO FANTASIA: A 6 cm, diminuir 1 m/p liga/tricô tricotando 2 ms/pts juntamente em liga/tricô em todas as secções de ms/pts liga/tricô entre 2 torcidos = 6-6-6-10-10-10 diminuições (ou seja, diminuir 1-1-1-2-2-2 ms/pts em cada frente e 4-4-4-6-6-6 ms/pts nas costas). Quando todas as diminuições estiverem feitas, temos 144-160-172-188-208-228 ms/pts. A 15-15-16-16-16-16 cm, aumentar 1 m/p liga/tricô em todas as secções de ms/pts liga/tricô onde diminuímos antes – VER AUMENTOS-2 (= 6-6-6-10-10-10 aumentos) = 150-166-178-198-218-238 ms/pts. Na carreira seguinte pelo direito, aumentar 1 m/p liga/tricô de cada lado de cada torcido = 18-18-18-26-26-26 aumentos. Aumentar desta maneira 7-7-7-5-5-5 vezes ao todo a cada 10-10-10-14-14-14 carreiras (= a cada 5-5-5-7-7-7 carreiras pelo direito) = 276-292-304-328-348-368 ms/pts. Quando todos os aumentos estiverem feitos, continuar em idas e voltas no ponto fantasia. A 56-56-57-57-57-57 cm – ajustar a altura para terminar depois da 4.ª ou da 8.ª carreira do ponto fantasia -, tricotar 2 carreiras em ponto meia com as 4 ms/pts de orla da frente em ponto jarreteira de cada lado da peça. Continuar com a agulha circular 4,5 mm e tricotar 2 barras jarreteira. Arrematar - VER DICA PARA ARREMATAR. MANGAS: Tricotam-se em redondo nas agulhas de pontas duplas. Retomar as 52-58-62-64-68-70 ms/pts em espera para as agulhas de pontas duplas 5 mm e levantar 1 m/p em cada uma das 6-6-8-8-10-12 ms/pts montadas sob as mangas = 58-64-70-72-78-82 ms/pts. Colocar um marcador a meio das novas ms/pts. PASSAR A MEDIR A PARTIR DAQUI. Tricotar, então, A.2 (= 8 ms/pts na 1.ª carreira) a meio sob a manga (ou seja, temos 4 ms/pts de A.2 de cada lado do marcador), tricotar as restantes ms/pts em ponto meia. A 4 cm, diminuir 1 m/p de cada lado de A.2 - VER DIMINUIÇÕES-2 (manga). Diminuir desta maneira 11-14-15-19-18-19 vezes ao todo a cada 8-6-5-4-4-4 carreiras= 36-36-40-40-42-44 ms/pts. Quando a manga medir 48-47-46-45-44-44 cm, mudar para as agulhas de pontas duplas 4,5 mm e tricotar 2 barras jarreteira. Arrematar. Tricotar a outra manga da mesma maneira. MONTAGEM: Costurar os botões na orla da frente direita. |
|||||||||||||||||||
Explicações do diagrama |
|||||||||||||||||||
|
|||||||||||||||||||
 |
|||||||||||||||||||
 |
|||||||||||||||||||
Terminou este projecto?Então, identifique as suas fotos com as tags #dropspattern #lobeliacardigan ou mostre-as na galeria #dropsfan. Precisa de ajuda para este modelo?Encontrará 30 turotiais em vídeo, uma rubrica Comentários/Perguntas e muito mais ao visitar a página do modelo em www.garnstudio.com © 1982-2026 DROPS Design A/S. Todos os direitos reservados. Este documento, incluuindo as suas su-secções, tem copyrights. Saia mais o que pode fazer com os nossos modelos no fim de cada uma das páginas do nosso site. |
|||||||||||||||||||


Com mais de 40 anos no design de modelos de tricô e de croché, a DROPS Design oferece uma das mais vastas colecções demodelos gratuitos na Internet - traduzidos em 17 línguas. Neste dia de hoje, temos 324 catálogos e 12290 modelos - dos quais 12271 estão traduzidos em português.
Trabalhamos com muito empenho para lhe proporcionar o melhor que o tricô e o croché têm para oferecer, para lhe fornecer inspiração e conselhos bem como fios da mais elevada qualidade a preços incríveis! Gostaria de usar os nossos modelos para outros fins que não uso pessoal? Pode ler o que lhe é permitido fazer no Copyright texto que se encontra na parte de baixo de todos os nossos modelos. Bom tricô! Bom croché!
Deixe um comentário acerca do modelo DROPS 171-14
Gostaríamos muito de saber o que tem a dizer-nos acerca deste modelo!
Se deixar uma pergunta acerca do modelo, certifique-se de que escolhe a categoria adequada no formulário abaixo para acelerar o processo relativo à resposta. Os campos obrigatórios estão assinalados com um *.