
Categorias populares
Procura um fio?


Comentários / Perguntas (19)
Carmen Tisoc Rasmussen escreveu:
La parte de arriba no entiendo su esplicacion no hay video por favor
13.06.2018 - 06:35DROPS Design respondeu:
Hola Carmen. Primero se trabaja la elevación en la espalda y después se trabaja la parte de arriba del cuerpo de ida y vuelta. Esto se hace para que la prenda coja mejor forma. En este momento no hay video para esta parte del patrón.
23.06.2018 - 19:42
![]() Katharina escreveu:
Katharina escreveu:
Hallo und guten Tag, ich bin dabei das Modell "Erendruid" (Poncho mit Kapuze) zu häkeln. Die ersten 18 cm (nur Stäbchen) hat auch alles gepasst. Jetzt bin ich bei dem Muster und nach den ersten 4 Reihen merke ich schon, dass sich alles zieht und die ersten 18 cm ziehen Falten. Ich erkläre mir das durch die vielen Lm die ja enger sind als Stäbchen. Was mache ich falsch, oder wie kann ich das beheben? Vielen Dank im voraus für eine Antwort. Viele Grüße Katharina
09.10.2017 - 14:17DROPS Design respondeu:
Liebe Katharina, versuchen Sie die Lm genauso breit wie die Stäbchen zu häkeln, damit Muster A.2 ca 9 cm in der Breite mißt. Gerne können Sie auch Ihrem Laden Ihr Häkelprojekt zeigen, damit Sie Ihnen weiterhelfen können. Viel Spaß beim häkeln!
09.10.2017 - 15:22Mahtab escreveu:
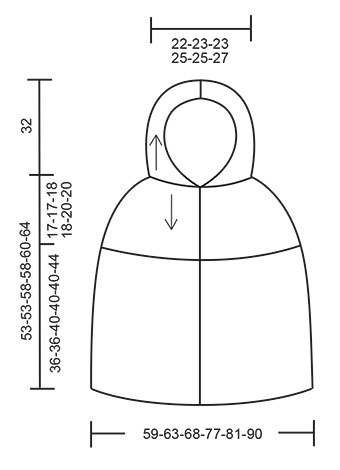
Hello. I did the same thing. I checked the schematic bellow the pattern. However, this schematic has measurements for the lower edge of the poncho, and information regarding the bust size are not included. This is what makes choosing the right size difficult.
08.08.2017 - 07:03Mahtab escreveu:
Hello. I find it difficult to find the right size of the pattern. I usually find the right size according to bust measurements. As an example, which bust size does M sizecrefer to? Thank you for your reply in advance.
05.08.2017 - 05:56DROPS Design respondeu:
Dear Mahtab, the finished size always depend on the style of the given piece, so please refer to the schematics at the end of each pattern and check the measurements given there. Happy Crafting!
06.08.2017 - 10:18
![]() Marlou escreveu:
Marlou escreveu:
Na de opzetlussen, moet je keren en dan haak je in elke 4 de lus 1 stokje, hoe kan je dan op in mijn geval op 58 steken eindigen ?
29.01.2016 - 19:38DROPS Design respondeu:
Hoi Marlou. Je begint dus met 73 lossen. Dan haak je: Keer en haak 1 stk in 4e l vanaf haak (= 2 stk), 1 stk in elke van de volgende 4 l, * sla 1 l over, 1 stk in elke van de volgende 4 l *, herhaal van *-*. Dus 2 stk + 4 stk en voor elk 5 l, haak je 4 stk (je slaat 1 l over). Je haakt dit over 65 l = 13 herhalingen = 52 stk + 6 stk van het begin = 58 stk.
01.02.2016 - 16:15
![]() Janice Kern escreveu:
Janice Kern escreveu:
Thank you very much for the video! Your patterns are the best but complex for me so, I realize how much time these videos take, but what a great help! :)
25.01.2016 - 02:48Caroline Brooke escreveu:
I find it difficult to follow the Drops method of pattern writing in terms of increasing. Can someone explain to me how I go about increasing '17 sts evenly' on a total of 48 sts? How do you work out this kind of instruction? It's obviously not simple as 48 cannot be divided by 17? Apologies, I love your designs but as a UK knitter this is very unusual method of pattern writing, and NOT easy!
24.11.2015 - 12:52DROPS Design respondeu:
Dear Mrs Brooke, please click here for more informations about how to dec/inc evenly on a row. Remember you can also get personnal andd individual help, tips & advices from your DROPS store. Happy knitting!
24.11.2015 - 14:33
![]() Katie escreveu:
Katie escreveu:
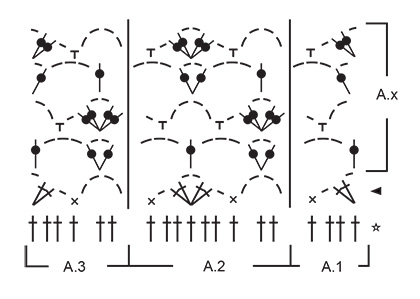
Well,what I don't understand is how many stitches are in A.2 ,and is A.x all 3 sections or just the first section? For my size it says to do A.2 14 times total and my numbers aren't adding up. Sorry ,but I've given myself a headache trying to figure this out and I know it can't be that hard lol. Thank you.
02.11.2015 - 00:53DROPS Design respondeu:
Dear Katie, A.1 will be worked over the first 4 sts, then A.2 will be worked over the next 9 sts, and A.3 over 6 sts. Inserting a marker after each repetition can help to follow diagram. Remember you will also get individual help from your DROPS store. Happy knitting!
02.11.2015 - 09:47
![]() Katie escreveu:
Katie escreveu:
I can't figure out the chart,especially A.x . Any way the charts could be written out? I really want to finish this beautiful poncho. Thank you,any help will be greatly appreciated.
30.10.2015 - 01:55DROPS Design respondeu:
Dear Katie, each symbol represent 1 stitch - see diagram text where it states if st has to be worked in or around st from previous row. Work A.1 over the first sts on row (after the 4 dc for band sts), then repeat A.2 over the next sts, and finish with A.3 + 4 dc for band sts. Happy crocheting!
30.10.2015 - 10:24
|
|||||||||||||||||||||||||
Erendruid |
|||||||||||||||||||||||||
 |
 |
||||||||||||||||||||||||
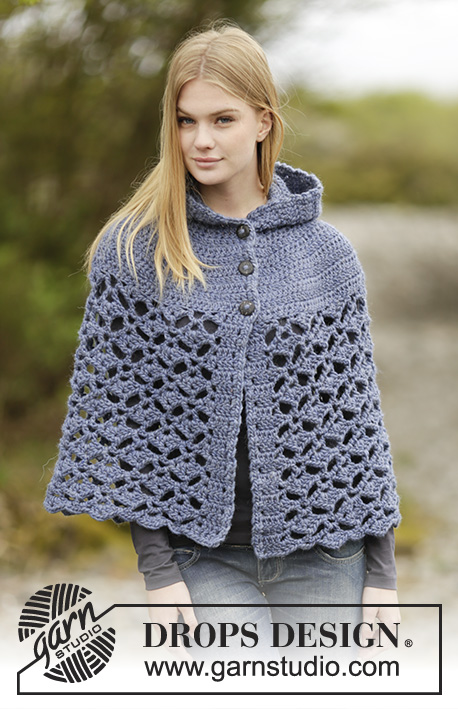
Poncho DROPS com capuz em croché em ponto de leques, feito de cima para baixo, em ”Andes”. Do S ao XXXL.
DROPS Extra 0-1166 |
|||||||||||||||||||||||||
|
---------------------------------------------------------- NOTA: Existem termos diferentes de tricô e croché em português de Portugal e do Brasil. Malha = Ponto Canelado = Barra Ponto Jarreteira = Cordões de Tricô Ponto Liga = Ponto Tricô Croché : mpa – meio ponto alto pa – ponto alto pad – ponto alto duplo pat – ponto alto triplo pb – ponto baixo pbx – ponto baixíssimo pc – ponto corrente ---------------------------------------------------------- PONTO FANTASIA: Ver diagramas A.1 a A.3. Os diagramas mostram todas as carreiras do motivo, vistas pelo direito. DICA CROCHÉ: Substituir o 1.º pa no princípio de cada carreira de pa por 3 pc. AUMENTOS: Para aumentar 1 pa, crochetar 2 pa no mesmo pa. NOTA: Não aumentar acima dos 4 pa de cada lado da peça (= pontos de orla das frentes). BOTÕES: Medir, depois, a partir do rebordo de montagem, na frente, e costurar os botões na orla frente esquerda da seguinte maneira: TAMANHO S-M-L-XL: 2, 9 e 16 cm TAMANHO XXL-XXXL: 2, 10 e 18 cm ---------------------------------------------------------- PONCHO: Crocheta-se em idas e voltas, de cima para baixo, a partir do decote. Crocheta-se, depois, o capuz. Montar uma corrente de 66-68-68-73-73-78 pc (incluindo 3 pc para virar) com a agulha de croché 7 mm em Andes. Virar e crochetar 1 pa no 4.º pc a partir da agulha de croché (= 2 pa), 1 pa em cada um dos 2-4-4-4-4-4 pc seguintes, *saltar 1 pc, 1 pa em cada um dos 4 pc seguintes *, repetir de * a * = 52-54-54-58-58-62 pa (incluindo 4 pontos de orla da frente de cada lado da peça). Virar. VER DICA CROCHÉ! Crochetar 1 carreira de pa (= 1 pa em cada pa) e, ao mesmo tempo, aumentar - VER AUMENTOS - 17-17-17-23-23-23 pa a intervalos regulares = 69-71-71-81-81-85 pa. Virar. NÃO ESQUECER DE MANTER A MESMA TENSÃO DA INDICADA PARA A AMOSTRA! Continuar então em pa e, ao mesmo tempo, aumentar 2-3-4-5-5-7 vezes ao todo 12 pa a intervalos regulares em todas as carreiras = 93-107-119-141-141-169 pa. Virar. Continuar então em pa e, ao mesmo tempo, aumentar 5-4-4-3-4-2 vezes 6 pa a intervalos regulares em todas as carreiras = 123-131-143-159-165-181 pa. Virar. Crochetar então 1 carreira de pa e, ao mesmo tempo, aumentar 3-4-1-3-6-8 pa a intervalos regulares = 126-135-144-162-171-189 pa. Virar. A peça mede cerca de 17-17-18-18-20-20 cm. PASSAR A MEDIR A PEÇA A PARTIR DAQUI! Continuar no ponto fantasia pelo direito da seguinte maneira: 1 pa em cada um dos 4 primeiros pa (= pontos de orla da frente), A.1 - ver acima -, 12-13-14-16-17-19 vezes A.2 ao todo, A.3, 1 pa em cada um dos 4 últimos pa (= orla da frente). Repetir então A.x em altura. NÃO ESQUECER DE MANTER A MESMA TENSÃO DA INDICADA PARA A AMOSTRA! Continuar desta maneira até a peça medir cerca de 36-36-40-40-40-44 cm - ajustar para depois de 1 carreira pelo direito. Arrematar. CAPUZ: Crochetar em idas e voltas ao longo da corrente de montagem: 1 pa em cada um dos pc com 1 pa na 1.ª carreira do poncho - ver DICA CROCHÉ = 52-54-54-58-58-62 pa. Continuar em pa até o capuz medir cerca de 32 cm de altura. Arrematar. Dobrar o capuz ao meio e uni-lo na parte de cima - costurar na alça mais exterior dos pontos para que a costura seja lisa. ORLA EM CROCHÉ: Crochetar então a seguinte orla ao longo das orlas das frentes e do capuz, começando na parte de baixo da orla da frente direita, pelo direito: 1 pb à volta da 1.ª carreira de pa, *2 pc, 1 pb à volta da carreira de pa seguinte*, repetir de * a * ao longo da orla da frente direita, à volta do capuz e ao longo da orla da frente esquerda. Arrematar. MONTAGEM: Costurar os botões na orla frente esquerda - ver acima. Abotoar nos buracos da orla da frente direita. |
|||||||||||||||||||||||||
Explicações do diagrama |
|||||||||||||||||||||||||
|
|||||||||||||||||||||||||
 |
|||||||||||||||||||||||||
 |
|||||||||||||||||||||||||
Terminou este projecto?Então, identifique as suas fotos com as tags #dropspattern ou mostre-as na galeria #dropsfan. Precisa de ajuda para este modelo?Encontrará 7 turotiais em vídeo, uma rubrica Comentários/Perguntas e muito mais ao visitar a página do modelo em www.garnstudio.com © 1982-2026 DROPS Design A/S. Todos os direitos reservados. Este documento, incluuindo as suas su-secções, tem copyrights. Saia mais o que pode fazer com os nossos modelos no fim de cada uma das páginas do nosso site. |
|||||||||||||||||||||||||


Com mais de 40 anos no design de modelos de tricô e de croché, a DROPS Design oferece uma das mais vastas colecções demodelos gratuitos na Internet - traduzidos em 17 línguas. Neste dia de hoje, temos 324 catálogos e 12290 modelos - dos quais 12271 estão traduzidos em português.
Trabalhamos com muito empenho para lhe proporcionar o melhor que o tricô e o croché têm para oferecer, para lhe fornecer inspiração e conselhos bem como fios da mais elevada qualidade a preços incríveis! Gostaria de usar os nossos modelos para outros fins que não uso pessoal? Pode ler o que lhe é permitido fazer no Copyright texto que se encontra na parte de baixo de todos os nossos modelos. Bom tricô! Bom croché!
Deixe um comentário acerca do modelo DROPS Extra 0-1166
Gostaríamos muito de saber o que tem a dizer-nos acerca deste modelo!
Se deixar uma pergunta acerca do modelo, certifique-se de que escolhe a categoria adequada no formulário abaixo para acelerar o processo relativo à resposta. Os campos obrigatórios estão assinalados com um *.