
Categorias populares
Procura um fio?


Comentários / Perguntas (61)
![]() Adriana escreveu:
Adriana escreveu:
Ciao. Volevo sapere cosa si intende per aumento ogni 3 giri. Cioè faccio 2 giri e aumento sul terzo o faccio 3 giri e aumento sul quarto? Grazie mille
27.10.2019 - 23:36DROPS Design respondeu:
Buongiorno Adriana. Lavora due giri senza aumenti e poi aumenta al terzo. Buon lavoro!
28.10.2019 - 07:17
![]() Maryla escreveu:
Maryla escreveu:
Nie mogę zrozumieć jak wykonać : W TYM SAMYM CZASIE dodać z każdej strony wszystkich (1 o.l., 3 o.p., 1 o.l.) – PATRZ DODAWANIE OCZEK = 8 dodatkowych o. Przer. dodawane o. na praw. Przeciez 1ol, 3op. 1o.l z dwóch stron to 10 oczek a nie 8. Gdzie zacząć je dodawać i od jakiego zacząć. To nie jest zrozumiałe
22.10.2019 - 16:57DROPS Design respondeu:
Witaj Marylo! W całym okrążeniu sekwencja (1 o.l., 3 o.p., 1 o.l.) występuje 4 razy > jest to w miejscach linii reglanów (tak jakbyś wykonywała sweter). Jeżeli dodasz po 1 o. z każdej strony tej sekwencji oczek to otrzymasz 8 dodatkowych oczek w okrążeniu (4x2=8). Później co 3 okrążenia powtarzasz to samo jeszcze 15-16-16 razy (w zależności od rozmiaru). Miłej pracy!
23.10.2019 - 08:27
![]() Anfal Wedaa escreveu:
Anfal Wedaa escreveu:
Thanks ,how I could send to you the photo of the poncho after finishing it ? And one more question When we increase every 3rnd It will be p1 k4 p1 and increase like that or we increase the k11 to be k 15 ?
08.07.2019 - 14:10DROPS Design respondeu:
Dear Mrs Wedaa, when inc on each side of P1,k3,P1 you will increase in the K section on each side, so that in 2nd and 3rd size you will get after 1st increase: at the beg of the repeat: K12 (P1, K3,P1) K3, P1, A.1 ... and A.1, K3, (P1, K3, P1), K12 at the end of the repeat. You can tag us in the social medias with #dropsfan - read more here and join us in the DROPS Workshop. Happy knitting!
08.07.2019 - 14:37
![]() Anfal Wedaa escreveu:
Anfal Wedaa escreveu:
Thanks for video but can I ask more one question! When I finish the row one on k11 .. start the second row with k11 or p1 ?
08.07.2019 - 09:20DROPS Design respondeu:
Dear Mrs Wedaa, you have to work all rounds as follows: * K11-11, P 1, K 3, P 1, K 2-2, P 1, A.1 (= 3 sts), P 2, A.2 (= 13 sts), ** P 2, A.1 **, repeat from **-** 0-1 more time, P 2, A.2, P 2, A.1, P 1, K 2-2, P 1, K 3, P 1, K 11-11 *, repeat from *-* 1 more time, ie work all stitches on the round as explained above, at the same time work row 1 in each diagram. On next round (=2nd round, work the stitches K over K and P over P and work row 2 in diagrams). Happy knitting!
08.07.2019 - 10:52
![]() Nathalie Bourassa escreveu:
Nathalie Bourassa escreveu:
Bonjour, merci pour vos magnifiques patrons. Je réalise présentement le modèle 157-15 , j’ai montré le cou à 138 mailles maintenant je dois augmenter de 24 mailles ce qui donne une augmentation au 5,75 mailles. Alors j’augmente à la 5ième et 6ième ou seulement à la 6ième mailles? Merci beaucoup!
15.10.2018 - 00:56DROPS Design respondeu:
Bonjour Mme Bourrassa, augmentez après alternativement chaque 5ème et chaque 6ème m, mais veillez à bien vérifier votre nombre de mailles - voir aussi ici. Bon tricot!
15.10.2018 - 10:51
![]() Germana escreveu:
Germana escreveu:
Buonasera nelle spiegazioni degli intrecci mi manca 1 maglia .....dice trasferirire 3 m sul ferro ausiliario lavorare 3 m a dritto e 2 m dir dal ferro ausiliario .....ma le maglie in tutto non sono 6? Grazieeee
09.10.2018 - 21:00DROPS Design respondeu:
Buonasera Germana. Abbiamo corretto il testo. La ringraziamo per la segnalazione. Buon lavoro!
09.10.2018 - 21:05
![]() Amurtiger escreveu:
Amurtiger escreveu:
1 Kraus Rippe in Hin und Rückreihen = 2 Reihen rechts Fehler: 1 Reihe rechts
04.05.2017 - 17:32DROPS Design respondeu:
Lieber Frau Amurtiger, wenn mann 1 Kraus Rippe hin und zurück strickt, muss man 2 Reihe rechts stricken (1 Hinreiche rechts + 1 Rückreihe rechts). Viel Spaß beim stricken!
11.05.2017 - 14:30
![]() Eurydice escreveu:
Eurydice escreveu:
Please help, I am trying to do the poncho & when I do increases the pattern does not describe how to work the additional stitches that fall into the cable pattern. Am I just to do increases around the cable patterns so that it does not interfere with the cable pattern? Or do I work the increases into the cable pattern which will adjust the overall look of the garment? Please help. I am lost with this pattern as it does not provide much detail with the poncho.
01.02.2017 - 23:58DROPS Design respondeu:
Dear Eurydice, inc for poncho are worked on either side of (P1,K3,P1) worked a total of 4 times in the round as raglan lines, work the inc sts in stocking st, so that inc will be worked before or after cable patterns and will not interfere the patterns. Happy knitting!
02.02.2017 - 10:11
![]() Eurydice escreveu:
Eurydice escreveu:
I made the headband but it did not come out the same as it is pictured on your site. I would like to know if I am suppose to work charts A.1 and A.2 front and back from starting with row 1-8 for A.2 and 1-4 for A.1? If so, I am also to work chart A.1 repeatedly over chart A.2? Please help.
31.01.2017 - 21:03DROPS Design respondeu:
Dear Eurydice, when working the headband, you'll work the diagrams on same row, ie: K 2, P 1, A.1 (= 3 sts), P 2, A.2 (= 13 sts), P 2, A.1, P 1, K 2. When A.1 has been worked 1 time in height, repeat A.1 from row 1. When A.2 has been worked 1 time in height you have worked 2 repeats of A.1 in height. Happy knitting!
01.02.2017 - 09:24
![]() Eurydice escreveu:
Eurydice escreveu:
Also, for the poncho when doing the increases the pattern does not describe or detail how to work the additional stitches that fall into the cable pattern. Am I just to do increases around the cable patterns so that it does not interfere with the cable? Or do I work the increases into the cable pattern which will adjust the overall look of the garment? Please help. I am lost with this pattern as it does not provide much detail with the poncho.
31.01.2017 - 21:00DROPS Design respondeu:
Dear Eurydice, you are working ( P 1, K 3, P 1) a total of 4 times in the round (like raglan lines), and the inc have to be worked on either side of these sts: inc, P1,K3,P1, inc. Inc will not affect the cable patterns. Happy knitting!
01.02.2017 - 09:17
|
||||||||||||||||||||||
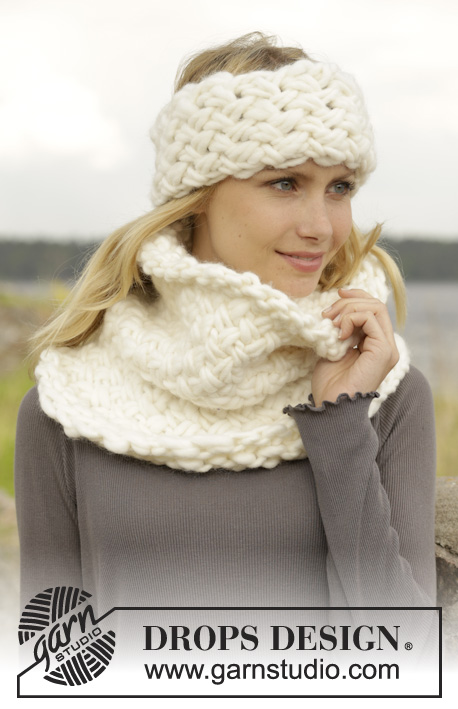
Cold Springs#coldspringsset |
||||||||||||||||||||||
|
|
||||||||||||||||||||||
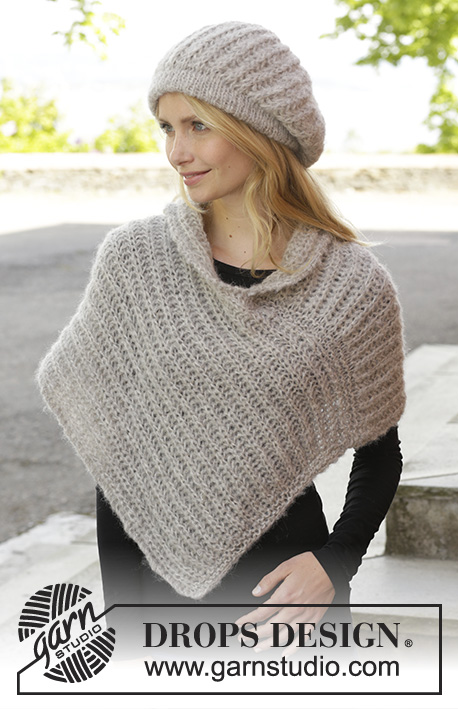
Poncho e fita de cabelo DROPS com tranças, tricotado de cima para baixo ou em top down, em ”Alaska”. Do S ao XXXL.
DROPS 157-15 |
||||||||||||||||||||||
|
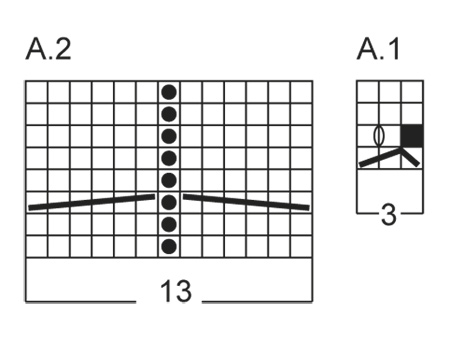
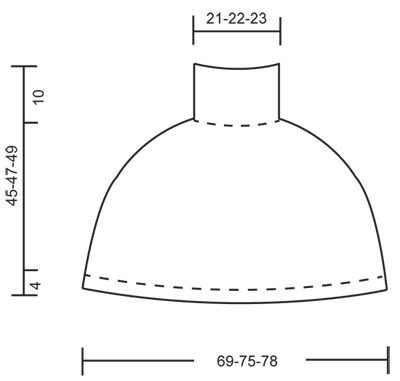
---------------------------------------------------------- NOTA: Existem termos diferentes de tricô e croché em português de Portugal e do Brasil. TRICÔ : Malha = Ponto Canelado = Barra Ponto Jarreteira = Cordões de Tricô Ponto Liga = Ponto Tricô CROCHÉ : mpa – meio ponto alto pa – ponto alto pad – ponto alto duplo pat – ponto alto triplo pb – ponto baixo pbx – ponto baixíssimo pc – ponto corrente ---------------------------------------------------------- PONTO FANTASIA : Ver os diagramas A.1-A.2. Os diagramas mostram todas as carreiras do ponto fantasia, vistas pelo direito. PONTO JARRETEIRA (em redondo na agulha circular): Tricotar: *1 carreira meia, 1 carreira liga/tricô*, repetir de * a *. 1 barra jarreteira = 2 carreiras. AUMENTOS: Para aumentar 1 m/p, fazer 1 laçada. Na carreira seguinte, tricotar a laçada torcida em meia (ou seja, enfiar a agulha na alça de trás e não na alça da frente) para evitar buracos. ---------------------------------------------------------- PONCHO: Tricota-se em redondo na agulha circular, de cima para baixo. Montar 132-138-144 ms/pts com a agulha circular 4 mm em Alaska. Tricotar 1 carreira meia e continuar então em canelado/barra (3 ms/pts meia/3 ms/pts liga/tricô). A 10 cm de altura total, tricotar 1 barra em ponto jarreteira - ver acima - e, AO MESMO TEMPO, distribuir 18-24-28 aumentos au 1er carreira = 150-162-172 ms/pts. Continuar com a agulha circular 5 mm. NÃO ESQUECER DE MANTER A MESMA TENSÃO DA INDICADA PARA A AMOSTRA! A carreira começa, então, num dos lados. Tricotar : *9-11-11 ms/pts meia, 1 m/p liga/tricô, 3 ms/pts meia, 1 m/p liga/tricô, 1-2-2 ms/pts meia, 1 m/p liga/tricô, A.1 (= 3 ms/pts), 2 ms/pts liga/tricô, A.2 (= 13 ms/pts), **2 ms/pts liga/tricô, A.1**, repetir de ** a ** mais 0-0-1 vez, 2 ms/pts liga/tricô, A.2, 2 ms/pts liga/tricô, A.1, 1 m/p liga/tricô, 1-2-2 ms/pts meia, 1 m/p liga/tricô, 3 ms/pts meia, 1 m/p liga/tricô, 9-11-11 ms/pts meia*, repetir de * a * mais 1 vez. AO MESMO TEMPO, aumentar de cada lado de todas as (1 m/p liga/tricô, 3 ms/pts meia, 1 m/p liga/tricô) – VER AUMENTOS = 8 ms/pts a mais. Tricotar os aumentos em meia. Repetir estes aumentos 16-17-17 vezes ao todo a cada 3 carreiras = 278-298-308 ms/pts. Continuar desta maneira. A 41-43-45 cm de altura total, continuar com a agulha circular 4 mm e tricotar 1 barra jarreteira em todas as ms/pts e, AO MESMO TEMPO, distribuir 4-2-4 aumentos = 282-300-312 ms/pts. Continuar então em canelado/barra 3 ms/pts meia/3 ms/pts liga/tricô até a peça medir 45-47-49 cm. Arrematar as ms/pts como elas se apresentam. ---------------------------------------------------------- FITA DE CABELO: Tricota-se em idas e voltas. Montar 23 ms/pts com as agulhas 5 mm em Alaska. Tricotar 1 barra em ponto jarreteira - ver acima - e, AO MESMO TEMPO, na última carreira, distribuir 6 aumentos = 29 ms/pts. Continuar, então, da seguinte maneira pelo direito: 2 ms/pts meia, 1 m/p liga/tricô, A.1 (= 3 ms/pts), 2 ms/pts liga/tricô, A.2 (= 13 ms/pts), 2 ms/pts liga/tricô, A.1, 1 m/p liga/tricô, 2 ms/pts meia. Continuar no ponto fantasia desta maneira. NÃO ESQUECER DE MANTER A MESMA TENSÃO DA INDICADA PARA A AMOSTRA! A 47 cm de altura total, tricotar 1 barra jarreteira em todas as ms/pts e, AO MESMO TEMPO, na 1.ª carreira, distribuir 6 diminuições = 23 ms/pts. Arrematar. Costurar a fita de cabelo a meio das costas. |
||||||||||||||||||||||
Explicações do diagrama |
||||||||||||||||||||||
|
||||||||||||||||||||||
 |
||||||||||||||||||||||
 |
||||||||||||||||||||||
Terminou este projecto?Então, identifique as suas fotos com as tags #dropspattern #coldspringsset ou mostre-as na galeria #dropsfan. Precisa de ajuda para este modelo?Encontrará 16 turotiais em vídeo, uma rubrica Comentários/Perguntas e muito mais ao visitar a página do modelo em www.garnstudio.com © 1982-2026 DROPS Design A/S. Todos os direitos reservados. Este documento, incluuindo as suas su-secções, tem copyrights. Saia mais o que pode fazer com os nossos modelos no fim de cada uma das páginas do nosso site. |
||||||||||||||||||||||


Com mais de 40 anos no design de modelos de tricô e de croché, a DROPS Design oferece uma das mais vastas colecções demodelos gratuitos na Internet - traduzidos em 17 línguas. Neste dia de hoje, temos 324 catálogos e 12290 modelos - dos quais 12271 estão traduzidos em português.
Trabalhamos com muito empenho para lhe proporcionar o melhor que o tricô e o croché têm para oferecer, para lhe fornecer inspiração e conselhos bem como fios da mais elevada qualidade a preços incríveis! Gostaria de usar os nossos modelos para outros fins que não uso pessoal? Pode ler o que lhe é permitido fazer no Copyright texto que se encontra na parte de baixo de todos os nossos modelos. Bom tricô! Bom croché!
Deixe um comentário acerca do modelo DROPS 157-15
Gostaríamos muito de saber o que tem a dizer-nos acerca deste modelo!
Se deixar uma pergunta acerca do modelo, certifique-se de que escolhe a categoria adequada no formulário abaixo para acelerar o processo relativo à resposta. Os campos obrigatórios estão assinalados com um *.