
Categorias populares
Procura um fio?


Comentários / Perguntas (68)
![]() Amy escreveu:
Amy escreveu:
To whom it may concern: I was wondering when I am knitting the 12 stitches do I knit both ends of the row in garter stitch or just the last stitch of the row. Thank you in advance for your help Amy
31.10.2015 - 16:27DROPS Design respondeu:
Dear Amy, when you are working the 12 sts for mid upper part, work the 1st and last st in garter st. See also the video in previous answer. Happy knitting!
31.10.2015 - 18:20
![]() Amy escreveu:
Amy escreveu:
To whom it may concern: The problem I am having is I have the 10 stitches on my needle for the top portion of the slipper but when I reach the 7 cm am I suppose to increase on those 10 stitches to reach the number 61 stitches that I need or do I start increasing after after the 7 cm. It says to pick up 12 stitches after I reach the 7 cm on either side of the edge stitch. That is where I am having the problem. Thank you again for your help
29.10.2015 - 04:56DROPS Design respondeu:
Dear Amy, after you have worked the 7 cm over the mid sts, and 10 sts left, pick up 12 sts along both side of the upper foot (along right side of the middle part + along left side of the middle part) + slip sts from thread back on needle = you have a total of 61 sts on needle and your work looks like as in video, time code 5:18 approx. Happy knitting!
29.10.2015 - 09:32
![]() Amy escreveu:
Amy escreveu:
To whom it may concern: I am still confused as to how many rows I need because there is no explanation for when I go to start the pattern 2 portion of the slipper part and how many increases I need to reach the required amount of sts as well. I tried to watch the video but it was hard to follow when the sped up the knitting part. Thank you again for your help Amy
28.10.2015 - 16:04DROPS Design respondeu:
Dear Amy, wijth pattern 2 portion of the slipper part, do you mean the edge around leg? Work first 4 ridges in garter st (= 8 K rows) but on the 8th K row increase 6 sts evenly - see here how to increase evenly. Then work following A.1 until 35-38 cm, work 4 ridges (8 K rows), but on the 1st of these 8 rows, decrease 6 sts evenly. Happy knitting!
28.10.2015 - 18:26
![]() Amy escreveu:
Amy escreveu:
Amy 25.10.2015 kl. 00:38: To whom it may concern: I am currently working on the slipper boot pattern and am wondering how I am suppose to do the heel of the slipper when it doesn't say how many rows to do it just say to work back and forth on the needles. If you could let me know it would be appreciated Thank you in advance for your help
25.10.2015 - 15:33
![]() Amy escreveu:
Amy escreveu:
To whom it may concern: I am currently working on the slipper boot pattern and am wondering how I am suppose to do the heel of the slipper when it doesn't say how many rows to do it just say to work back and forth on the needles. If you could let me know it would be appreciated Thank you in advance for your help
25.10.2015 - 00:38
![]() Yvonne escreveu:
Yvonne escreveu:
Kan ik de slof ook op 2 pennen breien ?
10.06.2015 - 23:26DROPS Design respondeu:
Hoi Yvonne. Nee, enkele delen van deze slof worden in de rondte gebreid.
11.06.2015 - 13:44
![]() Trudy escreveu:
Trudy escreveu:
I guess I did not make myself clear. I understand about putting the stitches back on the needles, although I am not sure if we are using three now or four. If we are using four - then I need to know how many stitches are put onto the fourth needle which would be the heal area of the boot.
12.04.2015 - 17:54DROPS Design respondeu:
Dear Trudy, distribute the sts on 4 needle or as in the video, making sure the markers are on the correct places. Happy knitting!
13.04.2015 - 09:32
![]() Elaine Langille escreveu:
Elaine Langille escreveu:
I don't understand "knit over knit" and "purl over purl" I watched the video, but still didn't know how to do it
11.02.2015 - 03:56DROPS Design respondeu:
Dear Mrs Langille, you work pattern 2 over the 12 sts as follows from RS: 1 edge st in garter st, *K2,P2* over the next 10 sts and finish with 1 edge st in garter st. On next row from WS work 1 edge st in garter st, *P2/K2* over the next 2 sts, 1 edge st in garter st. Happy knitting!
11.02.2015 - 09:14
![]() M Damen escreveu:
M Damen escreveu:
Een opmerking niet over de sloffen maar over de gebruikte taal. gecontroleerd is met 1 L niet met 2. Deze fout staat al enkele jaren bij ieder patroon.
04.01.2015 - 20:21Dianne Perrin escreveu:
Drops 158-47 pattern no an-025 I do not understand the directions for A.1 which is the first row and which x box is a p from rs and which x box is k from ws and which blank box is k from rs and which blank box is p from ws
16.12.2014 - 07:15DROPS Design respondeu:
Dear Mrs Perrin, please click here to read more about diagrams. Row 1 = K5, (P2, K2) repeat (to) a total of 5 times, K3. Row2= K3, (P2, K2) repeat (to) a total of 5 times, P2, K3. Happy knitting!
16.12.2014 - 09:58
|
|||||||
One Step Ahead#onestepaheadslippers |
|||||||
 |
 |
||||||
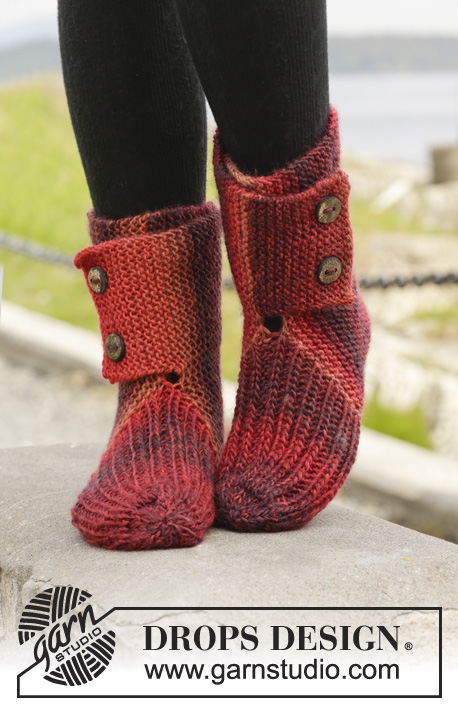
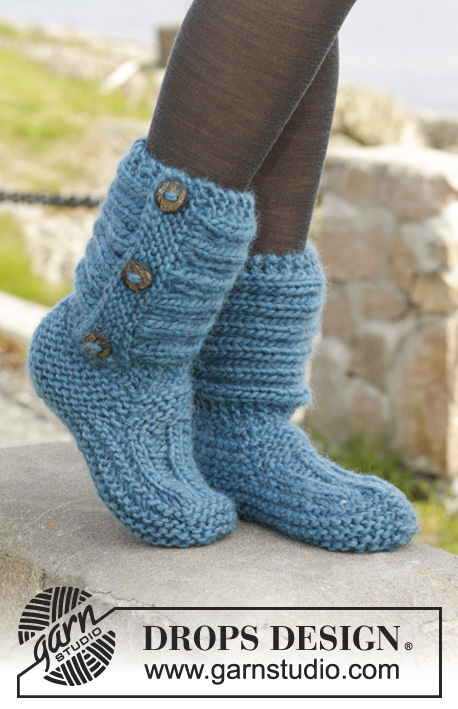
Pantufas DROPS em ponto jarreteira com canelado/barra, em "Andes".
DROPS 158-47 |
|||||||
|
---------------------------------------------------------- NOTA: Existem termos diferentes de tricô e croché em português de Portugal e do Brasil. TRICÔ : Malha = Ponto Canelado = Barra Ponto Jarreteira = Cordões de Tricô Ponto Liga = Ponto Tricô CROCHÉ : mpa – meio ponto alto pa – ponto alto pad – ponto alto duplo pat – ponto alto triplo pb – ponto baixo pbx – ponto baixíssimo pc – ponto corrente ---------------------------------------------------------- PONTO JARRETEIRA (em redondo nas agulhas de pontas duplas): Tricotar: *1 carreira meia, 1 carreira liga/tricô*, repetir de * a *. 1 barra jarreteira = 2 carreiras. PONTO JARRETEIRA (em idas e voltas): Tricotar todas as carreiras em meia. 1 barra jarreteira = 2 carreiras meia. PONTO FANTASIA: Ver diagrama A.1. PONTO FANTASIA 2: Carreira 1 (= pelo direito): *2 ms/pts meia, 2 ms/pts liga/tricô*, repetir de * a * até restarem 2 ms/pts, 2 ms/pts meia. Carreira 2 (= pelo avesso): Tricotar as ms/pts meia em meia e as ms/pts liga/tricô a em liga/tricô. Repetir a carreira 2 ---------------------------------------------------------- PANTUFAS: Tricotar primeiro uma orla na parte de baixo da perna, depois, o pé. Terminar com a orla à volta da perna. PERNA: Montar 37-37-39 ms/pts com as agulhas de pontas duplas 6 mm e o fio Andes. Tricotar em ponto jarreteira em redondo - ver acima - até a peça medir cerca de 4 cm - terminar depois de 1 carreira de ms/pts liga/tricô. NÃO ESQUECER DE MANTER A MESMA TENSÃO DA INDICADA PARA A AMOSTRA! PÉ: Continuar em idas e voltas. Manter, então, as 10 primeiras ms/pts nas agulhas, colocar as restantes 27-27-29 ms/pts num alfinete de ms/pts. Tricotar, então, as 10 ms/pts da parte central em PONTO FANTASIA 2 – ver acima – e, AO MESMO TEMPO, no fim das 2 carreiras seguintes montar 1 m/p ourela (tricotar as ms/pts ourela em ponto jarreteira - ver acima) = 12 ms/pts. Quando a parte central medir 7-8½-10 cm, diminuir 1 m/p ourela de cada lado da peça = 10 ms/pts. Retomar então as ms/pts em espera e levantar 12-14-16 ms/pts de cada lado da parte central (a 1 m/p dos rebordos) = 61-65-71 m/p. MEDIR , ENTÃO, A PARTIR DAQUI! Colocar 1 marcador a meio das 10 ms/pts da parte central (= ao nível da frente, no lado da ponta do pé) e 1 outro marcador na m/p na parte de trás do calcanhar. Temos 30-32-35 ms/pts entre os marcadores de cada lado da peça. Continuar , então, em redondo, em ponto jarreteira. A 2 cm, tricotar a cada 2 carreiras 2 ms/pts tricotadas juntamente em meia de cada lado de cada marcador (= 4 ms/pts a menos por carreira). Continuar estas diminuições até a peça medir 5-5-6 cm. Arrematar as restantes ms/pts. Fazer a costura sob o pé na alça mais exterior das ms/pts para evitar uma costura demasiado grossa. ORLA À VOLTA DA PERNA: Tricota-se em idas e voltas. Montar 22 ms/pts com as agulhas 6 mm em Andes. Tricotar 4 barras jarreteira e, AO MESMO TEMPO, na última carreira, distribuir 6 aumentos = 28 ms/pts. Tricotar seguindo A.1 (= 28 ms/pts) até a peça medir cerca de 35-36-38 cm. Tricotar então 4 barras jarreteira e, AO MESMO TEMPO, na 1.ª carreira, distribuir 6 diminuições = 22 ms/pts. Arrematar. Colocar as ms/pts arrematadas por cima das ms/pts montadas, e costurar 3 botões no canelado/barra jarreteira da orla. MONTAGEM: Costurar a orla da perna na carreira de montagem da perna (ou seja, as ms/pts montadas para a perna, no início das explicações). Colocar a orla de maneira a que os botões estejam na parte exterior, com a abertura para trás, do lado do calcanhar – costurar pelo avesso para que a costura seja invisível. Tricotar outra pantufa igual – ter atenção para que a abertura fique no outro lado. |
|||||||
Explicações do diagrama |
|||||||
|
|||||||
 |
|||||||
Terminou este projecto?Então, identifique as suas fotos com as tags #dropspattern #onestepaheadslippers ou mostre-as na galeria #dropsfan. Precisa de ajuda para este modelo?Encontrará 18 turotiais em vídeo, uma rubrica Comentários/Perguntas e muito mais ao visitar a página do modelo em www.garnstudio.com © 1982-2026 DROPS Design A/S. Todos os direitos reservados. Este documento, incluuindo as suas su-secções, tem copyrights. Saia mais o que pode fazer com os nossos modelos no fim de cada uma das páginas do nosso site. |
|||||||


Com mais de 40 anos no design de modelos de tricô e de croché, a DROPS Design oferece uma das mais vastas colecções demodelos gratuitos na Internet - traduzidos em 17 línguas. Neste dia de hoje, temos 324 catálogos e 12290 modelos - dos quais 12271 estão traduzidos em português.
Trabalhamos com muito empenho para lhe proporcionar o melhor que o tricô e o croché têm para oferecer, para lhe fornecer inspiração e conselhos bem como fios da mais elevada qualidade a preços incríveis! Gostaria de usar os nossos modelos para outros fins que não uso pessoal? Pode ler o que lhe é permitido fazer no Copyright texto que se encontra na parte de baixo de todos os nossos modelos. Bom tricô! Bom croché!
Deixe um comentário acerca do modelo DROPS 158-47
Gostaríamos muito de saber o que tem a dizer-nos acerca deste modelo!
Se deixar uma pergunta acerca do modelo, certifique-se de que escolhe a categoria adequada no formulário abaixo para acelerar o processo relativo à resposta. Os campos obrigatórios estão assinalados com um *.