Comentários / Perguntas (122)
![]() Joan Mikkelsen escreveu:
Joan Mikkelsen escreveu:
Hejsa Når man læser opskriften og kommer til mønsteret, så står der at man skal starte med M.1. Men ser man på billedet af trøjen er det ikke denne mønster man starter med. Der ser det ud til at det er noget af M.3. også måske ikke, da det første mønster på ærmet og trøjer ikke ser ens ud på billedet. Så spørgsmålet er hvad skal man starte med??
11.10.2023 - 21:44DROPS Design respondeu:
Hej Joan, du skal faktisk starte med M.1 både på ryg & forstykke og på ærmerne så de bliver ens. M.3 bruger du først når du kommer op til skulderen :)
17.10.2023 - 13:55
![]() Olga escreveu:
Olga escreveu:
Ik heb de mouw af en ik snap niet helemaal hoe ik hem vast moet maken aan de mouwkop. Welke vorm hoort de mouw te hebben? Het lijkt me dat de bovenkant van de mouw langer moet zijn dan de onderkant, maar ik kant geen steken af? Waarom moet ik heen en weer breiden als ik de naden toch aan elkaar moet naaien?
20.09.2023 - 16:02DROPS Design respondeu:
Dag Olga,
De mouw heeft geen ronding (mouwkop) aan de bovenkant. Je breit het laatste stukje heen en weer omdat de mouw als het waar een stukje in het pand wordt geschoven. Dus een klein stukje van de onderarmnaad wordt aan het voorpand/achterpand genaaid. Zie ook de maattekening onderaan. Hier kun je zien dat er een kleine inham bij de oksel zit.
20.09.2023 - 19:50
![]() Eva Wikman escreveu:
Eva Wikman escreveu:
Vill ha svar på min fråga så jag kan fortsätta sticka, varför ska jag minska maskor efter resåren och inte öka som man brukar. Resåren blir ju större om mag gör så. Tacksam för svar snarast
31.07.2023 - 16:19DROPS Design respondeu:
Hej Eva, om du inte minskar blir tröjan för bred. Resåren stickar du på mindre stickor och resåren drar ihop arbetet om du inte har ökat för resår.
07.08.2023 - 11:57
![]() Eva Wikman escreveu:
Eva Wikman escreveu:
Är det fel på mönstret ?? Ska man minska maskor efter resåren ? Har aldrig varit med om det på alla tröjor jag har stickat
28.07.2023 - 15:59DROPS Design respondeu:
Hej Eva, ja, eller så vil bolen bli for smal (du behöver flere masker i resåren, da den ellers trækker arbejdet sammen) :)
04.08.2023 - 14:42
![]() CHALANI FONSEKA JENSEN escreveu:
CHALANI FONSEKA JENSEN escreveu:
Hi I knitted the sweater with the smallest size but its bit bigger than I want. How I go to the next smaller size which XS ?
21.02.2023 - 20:24DROPS Design respondeu:
Dar Mrs Fonseka Jensen, you will find all finished measurements for each size in the chart at the bottom of the pattern - this might help you to adjust to the required measurments/size. This lesson might help you. Happy knitting!
22.02.2023 - 08:35
![]() Catrin Håkansson escreveu:
Catrin Håkansson escreveu:
Fattar inte hur man gör under armen när det står att jag ska sticka fram och tillbaka, och lägga upp en maska , jag stickar ju med rundstickar , ska man inte maska av för ärmhålen som fram och bak stycket ?
20.01.2023 - 21:16DROPS Design respondeu:
Hei Catrin. Du strikker rundt til ermet måler 61-60-59-58-56-54 cm, legg opp 1 ny maske og snu arbeidet. Strikk fra vrangen pinnen ut og legg opp 1 ny maske. Strikk frem og tilbake (på rundpinne) til ermet måler 63 cm. Det felles ikke av masker på ermet, slik det gjøres på for-bakstykket. mvh DROPS Design
23.01.2023 - 10:44
![]() Michaela escreveu:
Michaela escreveu:
Pre českú verziu chyba dôležitá veta, ktorú som našla v komentároch ešte z roku 2018 a do návodu to nebolo doplnene. Ak budete pliesť predný diel treba pri oddelení ociek na pomocnú ihlicu ďalej uberať nasledovne: AT THE SAME TIME bind off at beg of every row from neck: 2 sts 3 times and 1 st 3 times = 26-27-29-30-32-33 sts remain on shoulder.
17.01.2023 - 00:04
![]() Sara Jones escreveu:
Sara Jones escreveu:
Thanks for your last reply. The video about casting on is really helpful. Please could you just clarify where in the pattern I cast on the extra two stitches? Is it right at the end of the sleeve when it is the full 63cm before casting off, or does it not matter where they go?! Thanks again
28.11.2022 - 22:29DROPS Design respondeu:
Dear Mrs Jones, you will cast on these 2 new stitches when sleeve measures 61-60-59-58-56-54 cm from the cast on edge, then continue working the sleeve cap back and forth on needle . Happy knitting!
29.11.2022 - 10:04
![]() Sara Jones escreveu:
Sara Jones escreveu:
I’m coming towards the end of my first sleeve & wonder when I should “cast on one new stitch in each side”. I’ve finished the pattern M1 & am about to continue just in the blue until the finished measurement. I’m unsure when to cast on the new stitches & which technique would be best. Am I casting on these two extra stitches on one occasion or repeatedly? Thank you
28.11.2022 - 09:07DROPS Design respondeu:
Dear Mrs Jones, this video shows how to cast on new stitches on the side; use this technique to cast one only 1 stitch at the end of the first row from the right side then 1 stitch at the end of the first row from the wrong side; Happy knitting!
28.11.2022 - 10:36
![]() Sara Jones escreveu:
Sara Jones escreveu:
Just discovered I’ve knitted too far in the front so need to rip back a few rows to cast off the middle 19 stitches for the neck (size XL). I’m not sure what to do with the instructions to cast off 2 stitches 3 times & 1 stitch 3 times. Is this on consecutive rows & always in the middle of the front i.e. closest to the neck opening? This would mean casting off on a knit row then a purl row? Is there a video to help with this? Thank you
29.10.2022 - 22:18DROPS Design respondeu:
Dear Sara, you need to cast off at the beginning of each row from the neck (that is, the stitches closest to the neckline). So, you cast off in rows from the right side when working the right front and rows from the wrong side when working the left front. Cast off 2 stitches in the next 3 rows from the right side, for example, and then cast off 1 stitch in the next 3 rows (from the same side as before). You can see all relevant videos for this pattern under the pattern instructions. Happy knitting!
30.10.2022 - 22:35
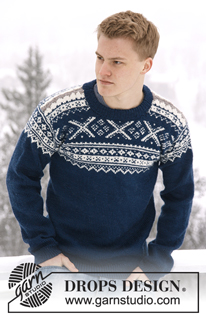
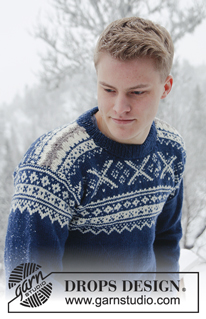
Nordic Midnight#nordicmidnightsweater |
||||||||||
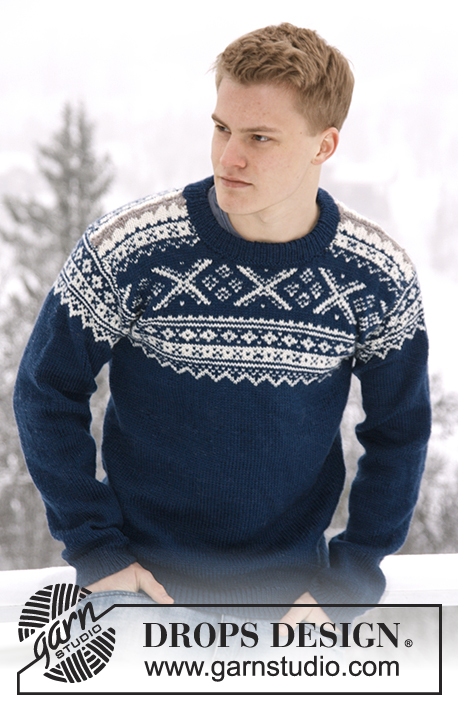 |
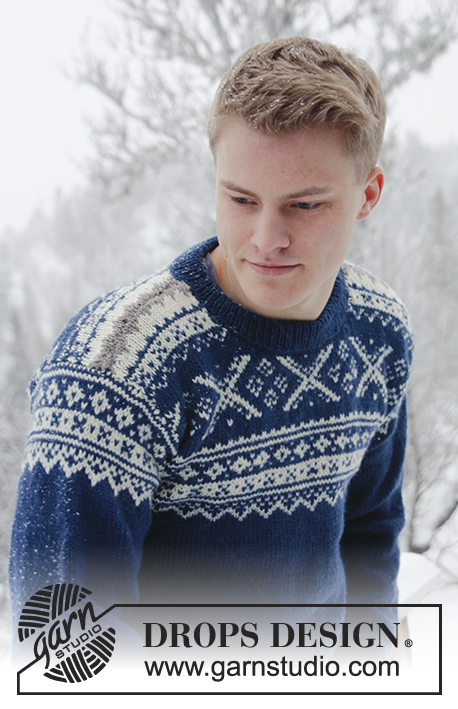 |
|||||||||
Pulôver DROPS com jacquard norueguês, em ”Karisma”.
DROPS Extra 0-809 |
||||||||||
|
-------------------------------------------------------- NOTA: Existem termos diferentes de tricô e croché em português de Portugal e do Brasil. TRICÔ : Malha = Ponto Canelado = Barra Ponto Jarreteira = Cordões de Tricô Ponto Liga = Ponto Tricô CROCHÉ : mpa – meio ponto alto pa – ponto alto pad – ponto alto duplo pat – ponto alto triplo pb – ponto baixo pbx – ponto baixíssimo pc – ponto corrente -------------------------------------------------------- JACQUARD : Ver diagramas M.1 a M.3 – os diagramas tricotam-se em ponto meia e mostram 1 repetição do ponto fantasia. -------------------------------------------------------- COSTAS & FRENTE : Tricotam-se em redondo na agulha circular. Montar 210-228-246-270-306-330 ms/pts com a agulha circular 3 mm e o fio Karisma cinza azulado escuro. Tricotar em canelado/barra 1 m/p meia/ 1 m/p liga/tricô durante 5 cm. Continuar com a agulha circular 4 mm e tricotar 1 carreira meia e, AO MESMO TEMPO, distribuir 36-38-40-44-52-56 diminuições = 174-190-206-226-254-274 ms/pts. Colocar um marcador no princípio da carreira e um outro marcador depois de 87-95-103-113-127-137 ms/pts (referências dos lados). Continuar em ponto meia. NÃO ESQUECER DE MANTER A MESMA TENSÃO DA INDICADA PARA A AMOSTRA ! A 15 cm de altura total, aumentar 1 m/p de cada lado dos 2 marcadores. Repetir estes aumentos a 30 cm de altura total = 182-198-214-234-262-282 ms/pts. A 41-43-45-46-48-50 cm de altura total, colocar 2 marcadores : 1 na m/p central da frente, e 1 outro na m/p central das costas. Tricotar então M.1 – a m/p com a flecha no diagrama deve ser aquela com marcador a meio da frente/costas – contar a partir da flecha em direcção ao lado. Contar novamente a partir do marcador - referência do lado - para que o jacquard seja igual na frente e nas costas. AO MESMO TEMPO, a 46-47-48-49-50-51 cm de altura total, arrematar 6-10-14-20-30-36 ms/pts para as cavas de cada lado da peça (ou seja, 3-5-7-10-15-18 ms/pts de cada lado das 2 referências dos lados). Terminar a frente e as costas separadamente, em idas e voltas. FRENTE : = 85-89-93-97-101-105 ms/pts. Terminar M.1, depois, tricotar M.2 e, por fim, M.3 antes de terminar em bege acastanhado claro (a m/p com a flecha em cada diagrama deve ser a m/p com o marcador a meio da frente/costas – contar a partir da flecha no lado). A 58-60-62-64-66-68 cm de altura total, colocar em espera as 15-17-17-19-19-21 ms/pts centrais num alfinete de ms/pts para o decote e terminar cada ombro separadamente. AO MESMO TEMPO, arrematar no princípio de cada carreira a partir do decote : 3 vezes 2 ms/pts e 3 vezes 1 m/p = restam 26-27-29-30-32-33 ms/pts para o ombro. Arrematar a 66-68-70-72-74-76 cm de altura total. COSTAS : = 85-89-93-97-101-105 ms/pts. Tricota-se como a frente até a peça medir 64-66-68-70-72-74 cm. Arrematar então as 29-31-31-33-33-35 ms/pts centrais para o decote e terminar cada ombro separadamente - AO MESMO TEMPO, arrematar 2 ms/pts na carreira seguinte a partir do decote = restam 26-27-29-30-32-33 ms/pts para cada ombro. Arrematar a cerca de 66-68-70-72-74-76 cm de altura total – arrematar na mesma carreira que para a frente. MANGAS : Tricotam-se em redondo nas agulhas de pontas duplas, depois, na agulha circular quando necessário. Montar 62-64-66-66-68-68 ms/pts nas agulhas de pontas duplas 3 mm em cinza azulado escuro. Tricotar em canelado/barra 1 m/p meia/ 1 m/p liga/tricô durante 5 cm. Mudar para as agulhas de pontas duplas 4 mm e tricotar 1 carreira meia e, AO MESMO TEMPO, distribuir 11 diminuições = 51-53-55-55-57-57 ms/pts. Colocar um marcador no princípio da carreira (= meio sob a manga) e continuar em ponto meia. A 6 cm de altura total, aumentar 1 m/p de cada lado do marcador. Repetir estes aumentos num total de 17-18-19-21-22-24 vezes : No Tamanho S : a cada 9 carreiras, No Tamanho M : alternadamente a cada 8 e 9 carreiras, No Tamanho L : a cada 8 carreiras, No Tamanho XL : a cada 7 carreiras, No Tamanho XXL : alternadamente a cada 6 e 7 carreiras, No Tamanho XXXL : alternadamente a cada 5 e 6 carreiras = 85-89-93-97-101-105 ms/pts. AO MESMO TEMPO, a 53 cm para todos os tamanhos, tricotar M.1 (a m/p com a flecha no diagrama = meio acima da manga – contar a partir daqui em direcção ao lado). Depois de M.1, terminar em cinza azulado escuro até ao fim. AO MESMO TEMPO, a 61-60-59-58-56-54 cm de altura total (mais curto para os tamanhos maiores porque o arredondado da manga é mais comprido e os ombros mais largos), terminar em idas e voltas na agulha circular a partir do meio sob a manga. Montar 1 m/p de cada lado da peça (= m/p ourela para as costuras) e continuar até a manga medir 63 cm para todos os tamanhos, e arrematar. MONTAGEM : Fazer a costura dos ombros e montar as mangas (a parte da manga tricotada em idas e voltas deve corresponder às ms/pts arrematadas para as cavas). GOLA: Levantar, pelo direito, cerca de 82 a 98 ms/pts à volta do decote (incluindo as ms/pts do decote da frente em espera) com a agulha circular 3 mm pequena no fio cinza azulado escuro. Tricotar 1 carreira liga/tricô, e, depois, tricotar 1 carreira meia e, AO MESMO TEMPO, distribuir aumentos para ajustar para 102-108-110-116-118-122 ms/pts. Tricotar então em canelado/barra 1 m/p meia/ 1 m/p liga/tricô durante cerca de 7 cm, e arrematar as ms/pts como elas se apresentam. Dobrar o canelado/barra ao meio pelo avesso e costurar pelo avesso com pequenos pontos e não demasiado apertados. |
||||||||||
Explicações do diagrama |
||||||||||
|
||||||||||
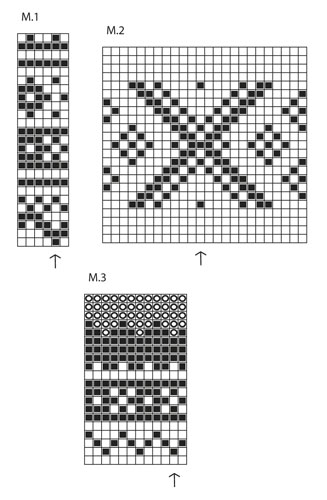 |
||||||||||
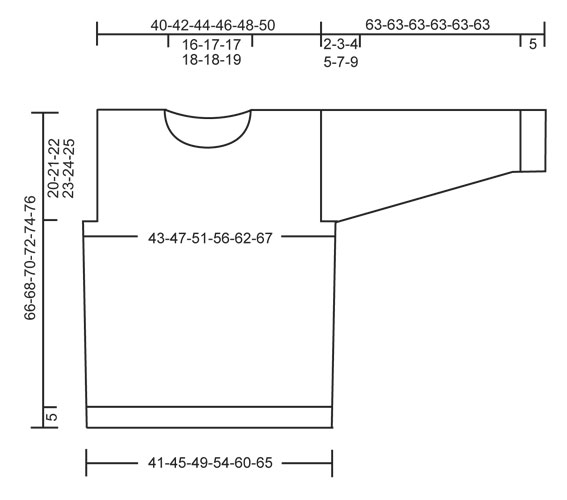 |
||||||||||
Terminou este projecto?Então, identifique as suas fotos com as tags #dropspattern #nordicmidnightsweater ou mostre-as na galeria #dropsfan. Precisa de ajuda para este modelo?Encontrará 26 turotiais em vídeo, uma rubrica Comentários/Perguntas e muito mais ao visitar a página do modelo em www.garnstudio.com © 1982-2025 DROPS Design A/S. Todos os direitos reservados. Este documento, incluuindo as suas su-secções, tem copyrights. Saia mais o que pode fazer com os nossos modelos no fim de cada uma das páginas do nosso site. |
||||||||||






Deixe um comentário acerca do modelo DROPS Extra 0-809
Gostaríamos muito de saber o que tem a dizer-nos acerca deste modelo!
Se deixar uma pergunta acerca do modelo, certifique-se de que escolhe a categoria adequada no formulário abaixo para acelerar o processo relativo à resposta. Os campos obrigatórios estão assinalados com um *.