
Categorias populares
Procura um fio?


Comentários / Perguntas (61)
![]() Provot Catherine escreveu:
Provot Catherine escreveu:
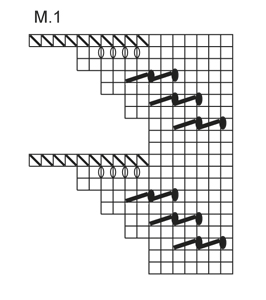
Re bonjour, Toujours sur le DROPS Childrens 22-18 Lorsqu'on rabat le 10 m on est au bord exterieur des 29 m rajoutes? merci!
29.01.2016 - 13:32DROPS Design respondeu:
Bonjour Mme Provot, tout à fait, les 10 mailles rabattues sont celles de M.1, en début de rang. Bon tricot!
29.01.2016 - 16:32Provot Catherine escreveu:
Bonjour, pour le point fantaisie du DROPS children 22-18: faut il rajouter chaque fois 29 m apres les 20 rangs du diagramme M1 et recommencer? Merci de votre réponse
29.01.2016 - 07:48DROPS Design respondeu:
Bonjour Mme Provot, M.1 se tricote sur les 20 m de chaque côté jusqu'à ce que l'ouvrage mesure 49 cm (2ème taille) - quand les 20 rangs de M1 sont tricotés, reprenez au 1er rang. Bon tricot!
29.01.2016 - 09:11
![]() Regine escreveu:
Regine escreveu:
Smådrops 22-18 Dette er en uforståelig oppskrift. Jeg er vant med å lese og følge strikkeoppskrifter, men denne er ikke skrevet for at andre personer skal kunne strikke dette. Dere bør skrive oppskriften på nytt slik at det er forståelig!
26.11.2015 - 17:31
![]() Chantal Galarneau escreveu:
Chantal Galarneau escreveu:
Serait-il possible de savoir, maille par maille, rang par rang comment tricoter ce patron. Le fait d'expliquer les rangs raccourcit indépendamment du motif rend la chose très compliquer pour moi. J'ai lu et relu les explications et les commentaires, j'ai une vague idée, mais ne comprend toujours pas comment comment sur le 1er rang l'on doit rabattre 10 M et sur le second rand, en dessous de ces même mailles, faire une jeté entre des M maintenant inexistante... Merci de votre aide
19.04.2015 - 18:39DROPS Design respondeu:
Bonjour Mme Galarneau, pour les rangs raccourcis, on tricote *2 rangs sur les m jusqu'au marqueur, 1 rang sur toutes les m, 2 rangs sur les mailles jusqu'au marqueur (de l'autre côté), puis 5 rangs sur toutes les mailes* (=2 rangs en plus sur les m de chaque côté). M.1 se lit en commençant en bas à droite vers la gauche sur l'endroit, les m sont rabattues au début des rangs 10 et 20. Bon tricot!
20.04.2015 - 10:07
![]() Mona escreveu:
Mona escreveu:
Går det an å få en "enklere" mønsterforklaring" på denne oppskriften. Dette var det ikke lett å finne ut av.
07.03.2015 - 11:59Hazel escreveu:
Hi Thank you again for a quick and prompt reply. The problem is, you did not confirm my issue. I understand I do a short row after the 6th row.... I also understand that I must follow the M1 pattern. I then do another short row after row after the following 5th row..... BUT do I do any more short rows? Or is it just twice??? Thank you for your patience.
05.12.2014 - 02:27DROPS Design respondeu:
Dear Hazel, you have to repeat the section from *-* under "SHORT ROWS" at the beg of the pattern (with M1 each side), from where you cast on new sts each side after sleeve, until you bind off these sts each side for 2nd sleeve (= 3 ridges over middle sts and 4 ridges over sts in each side every time you repeat the section from *-*). This will create the extra width in each side. Happy knitting!
05.12.2014 - 09:12Hazel escreveu:
Thank you for your reply..... I sort of worked it out. Now another question ?? Do I do the short rows only twice, or every sixth row till I reach the desired length. Thank you.
04.12.2014 - 05:46DROPS Design respondeu:
Dear Mrs Hazel, short rows are worked at the same time as you work diagram M1 each side, ie first work 6 rows over all sts then start short rows: *1 row to marker in one side, turn and work row back, 1 row over all sts, turn and work row back, 1 row to marker in the other side, turn and work row bac, 5 rows over all sts* - when you work sts from beg/end of row each side, work in pattern M1 as explained (1st row in diagram at the end of 1st row from RS and at the end of 2nd row from WS). Happy knitting!
04.12.2014 - 11:18Hazel escreveu:
I don't understand this pattern at all. The pattern M1 gives me no clue to what are rows and what are stitches..... do I read it sideways or from top to bottom. Do I read from left to right and right to left on the next row? The diagram gives loads of numbers, but I have no clue to what they relate to!!! using a fluffy yarn, I do NOT want to knit and undo all the time. I am at a loss how to do the short rows also. Do I stop doing the pattern when doing short rows? HELP
02.12.2014 - 02:25DROPS Design respondeu:
Dear Mrs Hazel, start reading diagram from bottom corner on the right side towards the left - work 1st row at the end of 1st row from RS and at the end of 2nd row from WS (ie row with holes will be worked at the end of row) - 1 square = 1 st x 1 row. You have to work short rows at the same time as pattern to get the extra width on each side of piece. Happy knitting!
02.12.2014 - 09:22
![]() Jose escreveu:
Jose escreveu:
Hoi, hier ben ik weer. Het lijkt wel of nog nooit gebreid heb, maar het tegendeel is waar. Maar ik krijg het niet voor elkaar. Ik begin met het werk dubbel te vouwen dan heb je een T. Als ik dan de zijnaden vast maak houd ik dus een dichtgenaaide T over. Als ik eerst de voorpanden tegen elkaar leg heb ik de mouwen aan de boven en onderkant zitten. Ik kom hier echt niet uit. Heb je misschien een telefoon nummer dat we elkaar kunnen spreken? Groetjes
02.07.2014 - 13:24DROPS Design respondeu:
Hoi José. Dit heeft eigenlijk niet zo veel met breien te doen ;-) Het is correct, dat je na het vouwen een soort T hebt. Maar je moet niet de onderkant dichtnaaien. Alleen de twee zijkanten (de stipjes). De twee armsgaten en de hele onderrand (= de golfjes onderaan de "T") blijven open. Ga eventueel langs jouw winkel of breigroep. Ik ben voor niet telefonisch bereikbaar.
02.07.2014 - 15:45
![]() José escreveu:
José escreveu:
Ja, Hier ben ik weer. Als ik het werk dubbelvouw is het aan de bovenkant dicht. Hoe gaat het hoofd erdoor? Nogmaals heb het op 2 pennen gebreid Groetjes José Groetjes
30.06.2014 - 13:45DROPS Design respondeu:
Hoi José. Nee, je naait alleen de zijkanten aan elkaar zoals te zien is op de tekeningen onderaan (de stippellijn). De golfjeslijn onderaan op de tekening zijn de voorkanten/randen.
01.07.2014 - 14:16
|
|||||||||||||||||||
Fairy Wings#fairywingsbolero |
|||||||||||||||||||
 |
 |
||||||||||||||||||
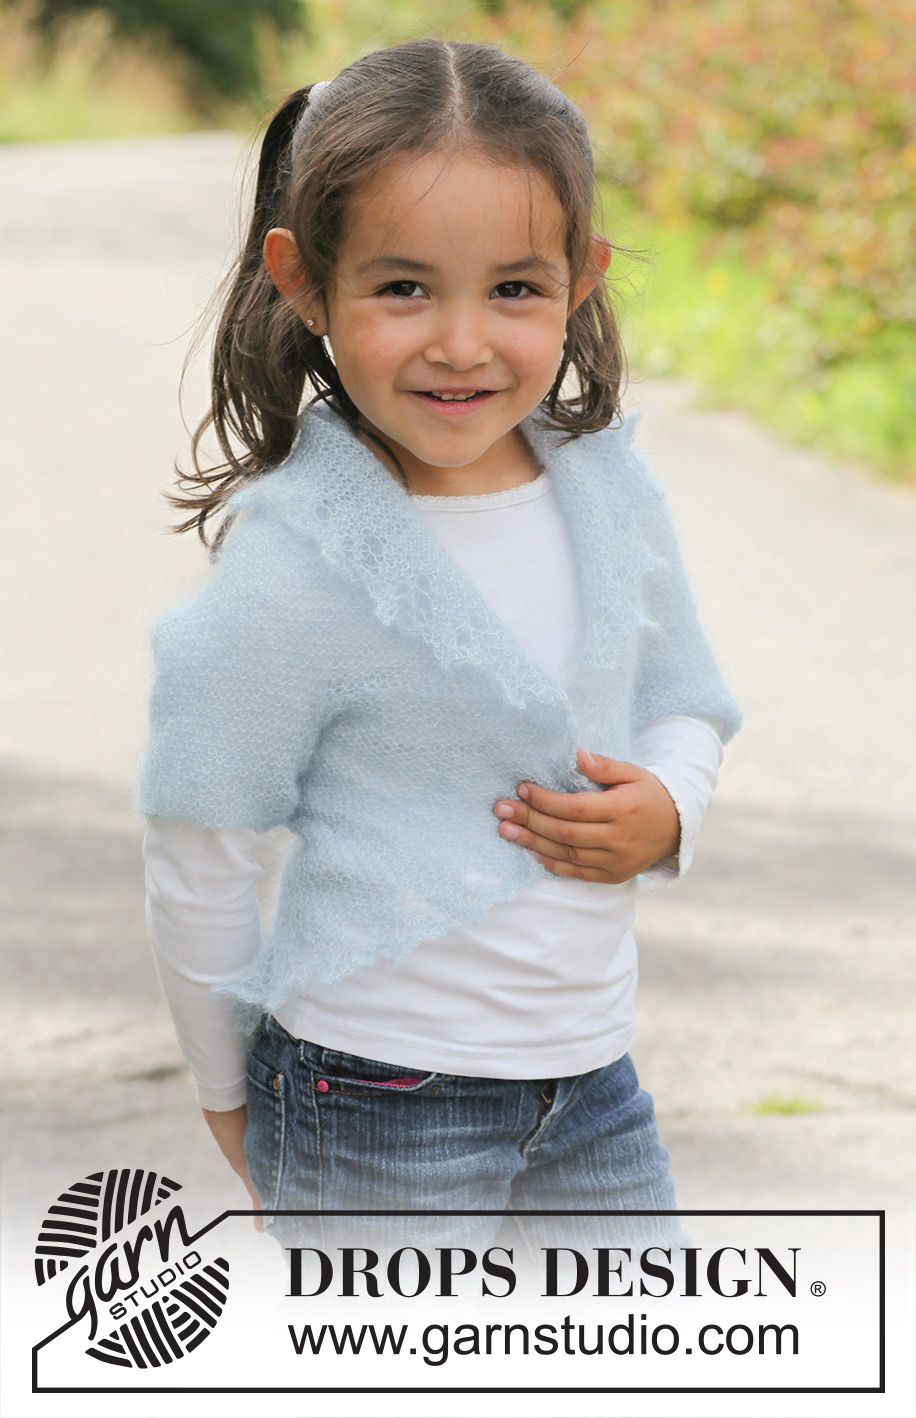
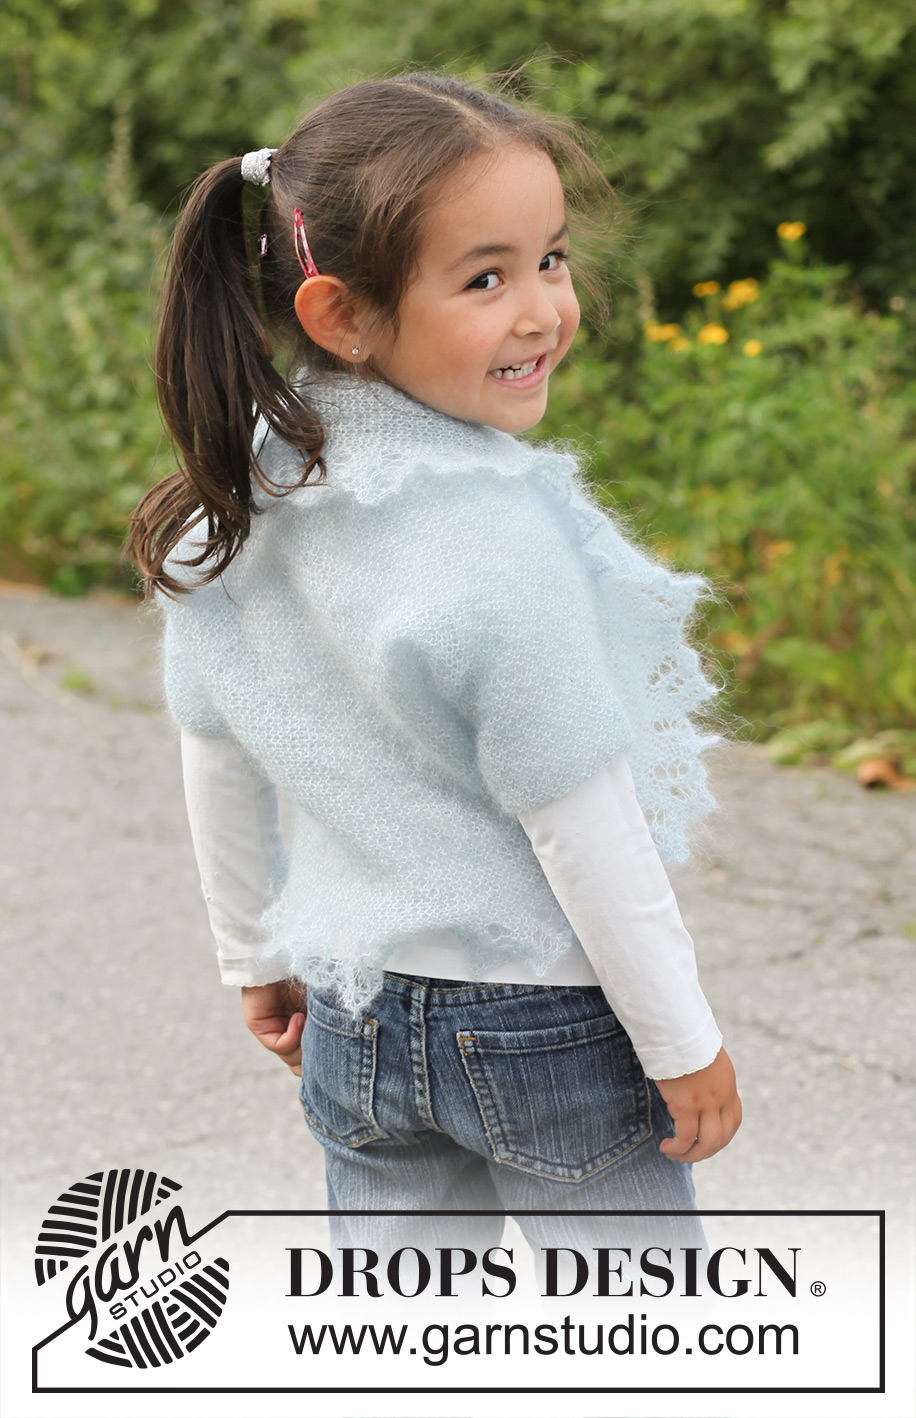
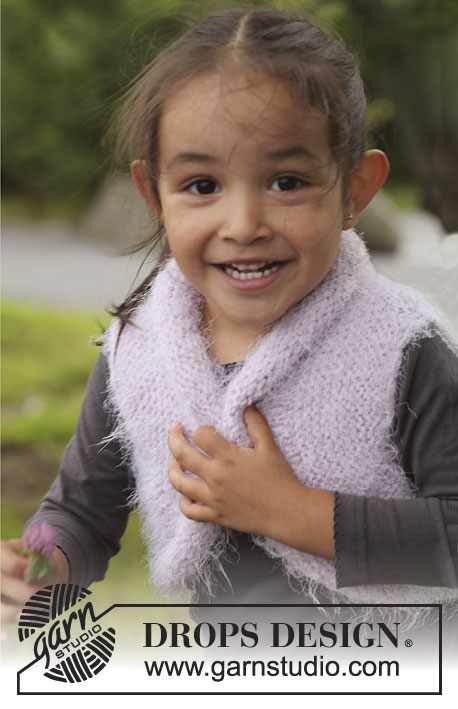
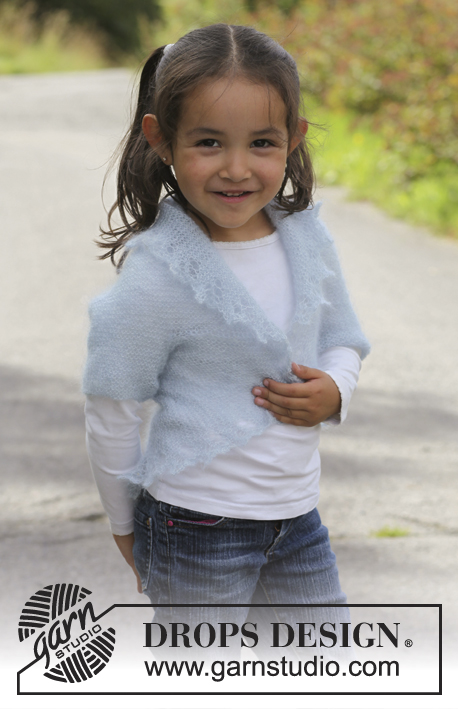
Bolero tricotado em ponto jarreteira com orla rendada em DROPS Kid-Silk. Tamanhos criança: 3 - 12 anos
DROPS Children 22-18 |
|||||||||||||||||||
|
-------------------------------------------------------- PONTO JARRETEIRA (em idas e voltas) : Tricotar todas as carreiras em meia. 1 « barra » jarreteira = 2 carreiras endroit. PONTO FANTASIA : Ver diagrama M.1. Para que o ponto fantasia seja igual dos dois lados, tricotar a 1.ª carreira do diagrama no fim da 1.ª carreira, pelo direito da peça, e no fim da 2.ª carreira, pelo avesso da peça. Ou seja, todas as carreiras com as laçadas e as ms/pts a tricotar juntamente em meia devem tricotar-se no fim da carreira. O número de ms/pts no diagrama varia de 7 a 17. CARREIRAS ENCURTADAS : Tricotar 6 carreiras em todas as ms/pts, * continuar até ao marcador de um dos lados da peça, virar, puxar o fio e tricotar a carreira de volta. Tricotar 1 carreira em todas as ms/pts, virar, continuar até ao marcador do outro lado da peça, virar, puxar o fio e tricotar a carreira seguinte. Tricotar 5 carreiras em todas as ms/pts *, repetir de * a *, ou seja, tricotam-se 6 carreiras (= 3 « barras » jarreteira) nas 70-76-78-86-92 ms/pts centrais e 8 carreiras (4 « barras » jarreteira) nas ms/pts de cada lado da peça, em cada série. -------------------------------------------------------- BOLERO : Tricota-se no sentido do comprimento, em idas e voltas, na agulha circular, de uma manga à outra. Dobrar, então, ao meio e costurar as mangas e os lados. Montar 52-58-62-66-70 ms/pts com 2 fios Kid-Silk e a agulha circular 3.5 mm. Retirar 1 fio e tricotar em PONTO JARRETEIRA - ver acima - com 1 só fio Kid-Silk. NÃO ESQUECER DE MANTER A MESMA TENSÃO DA INDICADA PARA A AMOSTRA ! A 8 cm de altura total (= manga), montar frouxamente 27-29-30-34-37 ms/pts de cada lado (montar as ms/pts no fim das 2 carreiras seguintes) = 106-116-122-134-144 ms/pts. Colocar 2 marcadores, depois de 18-20-22-24-26 ms/pts de cada um dos lados da peça (= 70-76-78-86-92 ms/pts entre os marcadores). Continuar em ponto jarreteira e em PONTO FANTASIA nas ms/pts exteriores, de cada lado da peça – ver acima – e, AO MESMO TEMPO, tricotar as CARREIRAS ENCURTADAS – ver acima ! A cerca de 44-49-54-59-64 cm de altura total (incluindo a manga), arrematar frouxamente 27-29-30-34-37 ms/pts de cada lado da peça (arrematar no princípio das 2 carreiras seguintes) – NOTA : Ajustar a altura para arrematar depois de 1 repetição completa de M.1. Continuar em ponto jarreteira nas restantes 52-58-62-66-70 ms/pts (= manga). Quando a manga medir 8 cm, arrematar frouxamente com 2 fios. MONTAGEM : Dobrar o bolero ao meio – o diagrama indica como dobrar a peça. Costurar as mangas e os lados do corpo na alça da frente das ms/pts mais exteriores. Ter atenção para que a costura não seja demasiado franzida nem apertada – a linha pontilhada no diagrama indica onde ficam as costuras. |
|||||||||||||||||||
Explicações do diagrama |
|||||||||||||||||||
|
|||||||||||||||||||
 |
|||||||||||||||||||
 |
|||||||||||||||||||
Terminou este projecto?Então, identifique as suas fotos com as tags #dropspattern #fairywingsbolero ou mostre-as na galeria #dropsfan. Precisa de ajuda para este modelo?Encontrará 14 turotiais em vídeo, uma rubrica Comentários/Perguntas e muito mais ao visitar a página do modelo em www.garnstudio.com © 1982-2026 DROPS Design A/S. Todos os direitos reservados. Este documento, incluuindo as suas su-secções, tem copyrights. Saia mais o que pode fazer com os nossos modelos no fim de cada uma das páginas do nosso site. |
|||||||||||||||||||


Com mais de 40 anos no design de modelos de tricô e de croché, a DROPS Design oferece uma das mais vastas colecções demodelos gratuitos na Internet - traduzidos em 17 línguas. Neste dia de hoje, temos 324 catálogos e 12290 modelos - dos quais 12271 estão traduzidos em português.
Trabalhamos com muito empenho para lhe proporcionar o melhor que o tricô e o croché têm para oferecer, para lhe fornecer inspiração e conselhos bem como fios da mais elevada qualidade a preços incríveis! Gostaria de usar os nossos modelos para outros fins que não uso pessoal? Pode ler o que lhe é permitido fazer no Copyright texto que se encontra na parte de baixo de todos os nossos modelos. Bom tricô! Bom croché!
Deixe um comentário acerca do modelo DROPS Children 22-18
Gostaríamos muito de saber o que tem a dizer-nos acerca deste modelo!
Se deixar uma pergunta acerca do modelo, certifique-se de que escolhe a categoria adequada no formulário abaixo para acelerar o processo relativo à resposta. Os campos obrigatórios estão assinalados com um *.